Vasa - 1:65 DeAgostini [COMPLETED BUILD]

Paul, this looks excellent! What a great end result! That said, I believe the order you put the lines on the mast is somewhat critical. I am no expert, so hopefully others will chime in. However I always put the forward stays on first, then the shroud lines (alternating pairs from port to starboard).
Depending on the number of shroud lines and stays, they stack up quickly! But I don’t think the line you added should be first?
 
Paul, as Dean has said, the shrouds typically go on their masts in a particular order and this needs to be looked at. For the Vasa this is discussed by Fred Hocker in the ‘wasawarship’ forum. There are also some photos describing the process. When you stack up 8,10 or more shrouds, they build to be quite a thickness/height. Serving the shrouds also adds thickness, albeit not much. It gets pretty complicated and messy up there on the tops.

Just to help too are the comments below by Fred Hocker:

“Unfortunately, the shrouds did not survive, and there is no clear wear evidence at the masthead or in the top to suggest in what order the shrouds were set up. I would not worry about the order too much. A lot of the "rules" that governed rigging by the later 18th and 19th centuries, and which most researcher use to extrapolate backwards in time, were still being formulated in the 17th century. In the surviving material from Vasa, we see some things that follow the later rules (tablings and roping on the sails for example) and other things that do not (cringles and seizings on the sails, for example). It makes no functional difference at all whether the first pair of shrouds over the masthead are port or starboard, so I can imagine that there is some real-world variation. Important to keep in mind here that the people writing the rules are not the people doing the actual work.”

The words are from the above forum discussion.

Regards,

PeterG
 
Last edited:
STAY CALM, Paul.
giphy.gif
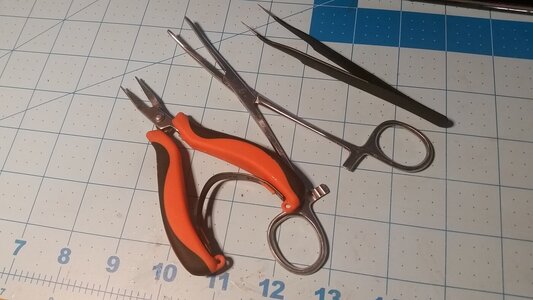
Welcome to rigging! You can expect to spend at least a half hour researching each type of line, using multiple sources, especially books and build logs. It takes time to figure out the features that are specific to 17th century style rigging features, such as sail reinforcements (tablings) and separating the 18th and 19th century features out while researching. Shrouds are looped around the masthead in a specific pattern, and if you need a source for that, let me know. Every line gets you farther along. Rigging is slow at times, and it will take you a few months. As for tools, here are my favorites.

The pliers are used where you have short distance access and you need to get a good, firm grip on the line to pull it. I often use two pairs of these small piers as my main rigging tools, especially for ratlining. Tweezers are often too weak hold the line, and piers actually have slightly longer reach since your fingers are farther back. The locking forceps (hemostat) is used when you need to be able to let go of the tool, need long reach, and need the weight of the tool to place some tension on the line as you manipulate it else where using the hook or fork.
Rigging Tools.jpg

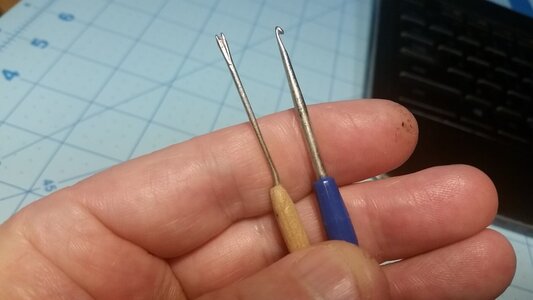
Use the fork to push the line and loop it around the ends of a belaying pin. It is made from the eye of a needle glued into the end of a long dowel. The hook is a simple, small crocheting hook. It's used to grab line and pull it to maneuver it. To fish a running rigging line through the holes in a top, get a length of thin, stiff wire, and fold a teardrop shaped eye on one end and tie your line to it, then fish the wire through the jumble of rigging and through the hole in the top. The other end of the line is usually already tied to a belaying point, do you usually fish the line UP through the top, then through blocks and tied off to the yard or wherever. It's easier that way than fighting to tie the last end of the line to the belaying point down low.
Rigging - Belaying Tools.jpg
 
Last edited:
Thank you, everyone, for your observations and suggestions! Very helpful!

Dear Doc
Well done for persevering in the learning and experimenting process, it has indeed brought you an impressive result. well done
Much appreciated my friend. Yes, lots of reading and studying thus far and more to come!

Paul, this looks excellent! What a great end result! That said, I believe the order you put the lines on the mast is somewhat critical. I am no expert, so hopefully others will chime in. However I always put the forward stays on first, then the shroud lines (alternating pairs from port to starboard).
Depending on the number of shroud lines and stays, they stack up quickly! But I don’t think the line you added should be first?
Excellent Dean! This is exactly the sort of critical review I am looking for and needing. If my sources can be trusted I think I have it right. First comes the pendants for the tackle, then the shrouds, and then the stays. In the images I have been looking at, the stays actually wrap around the shrouds not above them on the stack. For the time being I have installed some temporary stays just to hold things in place...

Again, thank you for thinking this through with me - everything is temporary and loose at this point so changes can still be made as better information comes to light...

We got another rigging Meister over here. Paul - it's outstanding. You must have attended that secret rigging/hook making school in Germany. Can't wait to see more.
Ha. Don't be silly. The Germans and the Russians (and the Poles, and the Austrians, and...) all have us beat! And while I do appreciate your confidence in me - the hooks are aftermarket photoetched. But they do look nice don't they!?!

Paul, as Daniel has said, the shrouds typically go on their masts in a particular order and this needs to be looked at. For the Vasa this is discussed by Fred Hocker in the ‘wasawarship’ forum. There are also some photos describing the process. When you stack up 8,10 or more shrouds, they build to be quite a thickness/height. Serving the shrouds also adds thickness, albeit not much. It gets pretty complicated and messy up there on the tops.
PeterG
Awesome Peter. Thank you for your comments and sharing this link. I am a fan of the wasawarship forum too. SO MUCH information there!

Welcome to rigging! You can expect to spend at least a half hour researching each type of line, using multiple sources, especially books and build logs. It takes time to figure out the features that are specific to 17th century style rigging features, such as sail reinforcements (tablings) and separating the 18th and 19th century features out while researching. Shrouds are looped around the masthead in a specific pattern, and if you need a source for that, let me know. Every line gets you farther along. Rigging is slow at times, and it will take you a few months. As for tools, here are my favorites.
Cool Kurt. This 'best practices' information will shorten my learning curve.

I am likewise of the mind that I will need to go line by line. I struggle with the lexicon however - the terminology sometimes seems impossible to sort out. I also harbor some concerns for getting the order of things right. I already caught myself just today. As I was thinking through and working on this first line, I realized I should have pre-rigged and installed some blocks that hang from the underside of the trees. Then I realized that several of the fittings I need for that step are not standard blocks...so instead of working on rigging this afternoon I spent my time making custom blocks. One step forward - one step back.

Running rigging from the bottom up...never would have thought of that on my own! You're awesome!
The terminology comes with each line's research before you install the line on the model. You get most of it from R.C. Anderson, and a bit more from build logs. I had to research lines on La Couronne in English and Italian. My Italian sucks. Typically kit instructions show you where to pre-rig blocks. For example, you want to put blocks on the undersides of the crosstrees and tops for lifts, which are lines that lift the outer most ends of the yardarms. A detailed rigging diagram is essential to getting ALL the blocks on the masts and yards installed early, so you don't have to fight in cramped areas installing blocks later.

Here's a thought: I have the Corel rigging instructions for La Couronne, which are excellent in that they are in three main sheets, each done in a specific order. It allows the builder to do the rigging in very well thought out order, which could be applied to Wasa. The belaying points and runs of the lines would be different, but the drawings provide the order, so you don't miss anything and don't crowd yourself out of an area with lines before you are done there. If you want them, let me know.

I assume that the Wasa being Swedish, the style of the rigging is close to Dutch, which I am familiar with, since that style is used by the French at this time period.

One of the frustrating things is trying to remember which book or post had a bit of information on the specific line you want to work on. You remember seeing it once, but forgot where it was. I'm always scouring the "build tutorial" directory on my computer to find that one picture that's in my head showing the feature I need to look at again. Sometimes, with all the files and books here, it may take a half hour to find it again.
 
I think @DARIVS ARCHITECTVS Kurt has made an excellent suggestion with regards to the sequence of rigging. I agree with you Paul that this seems to be the most daunting task you face. I have no doubt that your execution will be top notch, but you don't want to be making unnecessary mistakes and then having to do redo them because the order was wrong. I also agree that the VASA's rigging would essentially be the same as that of the Dutch ships of the era.
 
Hello Friends,

As I make the transition to rigging, I have been forced back into the build logs of my Vasa-building predecessors. In doing that I was reminded of the general level of excellence to be found in this niche community. On this forum and others there are some really masterful renditions of my beloved Vasa.

Equally impressive is the variety of rigging solutions for this ship. Indeed, there are more different interpretations than there are universal agreements. In fact, folks will make claims with great confidence: THIS IS HOW YOU DO THAT - and others will be equally assertive for an entirely different approach. At first I was greatly dismayed by that, but then I felt a certain freedom rising up from the discouragement. If people who know what they are doing have made different choices the 'bar' isn't as high as I feared it might be.

Anyway, I spent the entire day yesterday studying books, rigging guides, and build logs looking for answers to a very narrow set of questions about shrouds and mast tackles (and a bit about stays). Nothing was 'accomplished' on the ship itself - but decisions were made, and I'll call that progress.

Just so I could get my sea legs I decided I would rig one line. My goal was to get a sense of the skills I would need to develop. I served a rope, seized blocks, attached a hook - all things YOU already know how to do. For me it was all new ground being traveled (though I did rig cannons previously).

I also built some 'helpers' to assist me during the rigging stage. I have one of those alligator-clip 'third hand' things but I couldn't get it to hold lines securely or keep the rope straight enough for my tastes.

Here is my first finished line - a forward mast tackle using a violin (fiddle?) block and single block/hook at the channel (what Anderson calls a four-part Dutch tackle):

View attachment 281397

I started by creating a loop (a bight?) in the line. The rope diameter is 0.66 mm (I'll use the same size for the foremast shrouds) and has been served where it lays over the mast.

View attachment 281390 View attachment 281391

View attachment 281392

I then rigged up my blocks. Here is my 'helper' helping me tie into the loop at the violin block:

View attachment 281393

And here are some close-up images for your critical review. First, the loop over the mast:

View attachment 281396

The rigging at the violin block:

View attachment 281394

And the rigging at the channel:

View attachment 281395

Things I learned so far:
  • This is going to take a long time.
  • I don't have enough rope made - there is a lot of waste.
  • Tweezers work better than fingers (at least in my hands - I'm pretty comfortable using small tools).
Perhaps the most important thing I learned was that I did not 'hate' this as much as I feared I might. I was not super enthused with the process of rigging cannons, and I feared that might carry over. At least for now this was more fun (satisfying) than drudgery.

Still, it is clear I have rolled out of the blow-up 'pretty princess' kiddie pool right into the Olympic-sized competition pool...

This would be a great time for you all to point out things I did wrong during this trial run. I would be most grateful for your wise counsel and tricks of the trade.

Peace.
Hello Paul. Awesome job. Question:
I see you use a double seize when attaching your violin block and a single one attaching your block at the channel. I know the shroud dead eyes use a double (some examples a triple) seize on the Victory. Is this according to research or your rigging plan as I wonder when or why they are used differently- Each modeler seems to be different?
Cheers
Grant
Hi Grant. Here's my logic on the seizing. On the heavier pendant line I chose a double wrap - on the lighter tackle line I chose a single wrap. It was also shown that way in a drawing from one of my reference books but there was no explanation as to why...

My kit does not have any rigging drawings (actually, no drawings at all) so the whole thing is a giant guessing game with regard to what to include and not include based on things I find in other resources. At the end of the day, I believe we need to very humble in making claims about how things were done in 1628...
True story Paul.

I do like the look the way the double wrap finishes off the rigging. I have looked at some beautiful Victory’s and they all are slightly different in their applications. The one scratch build who uses McKay and Goodwin as his reference seems to follow your logic. I also agree with Jim those are good looking blocks.

Thanks for your reply. Cheers Grant
 
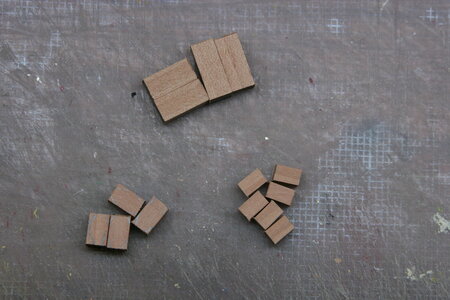
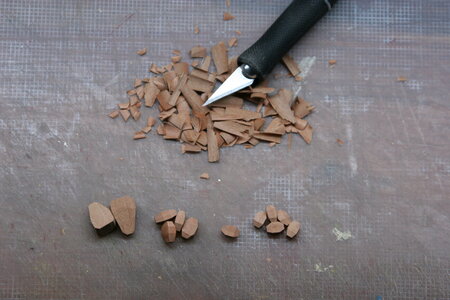
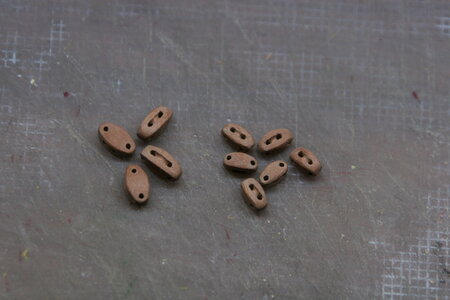
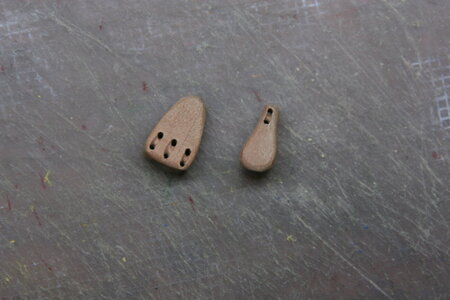
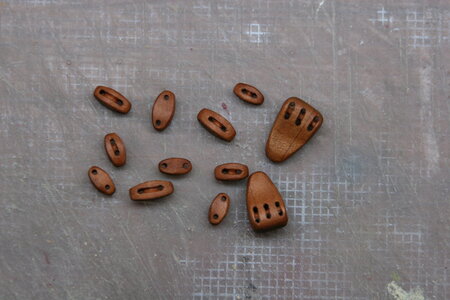
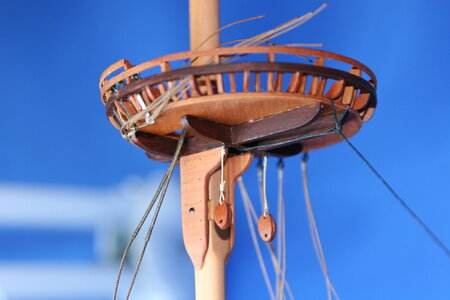
In my last post I had just completed my first rigging trial. As I was working on that I realized that the underside of the tops was soon going to become inaccessible (or at least filling up with pendants and shrouds making access dicey). I looked at the museum rigging sheet and saw that there were blocks hanging from the underside of the tops for the lift lines (not sure that's what they are called - I'm talking about ropes that run to the ends of the yards). Anyway, on the Vasa those blocks are atypical; so I tried my hand at block making...

In the images that follow the oblong blocks are the ones I'm talking about. The larger blocks are for something else later in the rigging process.

I started with little chunks of wood, used an XActo for rough shaping, and then used files and sandpaper the rest of the way:

IMG_7751.JPG IMG_7753.JPG
IMG_7758.JPG IMG_7764.JPG

The final result:

IMG_7766.JPG

In looking at the plans more closely I may not be needing the smaller ones (note to self - read the plans more carefully).

Installed:

IMG_7771.JPG

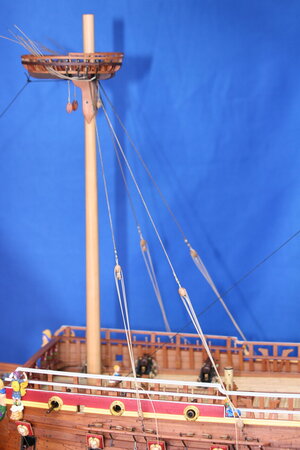
And then it was back to tackle lines on the foremast.

The more forward configuration is a Dutch 4-part tackle using a violin block and a single block. The more aft is a Dutch 5-part tackle using two double blocks. I will reverse this orientation on the main mast so the 5-part tackles will be more forward and the 4-part more aft. This arrangement was suggested by Anderson - but I did it mostly for fun and visual interest. The 5-part tackle should hang a bit lower than the 4-part...

IMG_7773.JPG

Next up: foremast shrouds... Thanks for stopping by!
 
Last edited:
In my last post I had just completed my first rigging trial. As I was working on that I realized that the underside of the tops was soon going to become inaccessible (or at least filling up with pendants and shrouds making access dicey). I looked at the museum rigging sheet and saw that there were blocks hanging from the underside of the tops for the lift lines (not sure that's what they are called - I'm talking about ropes that run to the ends of the yards). Anyway, on the Vasa those blocks are atypical; so I tried my hand at block making...

In the images that follow the oblong blocks are the ones I'm talking about. The larger blocks are for something else later in the rigging process.

I started with little chunks of wood, used an XActo for rough shaping, and then used files and sandpaper the rest of the way:

View attachment 282252 View attachment 282253
View attachment 282254 View attachment 282256

The final result:

View attachment 282257

In looking at the plans more closely I may not be needing the smaller ones (note to self - read the plans more carefully).

Installed:

View attachment 282258

And then it was back to tackle lines on the foremast.

The more forward configuration is a Dutch 4-part tackle using a violin block and a single block. The more aft is a Dutch 5-party tackle using two double blocks. I will reverse this orientation on the main mast so the 5-part tackles will be more forward and the 4-part more aft. This arrangement was suggested by Anderson - but I did it mostly for fun and visual interest. The 5-part tackle should hang a bit lower than the 4-part...

View attachment 282259

Next up: foremast shrouds... Thanks for stopping by!
Well done on those blocks Paul. I am super glad you posted this as I was going to do my shrouds first, before the tackle lines and I can see this would have created some problems ....brilliant job thus far.
 
Back
Top