Vasa - 1:65 DeAgostini [COMPLETED BUILD]

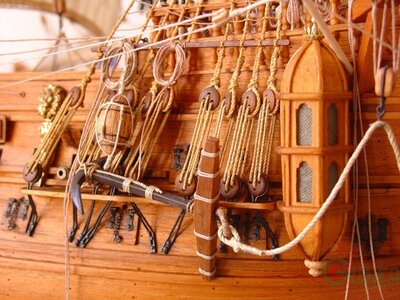
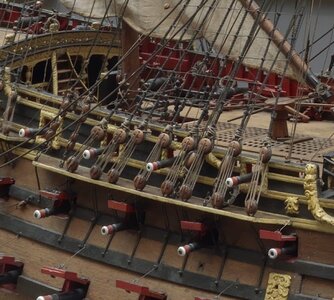
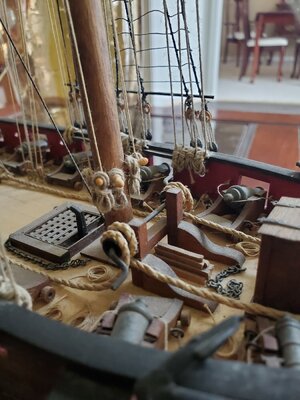
The idea of creating a fixture with a piece of wood and two pins works to a certain extent. I found it challenging to keep the chainplates all at the same tension. The result was that there was not a straight imaginary horizontal line between the upper deadeyes. I am going to assume that I know what I am doing and that the problem is not with the builder(lol) but more with the way the chainplate fastens to the hull. Maybe the next time I will glue the lower deadeyes to the channels. Ok so my assumption is false; ie I don't know what the heck I am doing but perhaps there is still some merit in gluing the lower deadeyes to the channels.
Gluing the deadeyes to the channels is a fix to the problem of the chainplates not being the correct length, as measured between the channel and where they are nailed to the hull on the wale. The problem is usually when you aren't consistent with the length of the loops of wire that are part of the chain plate. After you nail the bottom of the chain plate to the hull, if you grab the lower dead any pull upward to take slack out of the chainplate assembly, the deadeye should not come too far away from the top surface of the channel. If, in the process of nailing the lower end of the chainplate to the wale, you bend the channel down or snap it completely off the hull, it's too tight. The trick is getting the chainplate to loose all its slack as you drive the nail(s) into the wale (and sometimes also the hull), when the nails are fully in. This all comes with practice. Also be aware that the length of the chainplate assemblies grow slightly as you go aft because of the increasing angle of the chainplate. When viewed from the side, chain plates and shrouds should be 100% parallel. Kits often have all kinds of crazy angles in the chainplates as they trive to avoid crossing in front of gun ports. This is terrible wrong. If you don't want either a shroud or a chainplate to cross over a gun port, the position of the shroud needs to be moved forward or aft to avoid blocking the guns and lids. With shrouds often running between two decks of gun ports, finding proper positions for the shrouds can be tricky, especially of the gun ports are not staggered properly between the two decks. In that case, bad gun port positioning can really screw you over later on when you start rigging the shrouds. Gun port and shroud/chainplate locations must be coordinated to be correct.

An example of bad chainplate assembly. This stands out and detracts from the good appearance of the vessel. The chainplates are all over the place! Kits are often guilty of actually instructing new model builders to do this. Any sailor who saw this would probably vomit.Sick
corel-models-sm17-la-couronne-1636-french-ship-of-the-line-805-mm-length (3).jpg

This is what you want. It's not precisely perfect, but the upper deadeyes are parallel with the channels, the chainplates and shrouds don't block the guns or lids although one gun on the upper deck forward is badly crowded, and the chainplates are parallel to the shrouds. Some of the anchoring plates for the chainplates are not perfectly in line with their shrouds above. I moved the channels down one full deck to their correct position, and had to work around gun ports already plotted and cut using kit instructions, so things got tight. At least everything was tensioned properly on my first ship build. Use a length of line and a pencil and mark on the hull where your shrouds and gun ports will be early in the build to avoid conflict.
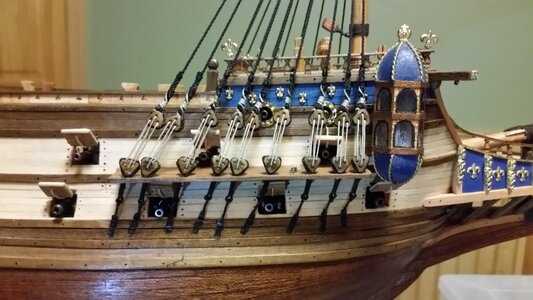
687 Foremast Shrouds.jpg
 
Last edited:
I happen to agree with you Capt. Jack. I did not appreciate how important it was to make sure the chain plates all related to the channel precisely. While I don't like to think of my 2–3-year project as a practice ship - I confess that I am learning more from my mistakes than from the things I do well.
It's never a problem to go back and correct something once it goes in the wrong direction. If you just say "F**k it!" and move on, and you do that when several problems present themselves, that's how you make a bad model.
 
Last edited:
Gluing the deadeyes to the channels is a fix to the problem of the chainplates not being the correct length, as measured between the channel and where they are nailed to the hull on the wale. The problem is usually when you aren't consistent with the length of the loops of wire that are part of the chain plate. After you nail the bottom of the chain plate to the hull, if you grab the lower dead any pull upward to take slack out of the chainplate assembly, the deadeye should not come too far away from the top surface of the channel. If, in the process of nailing the lower end of the chainplate to the wale, you bend the channel down or snap it completely off the hull, it's too tight. The trick is getting the chainplate to loose all its slack as you drive the nail(s) into the wale (and sometimes also the hull), when the nails are fully in. This all comes with practice. Also be aware that the length of the chainplate assemblies grow slightly as you go aft because of the increasing angle of the chainplate. When viewed from the side, chain plates and shrouds should be 100% parallel. Kits often have all kinds of crazy angles in the chainplates as they trive to avoid crossing in front of gun ports. This is terrible wrong. If you don't want either a shroud or a chainplate to cross over a gun port, the position of the shroud needs to be moved forward or aft to avoid blocking the guns and lids. With shrouds often running between two decks of gun ports, finding proper positions for the shrouds can be tricky, especially of the gun ports are not staggered properly between the two decks. In that case, bad gun port positioning can really screw you over later on when you start rigging the shrouds. Gun port and shroud/chainplate locations must be coordinated to be correct.

An example of bad chainplate assembly. This stands out and detracts from the good appearance of the vessel. The chainplates are all over the place! Kits are often guilty of actually instructing new model builders to do this. Any sailor who saw this would probably vomit.Sick
View attachment 287296

This is what you want. It's not precisely perfect, but the upper deadeyes are parallel with the channels, the chainplates and shrouds don't block the guns or lids although one gun on the upper deck forward is badly crowded, and the chainplates are parallel to the shrouds. Some of the anchoring plates for the chainplates are not perfectly in line with their shrouds above. I moved the channels down one full deck to their correct position, and had to work around gun ports already plotted and cut using kit instructions, so things got tight. At least everything was tensioned properly on my first ship build. Use a length of line and a pencil and mark on the hull where your shrouds and gun ports will be early in the build to avoid conflict.
View attachment 287297
Great information!
 
Wolfram zu Mondfeld states that the upper deadeyes should be in a horizontal line, parallel with the channels.
Yes I'm aware of Mondfeld's opinion on this subject. He also wrote somewhere that ratlines suppose to be parallel to the waterline. All these factors make no sence when you do this. Ab Hoving told me never trust the "modern" writers about their opinion when it comes to rigging. And yes study different books about rigging gives a lot of different meanings. Ab said to me your best reference are paintings and models of the past. So I look about such problems to paintings and old models. In the Rijksmuseum is the ship William Rex. Where a lot writers did their knowledge about rigging. Looking to this model's shrouds I came to this conclusion that the distance between the deadeyes should be equal. Also some pictures of vd Velde show this like this.
20220130_091822.jpg
 
By no means I'm an expert in this field, but, when looking at the provided pictures of deadeyes, chainplates, position of gunports, etc, etc, I think the blame, if you want to call it that, lies IMO with the kit manufacturers. They design and manufacture their kits and know from step 1 what's coming. They are in the position to know where gunports are in relation to the chainplates, etc. Maybe if you are a very experienced builder, you might be able to avoid these traps, but if it's your first model... It requires an awful lot of foresight.
 
Yes I'm aware of Mondfeld's opinion on this subject. He also wrote somewhere that ratlines suppose to be parallel to the waterline. All these factors make no sence when you do this. Ab Hoving told me never trust the "modern" writers about their opinion when it comes to rigging. And yes study different books about rigging gives a lot of different meanings. Ab said to me your best reference are paintings and models of the past. So I look about such problems to paintings and old models. In the Rijksmuseum is the ship William Rex. Where a lot writers did their knowledge about rigging. Looking to this model's shrouds I came to this conclusion that the distance between the deadeyes should be equal. Also some pictures of vd Velde show this like this.
View attachment 287343
As far as deadeye spacing goes, both methods could be correct, depending on the ship. Sources for information tell us different things at times. Paintings are a great source for information, but can also be incorrect. We often cannot know the difference.
 
By no means I'm an expert in this field, but, when looking at the provided pictures of deadeyes, chainplates, position of gunports, etc, etc, I think the blame, if you want to call it that, lies IMO with the kit manufacturers. They design and manufacture their kits and know from step 1 what's coming. They are in the position to know where gunports are in relation to the chainplates, etc. Maybe if you are a very experienced builder, you might be able to avoid these traps, but if it's your first model... It requires an awful lot of foresight.
Research is key. I just started building three years ago, and the amount gathering of books and reading was much more than actual building. Kits are often poorly researched in some features. Sometime the kits themselves can help you spot areas you need to research. Mantua and Corel each make models of La Couronnne. They look vastly different to each other. One is based on an interpretation of the ship made by Vincezo Lusci, the other from some other idea of what the ship was. The question becomes, what features were accurate? Often we cannot know.
 
Just when you think you might be getting the hang of it - this happens... :rolleyes:

View attachment 287192
Hi Paul. During the running rigging of my HMS Fly I had at least half dozen incidents of the seizing coming apart. And Murphy's law applies 100%,'The odds of a particular seizing coming undone is directly proportional to the difficulty of repairing such seizing'. :rolleyes:
 
Research is key. I just started building three years ago, and the amount gathering of books and reading was much more than actual building. Kits are often poorly researched in some features. Sometime the kits themselves can help you spot areas you need to research. Mantua and Corel each make models of La Couronnne. They look vastly different to each other. One is based on an interpretation of the ship made by Vincezo Lusci, the other from some other idea of what the ship was. The question becomes, what features were accurate? Often we cannot know.
Hello Kurt,

Since I restarted modeling after years of neglect, I've come to like to do research on the model I'm building, especially as instructions and drawings are often poor, so I can relate to the necessity of said research.
Still, the kit developers / manufacturers decide upon whichever configuration they want to offer and should develop their drawings and descriptions accordingly. It should be possible to build a model from the instructions without major configuration issues, like gunports and chainplates interfering.
If one as a modeler wants to deviate because of historical accuracy or AL-FI, then the builder is dependent on his own research and resourcefulness.
In the short time I've been back to building, I've come to realize that the historical accuracy of any model is a fickle thing; we simply lack the information to be certain of each and every aspect of a model and I'm okay with that.
Having said that, I'm more than impressed by those on SOS, who so thoroughly research their model, just to make sure their build is as accurate as can be and do not take what's in the kid's instructions for granted.

Kind regards,

Johan
 
Just when you think you might be getting the hang of it - this happens... :rolleyes:

View attachment 287192
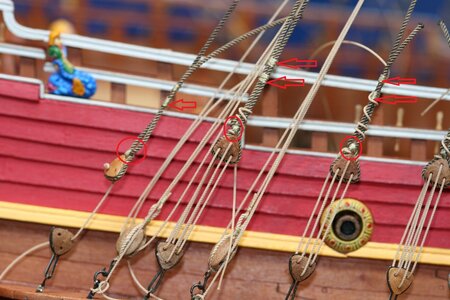
Pavel, I'll try to help you. I'll tell you how I make shrouds and lanyards. For starters, you DO NOT need to make all shrouds the same length. Each shroud must be made in such a length that the distance between the lufers is the same. To do this, you can use a template that will be the same for each pair of ufers. When tying the upper eyelets, you do not need to immediately tighten the fire completely and glue it. Leave the shroud and lufer to move for further adjustment. Marked in your photo circle. After all the distances have been set, you can tighten the fire in a circle and only after that tie what is indicated by the arrows.
IMG_7839.JPG
 
Pavel, I'll try to help you. I'll tell you how I make shrouds and lanyards. For starters, you DO NOT need to make all shrouds the same length. Each shroud must be made in such a length that the distance between the lufers is the same. To do this, you can use a template that will be the same for each pair of ufers. When tying the upper eyelets, you do not need to immediately tighten the fire completely and glue it. Leave the shroud and lufer to move for further adjustment. Marked in your photo circle. After all the distances have been set, you can tighten the fire in a circle and only after that tie what is indicated by the arrows.
View attachment 287591
Good scoop Sasha, I'll use that method on my tip masts and on my next build.

@ Paul, you're special.... Pavel is how Paul is written and pronounced.
 
Pavel, I'll try to help you. I'll tell you how I make shrouds and lanyards. For starters, you DO NOT need to make all shrouds the same length. Each shroud must be made in such a length that the distance between the lufers is the same. To do this, you can use a template that will be the same for each pair of ufers. When tying the upper eyelets, you do not need to immediately tighten the fire completely and glue it. Leave the shroud and lufer to move for further adjustment. Marked in your photo circle. After all the distances have been set, you can tighten the fire in a circle and only after that tie what is indicated by the arrows.
Thank you Sasha. Creating a template for each pair of shrouds would have gotten me closer than I got. It would also have necessitated creating 21 templates just for the lower masts (see below for why I say that). I do like the idea of keeping the line loose pending further revision - I glued the lines to the deadeye before seizing. I have also now seen the clever use of a 'backer board' that runs the full length of the channel to assist the builder with keeping things level.

But level to what is another question. Some have argued that the distance between the deadeyes takes priority - and they can prove it. Others have argued that keeping the deadeyes parallel to the channel takes priority - and they can prove it. Just to complicate things I have seen world-class models that allow the upper deadeye to vary from perfection just as would be likely seen on a working ship.

I have been trying to keep the upper deadeyes level to the channel but have not succeeded. But I have also now done most of the lower shrouds twice and I don't think I have a third time in me. Plus, each revision damages the lines because I use CA to fix things in place and it leaves a residue not easily removed.

Anyway, I know it frustrates some friends when I am hard on myself and critical of my own work. But at the end of the day I'm going to have to settle for what my hands have produced. I have never used my lack of experience as a shield (an excuse) - but it would appear rigging might be a justifiable time to do that.

Photos to follow in the days (weeks?) ahead. I need to complete the shrouds on the mizzen - adjust the tension throughout - and then clean up the rat's nest of loose ends. The main and mizzen stays are also on my punch list.

Thanks, everyone, for an edifying discussion. It's a truly wonderful hobby isn't it!?!
 
My dear friend - what you need now is perspective on the one hand and a confidence booster on the other. Right now, this rigging monster is like Mount Everest to you because this is the next thing that you have to do. You know, it's not. You decide what it is that becomes a HAVE TO. With all due respect to the wonderful advice that you have received with regards to the rigging, it doesn't help your mindset or your psyche. The second thing is confidence. I bet that all the brilliant work that you have done up to now, seems very far away to you. This is why I have sometimes worked on more than one model at a time - it boosts your confidence because you are achieving success again AND it offers PERSPECTIVE and a different approach to things. After two or three months of working on something different, you will be amazed at how differently you view the challenges that now seem insurmountable. My two cents.
 
Thanks Heinrich. Not insurmountable - but with a measured expectation :D!

Maybe others do the same but I'll point it out just for the sake of modelling collegiality. I find myself looking at 1:48 scale models and trying to do the same at my scale. Or I look at models that are ten years in the making and then try to see how I can accomplish something similar but on a shorter time horizon. Of course neither can be done.

Anyway, your point is well taken: PERSPECTIVE matters!
 
Of course, this means my upper deadeyes will not be in a perfect level line but I'm trying to get them as close as I can.
Paul, my post was only about this moment. Now, of course, it’s not worth redoing, especially since all nodes are flooded with CA. This is advice for the future. Do not tighten all the ropes around the lufer, leave yourself room for maneuver (length adjustment).
 
Paul, this was my first attempt 25 years. All those years I thought it was good. Now that I have learned, I realize how screwed up its is. Belay pins IN the mast. Ratlines all screwed up, top mast... I didn't use knots. Shrouds....what are those? Futtock.....never heard of it. The only mouse that I knew back then was Mickey. All this being said, the model still looks good....when I finish the Rattlesnake, it will be in the opposite end of the house.

There is a wealth of information being passed here, sometimes it comes after we present our work. This is great, we can either go back and redo the work or store it in our memory for the next build or even other areas of the current build that we haven't gotten to.

The bottom line is that once the ship is completed, there are so many things to look at that minor mistakes will not be found or noticed..... except by you.

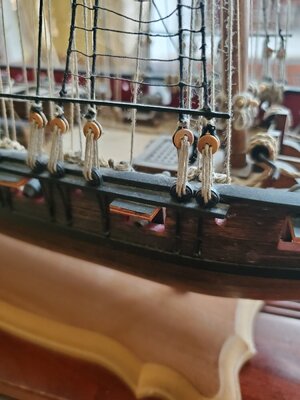
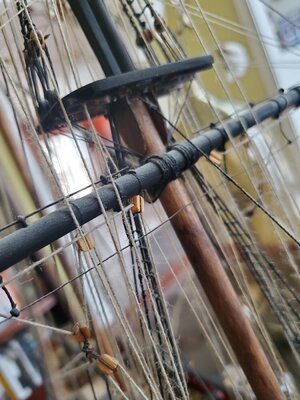
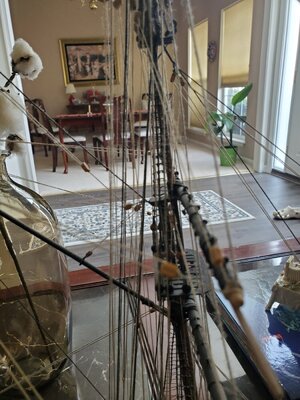
Your build I exceptional, no other way to define it. 20220131_110932.jpg20220131_110941.jpg20220131_110955.jpg20220131_111017.jpg
 
I have never used my lack of experience as a shield (an excuse) - but it would appear rigging might be a justifiable time to do that.
Paul,

First, it's a stunning model you're creating!
Second, admitting one is lacking experience is in my honest opinion not an excuse, but an admission with an opportunity to improve oneself.

Kind regards,

Johan
 
Back
Top