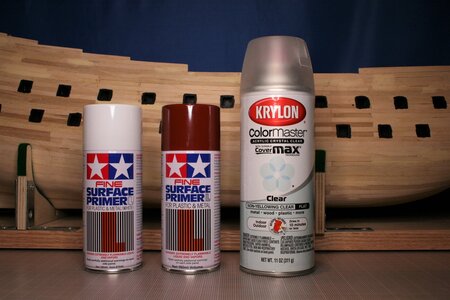
Could you please show us what priming product you use?I appreciate your kind words, Jan. It just takes time. If someone was contemplating this beautiful ship you need to really budget for painting time. And probably plan on more painting time than you think. The castings are nice but not perfect and they all need to be filed to remove flash and any creases created by the molding process. Next they need to be cleaned with a degreaser/acetone. Then they need to be primed using a priming paint for fine work (not what you would use for patio furniture). Then painting. And repainting. And shading if the piece is big enough for that. And then highlighting. And then touching up what you ruined while shading and highlighting. And...well, you get the point...
The line dancer army was about one day's work. But rewarding when done. Mini-victories along the way for what is otherwise a seemingly endless project!
For the record, faces are the hardest, but at 1:65 some of these faces are actually too small to really see - notwithstanding what the zoom function on your PC tells you!
-

Win a Free Custom Engraved Brass Coin!!!
As a way to introduce our brass coins to the community, we will raffle off a free coin during the month of August. Follow link ABOVE for instructions for entering.
-

PRE-ORDER SHIPS IN SCALE TODAY!
The beloved Ships in Scale Magazine is back and charting a new course for 2026!
Discover new skills, new techniques, and new inspirations in every issue.
NOTE THAT OUR FIRST ISSUE WILL BE JAN/FEB 2026
You are using an out of date browser. It may not display this or other websites correctly.
You should upgrade or use an alternative browser.
You should upgrade or use an alternative browser.
Vasa - 1:65 DeAgostini [COMPLETED BUILD]
- Thread starter dockattner
- Start date
- Watchers 147
Is the ship Wasa or Vasa ? I get confused by its name.
.
.
Either one. Wasa seems to be more correct, given the Swedish language, also in German, but in either case, the name is pronounced with a "V" as in violin. For English speakers, Vasa is probably used to prevent mispronunciation.Is the ship Wasa or Vasa ? I get confused by its name.
.
Thanks, Dockattner!The primer is from Tamiya. It comes in white and red (shown here) and in grey. I am also showing the matte clear coat I'm using to protect the finished piece.
View attachment 191975
Hi Paul,
Very nice work on your Swedish team of line dancers.
I know they are very very small but what I should try is to pinch there eyes with a small needle with white paint for the first time and even less black paint for a second time. This will bring your rockets even more to live.
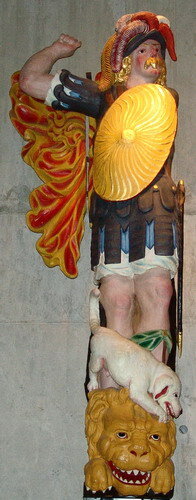
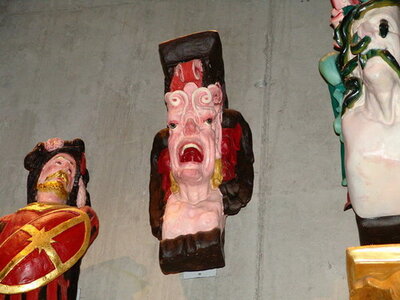
See below some of the researched statues with there actual colours.




Dummy guns. Let's not tell Kurt (@DARIVS ARCHITECTVS) - he's got a thing about dummy guns!

I chose this rusty/bronze color because the carriages on the main deck are black (per the museum researchers) and I was looking to create some contrast. That is, I was concerned that a black gun sitting on a black carriage with black wheels was going to look...well...too black.
The kit supplied gun carriages and trucks are pretty blah. I'm reading other build logs trying to find ways to improve them. The museum has some pictures and I'll incorporate what I can at scale...
Dummy guns. Let's not tell Kurt (@DARIVS ARCHITECTVS) - he's got a thing about dummy guns!
View attachment 192268
I chose this rusty/bronze color because the carriages on the main deck are black (per the museum researchers) and I was looking to create some contrast. That is, I was concerned that a black gun sitting on a black carriage with black wheels was going to look...well...too black.
The kit supplied gun carriages and trucks are pretty blah. I'm reading other build logs trying to find ways to improve them. The museum has some pictures and I'll incorporate what I can at scale...

LALALLALALALALAAAA NOT LISTENING !!!
This is a safe place, Kurt. You're among friends. Let's work through this together. The first step is to look at a picture of a dummy gun. Next week we'll let you be in the same room as one. When you're ready you can touch a dummy gun with your finger...but only when you're ready. For now - just know we care.View attachment 192269
LALALLALALALALAAAA NOT LISTENING !!!
Are you sure you're talking about a gun?This is a safe place, Kurt. You're among friends. Let's work through this together. The first step is to look at a picture of a dummy gun. Next week we'll let you be in the same room as one. When you're ready you can touch a dummy gun with your finger...but only when you're ready. For now - just know we care.
Paul, fantastic work.
Just wanted to mention I use cheap reading glasses for magnifiers. I have 20/20 vision still, and find that a 1.75X or 2.0X reading glass works really good for working on small parts. I currently keep 3 sets of different strengths of cheap reading glasses by the bench, and adjust depending on what I'm working on. If you just need a little magnification it's much more comfortable than working around a magnifying glass IMO.
Just wanted to mention I use cheap reading glasses for magnifiers. I have 20/20 vision still, and find that a 1.75X or 2.0X reading glass works really good for working on small parts. I currently keep 3 sets of different strengths of cheap reading glasses by the bench, and adjust depending on what I'm working on. If you just need a little magnification it's much more comfortable than working around a magnifying glass IMO.
I think I just threw up in my mouth a little...This is a safe place, Kurt. You're among friends. Let's work through this together. The first step is to look at a picture of a dummy gun. Next week we'll let you be in the same room as one. When you're ready you can touch a dummy gun with your finger...but only when you're ready. For now - just know we care.

Seriously, your work is impeccable. All those little details add up to a feast for the eyes when the ship is done. Congrats on the new chorus girls.
Hi Maarten! Thanks for the suggestion on improving the faces. I couldn't get the paint to release from the tip of the needle very well but I did the best I could. Also, the black covered up the white more than I wanted - or at least there wasn't enough contrast between the white eyes and the surrounding flesh at this size of figure.Hi Paul,
Very nice work on your Swedish team of line dancers.
I know they are very very small but what I should try is to pinch there eyes with a small needle with white paint for the first time and even less black paint for a second time. This will bring your rockets even more to live.
See below some of the researched statues with there actual colours.
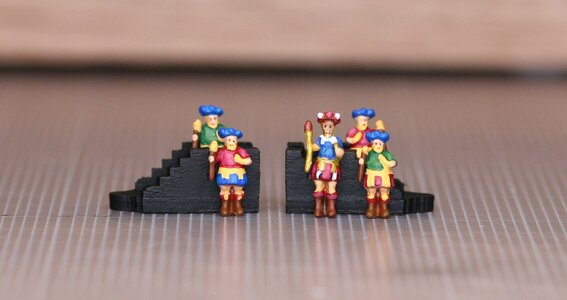
Anyway, here's a principal dancer and several line dancers inspecting the gun carriages presently under construction...they have eyes now so they can complete their work much better than before...
The pudgy one in the front with the red shirt says that Jim (@Jimsky) would not approve of painting wood so I am switching over to india ink.
Last edited:
Wow, those are small! Very good detail!Hi Maarten! Thanks for the suggestion on improving the faces. I couldn't get the paint to release from the tip of the needle very well but I did the best I could. Also, the black covered up the white more than I wanted - or at least there wasn't enough contrast between the white eyes and the surrounding flesh at this size of figure.
Anyway, here's a principal dancer and several line dancers inspecting the gun carriages presently under construction...they have eyes now so they can complete their work much better than before...
The pudgy one in the front with the red shirt says that Jim (@Jimsky) would not approve of painting wood so I am switching over to india ink.
View attachment 192530
Nothing wrong with using a good black paint. I’m thinking the real carriages were painted black?
That's correct. According to my research (and confirmed by Fred Hocker in one of the museum forums) navy yard records indicate that the carriages were painted "lamp black" so that's what I'm going to do as well.Wow, those are small! Very good detail!
Nothing wrong with using a good black paint. I’m thinking the real carriages were painted black?
Thats the surface tension of the paint keeping it as a droplet on the needle, using thicker paint from the edge of the paint can cover will maybe help.
But see you even gave them some lipstick, they look great now with their fierce eyes staring at you.
But see you even gave them some lipstick, they look great now with their fierce eyes staring at you.
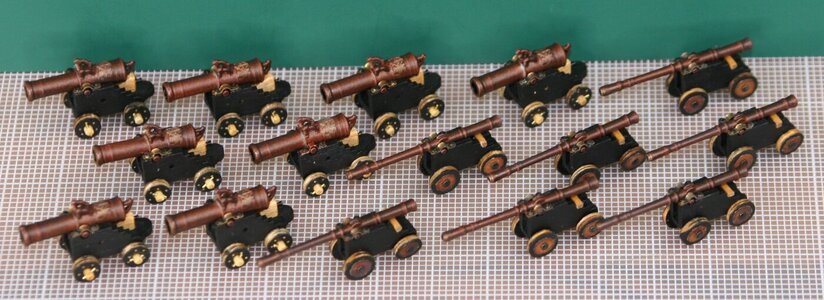
In my ongoing effort to pretend I don't need to add the second layer of planking to the hull (or plank the decks) I worked on the cannons that will show up "on deck." Earlier you saw a sneak peak of the black gun carriages - again, the black is a known color for these carriages. But black carriages with black trucks and bronzed guns (also approaching black) just didn't sound too great to me. So here is what I came up...
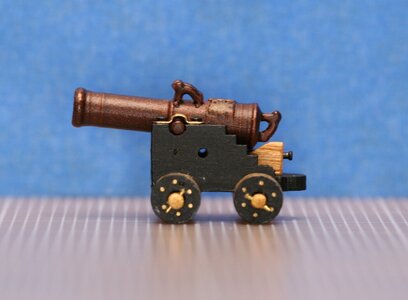
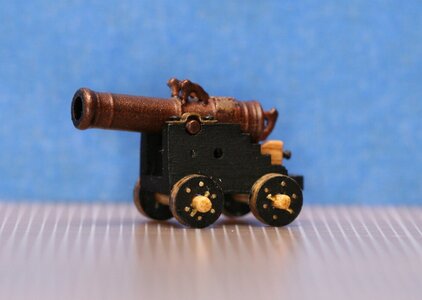
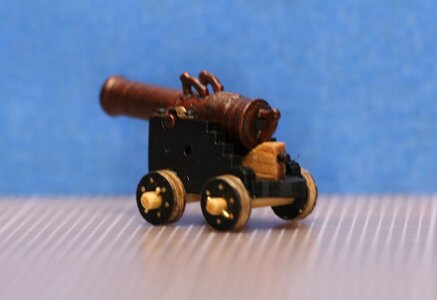
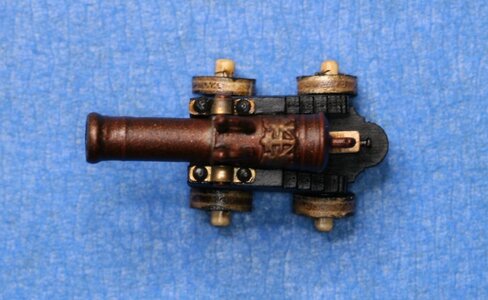
On these short guns I painted the cannons a rusty bronze color and barely highlighted the crest. I drilled some tiny holes in the trucks and inserted brass pins and similarly added the brass pin holding the wheels on the axle. While I did paint the wheels black I left the rolling edge natural to capture the reality that these guns were moved to the ship and on the ship. The retaining clips (whatever their real name is...) for the cannon should probably be black but I didn't want them to disappear against the black carriage - so I tarnished them (see below for how I did this) and then added black nail heads to simulate the bolts holding them in place. Oh, and I built the wedge out of scrap and added a nail head for a handle. There are 8 of these small guns but I need to order more tiny drill bits to finish them up (only three are completed). It turns out I'm very good at breaking tiny drill bits. Unexpected (and humbling) given my professional training...
And also these...
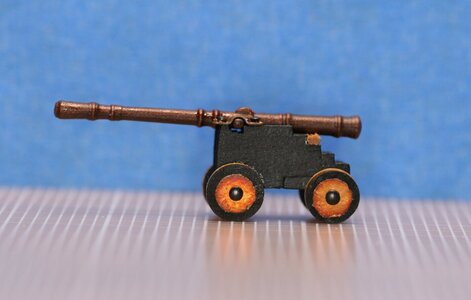
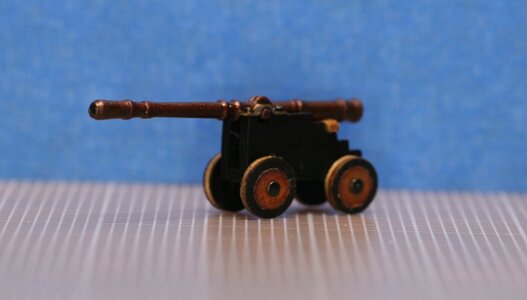
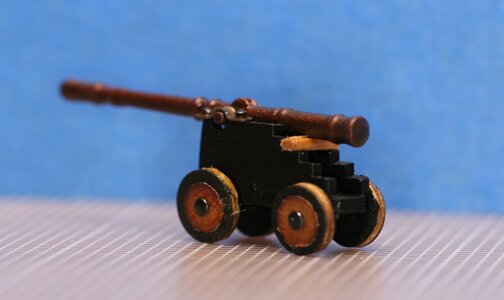
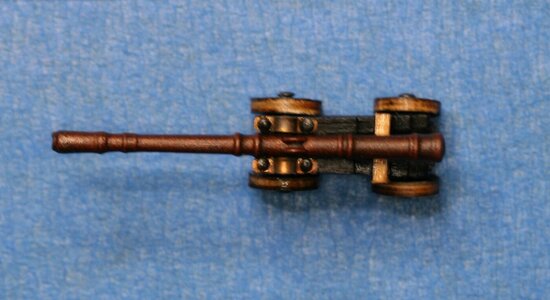
These long guns were painted the same rusty brown color as the short guns (and dummy guns). I distinguished these long guns by adding copper disc to the trucks and then used a black headed nail as a hub. For these cannon I added a wooden block (instead of a wedge) for the men working the cannon to configure the firing angle. I'm not sure if this (my added wooden block) was how the "stepping" of the carriage was used - but it made sense to this landlubber. Again, I left the rolling edge of the wheels "natural."
A brief word about technique...
I appreciate that the metal bits would probably be black. But I wanted to distinguish them from the (mandatory?) black carriages. So I chose to tarnish the clips holding the cannon in place (as well as the copper discs on the trucks of the longer cannon) rather than blacken them.
I experimented with several options and ended up aging the brass and copper using a hard-boiled egg. Its really quite simple: you hard boil an egg until it is thoroughly cooked through (maybe 10 minutes - you want the egg over-cooked for best results). While the egg is boiling away you prepare all the metal bits in some sort of sealable container. I used a glass bowl with a tight cover - but even a zip-lock bag would do (though the metal bits should not be touching each other). When the egg is cooked through - working efficiently - you smash up the egg and put it in your container with whatever you are trying to tarnish. In this image the smashed up egg is in the white cup).
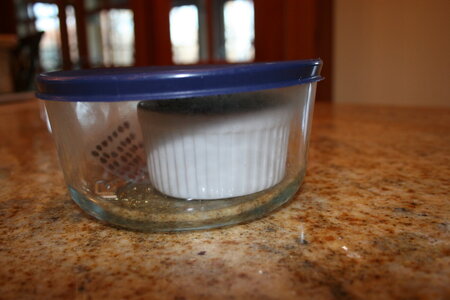
The copper discs took about 90 minutes to look like you see them - you can customize your final result by adjusting the time. The brass clips took much longer (overnight). Resist the urge to open the bowl or bag because the gases that are causing the surface reaction will drift away. I found I could easily monitor progress using the glass bowl. I then "sealed-in" the final result using a bit of spray poly.
I am very open to your suggestions for improving these guns!
I saw some examples that included strapping on the sides that would have been used to hold the axles to the cart (perhaps that would add a bit to the long guns?) but I think the hydrogen sulfide vapors from my overcooked eggs got the better of me at some point. Ordinarily I have no problem going back to rework something that can be improved. But I lacked that enthusiasm today...
Maybe it is time time to get back to planking! Thanks for checking out my build-log. You really are a fine group!


On these short guns I painted the cannons a rusty bronze color and barely highlighted the crest. I drilled some tiny holes in the trucks and inserted brass pins and similarly added the brass pin holding the wheels on the axle. While I did paint the wheels black I left the rolling edge natural to capture the reality that these guns were moved to the ship and on the ship. The retaining clips (whatever their real name is...) for the cannon should probably be black but I didn't want them to disappear against the black carriage - so I tarnished them (see below for how I did this) and then added black nail heads to simulate the bolts holding them in place. Oh, and I built the wedge out of scrap and added a nail head for a handle. There are 8 of these small guns but I need to order more tiny drill bits to finish them up (only three are completed). It turns out I'm very good at breaking tiny drill bits. Unexpected (and humbling) given my professional training...
And also these...


These long guns were painted the same rusty brown color as the short guns (and dummy guns). I distinguished these long guns by adding copper disc to the trucks and then used a black headed nail as a hub. For these cannon I added a wooden block (instead of a wedge) for the men working the cannon to configure the firing angle. I'm not sure if this (my added wooden block) was how the "stepping" of the carriage was used - but it made sense to this landlubber. Again, I left the rolling edge of the wheels "natural."
A brief word about technique...
I appreciate that the metal bits would probably be black. But I wanted to distinguish them from the (mandatory?) black carriages. So I chose to tarnish the clips holding the cannon in place (as well as the copper discs on the trucks of the longer cannon) rather than blacken them.
I experimented with several options and ended up aging the brass and copper using a hard-boiled egg. Its really quite simple: you hard boil an egg until it is thoroughly cooked through (maybe 10 minutes - you want the egg over-cooked for best results). While the egg is boiling away you prepare all the metal bits in some sort of sealable container. I used a glass bowl with a tight cover - but even a zip-lock bag would do (though the metal bits should not be touching each other). When the egg is cooked through - working efficiently - you smash up the egg and put it in your container with whatever you are trying to tarnish. In this image the smashed up egg is in the white cup).

The copper discs took about 90 minutes to look like you see them - you can customize your final result by adjusting the time. The brass clips took much longer (overnight). Resist the urge to open the bowl or bag because the gases that are causing the surface reaction will drift away. I found I could easily monitor progress using the glass bowl. I then "sealed-in" the final result using a bit of spray poly.
I am very open to your suggestions for improving these guns!
I saw some examples that included strapping on the sides that would have been used to hold the axles to the cart (perhaps that would add a bit to the long guns?) but I think the hydrogen sulfide vapors from my overcooked eggs got the better of me at some point. Ordinarily I have no problem going back to rework something that can be improved. But I lacked that enthusiasm today...
Maybe it is time time to get back to planking! Thanks for checking out my build-log. You really are a fine group!
Last edited:
Wow, you’ve been busy! Looks good!
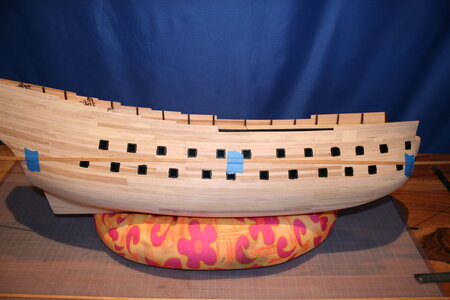
OK. Before you all laugh at me or shake your heads in dismay recall that this is my first build and anyone with a pinch of common sense would never have started with a ship this large. But I have run up against an issue. I was going to lay out the second layer of hull planking...but when I placed this test strip and kept it flush/flat against the hull it completely ignores the flow of the ship. No way I can edge bend a strip this thin. What am I missing?
