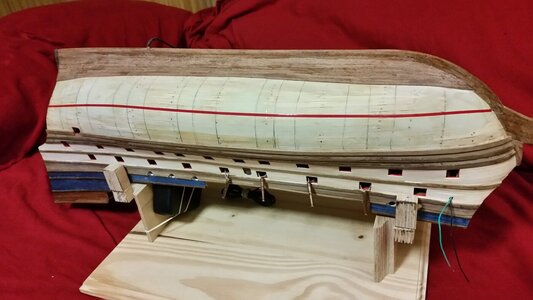
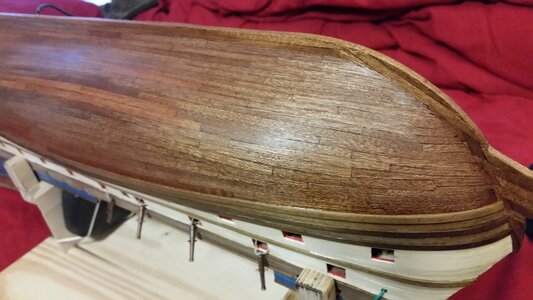
Vasa - 1:65 DeAgostini [COMPLETED BUILD]

OK. Before you all laugh at me or shake your heads in dismay recall that this is my first build and anyone with a pinch of common sense would never have started with a ship this large. But I have run up against an issue. I was going to lay out the second layer of hull planking...but when I placed this test strip and kept it flush/flat against the hull it completely ignores the flow of the ship. No way I can edge bend a strip this thin. What am I missing?

View attachment 193537
@dockattner ...
Cut your boards into smaller lengths, like planking a deck. Stagger your joints as well. Smaller boards will follow curve without bending, however you may have to miter the edges a hair (angle cut to average curve). Pick a board or scribe a line to set the curve you want to follow with the smaller boards. You already have nice vertical lines to determine where board ends will stagger. I did a two to three bulkhead span for average board length. 3 bulkheads in middle of ship with less or no curve, and smaller 2 bulkhead span for length of boards towards bow and stern where there is more of a curve. And you will need to taper boards towards the bow and probably use a stealer or two at the stern. And remember the boards at the keel will be straight for a few rows, then you will end up with tapered boards where they all meet from the bulwarks coming down to the rows at the keel. You want them to meet under the bulkhead where it is not visible from the side, if possible.
Just remember, no sharp corners, if you have to ...come back and radius where two boards meet at an angle with a small file. That way your next row will flow around a smooth and hopefully large radius!
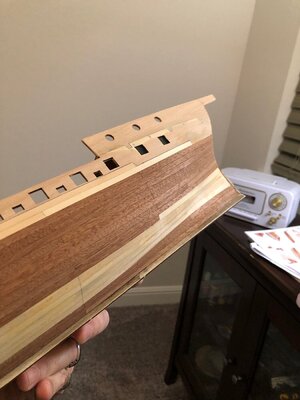
ship-49.jpg
Hope all that makes sense. My ship is smaller and has less curvature.
Think of the boards as rectangular teeth going around in a curve to form your bite....lol ;)
 
Last edited:
Hi Paul,

Thats the difficulty with veneer strips, they easily bend in one direction only.

What I would do is first lay down the lower wale, this is a thicker plank which can be bend with water and heat in the correct shape. If you have this basis you can start from here working down wards towards the kim. Secondly you can also lay down strips along the keel working upwards meeting the other strips at the kim.

The strips should be to size so cut them at max 6 mtrs in lenght at scale.

For getting these veneer planks in shape I glue them with CA, you can glue them under tension in the correct shape. I have done this on the veneer planks of my RC also and it works fine.
 
On another hand be careful with CA glue. This 'devil' has a tendency to penetrate the wood and made a 'perfect' blockage for final finishing e.g. oils and\or varnishing. I have even seen this behavior when using paint.
Veneer strips can be laid down using the cloth iron and PVA glue. We recently have this discussion on another thread.
 
Using PVA glue to glue the veneer strips down has the effect of softening them a bit, so you CAN get then to bend a little in a sideways direction, but only a very little, say, enough to close a small gap. It's best not to force them or they may not lay flat, or perhaps you'll here that sickening CRUNCH sound as they break or split. I hope you have enough veneer strips, so use the lengths as efficiently as possible, because kits only provide a precise amount, an NO EXTRA. Chinese sapelle looks the same as mahogany. That's what I used to finish the transom on La Couronne when I ran out of hull veneer strips.

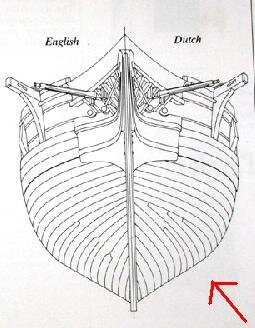
Also, in contrast to the hull shown by the Dematosdg, don't terminate the ends of plank strakes in points. Use drop planks and stealers. If you don't know what these are by now, read up or ask about them, because it's basic planking 101.

Hull Planking Styles.JPGDrop planks, Dutch style
 
Last edited:
Using PVA glue to glue the veneer strips down has the effect of softening them a bit, so you CAN get then to bend a little in a sideways direction, but only a very little, say, enough to close a small gap. It's best not to force them or they may not lay flat, or perhaps you'll here that sickening CRUNCH sound as they break or split. I hope you have enough veneer strips, so use the lengths as efficiently as possible, because kits only provide a precise amount, an NO EXTRA. Chinese sapelle looks the same as mahogany. That's what I used to finish the transom on La Couronne when I ran out of hull veneer strips.

Also, in contrast to the hull shown by the Dematosdg, don't terminate the ends of plank strakes in points. Use drop planks and stealers. If you don't know what these are by now, read up or ask about them, because it's basic planking 101.

View attachment 193633Drop planks, Dutch style

Hi. I was not suggesting Paul how to do the planking. Neither that the way I did it was the correct one. Every one knows that what you showed is the correct way ......

I will delete my posting because does not make any sense to show an incorrect work not included in the 101 course.

Cheers
Daniel
 
Thanks to everyone who has stepped up with advice and pictures and instruction. I can see that there are many approaches to hull planking. It has also become abundantly clear why this ship was not intended for a novice.
My plan is to lay in a sacrificial wale to establish a run for the planks (I don't have the pear wales yet from the supplier). I will not attempt to run a full ship-length plank and then put in 'fake' joints like I was thinking I was going to do. The challenge has not been diminished, however. The hull timbers on the Vasa are all joined with scarf joints (that's what I was going to simulate) - and putting in scarf joints with a radius (to follow a curve) seems to leave me wide open for imprecise joinery.
And while I understand I may be able to get some small amount of flex along the vertical axis it just seems like the amount of correction necessary is beyond the scope of what the material will allow (there's a 40-50 mm correction to make over the length of the hull). Of course I say that without even trying...
Feeling a little discouraged, and definitely out of my depth, but not hopeless...
 
Last edited:
Thanks to everyone who has stepped up with advice and pictures and instruction. I can see that there are many approaches to hull planking. It has also become abundantly clear why this ship was not intended for a novice.
My plan is to lay in a sacrificial wale to establish a run for the planks (I don't have the pear wales yet from the supplier). I will not attempt to run a full ship-length plank and then put in 'fake' joints like I was thinking I was going to do. The challenge has not been diminished, however. The hull timbers on the Vasa are all joined with scarf joints (that's what I was going to simulate) - and putting in scarf joints with a radius (to follow a curve) seems to leave me wide open for imprecise joinery.
And while I understand I may be able to get some small amount of flex along the vertical axis it just seems like the amount of correction necessary is beyond the scope of what the material will allow (there's a 40-50 mm correction to make over the length of the hull). Of course I say that without even trying...
Feeling a little discouraged, and definitely out of my depth, but not hopeless (but almost)...
Paul,
Why would you bother with a scarf joint on the veneer? Use a simple butt joint! Use multiple small boards to make the curve over the length of the hull. Miter ends, so there is no gap.
It’s really the only viable option, IMHO!
 
Paul,
Why would you bother with a scarf joint on the veneer? Use a simple butt joint! Use multiple small boards to make the curve over the length of the hull. Miter ends, so there is no gap.
It’s really the only viable option, IMHO!
Not scarf joints for strength - scarf joints for historical accuracy. All the hull timbers are joined using scarf joints on the original. I wanted to reproduce that in the model. I may not get to - but that's the answer to your question.
 
Not scarf joints for strength - scarf joints for historical accuracy. All the hull timbers are joined using scarf joints on the original. I wanted to reproduce that in the model. I may not get to - but that's the answer to your question.
Absolutely. Scarf joints would look great, if the difficulty and monotony don't drive you crazy first. Dockattner, if you devise a method to make scarf joints easily, like maybe a cookie cutter razor tool that cuts the shape of the joint precisely and consistently, I'll be your #1 fan. Using a razor knife by itself for me is error prone.
 
Absolutely. Scarf joints would look great, if the difficulty and monotony don't drive you crazy first. Dockattner, if you devise a method to make scarf joints easily, like maybe a cookie cutter razor tool that cuts the shape of the joint precisely and consistently, I'll be your #1 fan. Using a razor knife by itself for me is error prone.
The real problem is the fact that the scarf joint will not be parallel to the board itself unless he has the ability to bend laterally, which with a veneer would end in tears...lol ;) So now the real task would be to miter cut each board end (to average the curve across ship) and make the scarf joint perpendicular to the miter edge. It's doable, just an exercise in frustration!
You can make a template for your scarf joints to trace on each piece, then just align with the board end each time.
 
I see you guys are starting to understand the problem I uncovered when I discovered the test plank did not follow the lines of the ship...
Unfortunately, it’s the addition of the scarf joint that will add complexity.
If the miter angle needed to average the curve is shallow enough...the fact the scarf joint is not perpendicular to the board itself won’t be noticeable. So once again doable, just a lot of extra work!
 
Last edited:
Unfortunately, it’s the addition of the scarf joint that will add complexity.
If the miter angle needed to average the curve is shallow enough...the fact the scarf joint is not perpendicular to the board itself won’t be noticeable. So once again doable, just a lot of extra work!
Sort of like your new gun carriage project? Doable - just extra work...
 
Sort of like your new gun carriage project? Doable - just extra work...
Correct, so that’s where we have to ask ourselves how much extra work are we willing to do and will it make a real difference or get lost in the details? What’s the ROI? ;)
Furthermore each individual has their own reasons, ie historical accuracy, personal satisfaction, etc.
Since the majority of us are not doing a build for a museum, or for any client. Then historical accuracy becomes a personal preference. It’s your ship and your choice.
I build ships for personal satisfaction and for display. I will never be a slave to historical accuracy. I do however like detail at scale. But that’s my personal priority when it comes to the hobby of wooden ship modeling or building.
In conclusion, if historical accuracy is truly very important to you, and you want your ship to display it in all its glory, down to the last detail...then continue to do research and instill that accuracy in your build, regardless of time spent.
 
Last edited:
I see you guys are starting to understand the problem I uncovered when I discovered the test plank did not follow the lines of the ship...
I may have some insight on this issue. When I started trying to lay the first hull plank along the entire length of the hull framework, it became apparent that the height of the plank location, somewhere between the turn of the keel and the upper side, was a HUGE factor in how that plank lay on the hull. It may curve upward at sharply at both ends if the plank is too low, or lay straight across if too high. Somewhere in the middle of those positions, the front end may curve too sharply upward as it ran to the keel at the bow and only gently curve up at the keel end. You're trying to locate the position where the first plank will be laid, and you know it will influence the shape of all the planks that are laid beside it for several strakes up and down. Knowing where to start planking comes from experience, and the style of building that is uniquely yours.

For the first plank layer, I like to start at the lower gun deck, with the first plank just below the lower gun deck ports. On the final plank layer, start below the wales. It is at a position where the flatter area of the sides of the ship start to curve into the lower belly of the hull. Another starting place where you place a second full length plank is at the keel, and your work toward the turn of the bilge (the red line where the lower side of the hull curves sharply into the bottom). The tapering, drop planks, and stealers required for planks between these two starter planks work themselves out as you go. At the bow, you judge the width at the keel remaining to be filled, and add drop planks carefully as you work, adding planks from the bottom upwards. To fill in the bottom of the hull, you start at the keel with the garboard strake, move outboard toward the turn of the bilge, and use tapering to squeeze the ends in, or stealers at the stern to bridge the widened gap. Below are pictures showing progression of the first plank layer.

The hardest part is judging how many drop planks you need from the turn of the bilge up to the beakhead deck at the bow end of the ship. Now, I tend to work freestyle. That means that I do not use the measuring method at each frame and calculate precisely how much taper goes here or precisely when planks are approaching their half-width threshold and require a drop plank be fashioned. I work by eye, and for me the results are always symmetrical port to starboard, because I'm very careful. Many people cannot do that because they don't have a mind that sees shapes in three dimensions, in the way that I can cover a man in steel plate armor by eye, whacking out steel into 3-D on the anvil so that an armor suit's parts fit with minimal trimming and no gaps. That's my profession. If you asked me to paint a portrait, you'd get a stickman, and not very good one. The point is that your method will vary, depending on your personal experience, skill, and innate talents.

211 Continue Planking.jpg

Only two drop planks were required on this hull, one next to lowest wale, the other more visible three strakes down from the wale. Note that they were done in the English style when they should have been Dutch.
215 Removed Excess Spray Lacquer Using Denatured Alcohol.jpg
 
Last edited:
Absolutely. Scarf joints would look great, if the difficulty and monotony don't drive you crazy first. Dockattner, if you devise a method to make scarf joints easily, like maybe a cookie cutter razor tool that cuts the shape of the joint precisely and consistently, I'll be your #1 fan. Using a razor knife by itself for me is error prone.
Already invented. Or at least something similar. See the following (go to post 65 and open the images if they don't open by themselves): https://forum.us.model-space.com/default.aspx?g=posts&t=27668&p=4. He didn't use this tool to cut real scarf joints - they are simulations. What I can't figure out is how his planks follow the line of the hull and mine don't...

I found a build log on another forum where the builder ran into the same problem I am having but he never solved it before quitting... Ugh! I don't want to turn into that guy!
 
Last edited:
Already invented. Or at least something similar. See the following (go to post 65 and open the images if they don't open by themselves): https://forum.us.model-space.com/default.aspx?g=posts&t=27668&p=4. He didn't use this tool to cut real scarf joints - they are simulations. What I can't figure out is how his planks follow the line of the hull and mine don't...

I found a build log on another forum where the builder ran into the same problem I am having but he never solved it before quitting... Ugh! I don't want to turn into that guy!
Those are faked...angled ones look better that straight. He did regular planks, then drew on the board with a pencil the scarf line and cut with an xacto... you can see the cuts don’t go all the way through the edge of the board. He also used full thickness planks, not a veneer.
No tool used...
 
Those are faked...angled ones look better that straight. He did regular planks, then drew on the board with a pencil the scarf line and cut with an xacto... you can see the cuts don’t go all the way through the edge of the board. He also used full thickness planks, not a veneer.
No tool used...
Perhaps all he needed was thee surface cuts to make the impression there were scarf joints. That's how I made mine. Seemed to work out even on wales.
 
Hi Paul,

Thats the difficulty with veneer strips, they easily bend in one direction only.

What I would do is first lay down the lower wale, this is a thicker plank which can be bend with water and heat in the correct shape. If you have this basis you can start from here working down wards towards the kim. Secondly you can also lay down strips along the keel working upwards meeting the other strips at the kim.

The strips should be to size so cut them at max 6 mtrs in lenght at scale.

For getting these veneer planks in shape I glue them with CA, you can glue them under tension in the correct shape. I have done this on the veneer planks of my RC also and it works fine.
Maartin or s
Hi Paul,

Thats the difficulty with veneer strips, they easily bend in one direction only.

What I would do is first lay down the lower wale, this is a thicker plank which can be bend with water and heat in the correct shape. If you have this basis you can start from here working down wards towards the kim. Secondly you can also lay down strips along the keel working upwards meeting the other strips at the kim.

The strips should be to size so cut them at max 6 mtrs in lenght at scale.

For getting these veneer planks in shape I glue them with CA, you can glue them under tension in the correct shape. I have done this on the veneer planks of my RC also and it works fine.
omeone. . . please explain what a "kim" is that is being referred to????? Rich (P-2)
 
Back
Top