I'd like to know that alsoMaartin or s
omeone. . . please explain what a "kim" is that is being referred to????? Rich (P-2)
-

Win a Free Custom Engraved Brass Coin!!!
As a way to introduce our brass coins to the community, we will raffle off a free coin during the month of August. Follow link ABOVE for instructions for entering.
-

PRE-ORDER SHIPS IN SCALE TODAY!
The beloved Ships in Scale Magazine is back and charting a new course for 2026!
Discover new skills, new techniques, and new inspirations in every issue.
NOTE THAT OUR FIRST ISSUE WILL BE JAN/FEB 2026
You are using an out of date browser. It may not display this or other websites correctly.
You should upgrade or use an alternative browser.
You should upgrade or use an alternative browser.
Vasa - 1:65 DeAgostini [COMPLETED BUILD]
- Thread starter dockattner
- Start date
- Watchers 147
Include me...I'd like to know that also
I can accept that into my harbor but my Admiral would create a storm!!!!! Rich
I still need to know from Maartin what a "kim" is related to model builds. Rich (PT-2)No, no, no Dockattner... you take the kim and you've gotta take this too.
View attachment 194055
Have we polluted this thread enough? Back to ship modelling...
It must be a Dutch thing... except that kim in Dutch means "kim". No surprise there...I still need to know from Maartin what a "kim" is related to model builds. Rich (PT-2)
To better explain the context of my question... from several postings way back (from Maartin) "Secondly you can also lay down strips along the keel working upwards meeting the other strips at the kim." Doesn't sound like a typo for ?????? And the answer is _____________? Rich (PT-2)Maartin or s
omeone. . . please explain what a "kim" is that is being referred to????? Rich (P-2)
Hi gents,
The kim is the rounding edge of the hull.
You have the bottom and the sides of a hull, the kim is the round part joining these surfaces.
In this area you have the biggest change in shape of the planks.
The kim is the rounding edge of the hull.
You have the bottom and the sides of a hull, the kim is the round part joining these surfaces.
In this area you have the biggest change in shape of the planks.
Thanks.. . in small racing sail boats we talked about hard chine ones like a Star, Lightning, etc. . . or rounded chine ones like Thistle, 5-0-5, Flying Dutchman, etc . . . that type of soft chine is your kim in the builds that predominate SoS. Now I have a new word and term to put into the memory bank. Rich (PT-2)Hi gents,
The kim is the rounding edge of the hull.
You have the bottom and the sides of a hull, the kim is the round part joining these surfaces.
In this area you have the biggest change in shape of the planks.
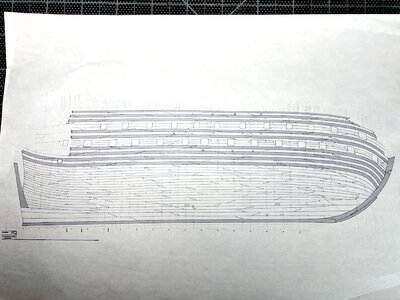
Yup. I have this as well but thank you for sharing. They (the museum people) only created this layout for one side of the ship and to make matters worse - the other side is apparently completely different because the builders simply used the material on hand (on top of that the hull is also asymmetric in shape). Notably, most hull planks were longer than we see later in history - these are 24-28 feet in length (on average) with wide variability (as depicted in the image).Paul,
Just thought that I would add to your frustrations - Found this image in one of my old files.
View attachment 194293
Last edited:
The splice joints are arranged in a mixed pattern, some have top planks pointing forward, others aft. It's hard to make sense of this, since there doesn't appear to be any convention with regard to the splice joint configuration. Is this correct? Even the use of drop planks looks random and messy.Paul,
Just thought that I would add to your frustrations - Found this image in one of my old files.
View attachment 194293
We have to stop thinking that these 17th century ships were build according to our way of thinking in planning, mass machining and drawings etc.
These were more large pieces of handcraft build on experience of the builder with the materials available. This means nothing is standard or mirrored.
We call it messy now because our idea of standardization but it is more efficient building with materials at hand.
These were more large pieces of handcraft build on experience of the builder with the materials available. This means nothing is standard or mirrored.
We call it messy now because our idea of standardization but it is more efficient building with materials at hand.
Last edited:
I understand. They were built as the wood available allowed. Joinery followed some conventions but they were not strictly adhered to.We have to stop thinking that these 17th century ships were build according the our way of thinking in planning, mass machining and drawings etc.
These were more large pieces of handcraft build on experience of the builder with the materials available. This means nothing is standard or mirrored.
We call it messy now because our idea of standardization but it is more efficient building with materials at hand.
While I am no naval archeologist I have read quite a lot about the Wasa and her construction. It appears she was built without written/drawn plans (planks first and then frames added later or along the way). While that sounds shocking to us (no plans) it was not unusual. An experienced builder (Dutch in this case) of that age would routinely build ships without plans. And, yes, the availability of material drove the bus. They would not cut a 24 foot board down to 22 feet to make it follow a pattern or match the other side of the ship. As I mentioned in another post, the hull anatomy/form/shape is slightly different port vs starboard but even the DeAg kit (which is based on the research at the museum and the most accurate among the several kits available) ignores that. According to Fred Hocker at the museum that was a conscious decision by the kit designers (I think it is actually an AL kit).I understand. They were built as the wood available allowed. Joinery followed some conventions but they were not strictly adhered to.
And all of our concern over 2 butt, 3 butt, 4 butt, or 5 butt shifts for deck planking... that wasn't even a thing in the early 17th century - deck planks were plopped down absent of a pattern (please correct me if I have any of this wrong Maarten).
As for me, I am not skilled enough or experienced enough to attempt an historically accurate reproduction. But, I also enjoy learning about the ship and when I can I want to capture the interesting details. For example, in addition to the planking elevation posted here by John, I also have an elevation showing where every iron nail/bolt was placed on the hull. Cool information but I won't be replicating it just as I won't try to replicate the planking details. BUT...I do want to include representative scarf joints - and representative iron nails - and representative tree nails as an artistic expression.
That desire is why I was (am!) flustered by the fact that my veneer planks aren't going to lay down the way I thought they were going to. That's probably not a surprise to all of you who have done this before - but it has caused this rookie to rethink a few things.
Onward!
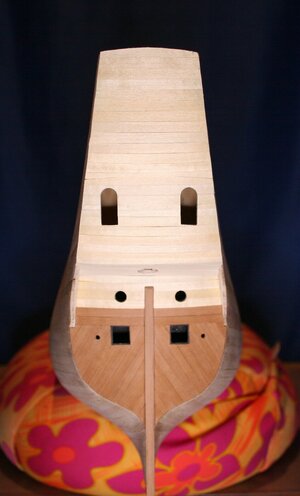
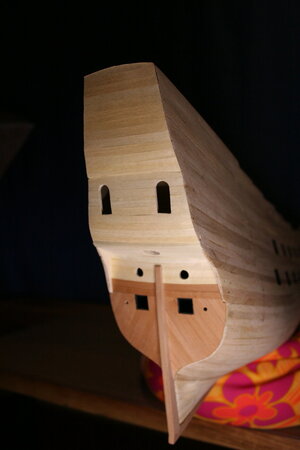
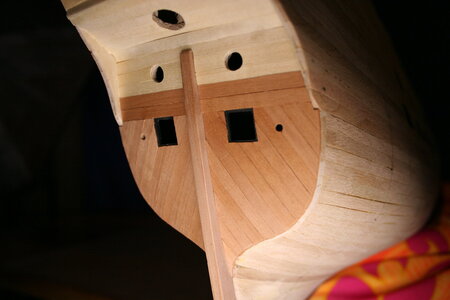
Well, after a month or so painting tiny metal bits I have returned to actual ship construction. I should probably have started planking the deck(s) but after all the noodling I have done wondering how to plank a hull I decided to ease myself into that task.
First up: planking the stern with the veneer layer. In the images below you will see pear on the lower portions and the kit-supplied "white" wood on the upper. Wherever you see the white veneer picture it being painted/stained/inked red...


It felt good to be working with wood again!
First up: planking the stern with the veneer layer. In the images below you will see pear on the lower portions and the kit-supplied "white" wood on the upper. Wherever you see the white veneer picture it being painted/stained/inked red...


It felt good to be working with wood again!
Beautiful job! Love that pearwood.
Looking good, I see you used the angle on the transom, 52 degrees I think? Don’t forget you still have to sand the veneer level. Although it’s thin and fairly uniform in thickness, it is still a good idea.Well, after a month or so painting tiny metal bits I have returned to actual ship construction. I should probably have started planking the deck(s) but after all the noodling I have done wondering how to plank a hull I decided to ease myself into that task.
First up: planking the stern with the veneer layer. In the images below you will see pear on the lower portions and the kit-supplied "white" wood on the upper. Wherever you see the white veneer picture it being painted/stained/inked red...
View attachment 194634
View attachment 194635
View attachment 194636
It felt good to be working with wood again!
I have to agree that for some of us the historical research and understanding brings the build more to life as we proceed. Kit designers and manufacturers have to look to cost and profit to turn out their models so disregarding some historical accuracy is to be expected, like the often mismatch between plans and what is provided in the kit, as I am learning with a much more simple Bluenose by MS. You can receive your own rewards in what you do during the build to make it YOURS! Just a thought. Rich (PT-2)While I am no naval archeologist I have read quite a lot about the Wasa and her construction. It appears she was built without written/drawn plans (planks first and then frames added later or along the way). While that sounds shocking to us (no plans) it was not unusual. An experienced builder (Dutch in this case) of that age would routinely build ships without plans. And, yes, the availability of material drove the bus. They would not cut a 24 foot board down to 22 feet to make it follow a pattern or match the other side of the ship. As I mentioned in another post, the hull anatomy/form/shape is slightly different port vs starboard but even the DeAg kit (which is based on the research at the museum and the most accurate among the several kits available) ignores that. According to Fred Hocker at the museum that was a conscious decision by the kit designers (I think it is actually an AL kit).
And all of our concern over 2 butt, 3 butt, 4 butt, or 5 butt shifts for deck planking... that wasn't even a thing in the early 17th century - deck planks were plopped down absent of a pattern (please correct me if I have any of this wrong Maarten).
As for me, I am not skilled enough or experienced enough to attempt an historically accurate reproduction. But, I also enjoy learning about the ship and when I can I want to capture the interesting details. For example, in addition to the planking elevation posted here by John, I also have an elevation showing where every iron nail/bolt was placed on the hull. Cool information but I won't be replicating it just as I won't try to replicate the planking details. BUT...I do want to include representative scarf joints - and representative iron nails - and representative tree nails as an artistic expression.
That desire is why I was (am!) flustered by the fact that my veneer planks aren't going to lay down the way I thought they were going to. That's probably not a surprise to all of you who have done this before - but it has caused this rookie to rethink a few things.
Onward!


