Vasa - 1:65 DeAgostini [COMPLETED BUILD]

Thanks, everyone, for the likes. Much appreciated.

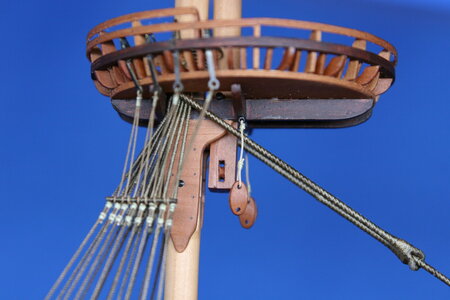
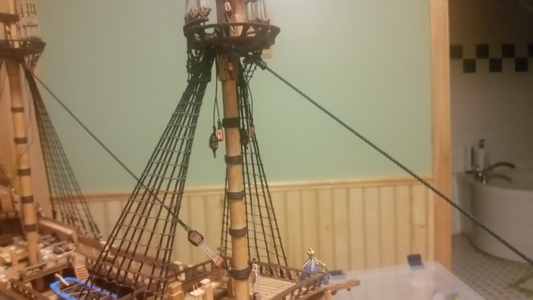
I haven't had much modeling time this week and next week looks worse, but I did manage to add the next mast segments. This required some remedial work as I neglected to design my top masts with a square base with a sheave for raising the mast with the top ropes. I cobbled together a visual solution (faux ends) rather than remake my top masts. Here are the fore and main masts:

IMG_7913.JPG IMG_7917.JPG

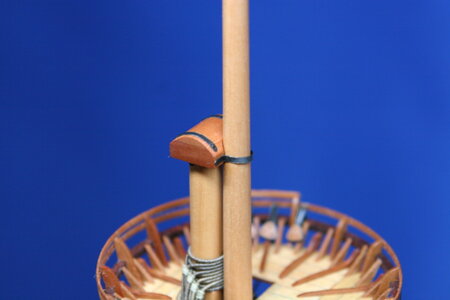
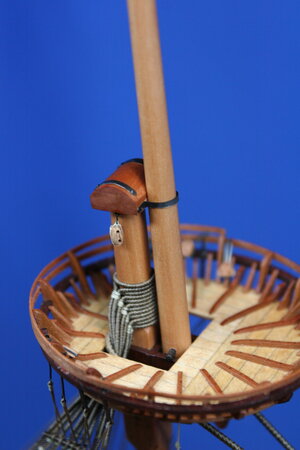
And here are the mast caps on the sprit mast, foremast, and main mast...

IMG_7905.JPG

IMG_7906.JPG
IMG_7910.JPG

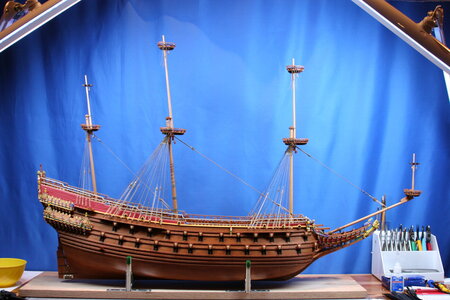
The current state of affairs:

IMG_7919.JPG

Oh, how I agonized over getting everything straight...

Thanks for visiting!
 
Beautiful work Paul. You are extracting a color from that Pear that is absolutely exquisite. And of course, the photographs are superb - that blue background really sets off your build extremely well.
 
By the way. After I had looked at the last picture for quite some time, I can tell you that for me the focal points of the build are the wales which you have done superbly well, the open gunport lids (which are the best and neatest I have seen), and then the way in which those gunports follow the wale-lines. Those lines are so strong that they create a delightfully slimming effect on the whole hull which makes for a very sleek-looking overall appearance.
 
Thanks, everyone, for the likes. Much appreciated.

I haven't had much modeling time this week and next week looks worse, but I did manage to add the next mast segments. This required some remedial work as I neglected to design my top masts with a square base with a sheave for raising the mast with the top ropes. I cobbled together a visual solution (faux ends) rather than remake my top masts. Here are the fore and main masts:

View attachment 293783 View attachment 293784

And here are the mast caps on the sprit mast, foremast, and main mast...

View attachment 293780

View attachment 293781
View attachment 293782

The current state of affairs:

View attachment 293785

Oh, how I agonized over getting everything straight...

Thanks for visiting!
This is precisely what you should do to fill in a missing part or a mistake in construction. We all forget things, and often it's not easy to go back and fix something once we discover it's not right. There usually is a way to cover a problem over if you stop and think about it. Congratulations Paul, on a clever solution to the missing topmast base end. It won't be the last time something like this happens, but often a mistake can be turned into a feature. Adding the sheave for extra detail make it something an observer would think is an enhancement, not a correction. Very clever work!
 
Paul,

I remember agonising over the angles of the masts too. The problem is not the foremast which has only a few degrees of rake, but the mizzen and mainmast are raked at what appears to be a ridiculous angle. From memory (and I will have to check my Log), but I think the angle was 7-8 degrees from vertical. This angle is exaggerated in its appearance by the lines of the deck which curve to be a steeper angle as the mast leaves the deck (as the deck is not horizontal), but from vertical, it is still quite a steep angle.

I like the use of top ropes and the detail of the sheave in the mast. Not many modellers go to this level of detail, but it was the only way ships of this age could raise and lower their mast sections in those days. I believe this is how it was done with the top rope belayed to an eye on the underside of the lower mast cap (at the top of the main or foremast lower section), the line then went down through the upper mast section sheave and then up to a single block on the opposite side of the mast cap, then down to the deck for securing (until the mast section needed lowering). In all cases the top rope had to pass through the tops three times.

I look forward to your installing the top ropes.

Regards,
PeterG
 
Last edited:
Danke an alle für die Likes. Sehr geschätzt.

Ich hatte diese Woche nicht viel Zeit zum Modellieren und nächste Woche sieht es schlimmer aus, aber ich habe es geschafft, die nächsten Mastsegmente hinzuzufügen. Dies erforderte einige Nachbesserungsarbeiten, da ich es versäumt hatte, meine obersten Masten mit einer quadratischen Basis mit einer Rolle zum Anheben des Mastes mit den obersten Seilen zu konstruieren. Ich habe eine visuelle Lösung (Faux Ends) zusammengeschustert, anstatt meine Top-Masten neu zu gestalten. Hier sind die Vor- und Hauptmasten:

View attachment 293783 View attachment 293784

Und hier sind die Mastkappen am Spritmast, Vormast und Hauptmast...

View attachment 293780

View attachment 293781
View attachment 293782

Der aktuelle Stand der Dinge:

View attachment 293785

Oh, wie habe ich mich gequält, alles richtig zu machen ...

Danke für den Besuch!
Wonderful work, I'm impressed.
 
Really beautiful work Paul! I love your solution to raising the top mast with a faux sheeve. Even though I will not incorporate this sheeve, thank you for pointing this extra sheeve out as my plans don't show it and I would have been blissfully unaware of its existence. I agree with Heinrich that your ship's hull is developing what appears to be a patina or darkening which is very rich looking.
 
By the way. After I had looked at the last picture for quite some time, I can tell you that for me the focal points of the build are the wales which you have done superbly well, the open gunport lids (which are the best and neatest I have seen), and then the way in which those gunports follow the wale-lines. Those lines are so strong that they create a delightfully slimming effect on the whole hull which makes for a very sleek-looking overall appearance.
Thank you Heinrich for these keen observations. She does have beautiful lines doesn't she? Of course those are somewhat unique as the ship proved to be unseaworthy with much of the blame to be placed on the shape of her hull.

The lighting for this photo accented the wale lines. I am pleased that the decorations didn't take over this model!

This is precisely what you should do to fill in a missing part or a mistake in construction. We all forget things, and often it's not easy to go back and fix something once we discover it's not right. There usually is a way to cover a problem over if you stop and think about it. Congratulations Paul, on a clever solution to the missing topmast base end. It won't be the last time something like this happens, but often a mistake can be turned into a feature. Adding the sheave for extra detail make it something an observer would think is an enhancement, not a correction. Very clever work!
Much appreciated Kurt. I was not going to mention it but then it occured to me that this might help another modeller. I have learned so much from how others have solved these sorts of problems I thought it best to pay it forward.

Paul,

I remember agonising over the angles of the masts too. The problem is not the foremast which has only a few degrees of rake, but the mizzen and mainmast are raked at what appears to be a ridiculous angle. From memory (and I will have to check my Log), but I think the angle was 7-8 degrees from vertical. This angle is exaggerated in its appearance by the lines of the deck which curve to be a steeper angle as the mast leaves the deck (as the deck is not horizontal), but from vertical, it is still quite a steep angle.

I like the use of top ropes and the detail of the sheave in the mast. Not many modellers go to this level of detail, but it was the only way ships of this age could raise and lower their mast sections in those days. I believe this is how it was done with the top rop belayed to an eye on the underside of the lower mast cap (at the top of the main or foremast lower section), the line then went down through the upper mast section sheave and then up to a single block on the opposite side of the mast cap, then down to the deck for securing (until the mast section needs. In all cases the top rope had to pass through the tops three times.

I look forward to your installing the top ropes.

Regards,
PeterG
Thank you kindly Peter. I wish I had come up with an elegant solution to the 7 degree rake I put in. Mostly I measured and held, measured and held, measured and held. The PVA I like has about a 3 minute tack-up so it was all rather frenetic.

And, yes, I plan to install top-ropes on the topmasts (I'll leave them off the topgallants) even though they would have been taken down. Perhaps someone can solve a puzzle for me: should these run through the deck to get to a capstan on the gundecks? Or were they rigged to an eyebolt on the deck? These masts would have been heavy so I'm picturing the use of triple blocks if they don't run to a capstan???

Wonderful work, I'm impressed.
Thank you so much Tobias. I'm impressed with your work too!

Really beautiful work Paul! I love your solution to raising the top mast with a faux sheeve. Even though I will not incorporate this sheeve, thank you for pointing this extra sheeve out as my plans don't show it and I would have been blissfully unaware of its existence. I agree with Heinrich that your ship's hull is developing what appears to be a patina or darkening which is very rich looking.
Thanks Daniel. I haven't seen this detail on many models from this period so leaving it off is the leading decision of our peers. You are in good company.

And yes, the linseed oil treatment is slowly darkening. It looks less orange now and more amber. In hindsight (while I do like how I have managed to get pretty close to the 1:10 model at the museum in tone) I think a walnut hull like you have might have been a better (more authentic) choice. No chance that will be one of my do-overs however!!!

Stunning just stunning work Paul
Thank you! Your chebec is brilliant!
 
Thanks, everyone, for the likes. Much appreciated.

I haven't had much modeling time this week and next week looks worse, but I did manage to add the next mast segments. This required some remedial work as I neglected to design my top masts with a square base with a sheave for raising the mast with the top ropes. I cobbled together a visual solution (faux ends) rather than remake my top masts. Here are the fore and main masts:

View attachment 293783 View attachment 293784

And here are the mast caps on the sprit mast, foremast, and main mast...

View attachment 293780

View attachment 293781
View attachment 293782

The current state of affairs:

View attachment 293785

Oh, how I agonized over getting everything straight...

Thanks for visiting!
Hello Paul- outstanding work! -that is no compliment just the truth. (Ok maybe bothThumbsup.)

Anyone notice Paul’s tools placed as perfectly as his Vasa is built- even Loctite 403 glue is symmetrical to the tweezers. ;)
Cheers
Grant
 
Thank you Heinrich for these keen observations. She does have beautiful lines doesn't she? Of course those are somewhat unique as the ship proved to be unseaworthy with much of the blame to be placed on the shape of her hull.

The lighting for this photo accented the wale lines. I am pleased that the decorations didn't take over this model!


Much appreciated Kurt. I was not going to mention it but then it occured to me that this might help another modeller. I have learned so much from how others have solved these sorts of problems I thought it best to pay it forward.


Thank you kindly Peter. I wish I had come up with an elegant solution to the 7 degree rake I put in. Mostly I measured and held, measured and held, measured and held. The PVA I like has about a 3 minute tack-up so it was all rather frenetic.

And, yes, I plan to install top-ropes on the topmasts (I'll leave them off the topgallants) even though they would have been taken down. Perhaps someone can solve a puzzle for me: should these run through the deck to get to a capstan on the gundecks? Or were they rigged to an eyebolt on the deck? These masts would have been heavy so I'm picturing the use of triple blocks if they don't run to a capstan???


Thank you so much Tobias. I'm impressed with your work too!


Thanks Daniel. I haven't seen this detail on many models from this period so leaving it off is the leading decision of our peers. You are in good company.

And yes, the linseed oil treatment is slowly darkening. It looks less orange now and more amber. In hindsight (while I do like how I have managed to get pretty close to the 1:10 model at the museum in tone) I think a walnut hull like you have might have been a better (more authentic) choice. No chance that will be one of my do-overs however!!!


Thank you! Your chebec is brilliant!
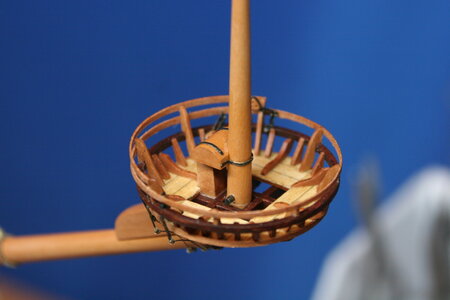
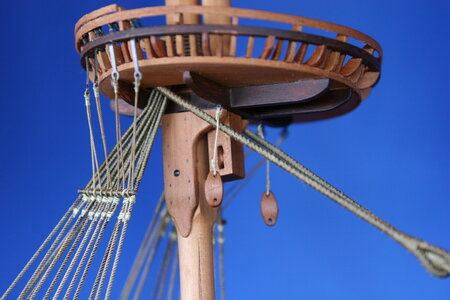
The ties for raising the topmast on La Couronne went down to a tackle which was hooked to an eyebolt on the deck at the base of the mast. You can see the tie line in the sheave of the base of the topmast, and the starboard block for the tie hung from the bottom surface of the top at an eyebolt. The port side block cannot be seen below the top from this angle. You can also see the tie line leading down in front of the foremast to the tackle, which is hooked to the deck eyebolt. Lines on Wasa may be similar. The tie line and tackle would have been dismantled after the upper mast section was finished being raised and secured in place.

1646068756081.png
 
hi Paul, long time no see, but just dropped by and had a look on your log.... allow me please to say you keep going with an enormous superior work.... as long as I have been involved with this great hobby of us, your build if not the best work I ever saw its sure one of the few top ones!


Well done. congrats.
Best wishes
Christos
Hello @Messis Christos. Yes, it's been a while since you posted progress on YOUR magnificent build. I thank you for your overly kind assessment of my work. I'll make no claims for quality - but I am truly enjoying this new diversion. Unfortunately, some other responsibilities and a troubling life issue have made modelling a rare activity at my place. Hoping you are well my friend.
 
Hello @Messis Christos. Yes, it's been a while since you posted progress on YOUR magnificent build. I thank you for your overly kind assessment of my work. I'll make no claims for quality - but I am truly enjoying this new diversion. Unfortunately, some other responsibilities and a troubling life issue have made modelling a rare activity at my place. Hoping you are well my friend.
Best of luck Paul
 
Hello @Messis Christos. Yes, it's been a while since you posted progress on YOUR magnificent build. I thank you for your overly kind assessment of my work. I'll make no claims for quality - but I am truly enjoying this new diversion. Unfortunately, some other responsibilities and a troubling life issue have made modelling a rare activity at my place. Hoping you are well my friend.
Hi Paul, just catching up on your beautiful build. I hope you are doing ok and things are working out.
 
Back
Top