Great, Look forward to your build!Thanks for the info, Dean. That does look like an interesting build, I will keep it in a "list of interest." I have already committed to the YQ Bluenose and am waiting on shipment to arrive.
-

Win a Free Custom Engraved Brass Coin!!!
As a way to introduce our brass coins to the community, we will raffle off a free coin during the month of August. Follow link ABOVE for instructions for entering.
-

PRE-ORDER SHIPS IN SCALE TODAY!
The beloved Ships in Scale Magazine is back and charting a new course for 2026!
Discover new skills, new techniques, and new inspirations in every issue.
NOTE THAT OUR FIRST ISSUE WILL BE JAN/FEB 2026
You are using an out of date browser. It may not display this or other websites correctly.
You should upgrade or use an alternative browser.
You should upgrade or use an alternative browser.
VASA 490 Build Log - Billing Boats, 1:75 [COMPLETED BUILD]
Magnificent build, Daniel! Congrats on the completion of this epic project!
Thank you, Marc!Magnificent build, Daniel! Congrats on the completion of this epic project!
Good morning Daniel. That is awesome news. Brilliant kit, I am following a couple of guys building this kit and it just superb. Looking forward to you starting this venture. Cheers GrantThanks for the info, Dean. That does look like an interesting build, I will keep it in a "list of interest." I have already committed to the YQ Bluenose and am waiting on shipment to arrive.
Thanks Grant, I'll reserve you a seat when I get close to starting.Good morning Daniel. That is awesome news. Brilliant kit, I am following a couple of guys building this kit and it just superb. Looking forward to you starting this venture. Cheers Grant
Excellent…front row -Thanks DanielThanks Grant, I'll reserve you a seat when I get close to starting.
Thank you, Shota!Congratulations Daniel, Wow what a beautiful model youhavecreated!!
You can be proud on such a masterpiece!
good luck with the new project-YQ Bluenose
regards Shota

Thank you, Mark. That base is a cutting board I found in a Home Goods store.Absolutely brilliant Daniel, masterful work. I especially like the base you've chosen to mount your Vasa. As for the Vasa itself, well, the pictures you posted say it all. Well done indeed
Did your plans indicate where to locate the gun Ports, i.e., how far down from the main deck, how far apart bow to stern, etc.? I am building the Corel version and have run into lots of problems with this step in the process. See my previous post on this. Thanks
Hello, unchains, my kit included a 1:1 set of plans, so I made a baseline on them with dist. 0 being at the keel. Using a square, I plumed down from the center of each opening then measured in mm from the end of the keel to each corresponding plumb line, from the intersection of the two lines along the bottom I measured up to the bottom of each opening thus I had 'mapped' each gun port opening. You will see a set of two numbers at each verticle line I drew, the upper number is the horizontal distance from point "zero"and lower is the verticle dist off of the bottom line.I then transferred this information to my set-up board you see on post # 2 in my build log. Fortunately, I had a set of plans which allowed me to do this, however Billings did not furnish any info on how to do this nor any measurements. Did your plans indicate where to locate the gun Ports, i.e., how far down from the main deck, how far apart bow to stern, etc.? I am building the Corel version and have run into lots of problems with this step in the process. See my previous post on this. Thanks
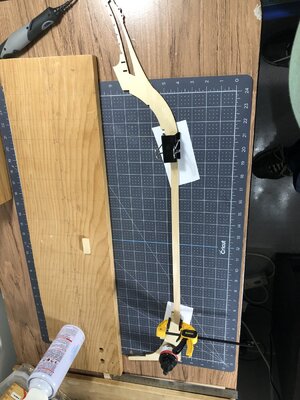
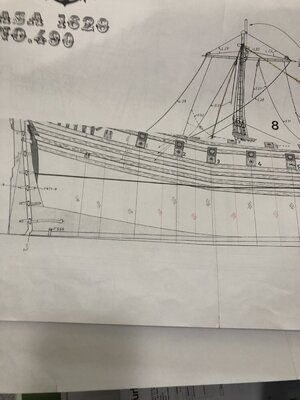
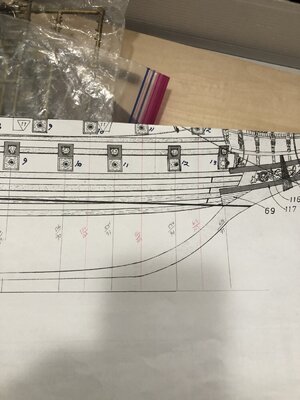
Hope this helps.
- Joined
- Jul 12, 2021
- Messages
- 141
- Points
- 143

A key question here is how accurate do you want to be? The gunports on the port side are not in the same place as the ports on the starboard side, and the spacing between ports on each side is uneven, although they do tend to be the same height above the wale.
Fred
Fred
Hello Dr Hocker. You make a fine point here, one that I believe most passionate modelers face. For me, I just wanted to build a Vasa that had a reasonable resemblance to the original while at the same time afforded me a lot of leeway with artistic license. I knew that the Vasa had workers from different countries and that the ship was not very symmetrical. I had no idea the gun ports were asymmetrical but even if I had known I'm sure I would have followed the plans. Interestingly my biggest concern was to maintain a smooth eye pleasing sweep of the ports as one looks down the side. Thanks for checking in on me.A key question here is how accurate do you want to be? The gunports on the port side are not in the same place as the ports on the starboard side, and the spacing between ports on each side is uneven, although they do tend to be the same height above the wale.
Fred
Thanks. This is helpful.Hello, unchains, my kit included a 1:1 set of plans, so I made a baseline on them with dist. 0 being at the keel. Using a square, I plumed down from the center of each opening then measured in mm from the end of the keel to each corresponding plumb line, from the intersection of the two lines along the bottom I measured up to the bottom of each opening thus I had 'mapped' each gun port opening. You will see a set of two numbers at each verticle line I drew, the upper number is the horizontal distance from point "zero"and lower is the verticle dist off of the bottom line.I then transferred this information to my set-up board you see on post # 2 in my build log. Fortunately, I had a set of plans which allowed me to do this, however Billings did not furnish any info on how to do this nor any measurements. View attachment 370444View attachment 370445View attachment 370446
Hope this helps.
Thank you Ken.Wonderful model Daniel! Congratulations!
S'il en était encore besoin, je tenais à remercier Daniel pour l'excellent travail de présentation de sa construction, qui aujourd'hui encore m'accompagne dans la compréhension du plan Billings. Par ailleurs, je suis complètement d'accord avec lui sur le fait que chacun doit garder une petite part ''artistique'' sur certains détails dans ce qui deviendra ''sa'' version unique de Vasa. Pour exemple, j’ai ajouté des capots sur les trappes d’accès aux ponts inférieurs qui n existaient peut être pas. Pas présent sur les photos du pont supérieur au musée.
If it were still needed, I wanted to thank Daniel for the excellent work of presenting his construction, which today still accompanies me in understanding the Billings plan. Besides, I completely agree with him on the fact that everyone should keep a small ''artistic'' part on certain details in what will become ''his'' unique version of Vasa. For example, I added covers to the access hatches to the lower decks which may not have existed. Not present in the photos of the upper deck at the museum.
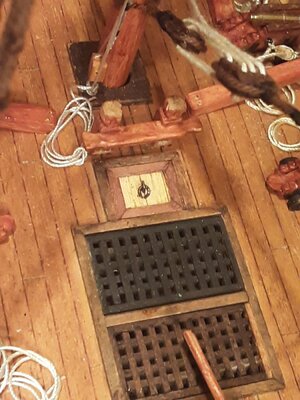
If it were still needed, I wanted to thank Daniel for the excellent work of presenting his construction, which today still accompanies me in understanding the Billings plan. Besides, I completely agree with him on the fact that everyone should keep a small ''artistic'' part on certain details in what will become ''his'' unique version of Vasa. For example, I added covers to the access hatches to the lower decks which may not have existed. Not present in the photos of the upper deck at the museum.

Last edited by a moderator:
Bravo Jef! That is exactly the kind of modifications that make modeling so satisfying.
Translation:S'il en était encore besoin, je tenais à remercier Daniel pour l'excellent travail de présentation de sa construction, qui aujourd'hui encore m'accompagne dans la compréhension du plan Billings. Par ailleurs, je suis complètement d'accord avec lui sur le fait que chacun doit garder une petite part ''artistique'' sur certains détails dans ce qui deviendra ''sa'' version unique de Vasa. Pour exemple, j’ai ajouté des capots sur les trappes d’accès aux ponts inférieurs qui n existaient peut être pas. Pas présent sur les photos du pont supérieur au musée.
View attachment 372087
