Vasa Build Log - Billing Boats - Scale 1/75 [COMPLETED BUILD]

I only recently discovered SOS and so wasn't entering a build log as I went for the last few months of a build of the Swedish Vasa from the Billing Boat kit. My name is Peter, and I live in the snow country of south-east Australia. About 12 months ago, following a cruise in the Baltic Sea my wife and I visited the amazing Vasamuseet in Stockholm, I commenced building the Vasa. This is the second large Billing Boat I have constructed, the first being the Cutty Sark, almost 40 years ago. This model is proudly displayed in a glass case in our home and has been a talking point and feature most of my life. Hopefully, while I now have more time, the Vasa will be the same.

I have read many of the build logs regarding the Vasa and of these, there are builds from kits of Corel, Sergal/Mantua, Billing and more recently the De Agostini release from Italy. Prior the DeAgostini model (by ModelSpace), a number of writers commented that they felt the Billing Boat's Vasa was the most accurate. It was available before the DeAgostini model release, and so my choice was the Billing Boats kit when I made the purchase. Having now progressed through this build, overall I am very happy with the content of materials (although I have substituted some timbers), and scratched a number of items (eg below decks cannon mounts etc). The instructions are limited and short on detail, but the build logs have subsequently helped and filled in some of the 'gaps'.

View attachment 113240

The kit packaging and delivered product was complete with no obvious broken parts or missing items. One thing that I did notice was that hull planking used timber referred to as 'Obechi'. While this was included, I did not like its scaled width or thickness, and so I did some maths to scale the planking of the actual ship pictures I had, and then purchased some 5 x 1 mm mahogany in precut strips. This to me, was a much better planking material, and better for the scaling appearance of the ship. A similar argument held for the deck planking and so I milled some of the mahogany to use for this as well. Different stain/treatments were also used to maintain reasonable appearance and weathering effects.

View attachment 113241

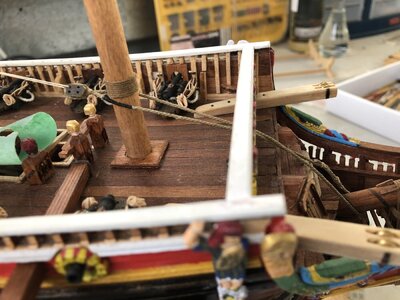
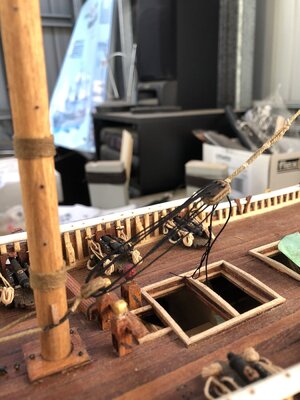
Bulkhead layout was straightforward but the bulkhead extensions above deck (which were instructed to be 'thinned') were weak and fragile. Some of these broke in the process of the build, especially with the deck plywood fitting and so I trimmed these and added extensions later when the planking was built up above the deck level. The decking base needed some trimming but this was minimal and fitted satisfactorily.

View attachment 113242

Before any comments are made about the Smirnoff bottles in the background, these are holding raw alcohol which I intend to use in assisting the bending of planks. This is to be an experiment, but I have read where it is more effective than water and/or steam bending. More on this later!!

Thanks - more soon

Peter G.
Hallo Peter alias @PeterG
we wish you all the best and a HAPPY BIRTHDAY
Birthday-Cake
 
Working on the masts, and adding the tops. The tops I made a while back and so these were ready. Below is the foremast with top mast and topgallant sections being prepared. I have stained the lower section and the upper section will be dismantled and stained before fixing together. Each individual mast section is joined by a brass rod placed in holes drilled in centre of each piece. This is as per the Billing instructions and when done with a tight drill and brass diameter, it forms quite a strong section when all put together and glued. The same approach will be applied to the main and mizzen masts.

View attachment 225735

The bow sprit is different as a knee is affixed to the upper surface with the top passing over it before the bow sprit mast is added. I have glued and nailed the knee in place and it forms quite a rigid, strong support. The knee also supports the top which is then locked in place by the base of the mast section (see following photo).

View attachment 225736

In the following photo I am about to add the block above the top that is located on the knee and fits neatly into the heel of the top sprit mast section.

View attachment 225738

In the case of the upper sections of the main mast and foremast, there are sheaves (made of brass) which had to be housed between two cheeks which give support to the trees under the tops. This is shown below. Onto the trees the tops sit and are glued into place, but before this is done, the angle of the trees relative to the mast has to be accurately determined before fixing permanently. This angle (and I used the angle measured directly from the 1:1 scale drawings) is important as it determines the tops angle for each mast. These angles are not parallel to the deck (as I would have expected), but quite a bit more forward dipping when the mast is in place in the hull and located with its correct offset angle. each mast (fore, main and mizzen is different in angle so some time is required to get it right).

View attachment 225740

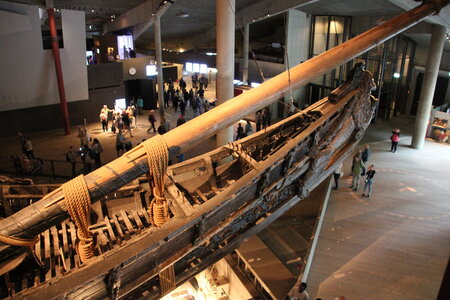
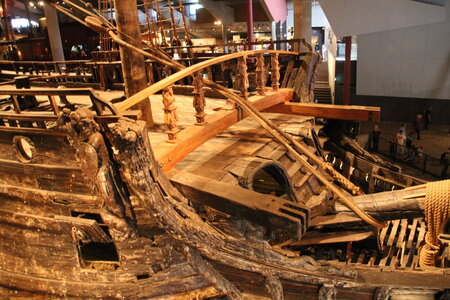
On the actual Vasa (see below), the masts are not made from one piece of timber but rather are a compound of various pieces fitted accurately together and then nailed and with woldings. This can be seen from photos of the actual ship as below of the main mast. Note in this photo the different colours of timber on each side of the trunk of the mast, laminated together. Note too the steel bands near the lower top and the three woldings (rope wrappings) around the mast.

View attachment 225741

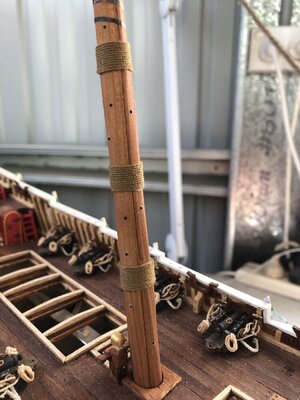
For my mast sections, clearly to do this laminating, it would be possible but a lot of work to get right. So, I took the relevant mast sections and scribed with a sharp blade, a cut which marked the edges of the timber laminations. I then ran masking tape along the cuts and applied some darker stain to the required wood sections. When the masking tape was removed, it leaves a distinct line which for intents and purposes, is an accurate lamination from the closest scrutiny. The steel banding I created from black crepe paper and glued with thinned white glue after cutting into thin strips, and the woldings were a simple matter of winding rope I made around the mast section at the appropriate spacings and heights above deck (after insertion into the hull). The instructions indicated these positions. The photo below shows the appearance of the laminations of the lower main mast section.

View attachment 225743

The next picture shows the steel strapping and the woldings being added. This was relatively simple but needed a steady hand to wind the strappings and rope in place.

View attachment 225744

Once this was all done, the masts just needed to have their block added and the fittings attached.

Time elapsed: 1645 hours

Best regards,

PeterG
Clever solution for the made mast Peter!
 
Many thanks for the birthday wishes!! I had a great day with lunch and dinner for friends and family cooked by the Admiral!

Time to mount the masts!! The biggest problem I had with this was to get the exact angle of rake for the lower sections of masts when installed in the hull. I measured the angles accurately from the Billing instructions and also the plans provided from Vasamuseet , kindly provided by David Teel who some time ago, sent me his copy. The angles of the masts differ slightly (<1 degree) between the two plan sets but are relatively close given the rake for the mainmast is greater than 7 degrees. The angle of the rake for each mast section had to be calculated from a horizontal rather than the deck or keel as this reference I could accurately duplicate on the model using a portable level. There is some likely error if the ship is not sitting correctly in its mounting stand, but this should be minimal based on the plans used.

In a https://warshipvasa.freeforums.net/ post by Fred Hocker of the Vasamuseet, he states for the mast rake angles:

"The foremast rakes aft by a little less than 1 degree. The mainmast rake is between 7 and 7.5 degrees, depending on how you set up the maststep and partners. The mizzenmast is 7.5 degrees. All angles are relative to vertical, rather than then deck."

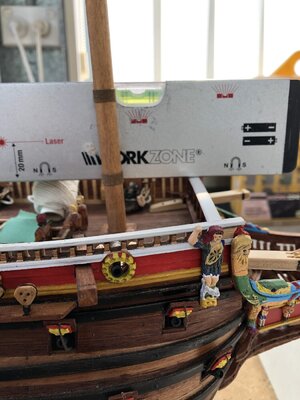
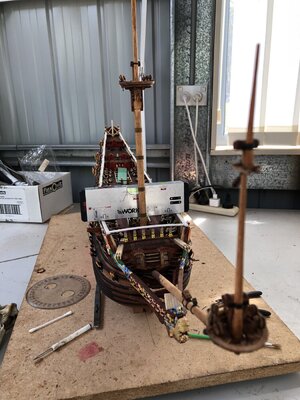
The biggest problem was to mount the mast sections in the ship, glue them in and maintain the rake angle until the glue dries. Note that I am only focussed on the lower mast sections and not the topmasts or topgallants as these are offset from the lower sections, but also will be subject to 'bending' by rigging tension. Obviously, I will attempt to visually keep them straight, but the tension ultimately dictates this. To best estimate the rake angle while mounting, I used a portable level mounted on the deck and across the deck for along and across the hull reference. See pictures below for these two alignments.

IMG_7522.JPG

The picture above allowed me to align the foremast vertically (with the level sitting on the upper deck railings). The main and mizzen lower mast sections could then be similarly positioned and oriented with eye-balling along the line of the ship to each mast to ensure vertical. For the horizontal rake angles, the next picture is used with the level horizontal, and the protractor used to rake the mast to the angle required from the plans (7 degrees).

IMG_7523.JPG

Once the masts were in place, I could then start the tackle and shroud placement and secure the mast sections more securely on both port and starboard side.

I would be very interested to hear how other people mount their masts when a lot of mast rake is required. It is a fiddly job to get right and the reference lines to estimate the angles are not always precise given that the ship position obviously dictates the angle and correctness of the mounting. Note too that the taper of the mast increases the error of measurement (as it is about 1 degree from base to top of lower section), and so the centreline of the trunk of the mast in each case had to be estimated against the protractor.

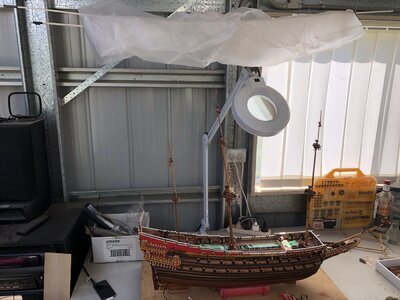
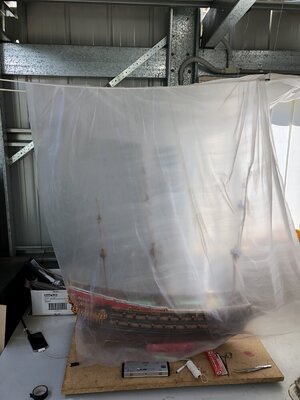
As an interesting aside to the above, with the masts mounted, the ship's height now extends to be very high off the working surface. In all cases up until now, when I shut down at night, I cover the ship with a very thin paint 'dropsheet' made of a light but flexible plastic (bought from the paint section of the local hardware store). My situation is that the build site is in a shed next to the garage of my rural property. This means that it is not absolutely sealed from dust and so it is important I do this covering. This dropsheet covering was now not possible to be suspended from the mast tops (as it would catch on everything and be dangerous to remove when working on the ship. So, what was the solution?

Well, what I did was to suspend two horizontal pieces of plastic (secured to the roof of my shed) which extended past the ends of the model. I could then place the dropsheet material over these supports and the sides hung down on either side of the ship. I simply clip the ends together to 'seal' the model of and magically, it is dust free!! Below is a picture of the dropsheet covering arrangement with the ships masts in place.

IMG_7531.JPG


IMG_7530.JPG

This arrangement so far has worked really well.

Elapsed time: 1710 hours

Best Regards,

Peter G.
 

Attachments

  • IMG_7522.JPG
    IMG_7522.JPG
    267.4 KB · Views: 25
Last edited:
While discussing how the masts were mounted, I have omitted to describe the bowsprit mounting. The bowsprit required a bit of work to:

- Taper correctly
- Scribe and stain the lamination that is seen on the real ship
- The steel banding that is also on the Vasa (see picture below)

IMG_6663.JPG

Also in the real Vasa, note the detail of the gammoning ropes. These ropes have eight turns around the bowsprit and down through the slits of the knee of the head below. The taughtening of the gammoning is provided by the wrapping of the rope end around the two vertical rope bundles and made tight. Interestingly, my 'The Rigging of Ships in the Days of the Spritsail Topmast' by R.C. Anderson says that the wrapping turns need to match the number of turns around the bowsprit itself (so eight turns). In practice, I found this too many, which probably tells me that my rope being used is out of scale (too thick). I may yet adjust this while it is accessible. The other thing that the book describes is the way that the gammoning is wound. The direction of wrapping is from port to starboard, starting with the turns at the aft and wrapping forward.

On my model, you can see the start of the wrapping.

IMG_7524.JPG

The completed gammoning looks good for effect. One other thing I found while attaching the gammoning is that, there is no upward pressure on the bowsprit at this stage. Later, the foremast stays etc will apply this upward tension, but at this stage, these ropes are not in place and so the gammoning tends to pull the spar too far toward the beakhead. To combat this, I shaped a piece of balse as a wedge and slotted it in between the beakhead (above the lion sculpture) and this acted to prevent the bowsprit from being pulled too far together and a suitable gap was then left, even with the gammon rope tension. I then removed the balsa wedge when the topmast stays were added.

IMG_7528.JPG

Elapsed time: 1715 hours

Best Regards,

Peter G.
 
I noticed that on the museum Vasa, a number of metal nails were driven into the mast to hold the laminations in place (I assume). I added a series of nails into my masts to simulate these. I have used copper, homemade nails using the knife-cut and drawn method while using Brass Black to colour the copper. I have drilled holes at the various places I have placed the nails so only the heads show.

IMG_7536.JPG

With the masts placed, I wanted to then add the three mast stays before adding tackles and shrouds. The stays and the way in which they were belayed has, over time caused much controversy, largely because the ropes and rigging has not been well preserved. Each stay for each mast is secured differently because of its position on the ship. The most complicated was the main mast as on the real Vasa, the stay is attached to a block with six holes for its lanyard and then four to a second block that is secured to a 'strop' which extends around the foot of the foremast and then through the front railing and down and around the foot of the bowsprit. This strop is shown from the museum photos as below:

IMG_6662.JPG

Note in the above photo, there is a twist in the strop with the strop supported by a small block of wood as it goes through the front railing. Note also that there is a leather or seizing covering as it passes around the foremast to prevent chaffing. Only the 4 hole, lower stay block can be seen in this photo with the 6 hole block off to the left of photo.

IMG_7535.JPG

In my build, I have seized the mainmast stay strop around the foremast and will add some wedges to ensure it doesn't ride up. I also fashioned a small wedge of mahogany to sit on the forward raining to hold the crossed strop in place as it passes through it. I realise that the photo I have taken is at a different angle to that of the original ship, so I may have to revise this.

The next question is how the 6 hole and 4 hole deadeye blocks were connected with their lanyard. Again, there has been a lot of discussion on this on the internet. The answer to how this was rigged has been provided by Fred Hocker and is on the //warshipvasa forum website. He says:

"The lower deadeye in the pair has four holes, the upper six. Both deadeyes survive for the forestay, but only the six-hole deadeye for the mainstay. The lanyard is rigged with one end tied off to the lower deadeye collar, then led to the upper deadeye, then the lower, and so one. The last turn goes through the sixth hole in the upper deadeye, and the end is made fast back on the collar of the lower deadeye. This was a common setup.

Fred Hocker"


Now while this appears OK, the lanyard roping still is confusing and so Fred amends his comments by detailing a clarification on how the stay deadeyes are rigged. 'The right way is to use two lanyards that are mirror images of one another. Both start at a becket above the lower deadeye, loop through three upper and two lower holes, then have their ends seized to the collar below the lower deadeye. It's odd looking but works'. Reworking the existing stays would mean replacing and re-rigging all three lower deadeyes and their collars. So be it - I would rather be correct with only a minor amount of work in redoing the stays (for main and foremast at least) while the shrouds and access are available.

IMG_7539.JPG

Elapsed Time: 1760 hours

Regards,

Peter G.
 
Last edited:
Hi Peter, you really have your build going well. I love your attention to detail, especially like your cannon painting and rigging. Some of the best I've seen!
 
Thank you Daniel. I like to get things 'right' so the research is warranted. For the Vasa of course there is so much published material that as you read, you come to an item that you say 'I must remember to do that when I build this or that...'. Then, when you later try and recall where the reference is in the literature, you have so much to choose from that you can spend a lot of time reviewing what you have already researched. As a potential solution to this, as I read the literature, I have now started to develop my own Word document of 'Things I must remember'. So for example, I recently came across a post about scale rope thicknesses. I want to adhere to this on my Vasa, and so I have transferred this article, included a source reference and created an Index to let me search for 'items I have saved'. It is already showing dividends, especially with rigging since a lot of the rigging and rope material (relevant to the Vasa), was not restored/recovered and so professional opinions such as from Fred Hocker, or even from R.C Anderson, become important.

The topic of scaled rope for a ship such as the Billing Boats Vasa (which is 1/72 scale), is an interesting topic. I am preparing to rig tackles/shrouds/stays etc (ie, all the standing rigging).

Fore example, the shrouds are an issue because each mast had different sized shroud ropes (according to Fred Hocker). I am manufacturing my own scale rope using a home built ropewalk. Also, the kit-provided rope material by BB is not, in my opinion of satisfactory quality - it looks like string, is too white (but of course, can be dyed), and too furry (even with bee's waxing). Deciphering the size and diameters of rigging ropes is difficult and the BB instructions make no mention of which 'rope' to use.

For reference, I have used "The Rigging of Ships in the Days of the Spritsail Topmast" by R.C.Anderson. This is an invaluable book for modelling of ships of the 1600-1720 era. The reprint of this book is almost 90 years old, but contains a large amount of useful, information about rigging a ship like the Vasa.

The second reference I have used is an excellent Masters thesis entitled "La Belle: Rigging in the Days of the Spritsail Topmast" by C.L.I. Corder. This thesis has useful detail from 1667 showing relative rigging sizes which can easily be scaled to suit my purpose.

A third reference I occasionally refer to is "The Royal Warship Vasa" by Björn Landström. This book, although without a specifically detailed account of the rigging, does show some good insight into the masts/trees/trestles etc with excellent illustrations.

After a lot of reading and experimenting with different thread sizes I came up with reasonable approximations based on the sizes documented. The documents I mentioned above describe from the mid-late 1600's, rope diameters relative to mast diameter for a whole variety of rigging including standing rigging. For the mizzen shrouds about 0.45mm rope, for the main mast, about 0.9mm, and for the foremast about 0.65mm. The lanyards are 0.30mm and the seizings under 0.2mm. Those diameters aren't exactly correct, but they are close enough. A word of caution too, be wary of discussions in the literature which refer to rope circumference versus rope diameter. Obviously the two are NOT the same and it is easy to use one where the other is intended. Conversion of course is simple but which is being used is important.

Note too, that the diameter measurement of scaled ropes is in itself, an issue. How do you measure the diameter of a length of rope? Well, to do it on a single length, with say a micrometer or a ruler is simply impractical and imprecise. So the recommended method is to take a piece of dowel or pencil and wrap 10/20/30 turns (the number is immaterial, but the number must be known). When laying reasonably tightly beside each other, measure the length spanned by the turns, divide by the number of turns, and then you can work out the scaled diameter. For example, if I have rope which I have made that is wrapped with 20 turns on a piece of dowel, and the length across the wrapping is 15mm, then divide 15 by 20 and you get 0.75mm. This is the approximate scaled size of the rope which is equivalent to 54mm (that is 0.75mm x 72, as the scale of the ship is 1/72) or roughly, 2 inches on the real ship.

Interestingly, I would also refer readers to the article here on SOS which discusses the merits of cotton versus poly ropes (https://shipsofscale.com/sosforums/threads/cotton-vs-poly-ropes.7319/#post-166650).

Hope this helps.

Regards,

PeterG
 
Last edited:
Thank you Daniel. I like to get things 'right' so the research is warranted. For the Vasa of course there is so much published material that as you read, you come to an item that you say 'I must remember to do that when I build this or that...'. Then, when you later try and recall where the reference is in the literature, you have so much to choose from that you can spend a lot of time reviewing what you have already researched. As a potential solution to this, as I read the literature, I have now started to develop my own Word document of 'Things I must remember'. So for example, I recently came across a post about scale rope thicknesses. I want to adhere to this on my Vasa, and so I have transferred this article, included a source reference and created an Index to let me search for 'items I have saved'. It is already showing dividends, especially with rigging since a lot of it (relevant to the Vasa), is not restored/recovered and so professional opinions such as from Fred Hocker, or even from A.C Anderson, become important.

The topic of scaled rope for a ship such as the Billing Boats Vasa (which is 1/72 scale), is an interesting topic. I am preparing to rig tackles/shrouds/stays etc (ie, all the standing rigging).

Fore example, the shrouds are an issue because each mast had different sized shroud ropes (according to Fred Hocker). I am manufacturing my own scale rope using a home built ropewalk. Also, the kit-provided rope material by BB is not, in my opinion of satisfactory quality - it looks like string, is too white (but of course, can be dyed), and too furry (even with bee's waxing). Deciphering the size and diameters of rigging ropes is difficult and the BB instructions make no mention of which 'rope' to use.

For reference, I have used "The Rigging of Ships in the Days of the Spritsail Topmast" by R.C.Anderson. This is an invaluable book for modelling of ships o=f the 1600-1720 era. The reprint of this book is almost 90 years old, but contains a large amount of useful, information about rigging something like the Vasa.

The second reference I have used is an excellent Masters thesis entitled "La Belle: Rigging in the Days of the Spritsail Topmast" by C.L.I. Corder. This thesis has useful detail from 1667 showing relative rigging sizes which can easily be scaled to suit my purpose.

A third reference I occasionally refer to is "The Royal Warship Vasa" by Björn Landström. This book, although without a specifically detailed account of the rigging, does show some good insight into the masts/trees/trestles etc with excellent illustrations.

After a lot of reading and experimenting with different thread sizes I came up with reasonable approximations based on the sizes documented. The documents I mentioned above describe from the mid-late 1600's, rope diameters relative to mast diameter for a whole variety of rigging including standing rigging. For the mizzen shrouds about 0.45mm rope, for the main mast, about 0.9mm, and for the foremast about 0.65mm. The lanyards are 0.30mm and the seizings under 0.2mm. Those diameters aren't exactly correct, but they are close enough. A word of caution too, be wary of discussions in the literature which refer to rope circumference versus rope diameter. Obviously the two are NOT the same and it is easy to use one where the other is intended. Conversion of course is simple but which is being used is important.

Note too, that the diameter measurement of scaled ropes is in itself, an issue. How do you measure the diameter of a length of rope? Well, to do it on a single length, with say a micrometer or a ruler is simply impractical and imprecise. So the recommended method is to take a piece of dowel or pencil and wrap 10/20/30 turns (the number is immaterial, but the number must be known). When laying reasonably tightly beside each other, measure the length spanned by the turns, divide by the number of turns, and then you can work out the scaled diameter. For example, if I have rope which I have made that is wrapped with 20 turns on a piece of dowel, and the length across the wrapping is 15mm, then divide 15 by 20 and you get 0.75mm. This is the approximate scaled size of the rope which is equivalent to 54mm (that is 0.75mm x 72, as the scale of the ship is 1/72) or roughly, 2 inches on the real ship.

Interestingly, I would also refer readers to the article here on SOS which discusses the merits of cotton versus poly ropes (https://shipsofscale.com/sosforums/threads/cotton-vs-poly-ropes.7319/#post-166650).

Hope this helps.

Regards,

PeterG
Wonderful discussion Peter. While I am not that far I have already begun researching some of the rigging challenges because some of that will reflect back on what I am doing with deck details (knightheads and such). I believe @Dave Teel sent you some materials on rigging at some point? Any chance I can talk you into copying that for me? I'd gladly cover your costs. The Vasamuseet is no longer offering plans (though I do have Fred Hocker's .pdf drawings that he posted to the forum).
 
Hi Paul. Thank you for your comments. Yes, I did receive the older plans published by Vasamuseet (but are no longer available) from Dave Teel. I am ever grateful to Dave for his generosity, especially as an ocean spans our physical locations!! We are all hanging out for Fred Hocker's Vasa II which hopefully will contain much more rigging detail. Unfortunately, I suspect I will be well past rigging by the time it is published!! So, mistakes will inevitably be made, but best guesses using the documents we have are the best we can do at the moment.

I can attempt to photograph the plans and get them to you. I have a reasonably good high resolution SLR camera so will attempt to get a converted PDF available for you. Leave it with me for a couple of days. Can you provide an email address or link location? Not sure how you can do that without public viewing.

Regards,

PeterG
 
WOW!! Thank you Peter. Every rope topic you addressed has been on my mind. I shall study your research as well as compare it with what I might consider pleasing to the eye (I.e. not necessarily exact scale but presentable non the less). To me rigging done well (as possibly opposed to right scale) is the icing on the cake so to speak. I am going to experiment with rope serving as this really does make awesome looking rigging.
 
Hi Paul. Thank you for your comments. Yes, I did receive the older plans published by Vasamuseet (but are no longer available) from Dave Teel. I am ever grateful to Dave for his generosity, especially as an ocean spans our physical locations!! We are all hanging out for Fred Hocker's Vasa II which hopefully will contain much more rigging detail. Unfortunately, I suspect I will be well past rigging by the time it is published!! So, mistakes will inevitably be made, but best guesses using the documents we have are the best we can do at the moment.

I can attempt to photograph the plans and get them to you. I have a reasonably good high resolution SLR camera so will attempt to get a converted PDF available for you. Leave it with me for a couple of days. Can you provide an email address or link location? Not sure how you can do that without public viewing.

Regards,

PeterG
Wonderful Peter. I'll message you.
 
Daniel, you will note that the sizing of ropes of course is only one aspect of the rigging which we have been discussing.

The one, to me however, which is 'all over the place', is the selection of rope colour. This is a really major issue as it affects not only the historic validity of the ship, but also the aesthetics and its appearance significantly. I think I am tending to adopt a different rope colour scheme for standing versus running rigging, but is it correct - Probably not? We know from comments from Fred Hocker (refer //warshipwasa/forum...), that there was very little evidence of the ropes being tarred, but this is not definite, and so, should black ropes be chosen? The existing ropes on the museum Vasa are largely brown with ratlines definately not being tarred (so they will probably be brown). I tend to think lighter colours (light browns, greys etc) for the running rigging are a good choice but it really is, I guess, personal choice, but we also have to bear in mind what is visually appealing as well as evident for viewing in the final model.

At this stage (as I am doing the standing rigging) I think my choice will be:

Black/dark brown for shrouds
Brown for tackles, uplifts etc
Lighter colours /light browns for shroud lanyards
Medium brown for stays with light brown for stay lanyards

Other than a myriad of other people's chosen colours, Eg Clayton or the 1/10 Vasa museum model, I am really unsure on this and would welcome opinions from others.

Regards,

PeterG
 
Last edited:
Yes @PeterG color is absolutely relevant to the final appearance and for the shrouds I will be using a brown to dark brown poly line with a light brown rat line. At this point I shall probably stay with brown for the rest of the standing rigging. The running rigging as it were will be in the lighter tans as I believe natural rope would have been back then. My kit comes with what I would describe as various diameters of white kite string. Not even suitable.
 
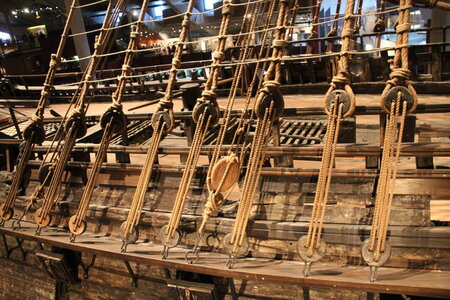
Daniel, we are both using the BB kit and it sounds as though your rope material is similar to mine, hence I went to the effort of building my own ropewalk. It actually wasn't too hard and works quite effectively although mine is vertically mounted and so is limited to rope lengths of only about 1.0-1.2 metres in length at a time. At this stage, in preparation for the rigging, I have been making numerous rope lengths and I am beginning to get an appreciation of just how much rope I am going to need. For each 1.0 metre of rope made, there are THREE metres of initial thread (for three braid rope). There is also the issue of cable laid (left handed twist) or hawser laid (right handed twist). Also, which are correct for the various ropes on the Vasa. As a good example, see the photo below, I took at the museum:

IMG_6665.JPG

These shrouds are on the port side, have hawser laid rope and have the shroud ends towards the bow. This is consistent with R.C. Anderson's book, but I will touch on this again later as there are some inconsistencies here too.

So, a lot to consider to be historically correct.

Regards,

PeterG.
 
Last edited:
Daniel, we are both using the BB kit and it sounds as though your rope material is similar to mine, hence I went to the effort of building my own ropewalk. It actually wasn't too hard and works quite effectively although mine is vertically mounted and so is limited to rope lengths of only about 1.0-1.2 metres in length at a time. At this stage, in preparation for the rigging, I have making numerous rope lengths and I am beginning to get an appreciation of just how much rope I am going to need. Of course, for each 1.0 metre of rope made, there is THREE metres of initial thread (for three braid rope). There is also the issue of cable laid (left handed twist) or hawser laid (right handed twist). Also, which was correct for the various ropes on the Vasa. As a good example, see the photo below, I took at the museum:

View attachment 226979

These shrouds are on the port side, have hawser laid rope and have the shroud ends towards the bow. This is consistent with R.C. Anderson's book, but I will touch on this again later as there are some inconsistencies here too.

So, a lot to consider to be historically correct.

Regards,

PeterG.
Hey Peter I certainly commend you and Paul for your efforts at achieving historical correctness. In fact I'm in awe of it. However I do plan to stray from historical correctness in some areas where I will be more concerned with artistic appeal to my likeing. I really am interested in rope making and looking forward to seeing your rigging. I've already used some of your early stage photos for help and thank you!
 
As I described in an earlier post, I was not happy with the 6-block to 4-block lanyards for the main and foremast stays. I have now rerigged these using two separate but mirror-image lanyards as suggested by Fred Hocker in his //warshipvasa/forum post. Fred has described the lanyards as
'The right way is to use two lanyards that are mirror images of one another. Both start at a becket above the lower deadeye, loop through three upper and two lower holes, then have their ends seized to the collar below the lower deadeye. It's odd looking but works'.

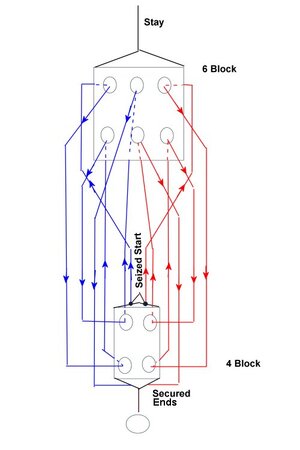
It is interesting to work this out on a diagram, so I drafted up a 'block rigging plan', that I think is close to what Fred is suggesting and using two lanyards, each a mirror image. They start at a becket on the lower block and then use all 6 holes in the upper block and return to four holes in the lower block. The reason this works is because the start and ends are with the lower block. The only question then is whether the second loop on each side goes to the inner, central hole of the upper block or lower central hole. It doesn't matter I don't think, so this is how I have rigged it.

Block 6 to 4.jpg

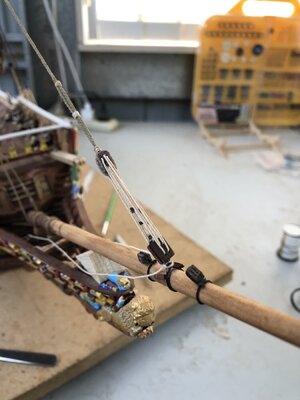
So, below is a picture of the reworked foremast 6 to 4 block/deadeye rigging lanyard. I have also changed my colour to a better, in scale, light brown/creamy brown rope. In the photo you can see the black seizing I have used on the two lanyards, which is tucked away in the central part of the return loops.

IMG_7966.JPG

All I have to do now is repeat this for the mainmast!!

Best regards,

PeterG.
 
Just a comment and question about the anchor point or seized location. It looks like you have tied off to the black rope that holds the 4 sheave block in place. I just wonder would in real life would the tie off be to the block itself or would the forces really be transferred through the rope holding the block? I do realize that in real life the forces at the dead end are reduced at least by a factor of 4 because of the number of pulleys. Very good looking rigging by the way!
 
Back
Top