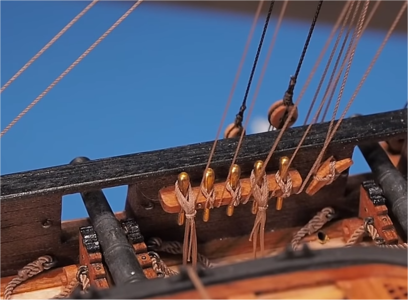
Vasa Build Log - Billing Boats - Scale 1/75 [COMPLETED BUILD]

Now, while I thought I had answered Paul's question, it turns out I hadn't - So, Paul got back to me with the following:

PAUL

Hi Peter,

I feel terrible but if I pointed to the main topsail brace, I didn't mean to. I am trying to figure out the run for the mizzen topmast stay - there is one on each side (bilateral).

Where does the green line terminate as it approaches the deck?

1651277562424.png

Paul

PETER RESPONDS

My apologies Paul - This was not the line I was looking at (however we eventually got there). This line of standing rigging caused me a bit of consternation at the time too!! Below is the museum plan of this line.
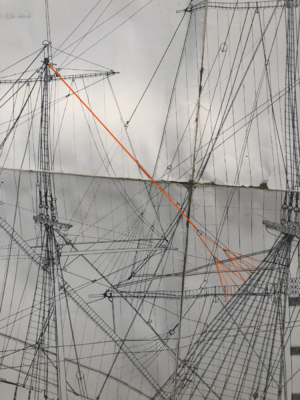
1651277715794.png

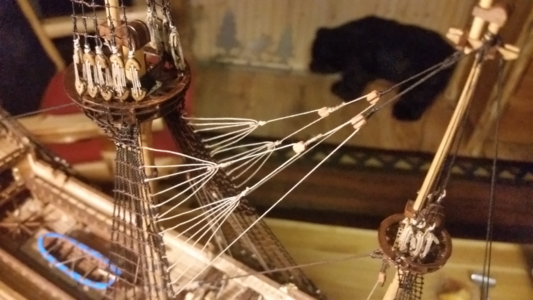
So, from just above the upper top of the mizzen, two stays come forward to two larger single blocks. On both the port and starboard side, the lines running through these blocks, go down to four euphroe blocks (two each side) to the crowsfeet attached to the mainmast aft shroud starting just below the main mast lower futtock stave.

So, that's what the plans say. I had a problem with this as this meant that there was no adjustment for tension to be applied at either end of this rigging. The upper stay pendants at the mast head cannot be tightened, nor can the lower crowsfeet attachment at the shrouds, so I went looking for an alternative. I found it on Page 123 (Fig 135 and Fig 137) of R.C. Anderson. In this description of the Norske Love rig of 1926, he adds a second block below the mizzen stay pendants on both the port and starboard sides. You will also find this arrangement on Clayton's rigging I think.
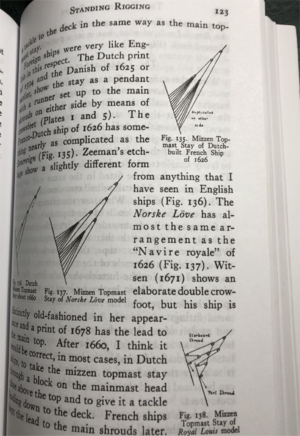
1651277750914.png

Having the second block, meant that a line could then be transferred to deck to tension these stays and the crowsfeet as part of the standing rigging. Personally I think this may have been an error in the museum's Rigging Plans.

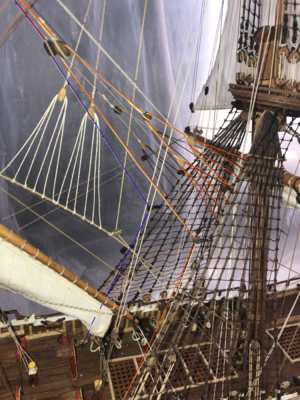
This arrangement (from Anderson) is how I have rigged it on my Vasa (see below):
1651277780331.png

I have shown the starboard lines in red, port in blue. Let us discuss only the port, as you can see the deck belaying point whereas it's hidden on the starboard side, but the starboard side is exactly the same.

From the crows feet blocks, a loop of line goes through a single block which then has a securing line running up through a second single large block supported by the pendant coming down from the mizzen head. The line running through this large block is then led to a single block attached to the aft mainmast shroud just below the lowest crowsfoot line attachment point. From here the line for port, goes to the port side deck belaying point just beside the main deck steps leading down from the gallery deck (note in the photo above, the line goes behind the mizzen sail so I have drawn it with dashed line). This securing point has a block with becket and hook secured to an eyebolt in the deck against the bulwarks. The line after coming out of this block then goes to a cleat mounted on one of the bulwarks. You can see this arrangement in the photo where the line returns from the deck mounted block and up to the cleat with a coil of the excess line tied off around the cleat.


This solution worked well for me and although it was tricky getting the eyebolt and block into the cramped location against the side of the deck, it was out of the way and did the job of allowing tension to be applied to the stays. You of course have to do the same rigging arrangement on both port and starboard sides.


I hope this helps Paul.


Regards,

PeterG.
 
And that, dear friends, is what it looks like to peer into the mind of a genius! My sincerest thanks to Peter for taking the time to not only answer my question but do it with such eagerness and sincerity. Peter's Vasa build is frankly unmatched, and if he didn't live half a world away I would be over at his house daily taking pictures and learning. I just hope he'll keep answering my questions!
 
I could offer a theory as to why the main mast brace lines for topsail and topgallant yards have such a crazy zig-zag between the two masts as they run down to the deck. My guess is that you, as a sailor operating all these lines, would want all the belaying points for lines that operate the sails on the main mast to be in the same area as other lines for the main mast, which would be on railings, knightheads, or kevels NEAR the main mast. Since main yard braces HAVE TO run aft in order to turn the yards, they have to go through blocks on the mizzen. Bu then the line are run forward to other blocks on the main shrouds or other forward location to blocks there before running down to their belaying points. You would not want lines associated with the mizzen and its sails to be belayed alongside lines associated with operating the main mast's sails. The could create confusion for the sailors. You would want lines for each mast belayed close to their respective masts. That was my thinking, anyway. You would need to review several ships belaying plans to see if this theory is true or not.

I also want to compliment Paul on the excellent use of photos and whatever paint program he is using to explain things. It's one of the better ways of discussing rigging issues.

La Couronne's mizzen topmast stays have runners that are tied to the rear most main shrouds on either side, just below their crows feet.
1651279544896.png
 
Last edited:
Thank you Paul - 'Genius' - I don't think so - Just the ability to read and at times remember when something relating to what you have done can be recovered!! Any time I could possibly answer a question to resolve an issue with your build Paul, I would be more than happy to contribute!!

Kurt - Absolutely correct and I note the rig on your La Couronne mirrors what I decided upon almost exactly - Great minds....

While in general you are also correct about having line groupings relate to the mast/rigging controls of similar groups on the decks, this cannot always be the case. The Belaying Plan underlines what you are saying with typically Mainmast sail controls coming to the centre of the ship while Mizzen lines typically are aft. However, such things as the Mizzen Brace belaying lie at the aft area of the Mainmast pin groupings. Because the mizzen spar extends just aft of the mainmast, it would take a complex and low set of rigging to have its control lines moved further aft. In these cases, the crew would just have to know!!

PeterG
The tack brace lines of the lateen sail are an exception because the tack is very close to the main mast, and the tack is so low to the deck that belaying them anywhere but at the rear main mast shrouds simply would not make sense, and would create obstacles for the crew. My theory was "in general", and exceptions and variations in rigging would certainly happen.
 
Good day,
May be Paul meant those fancy mizzen top mast stay, which is devided in two legs?
Than running end of than complex tackles and crowfeet constructions could run trough lead blocks(secured on both sides of the aft main mast shrouds ps and sbs) , and down to the railing and secuered on small cleat below railings...just make it in logical way by your own taste... most of details clearly seen on Peter model and Vasa museum drawing,even those cleats not shown...
Anderson p 122-123, but he didnt give where to belay running end of crowfeet stay tackle...means it is not important :)))!?
 
Thank you Kirill4. I suspect I was typing while you were too and yours uploaded just after mine. You are correct though about the belaying location. Obviously Anderson is not specific about belay points as every ship is different.

It has already been discussed, but there is still a lot of dissension over whether belaying pins were used at all on the Vasa. Belaying pins were not found in the wreckage on the scattered remains apparently. The bulwark railing may well have been the tying point for many lines, but not as convenient as pins.

I, like many before, have opted to use belaying pins but history may prove us wrong!!

Regards,
PeterG
 
Last edited:
Good day Peter,
Agree, You are right!
may be this was one of the reason why P.Kirsch in his "The Galleon..." didn't give belaying plan, but just gave list with names and Ns of the rigging lines... :)))
I would like to mention cleats on the shrouds probably could be used together with bulwark railings and gorizontal piece of wood secured to the upper knees of the channels ( same as could be seen on the Mary Rose, or on some the drawings in M.Baker manuskript )... if consider situation without belaying pins at all...
But yes... pins are much handy!!! :)))
 
Thanks Kirill4 - I will stick with belaying pins. As I am at the point end of finishing up the ship, I will have to add rope hanks to the numerous belaying pins I am using. I have some ideas about how to do this and so write something in the next day or so about it.

As I am starting to work on the numerous jobs of items I have not yet completed (a long list), I turned to the sculpture of the Polish man on both sides of the front decking of the ship. This sculpture I had left till late in the build, as it was accessible (until the anchors are installed), and my sculpting skills are limited.

1652750261838.png

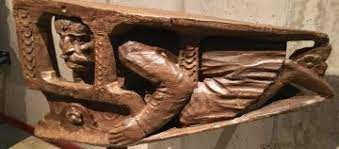
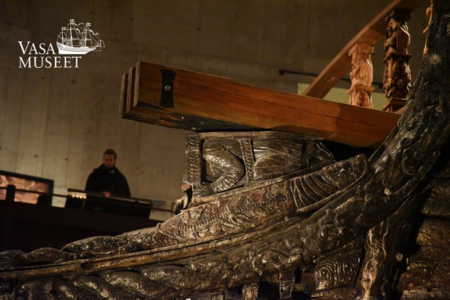
The Polish sculpture is an interesting bit of war propaganda in 17th century. Among the other 700 sculptures and ornaments on the Vasa ship are these two figures representing crouching Polish noblemen, because Poland and Sweden were at war in the 1620’s. The nobleman is encased in a wooden box beneath the anchor heads.

1652750493443.png

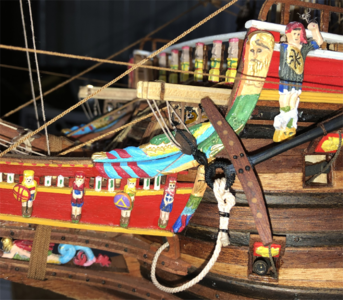
I have managed to mock up a sculpture which needs more paintwork with a finer brush, but the shape and fit is satisfactory. This is a small part of the finish of the forepeak of the ship, but it is an important and historical talking point.

1652750992718.png

Regards,

PeterG
 
What an amazing detail Peter. This is what adds so much to what is already an exquisite build!
 
This close-up is a good reminder of how well you have completed these super-tiny painted decorations. I can give testimony to how hard it is to have done these as well as you have! Respect!

As for the Polish fellow - I read somewhere that he is in the perfect spot for viewing while using the seats of ease...
 
Thank you Paul and Heinrich. My memory of the detail in your sculpture painting leaves mine wanting. I will do some final touch-up as we get to the completion stages of the ship, but thank you for your comments. And yes, Paul, the Polish man's position would afford him an excellent view!!

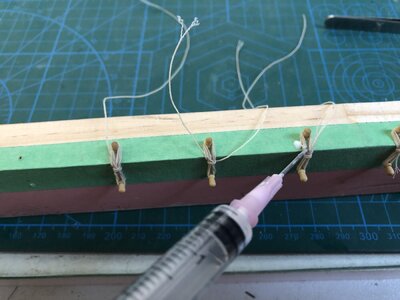
I mentioned earlier that I would detail how I was going to attempt some rope 'hanks' around the various belaying pins on the ship. There has been considerable previous discussion about this topic, but a few photos would summarise the method I have used quickly. I have used almost the exact same method as detailed in the informative Youtube video for the building of the Master Korabel brigantine Phoenix (by Мини Верфь Алексея Викулаева). His series of build videos are an excellent example of tutorial rigging and precision modelling. Many thanks

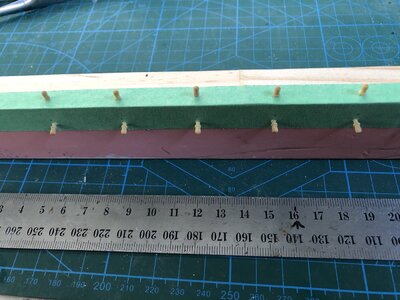
THE JIG
I have made a simple jig out of a piece of 2x1" pine. The important thing is that the edge to use is squared and not bevelled or rounded as some finished DAR timber is. I have attached some masking tape, as it will be in contact with glue, and also the sharp edge of a blade to cut the loose ends of line. I have drilled appropriate holes for about six sets of belaying pins. Note that the upper pins are seated to their base, but the side (lower) pins leave about 2-3mm of their thinner shaft exposed. I have separated my pins by 3cm with the lower pin about 1.5cm below the jig edge. This you may need to adjust for your scale and model.

IMG_9163.JPG

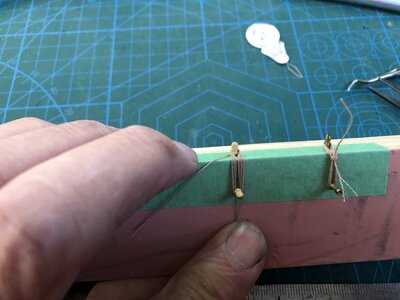
In the next stage, we select about 200mm (20 cm) of the rigging line we require a hank for. With about 50mm loose, wrap the remainder about 5-6 times around two pins as in the photo below. The line is taut but not tight. Line goes around the upper part of the upper pin, around the shank part of the lower pin.

IMG_9164.JPG

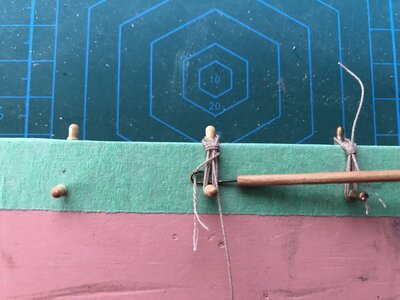
After the wrapping is done, I have made up a thin 0.2mm brass wire hook (which is REALLY useful for rigging), and this slides under the lower part of the
lower wrapping. With the hook, pick up the initial end of the line and pull it under the wrapped line. Repeat this three times and push the three loops around the wrapping tightly, pushed to near the top of the squared jig edge.

IMG_9166.JPG

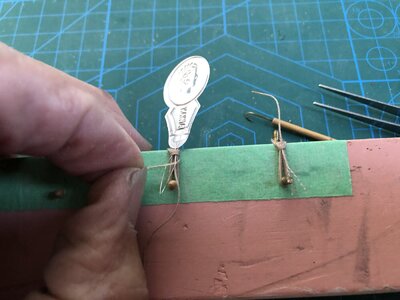
Use a needle threader from the top through the three wound line loops and pick up the lower end of the line used for the looping. Pull this end through and tighten so the hank is now neat and won't come undone.

IMG_9167.JPG

I have used a 50:50 mix of white PVA glue with water to saturate all the rope parts of the hank, especially the loops around the middle.

IMG_9170.JPG

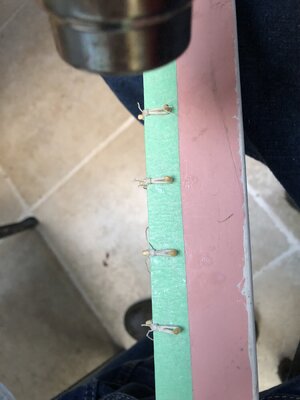
You can now leave the hanks to dry by themselves while you move on to the next hank (or do the gluing at the end after the hanks are all completed). Alternatively you can use a hair dryer or hot blowgun to dry the glue. I found out the hard way with polyester rope that you don't want the heat setting too high or you will melt the rope!!

IMG_9172.JPG

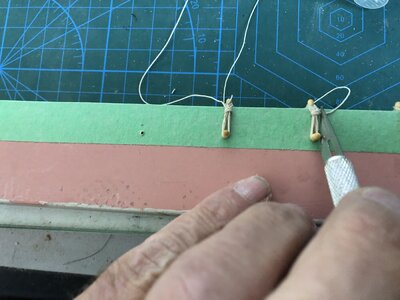
Finally, you can trim the loose end of the hanks (two per wrapping). If you want to have a 'loose' end as there would be on a ship, that's OK, just leave one end visible by cutting slightly longer.

IMG_9174.JPG

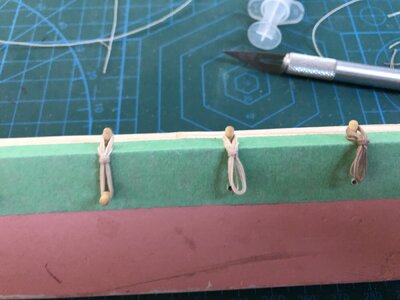
The individual hanks can be removed once they are dry by pulling out the lower belaying pin. The hanks should now hold their shape and provide the top part at 90 degrees to the lower part which means when you put them over the belaying pin, they should hang neatly down without any further shaping. Once they are installed over the belaying pin from the top loops, I add a small drop of CA glue to make sure it stays in position.

IMG_9175.JPG

Using this method of producing multiple hanks, you can create 5-6 hanks in about 15-20 minutes. I tend to look at the ship, figure out 5-6 rope types I need a hank for, and then create these in a production line process. It works well for me.

1652844104950.png

Regards,

PeterG
 
Last edited:
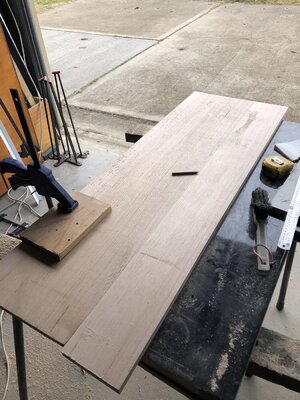
I have been working (to actually make money), lately and so have not been doing much on the ship (or the Build Log). While I was away from home however, I had the opportunity to think about how I am going to display the ship. I have already had a perspex case made (four sides plus a top and open base), which has just enough room all around for the ship. It is 1,140 x 423mm in size so there won't be a lot of surrounding room, but it should be sufficient. I managed to visit a timber yard in my travels and purchased enough 1,200mm lengths of a local hardwood called Tasmanian Oak. This timber is a a hardwood, strong and stable, and easy to work. It is well known for its staining qualities which means you can easily match it with others timbers, finishes and furnishings. It planes, sands, finishes and glues well.

Tasmanian Oak can be one of Eucalyptus Regnans (Mountain Ash), Eucalyptus Delegatensis (Alpine Ash) and Eucalyptus Obliqua (Messmate). This mix of hardwood species ranges from straw blonde to pale and dark pink through to chocolate blonde. The younger growth tends to be lighter in colour, while the older trees can be darker across the spectrum. This is what gives Tasmanian Oak hardwood a much larger variation in colour.


IMG_9202.JPG
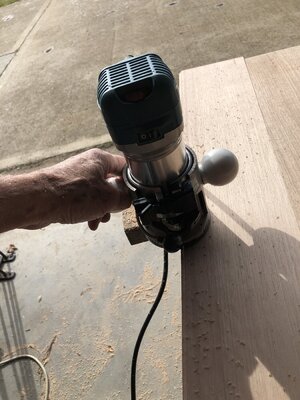
The planks I got were a little variable in colour, but when dowel-joined along it's edges and sanded, the joints are almost invisible to give me the 423mm width I require (despite the colour variation of the photo above). I have then cut to the overall size I require, leaving 10mm on each side for a 5mm rounded bevel and a 7mm straight cut for the perspex to slot into. Below I have used the router to bevel all the topside edges.

IMG_9203.JPG

From the above you can see I have to cut the perspex cover groove, but also on the bottom-side another access slot for the lighting wiring of the ship. With the base shaped and final sanding, I will apply a stain/clear finish. Once this is done, I will have to position the ship (when I have completed the outstanding items) and drill holes for the three brass pedestals that will support the ship in place.

At this stage, outstanding items for the ship include:

- Finish the various rope hanks for the running rigging lines onto the belaying pins - Still a lot to do!!
- Construct and add the stern lantern (a significant project in itself)
- Add rudder safety line/ropes
- Add flagstaffs and then make the flags and add these (a lot of research on the best way to do this...)
- Touch-up some sculptures and add additional final detailing and painting
- Add the roundels on the tops of the galleries. These are painted and ready but need fitting
- Add mast top section round things (at the very top of the masts), like hats (what are they called?)
- Final examination, fiddly bits I have forgotten after checking instructions etc etc.
- Mount ship to base board and ensure perspex cover fits OK plus finish wiring etc.

And here is me thinking I am getting near the end!!! Still a LOT of work to do.

Regards,

PeterG
 
Hi Daniel,

Thanks for letting me know you are using my belaying points PDF. I found it really useful, but it should also be used with the one published by the Museum. I found that when rigging, sometimes I needed to identify the point which went to which sail, but at other times I asked the question, “from this sail, where does the clew line go, or the leech line” etc. Both were useful.

Good luck - Running rigging takes a while!!

Regards

PeterG
 
Many thanks Rick.

While there are some errors in the Billing Boat Vasa plans/instructions, overall I am impressed with their design accuracy and overall kit supply. Some of the timbers could be to better scale, so I have substituted other timber. In particular, the sculptures are particularly detailed and good to work with as considerable bending and shaping is required to make them fit appropriately on the hull curvature etc.

Also, to be fair to the three principal Vasa kit suppliers, their designs were based on historic available ship drawings and plans before she was raised in, I think, April 1961. Subsequent research has contributed a lot of knowledge to the ship, it's design and shape. The recently released kit by D'Agostini is based on this research and is believed to be very accurate as it was developed in conjunction with the Swedish Museum. With the other kits out there, some have had updates as knowledge was increased, but others have not had the update effort put in.

Thanks again for the comments Rick.
I'm not surprised that there are mistakes in the Billings kit, I'm building their Bounty, which is turning out to be quite a long-winded almost scratch build as their plans are drawn on her origine as a collier. This has put me off Billing kits. I have visited Vasa on two occassions, the first really knocked the breath out of me at first sighting!
Good on yuh mate, keep on with the 'kit bashing' to rectify the mistakes!
You would think they could have done better, as it ain't so far to go to Stockholm from Denmark?
Stuart
 
Thank you Ciciak35 for your post and requesting my opinion. While I like the Billing Boats model kits, their instructions leave a lot to be desired for a novice and first-time builder. The Billing kits require a lot of 'scratch-additions' to make them as detailed as I would like at least and in mot cases this is not helped by basic instructions and diagrams that are often for expediency and eas e of building rather than detail accuracy. That said however, I believe the Billing Vasa ship design and shape is probably the most accurate out there.

The DeAgostini kit has excellent instructions and as John (Le Capitaine) has detailed, you can review these before going ahead with a purchase. Note too that you can also download the Billings kit instructions and manual at:

http://www.billingboats.com/da/3/2/boats/the-expert/P-bb490-wasa.html

The Vasa is a complex, large and detailed project to undertake with any kit, despite how good the instructions are. You might be better to approach the hobby with some prior experience and a smaller or less complex model to start, to build knowledge and tools etc. and then undertake the Vasa in the future when confident.

There is generally a compromise between the detail provided in instructions/diagrams and explanation manuals and assembling model ship kits. This is usually drawn on by the cost of putting together the ships kit components, time to write manuals, language/translation etc etc and the cost price of a model. There has to be a profit motive and so often the instructions quality suffers. Its just a fact of life in the hobby I am afraid. Note though that one of the BEST means of assistance to builders are the detailed logs provided here and in other sites.

Regards,

PeterG

PS. Apologies to my post readers for a delay in updating my log. I have been away for two weeks in the South Pacific..... I'll get back to the log as soon as I can, with having to deal with bushfires, drought and feeding our animals!!! I'm afraid the family Captain says these matters take priority.
These pages are no longer available.
 
Back
Top