With the growing equipment burden I wonder what the freeboard will be when you lower it from the bench/launching way into a pond? I am sure that you have that worked out and the displacement will be much less than the load. RichThanks for the comment, thumbs up and medal shota.
I am happy you are enjoying my build....
Cheers,
Stephen.
-

Win a Free Custom Engraved Brass Coin!!!
As a way to introduce our brass coins to the community, we will raffle off a free coin during the month of August. Follow link ABOVE for instructions for entering.
-

PRE-ORDER SHIPS IN SCALE TODAY!
The beloved Ships in Scale Magazine is back and charting a new course for 2026!
Discover new skills, new techniques, and new inspirations in every issue.
NOTE THAT OUR FIRST ISSUE WILL BE JAN/FEB 2026
You are using an out of date browser. It may not display this or other websites correctly.
You should upgrade or use an alternative browser.
You should upgrade or use an alternative browser.
Working Steam powered wooden Drifter trawler, Formidable LT100, 1:24th scale
- Thread starter Stevedownunder
- Start date
- Watchers 33
Hi Ted,Isn't it nice when it finally all comes together and runs!
Had all the same sorts of problems when I built 'Natterer' - you just had to step back, think your way through it, and sort them out, just as you have.
Great work!
Ted
Yes it certainly was nice I was very happy.
And what a truly brilliant build "Natterer" was, it is funny that even doing a hobby like model making can teach us far more than just the hand skills required.
As an aside I was first introduced to SOS by a friend of mine who introduced me to your "Natterer" which blew my mind it was a big part of the reason I joined SOS along with the fact that there are many other highly skilled individuals willing to share there work.
Cheers,
Stephen.
Working on a shoe hornGood job there's plenty of space in that hull! - have you made the shoe-horn yet?
Lovely job
Ted
Cheers,
Stephen.
Hi Rich,No questions. must amazement at the miracles that seem to come from your creative mind. Outstanding! Rich
Steady on mate I will get a big head at this rate, thank you very much for the comment
Cheers,
Stephen.
Hi Rich,With the growing equipment burden I wonder what the freeboard will be when you lower it from the bench/launching way into a pond? I am sure that you have that worked out and the displacement will be much less than the load. Rich
You are quite right weight and in some ways distribution of it is something that did concern me and led me to do a practical experiment.
If you go back to page 4, part 14 of this blog you will see it is all ok and will need some ballast added.
Cheers,
Stephen.
Added ballast??? I found that the original Bluenose had 4,000 lbs of cement and pig iron in the design but I think that was for stability before a full hold of slated cod were on board. Same with the small dories which were unstable until their catch of fish were aboard. I do remember your tank test with the lower stern but knew you would have it all balanced out. RichHi Rich,
You are quite right weight and in some ways distribution of it is something that did concern me and led me to do a practical experiment.
If you go back to page 4, part 14 of this blog you will see it is all ok and will need some ballast added.
Cheers,
Stephen.
Hi Steve,Hi Ted,
Yes it certainly was nice I was very happy.
And what a truly brilliant build "Natterer" was, it is funny that even doing a hobby like model making can teach us far more than just the hand skills required.
As an aside I was first introduced to SOS by a friend of mine who introduced me to your "Natterer" which blew my mind it was a big part of the reason I joined SOS along with the fact that there are many other highly skilled individuals willing to share there work.
Cheers,
Stephen.
Delighted you found 'Natterer' to help inspire you!
I've only been in SOS for a couple of years, long after finishing her, but have found the people on this site to be invariably friendly and supportive.
Long may it remain so!
Ted
Hi Ted,
Yes it is a great site....
Cheers,
Stephen.
Yes it is a great site....
Cheers,
Stephen.
Part 20.
I turned my attention to deck planking and did some experiments with regard to the caulking.
I have not planked a deck before though I have read plenty of great articles on this site and in books.
In Ted Frosts book From Tree to Sea when it comes to deck caulking he says that the caulking was not scraped after being applied, just left in an uneven way to be worn off by the crew as they walked on it, he also says that the deck wasn’t planed only the high spots removed, making a comment that “it is a working boat not a pleasure yacht”.
These experiments were done whilst Melbourne was in one of it’s hard Covid 19 lock downs during 2020, therefore I used what was to hand.
With this information I though that a slightly in-perfect deck would be more realistic. In my first experiments I used black paper of varying weights this worked well though a little to consistent for what I was looking for.
I am not saying that this is an original idea though I don’t recall hearing of it being done like this before so after some thought I tried mixing artists oil paint with Titebond 3 glue, this took far too long to dry.
I then tried artists acrylic Gouache a thick acrylic and Tamiya acrylic mixed with Titebond 3 (separately that is), this worked alright but was too runny.
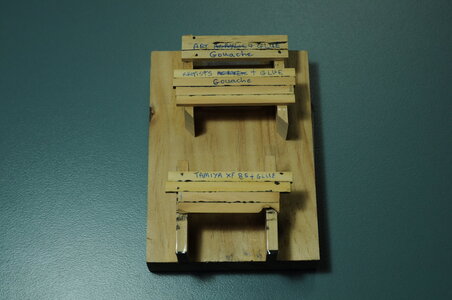
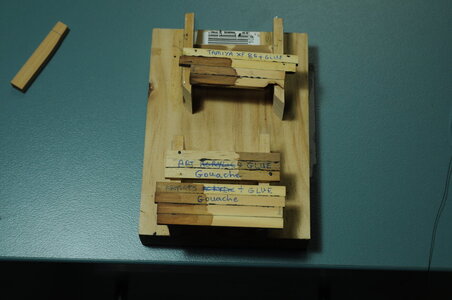
Doing some more experiments, I found that adding a spacer between the planks was even better, an unexpected bonus is that once dry the joint has some flexibility.
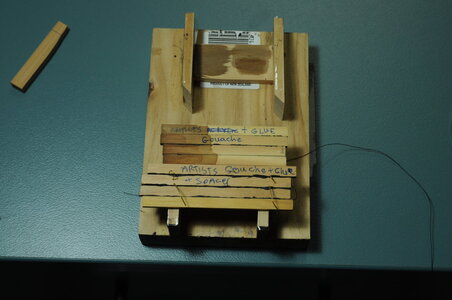
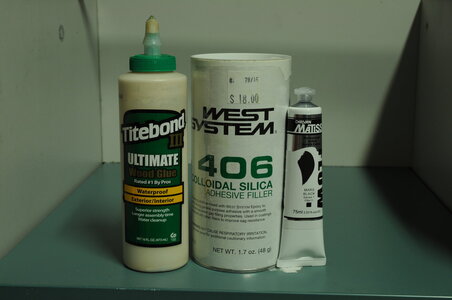
I then tried adding a filler, in this case West Systems 406 because I had some in stock, I also tried Micro Balloons however they didn’t mix in all that well, the West Systems 406 mixed in nicely.
The best thing is that I have a lot of control over how neat or messy the caulking is, my hope is to leave areas where I am guessing that the crew wouldn’t normally walk in a messy condition, that’s the plan time will tell how it works out….
This photo is as done.
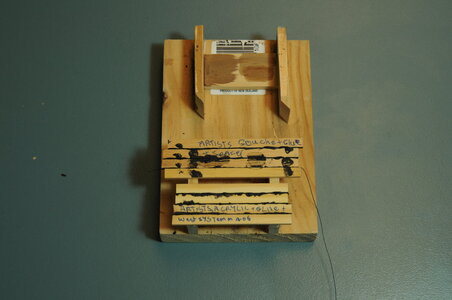
Then with some cleaning up.
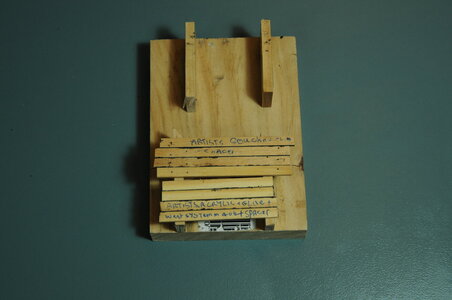
I have also played around with weathering the deck, still more to be done on that. I did find out that you cannot leave steel wool in vinegar for to long as it goes a rusty colour.
Before I can start planking the deck I need to make up the planks, I have a couple of blocks of Huon Pine that are awaiting being turned into sawdust and planks.
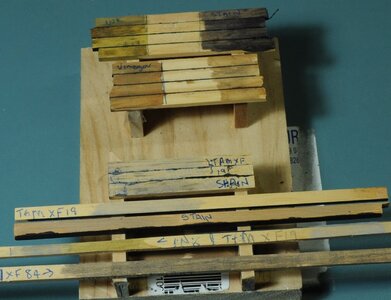
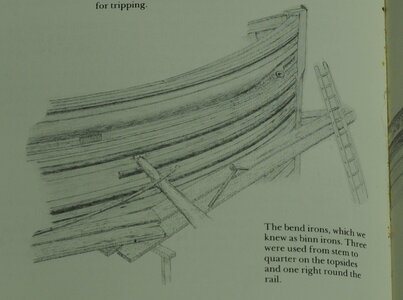
The next thing I looked at were what Ted Frost calls Binn Irons or Bend Irons there are 3 of these on each side of the hull, mounted one on each of the top 3 strakes. Giving some protection to the hull.
I couldn’t find a commercial Brass 1/8” “D” section so I thought I would try making some, this would need to be machined from 1/8” diameter Brass rod. I know from previous experience that machining long thin material in a conventional setup, for example holding in a vice or clamping at either end is not possible made worse by the material I wanted to hold being round and of small diameter.
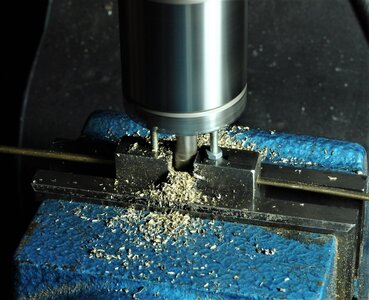
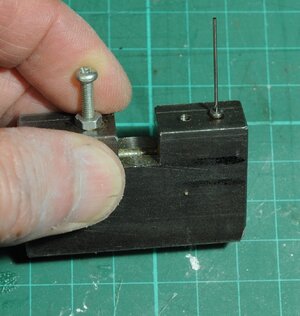
I pondered on this problem for a while and came up with an idea of making a jig to feed the material through with a milling cutter around midway to remove half of the material therefore round bar in one end and “D” section out the other.
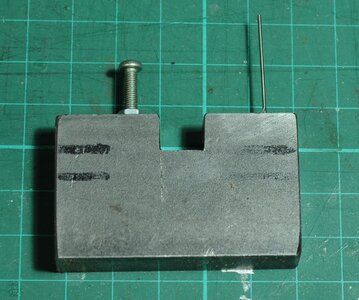
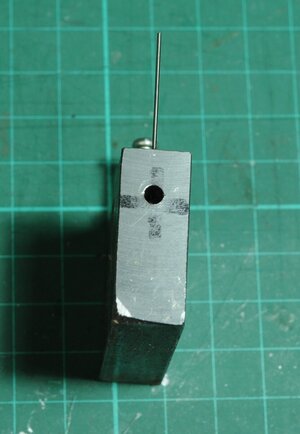
This jig is basically a piece of mild steel with a hole drilled right through, the diameter of the material with a slight amount of clearance to allow the material to slide through easily, then around the middle milling a pocket to the desired depth for the milling cutter to do it’s work, then on the output side I drilled and tapped a hole for a screw adjusted to stabilise the “D” section as it comes through.
I tentatively started machining and was surprised how quickly I was able to manufacture all the “D” section material I required.
SAFETY WARNING: This sort of setup is not without it’s risks there is potential risk of personal injury or damage to the cutter.
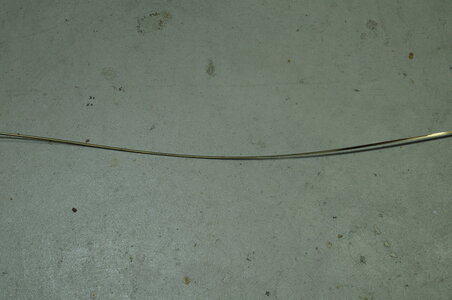
After machining the "D" section had quite a "twist" this was largely removed by straitening it in the vice.
Temporarily clamped onto the top strake.
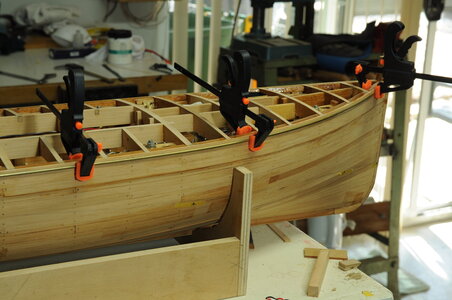
Machining jig now with drill jig for drilling pin holes in the "D" section.
I settled on a mixture of Titebond 3 with Matisse, Mars Black, flow, artists acrylic and West Systems 406 for my calking.
This post brings my build up to date, the glacial speed that I progress at will be more evident from now on.
I am currently working on a router table now that my long awaited Incra jig has arrived this is taking up my hobby time at present.
Thanks for looking in, for all the likes and all those that are following, I do really appreciate the comments and likes and hopefully you will remain following once the pace of posts slows dramatically.
Cheers,
Stephen.
I turned my attention to deck planking and did some experiments with regard to the caulking.
I have not planked a deck before though I have read plenty of great articles on this site and in books.
In Ted Frosts book From Tree to Sea when it comes to deck caulking he says that the caulking was not scraped after being applied, just left in an uneven way to be worn off by the crew as they walked on it, he also says that the deck wasn’t planed only the high spots removed, making a comment that “it is a working boat not a pleasure yacht”.
These experiments were done whilst Melbourne was in one of it’s hard Covid 19 lock downs during 2020, therefore I used what was to hand.
With this information I though that a slightly in-perfect deck would be more realistic. In my first experiments I used black paper of varying weights this worked well though a little to consistent for what I was looking for.
I am not saying that this is an original idea though I don’t recall hearing of it being done like this before so after some thought I tried mixing artists oil paint with Titebond 3 glue, this took far too long to dry.
I then tried artists acrylic Gouache a thick acrylic and Tamiya acrylic mixed with Titebond 3 (separately that is), this worked alright but was too runny.


Doing some more experiments, I found that adding a spacer between the planks was even better, an unexpected bonus is that once dry the joint has some flexibility.

I then tried adding a filler, in this case West Systems 406 because I had some in stock, I also tried Micro Balloons however they didn’t mix in all that well, the West Systems 406 mixed in nicely.
The best thing is that I have a lot of control over how neat or messy the caulking is, my hope is to leave areas where I am guessing that the crew wouldn’t normally walk in a messy condition, that’s the plan time will tell how it works out….
This photo is as done.

Then with some cleaning up.

I have also played around with weathering the deck, still more to be done on that. I did find out that you cannot leave steel wool in vinegar for to long as it goes a rusty colour.
Before I can start planking the deck I need to make up the planks, I have a couple of blocks of Huon Pine that are awaiting being turned into sawdust and planks.

The next thing I looked at were what Ted Frost calls Binn Irons or Bend Irons there are 3 of these on each side of the hull, mounted one on each of the top 3 strakes. Giving some protection to the hull.
I couldn’t find a commercial Brass 1/8” “D” section so I thought I would try making some, this would need to be machined from 1/8” diameter Brass rod. I know from previous experience that machining long thin material in a conventional setup, for example holding in a vice or clamping at either end is not possible made worse by the material I wanted to hold being round and of small diameter.
I pondered on this problem for a while and came up with an idea of making a jig to feed the material through with a milling cutter around midway to remove half of the material therefore round bar in one end and “D” section out the other.
This jig is basically a piece of mild steel with a hole drilled right through, the diameter of the material with a slight amount of clearance to allow the material to slide through easily, then around the middle milling a pocket to the desired depth for the milling cutter to do it’s work, then on the output side I drilled and tapped a hole for a screw adjusted to stabilise the “D” section as it comes through.
I tentatively started machining and was surprised how quickly I was able to manufacture all the “D” section material I required.
SAFETY WARNING: This sort of setup is not without it’s risks there is potential risk of personal injury or damage to the cutter.

After machining the "D" section had quite a "twist" this was largely removed by straitening it in the vice.

Temporarily clamped onto the top strake.


Machining jig now with drill jig for drilling pin holes in the "D" section.


I settled on a mixture of Titebond 3 with Matisse, Mars Black, flow, artists acrylic and West Systems 406 for my calking.

This post brings my build up to date, the glacial speed that I progress at will be more evident from now on.
I am currently working on a router table now that my long awaited Incra jig has arrived this is taking up my hobby time at present.
Thanks for looking in, for all the likes and all those that are following, I do really appreciate the comments and likes and hopefully you will remain following once the pace of posts slows dramatically.
Cheers,
Stephen.
Last edited:
Your machinists brain and skills are highly creative in how to produce the jig and trim piece, drilled to boot!!! RichPart 20.
I turned my attention to deck planking and did some experiments with regard to the caulking.
I have not planked a deck before though I have read plenty of great articles on this site and in books.
In Ted Frosts book From Tree to Sea when it comes to deck caulking he says that the caulking was not scraped after being applied, just left in an uneven way to be worn off by the crew as they walked on it, he also says that the deck wasn’t planed only the high spots removed, making a comment that “it is a working boat not a pleasure yacht”.
These experiments were done whilst Melbourne was in one of it’s hard Covid 19 lock downs during 2020, therefore I used what was to hand.
With this information I though that a slightly in-perfect deck would be more realistic. In my first experiments I used black paper of varying weights this worked well though a little to consistent for what I was looking for.
I am not saying that this is an original idea though I don’t recall hearing of it being done like this before so after some thought I tried mixing artists oil paint with Titebond 3 glue, this took far too long to dry.
I then tried artists acrylic Gouache a thick acrylic and Tamiya acrylic mixed with Titebond 3 (separately that is), this worked alright but was too runny.
View attachment 208617View attachment 208618
Doing some more experiments, I found that adding a spacer between the planks was even better, an unexpected bonus is that once dry the joint has some flexibility.
View attachment 208619
I then tried adding a filler, in this case West Systems 406 because I had some in stock, I also tried Micro Balloons however they didn’t mix in all that well, the West Systems 406 mixed in nicely.
The best thing is that I have a lot of control over how neat or messy the caulking is, my hope is to leave areas where I am guessing that the crew wouldn’t normally walk in a messy condition, that’s the plan time will tell how it works out….
This photo is as done.
View attachment 208620
Then with some cleaning up.
View attachment 208621
I have also played around with weathering the deck, still more to be done on that. I did find out that you cannot leave steel wool in vinegar for to long as it goes a rusty colour.
Before I can start planking the deck I need to make up the planks, I have a couple of blocks of Huon Pine that are awaiting being turned into sawdust and planks.
View attachment 208622
The next thing I looked at were what Ted Frost calls Binn Irons or Bend Irons there are 3 of these on each side of the hull, mounted one on each of the top 3 strakes. Giving some protection to the hull.
I couldn’t find a commercial Brass 1/8” “D” section so I thought I would try making some, this would need to be machined from 1/8” diameter Brass rod. I know from previous experience that machining long thin material in a conventional setup, for example holding in a vice or clamping at either end is not possible made worse by the material I wanted to hold being round and of small diameter.
I pondered on this problem for a while and came up with an idea of making a jig to feed the material through with a milling cutter around midway to remove half of the material therefore round bar in one end and “D” section out the other.
This jig is basically a piece of mild steel with a hole drilled right through, the diameter of the material with a slight amount of clearance to allow the material to slide through easily, then around the middle milling a pocket to the desired depth for the milling cutter to do it’s work, then on the output side I drilled and tapped a hole for a screw adjusted to stabilise the “D” section as it comes through.
I tentatively started machining and was surprised how quickly I was able to manufacture all the “D” section material I required.
SAFETY WARNING: This sort of setup is not without it’s risks there is potential risk of personal injury or damage to the cutter.
View attachment 208624
After machining the "D" section had quite a "twist" this was largely removed by straitening it in the vice.
View attachment 208625
Temporarily clamped onto the top strake.
View attachment 208626View attachment 208632
Machining jig now with drill jig for drilling pin holes in the "D" section.
View attachment 208633View attachment 208634View attachment 208635
I settled on a mixture of Titebond 3 with Matisse, Mars Black, flow, artists acrylic and West Systems 406 for my calking.
View attachment 208636
This post brings my build up to date, the glacial speed that I progress at will be more evident from now on.
I am currently working on a router table now that my long awaited Incra jig has arrived this is taking up my hobby time at present.
Thanks for looking in, for all the likes and all those that are following, I do really appreciate the comments and likes and hopefully you will remain following once the pace of posts slows dramatically.
Cheers,
Stephen.
Wow, can’t wait to see this done.
Your machinists brain and skills are highly creative in how to produce the jig and trim piece, drilled to boot!!! Rich
Thanks Rich,
It's not an entirely original jig it is the sort of design people use to do what I did, although it is the first time I have tried it.
How did you go with your drilling jig?
Cheers,
Stephen.
Hi Chris,Wow, can’t wait to see this done.
Unfortunately that will probably be a while off, although there will be updates to come.
Cheers,
Stephen.
Thanks Ted.
Cheers,
Stephen.
Cheers,
Stephen.
Part 21.
Hello once again, at last some more progress, yes the Glacier has moved.
After making the material in the last part.
I had decided to fit the “Binn irons” before starting work on the bulwarks and deck planking thinking it would be easier to to in this order.
At the time the idea of making Brass “D” section for the “Binn Irons” seemed like a good one, it fitted in with the overall build, though I would have to admit to not really thinking it through, as I found out it takes a long time and a lot of work to do this in metal.
After making the “D” section material I noticed there was quite a twist in it and that it was quite “springy” making it difficult to bend to shape leading me to anneal the brass this improved things a lot.
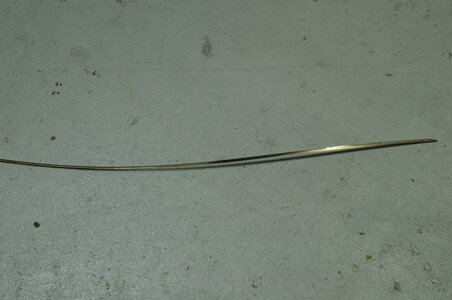
I straightened the “D” section as best as I could. Then using the drilling jig drilled a series of holes for brass pins, getting the right size hole took a bit of fiddling a light press fit was what I was aiming for.
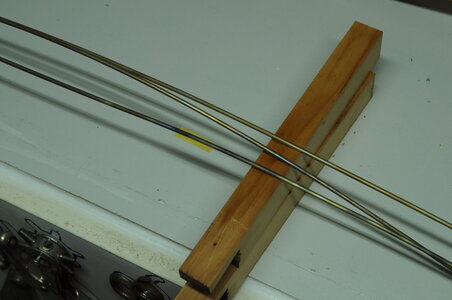
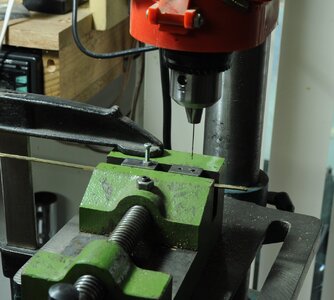
I made lots of pins by hand, sharpening one end with a file, 2 different lengths were made, this was a good after work job not requiring much thought.
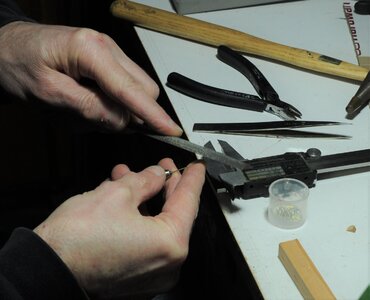
I set the Vernia caliper to the required depth then cut the .8mm brass wire, they were pretty consistent in length.
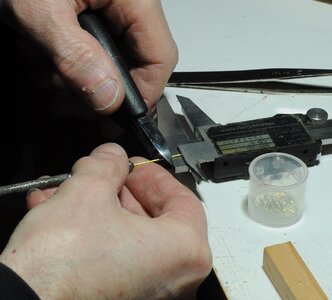
The “Binn irons” were roughly shaped by hand to get them close to the hull shape before starting to fit them, they were cleaned with thinner then etch primed just using a brush instead of spraying.
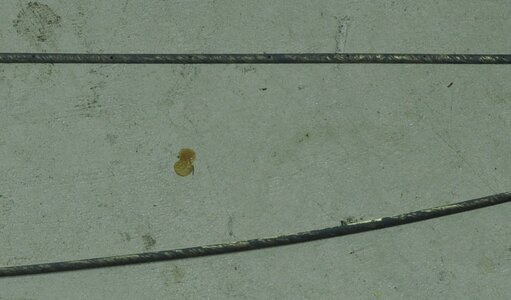
Once that was done I installed the pins so they are flush with the flat side of the “D”.
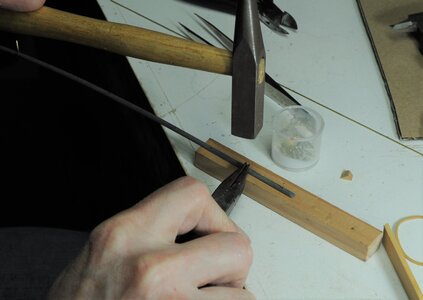
Next came the hard part, final installation with glue and pins what could go wrong!!! The biggest difficulty being getting a “fair” run when looking along the length of the boat this problem I didn’t really solve, there is a slight wobble when sighted along the length of the boat, all a bit late to rectify once pinned and glued in position. I resisted the urge to remove the “Binn iron” and try again fearing that I would do more damage than good, at present I am running with the thought “it adds character” the error only being seen when sighting down the length of the hull.
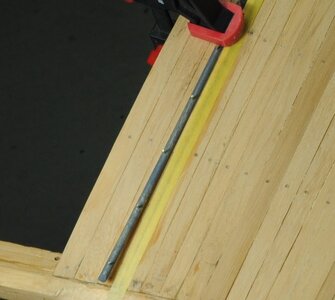
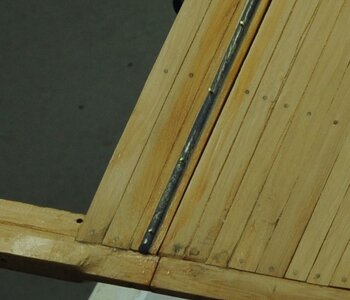
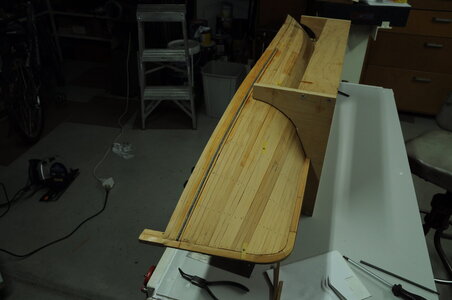
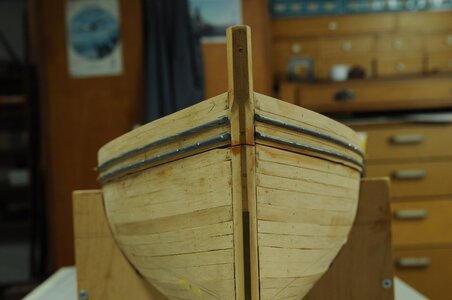
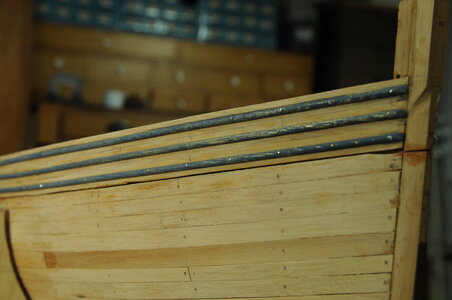
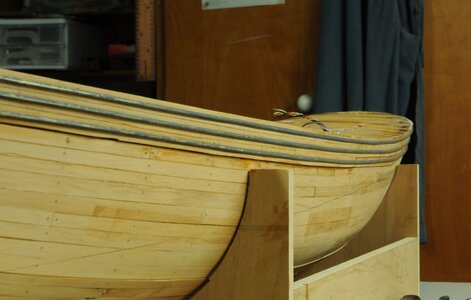
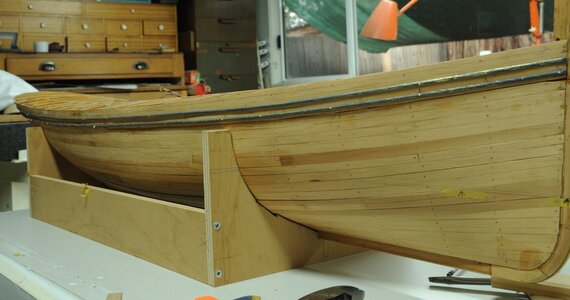
Thank you for looking in and my apologies for such a lengthy gap between posts, although this is more like the pace this build progresses at.
Cheers,
Stephen.
Hello once again, at last some more progress, yes the Glacier has moved.
After making the material in the last part.
I had decided to fit the “Binn irons” before starting work on the bulwarks and deck planking thinking it would be easier to to in this order.
At the time the idea of making Brass “D” section for the “Binn Irons” seemed like a good one, it fitted in with the overall build, though I would have to admit to not really thinking it through, as I found out it takes a long time and a lot of work to do this in metal.
After making the “D” section material I noticed there was quite a twist in it and that it was quite “springy” making it difficult to bend to shape leading me to anneal the brass this improved things a lot.

I straightened the “D” section as best as I could. Then using the drilling jig drilled a series of holes for brass pins, getting the right size hole took a bit of fiddling a light press fit was what I was aiming for.


I made lots of pins by hand, sharpening one end with a file, 2 different lengths were made, this was a good after work job not requiring much thought.

I set the Vernia caliper to the required depth then cut the .8mm brass wire, they were pretty consistent in length.

The “Binn irons” were roughly shaped by hand to get them close to the hull shape before starting to fit them, they were cleaned with thinner then etch primed just using a brush instead of spraying.

Once that was done I installed the pins so they are flush with the flat side of the “D”.

Next came the hard part, final installation with glue and pins what could go wrong!!! The biggest difficulty being getting a “fair” run when looking along the length of the boat this problem I didn’t really solve, there is a slight wobble when sighted along the length of the boat, all a bit late to rectify once pinned and glued in position. I resisted the urge to remove the “Binn iron” and try again fearing that I would do more damage than good, at present I am running with the thought “it adds character” the error only being seen when sighting down the length of the hull.


Thank you for looking in and my apologies for such a lengthy gap between posts, although this is more like the pace this build progresses at.
Cheers,
Stephen.
G'day Steve, I think your LT100 is looking amazing, I have missed your building of her, I'm just at the point of having finished the lower planking and I have decided to fibreglass the lower hull I'm just waiting for a nice day to do it, I look forward to the rest of your build,
. Best regards John,
. Best regards John,
Your fabrication and then installation of the three sets of bin iron on each side have turned out remarkably well. Great planning and execution of the work and well placed. Rich (PT-2)excellent work, well done


