Wright Brothers "Flyer" 1903

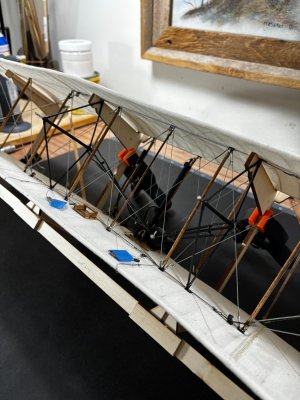
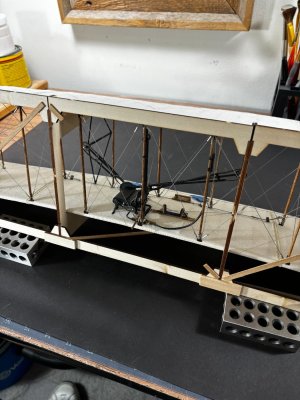
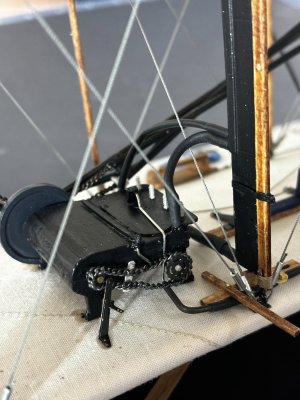
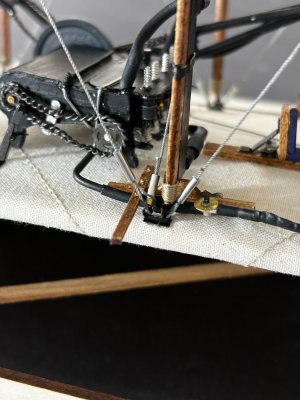
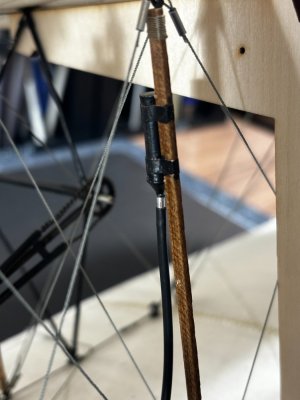
Here is my weekend update. I've been installing cable and am 75% complete with it on the main body area. Ive installed the radiator, fuel tank, and finished plumbing the engine with its radiator hoses. I was in Hobby Lobby the other day and found some 1/16" OD aluminum tubing so started using it to seize the cable connections. The few I had done with brass ill just paint silver. Check it out.

IMG_0431.jpgIMG_0432.jpgIMG_0433.jpgIMG_0434.jpgIMG_0435.jpgIMG_0436.jpgIMG_0437.jpg

I sure thank everybody for looking in, have a great weekend.
 
Great build log Daniel! I’ve got this kit as well and reading yours will definitely be a valuable resource for me. Can you tell me a little more about the Artesania scrappers you used on the leading edge? I’ve just ordered some and am curious how they work. Is it more of a sanding motion you use or more like a planar?
 
Great build log Daniel! I’ve got this kit as well and reading yours will definitely be a valuable resource for me. Can you tell me a little more about the Artesania scrappers you used on the leading edge? I’ve just ordered some and am curious how they work. Is it more of a sanding motion you use or more like a planar?
Hello, Will and welcome aboard. To me the shaping is more like using a planar except you use a pulling motion instead of a pushing motion of a planar. The number of times you pull over the same section depends of coarse on the hardness of the wood. Typically, after 3 to 5 pulls I'll hit it lightly with some 350 or 400 sandpaper then another couple strokes with the scraper and finish with a little lighter sanding. Simple shapes are easier than the more complex ones. You will get the hang of it fairly quick. They are an indispensable tool for the serious modeler.
 
Hello, Will and welcome aboard. To me the shaping is more like using a planar except you use a pulling motion instead of a pushing motion of a planar. The number of times you pull over the same section depends of coarse on the hardness of the wood. Typically, after 3 to 5 pulls I'll hit it lightly with some 350 or 400 sandpaper then another couple strokes with the scraper and finish with a little lighter sanding. Simple shapes are easier than the more complex ones. You will get the hang of it fairly quick. They are an indispensable tool for the serious modeler.
That’s great to hear. I’m already thinking of all the possibilities I can use them for.
 
Here is my weekend update. I've been installing cable and am 75% complete with it on the main body area. Ive installed the radiator, fuel tank, and finished plumbing the engine with its radiator hoses. I was in Hobby Lobby the other day and found some 1/16" OD aluminum tubing so started using it to seize the cable connections. The few I had done with brass ill just paint silver. Check it out.

View attachment 475108View attachment 475109View attachment 475110View attachment 475111View attachment 475112View attachment 475113View attachment 475114

I sure thank everybody for looking in, have a great weekend.
Classic Daniel.......tiny details immaculately pulled off. Cheers Grant
 
It is my pleasure to introduce to you my next build of the First Airplane the "Wright Bros. Flyer".
Orville Wright made the first powered manned flight at Kitty Hawk, North Carolina, USA, on December 17th, 1903, in a biplane called The Wright Flyer. They made 2 flights that day the first covered 120 feet and the second covered 852 feet. Afterwords while Orville and Wilber were celebrating their accomplishment, a gust of wind turned the plane over and it never flew again.

I have always marveled at this machine, except for its wings its quite odd looking in terms of function. It is a push plane with an odd front and rear design but what the heck it was the first of its kind. Here are some introductory photos of the kit. As you will see I need to expand my build hanger a little to accommodate the plans.

View attachment 465719View attachment 465720View attachment 465721View attachment 465722View attachment 465723

This kit comes with a nice 27-page instruction manual. Looking inside the box.

View attachment 465724View attachment 465725View attachment 465726

The wood is all basswood, some of that I will replace with a more substantial wood species. A large portion of the wood is for the wing assembly jig. This kit is designed to be all open framework with no wing covering but my intent is to cover the wings with silkspan for a more realistic look. The last time I used silkspan on a balsawood airplane was back in the 1960's so I see some practice pieces coming my way in the near future. One of the features that attracted me to this kit are the metalized parts including the engine which has several components to be built up and painted. Here is a closer look at those. The photo etched brass sheet on the left is thicker than any I have had before 0.50mm.

View attachment 465729

Well, I hope you all liked the intro here, I'm excited to get started however this probably will not be a fast build as I still have other projects I'm working on so will try and split time accordingly.
Thank you for checking in and as always Happy Modeling.
Hallo @Daniel20
we wish you all the BEST and a HAPPY BIRTHDAY
Birthday-Cake
Enjoy your special day
 
Back
Top