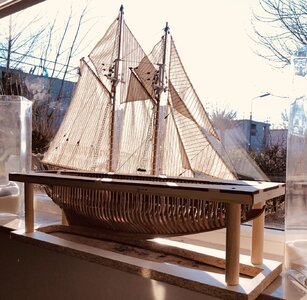
YQ Bluenose by Johan [COMPLETED BUILD]

Well, as I posted earlier, I ran I to some snags where the sharp edges of some of the aft frames broke off. @Henk Liebre offered me a workshop "Frame building" and we agreed to meet at Henk's place. So this morning Henk and I met and we discussed in detail both our processes and their differences. It also turned into a hands-on experience.
The main differences were:
1) Henk does a lot of char removal beforehand. He only leaves enough char to be able to align the parts meticulously, the dark char contrasting wonderfully with the natural wood color, making it easy to accurately align the parts.
2) A small sanding disk is used for char removal, at minimum RPM. It's a rather effortless procedure, just take your time; we're in no hurry.
3) It appears I might be rather heavy handed, or stressed out, when manually filing and sanding, applying undue force on the more fragile frame elements. Taking it slow gives better control over filing and sanding and significantly reduces the risk of breaking things.
4) I prefer to use a small vice to keep the parts steady while filing and sanding. To my surprise Henk holds the parts by hand and even though one obviously can't keep the parts from moving, the results are very good. I always suspected holding parts by hand would have a detrimental effect on the shape of the cross sections of the frames but nothing is farther from the truth. So this is down to one's personal preferences.
5) Adhesive application, when Henk demonstrated his bonding process, I was amazed by the amount of adhesive Henk used; very little of the sticky stuff was used. This led to almost instantaneous adhesion, with some allowance the locate the parts correctly and within a couple of minutes the next step could be taken.
In all, for me this was a very educational and productive meeting.
Henk, thanks for your hospitality and your time and thanks for sharing your experience, it's highly appreciated.

It's a distinct advantage having some friendly co-builders within driving distance, who are also willing to help a fellow builder. To me, the DBBS sure showed it's value. Thanks Henk and Peter!

PS1 No broken frame tips!!!
PS2 After meeting with both Henk and Peter, both sharing their knowledge and experiences, I'm pretty sure a lot of modelers could benefit from a modeling workshop or course, where one not only could be taught the basics of modeling, but also share experiences with one another.

Henk preparing his tools.View attachment 294327

Henk demonstrating his procedure.
(Anything familiar in the background?)
View attachment 294326

Close up
View attachment 294329

Frame assembly in progress:
View attachment 294330
Hi Johan. I am glad that the visit paid off. TOP!
Regards, Peter
 
Nice result this morning, good to show you that there are several roads to Rome are

Mine is patience, what can't do today we'll do tomorrow , no rush

Be careful guys! It is not really true that many roads lead to Rome ... I left Rome 7 years ago to go up to northern Italy after having met (at 63 years old ...) my soul mate.
So there are also roads that ... leave Rome!

Nice work Henk!
 
Johan,
It is true that holding the piece in your hand actually gives you more control, as you can move the piece and the tool in coordination. I used a Dremel to remove the char on my frames, at the lower speed and with a light grit sanding drum.
Also, most glues actually work better with less, because otherwise you have a large film that the pieces slide on and less opportunity for the pieces to actually touch without a lot of clamping pressure. And of course more glue takes longer to cure. I either apply with a syringe or a toothpick and spread out to a thin layer. I also wipe any glue squeeze out immediately, especially on small pieces.
As far as files go, I typically use diamond files, as they are smoother and less likely to break delicate parts.
Anyway, it seems Henk gave you some good tips to put into use! Sounds like time well spent! ;)
 
Hey Dean,

It sure was time well spend and enjoyable too.
I use the Dremel for char removal exactly as you describe. It's a rather steep learning curve, but it works pretty good.
It's where the files come into the playing field, where Henk prefers to hold the parts in one hand and uses the other hand for the file. This is where I use the vice to clamp the part to have it steady. I'll try out Henk's approach, to see whether this avoids damage to the frame tips. Henk reported no issues with his method.
The adhesive application was a true eye opener; when Henk started applying the I glue I thought it was never going to stick, but lo and behold, within minutes the parts were solidly joined together, without additional clamping... Amazing.

One is never too old to learn something new. ;)

PS Still having my eyes peeled for a Fokker D7...
 
Last edited:
Hey Dean,

It sure was time well spend and enjoyable too.
When I use the Dremel for char removal exactly as you describe. It's a rather steep learning curve, but it works pretty good.
It's where the files come into the playing field, where Henk prefers to hold the parts in one hand and uses the other hand for the file. This is where I use the vice to clamp the part to have it steady. I'll try out Henk's approach, to see whether this avoids damage to the frame tips. Henk reported no issues with his method.
The adhesive application was a true eye opener; when Henk started applying the I glue I thought it was never going to stick, but lo and behold, within minutes the parts were solidly joined together, without additional clamping... Amazing.

One is never too old to learn something new. ;)

PS Still having my eyes peeled for a Fokker D7...
Good stuff! Yep, the Fokker is a nice airplane! Unfortunately they don't have a 1/16 scale kit of the D7 that I know of.
I am debating between the Model Airways or the Artesania Latina 1/16 scale version of the DR1 triplane. ;)
 
As I wrote, frame 1 through 49 are nearing completion. However, still a lot of adjustments have to be made to align the frames relative to one another. My char removal and beveling process still leaves a lot to be desired, so I need a lot of tweaking before being able to continue with the next steps.
I challenged my Admiral to identify which frames still need the trennels added. Since she wasn't able to, I decided to forego furthering installation; when the Admiral can't spot them, nobody can...
For some odd reason my Admiral keeps on gently pushing me towards cutting my Bluenose in two. I don't have any idea where that's coming from... ;)

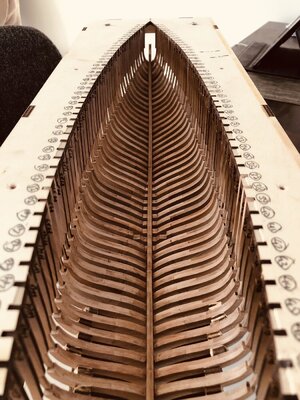
Here some pics of the current status, the jig is almost completely filled with frames. The dry fit is rather good and also the keelsons fit, although the aftmost keelson was too long; I had to remove about 1.25mm to make it fit.
Next is to complete the other six frames and attaching those to the keel.

422FC427-3D8C-40A7-9437-75C1EB2C0ECF.jpegB89E8CCD-76C6-4199-8AF3-876C5E588F79.jpegB3F95400-255A-4BF8-88CE-4ED580532464.jpeg
 
Last edited:
I’m thinking the Admiral may be buying you one of them fancy Japaneses saws for Father’s Day! :p
O no, Dean don't you start!
I told Ellen that if this build turns out exceptionally well, I might consider another build, especially for the Japanese saw to do it's disastrous work...
But first completion of this build, followed by a DR.1, if I can't lay my hands on a D7 and then...
 
Hi Johan, given my stop on the BN due to the realization of the 19 "Canoe, your work is almost reaching me!
I think I will finish this job within the week and then resume the BN and proceed to the end without further stops. I needed a stop because working with all those frames was ... nerve-wracking!
But now I can't wait to get back to the BN.
She is waiting for me ...
 
Last edited:
Hi Johan, given my stop on the BN due to the realization of the 19 "Canoe, your work is almost reaching me!
I think I will finish this job within the week and then resume the BN and proceed to the end without further stops. I needed a stop because working with all those frames was ... nerve-wracking!
But now I can't wait to get back to the NL.
She is waiting for me ...
Don’t think so, Piero, you are apparently more at ease in the jet age, “suck and blow” is what my flight buddy use to say, whereas I’m perfectly happy with reciprocating engines and propellers and “steam gages”…
 
Last edited:
@Canoe21 and @Henk Liebre:
I don't want to pollute Lawrence blog too much with my thoughts about the YQ-kit, hence this post.
Henk wrote the following: on Lawrence's blog:

"Hi Laurence,
I understand Johan's frustrations.
That this is a great kit in terms of material, I do not share it I
am getting more and more frustrated with the soot in the wood
In addition, there are huge color differences in the wood
The knocked-out wood parts with soot can be removed, but if I wood have to start painting , (which I already really dislike), and the soot still shows through in the paint after 4x painting, (and believe me I have tried different paints.) then the fun starts to wear off

Last night the slats for took the planking out of the box, and looked so dirty that I put everything back in the box and cleaned everything up.
I know price/quality ratio, but if this annoys me I'd rather pay a little more next time

For the time being I don't know if I will continue, I'm a bit done with it at the moment
Regards

Henk"

The char removal is rather dusty and time consuming. As long as I'm able to switch between tasks, I find it bothersome but doable.
There are some more misgivings though with the kit. I won't list them all, but my main issues are:
1) Tool design: to me the main key characteristics of the hull are the keel, the outer mould line and the inner mould line. The supplied tool does nothing to locate these characteristics in the build. At best it's implicitly established. @Peter Voogt gave me some valuable tips and tricks (thanks, Peter) on how to get to a stable inner mould line by using first the lower deck beam bearings and subsequently the upper deck beam bearings. After that, those members have to keep the whole frame/keel assembly stable. I think it's a doable procedure, but the outer mould line should come first; it's where the Bluenose shows her beauty. (Unless you're able to positively control the relationship between inner- and outer mould lines, it's considered bad practice to hold the inner mould line.)
2) Part design: a large number of parts are rather fragile by design, look for instance at he transom design. Parts are very thin and on top of that they are located at the extremities of the hull and thus by nature extremely vulnerable. One look at the various build logs and you can almost invariably see broken (and bonded) transom elements. Possibly the thin parts inherit their geometry just by scaling down, but then comes the next flaw (my opinion, not necessarily valid for all shipwrights):
3) Quality of the materials/material selection: the pear wood with the kit is brittle, I've addressed this before, I'm not going to elaborate again. But a more flexible wood selection would have worked miracles.
On a number of occasions I experienced frame failure (and of course on the most critical locations, thanks to Mr Murphy) due to the quality of the materials supplied.
Having had a closer look at the contents of the kit and the drawings and building description, I'm pretty sure I will encounter some more issues and I'll probably spend quite a few more Banknote-EUROBanknote-EUROBanknote-EURO on getting the hardwareI that I want for my model; think ropes, blocks, deadeyes, etc, but I still do like this build, which is mainly driven by the facts that it test my capabilities and that it's a POF Bluenose.
One other remark; I should also take into consideration the price/quality ratio. The kit is not overly expensive, thanks to the efforts from, amongst others, @Heinrich, so I should give the kit developers some credit, but I also think that with very little additional expense a better quality kit could have been produced.
Luckily there is a lot of experience around on SOS and willingness to help one another, an opportunity I'll shamelessly use to my advantage. ;)
One day my build will replace my father's Bluenose, now sitting proudly in the window of our living room...

Johan
As I have said before, I think the kit is a good value, however I would never build it as provided. I could not be happy with printed deck sheets, printed deck furnishings, the rope, the pulleys (as crude as they get), anchors, etc. The real value is in the pearwood main structure. The char is on the laser cut parts, however the deck beams are CNC cut, and have no char...so you get a small break on those!
So I chose to embrace the frame and keel, and the nice pearwood (which will bend very well when wet), and make everything else up to par with the frame and main structure.
The kit value is very subjective. If you like to scratch build and/or improve on a kit...it doesn't get much better. Look at what I did and what Peter is doing! It clearly has potential to be a nice ship. However, if you are not comfortable with making improvements, or spending money and time to buy and build all of the extras (that make this kit go from ok to great), then maybe this is not your kit of choice. It can be built as provided, however it will look like a cheap kit in my opinion. ;)
In conclusion, what you like in a kit, will determine if this is the kit for you! ;) I personally see every kit as a blank canvas, and enjoy putting my artistic license into play. As far as char goes, almost every kit has some due to laser cut parts, and no one likes it...we just deal with it for the sake of precision in wood!
Hey Dean,
If I would have known what I know today when I ordered the kit, I still would have bought it, I'm really impressed by the plank on frame idea and how stunning she potentially may look, once completed. In itself the pear ís beautiful, no doubt about that.
My current plans are to partially plank the lower deck, with pear, the same with the upper deck. I'm also working on a design to install some internal lightning and there are some more items I want to add or replace. Adding sails is still subject of discussion between the Admiral and me...
Having said that, buying this kit will inherently bring the builder some headache, but still I think it's worth the effort.
Johan
 
Back
Top