YQ Bluenose by Johan [COMPLETED BUILD]

Johan, you definitely qualify for a re-do certificate. In fact, having the courage to strip the unsatisfactory paint off your hull means you are well on your way to obtaining a re-do degree, possibly even a doctorate. Seriously though, I think you've done the right thing. If you were not happy with the result then you never would be. This way you get to have another crack at meeting your own expectations, and who can ask better than that? I also think your renewed choice of colour ('but instead go for the white for the waterline and the red and black paints for below and above the waterline') is spot on. Deeper, richer colours. I believe you will come out on top after this re-do and we look forward to seeing the outcome, good luck Thumbsup
Thanks Nomad,
As I said, I just couldn't live with this paint job, so it had to go.
It's like a colleague and dear friend and I said when we were confronted with non-conforming products: "Use as scrap". Or, in other words, if not satisfied or meeting requirements, re-do your job.
 
To take my mind off the paint job issues, I opted to shift my focus to one of the upcoming events: laying the deck.
The kit comes with waterways and pre-printed/marked deck halves for the port side of the ship, which include the nibble strips and the deck planks, and the waterways and nibble planks for the starboard side.
This topic was already subject to an in-detail description by @Peter Voogt, but in short, the build description requires both deckhalves and nibble planks for the fore- and aft decks to be laid on top of the deckbeams, on top of which the waterways are supposed to be laid. This means the waterways (and scuppers) are sitting above deck level, which most likely was not the case for the Bluenose original.
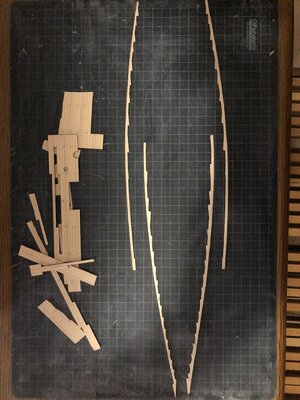
So, following more or less Peter's example, I first put in the waterways and then started to demolish the pre-printed decks and nibble planks. I wanted to preserve the nibble planks and lay the deck myself. I decided to reduce the width of the nibble planks, since the nibble planks are now supposed to sit adjacent to the waterways, instead of laying underneath the waterways, sitting against the stanchions.
Not changing the nibble planks would result in the first deckplanks being forced to move inboard, with, in my view, disproportionate deck esthetics.

In all I reduced the width of the nibble planks by about 1,5mm. I didn't dare doing more, given the fragility of the remaining parts. The parts shown below are grosse, they still need to be trimmed to their final measurements.
On the left side of the picture the scrap of the pre-printed deckparts can be seen; no way back, that's for sure... So I'm committed to a scratch build deck.

8125ADA6-6BC6-4088-ACCE-225EE3017031.jpeg
 
Planking completed initiated a next step in this build; the finish of the hull.
I was raised by my old man to use Humbrol paints on models, so I used those paints for the restauration of my father's Bluenose.
Going through a lot of build logs on SoS mentioning a myriad of possible paints, I decided to order some Vallejo paints for the hull. A white paint was ordered for the water line, the upper half would receive a very dark blue color, whereas the lower half would see a red paint applied.
As primer I used Tamiya, for its supposedly filling properties.
The results were worse than expected. The water-based paints, especially the blue one, are very difficult to apply with a brush. The paint appears to dry very quickly, so basically the paint has to be applied right with one brush stroke only. Unfortunately, I am just not capable enough to pull that off.

View attachment 327153

View attachment 327165

I had a conversation with @Henk Liebre on this topic and his advice was to accept the results and just continue the build.
After looking at this lousy paint job for a couple of days, I just couldn't stomach it anymore: this just wouldn't do. Sick

So I removed the offending paint layers. :eek:

View attachment 327168

View attachment 327169

The only area where the Vallejo paint stuck true was on the transom. I'm considering not to apply an additional primer layer, but instead go for the white for the waterline and the red and black paints for below and above the waterline.
First step though is to mark the waterline again.
What do y'all think, do I now qualify for a do-over certificate?
That is for sure a major re-do. In addition to the coins, we also need to create notes. Banknote-EUROOr certificates, as Mark mentioned.
The hull is a major point of view. If it’s not satisfied and it would be always a big GGGGRRRRR.
With a little advantage, with the sanding of this layer of paint, you a bit more solid base for the next layer.
Regards, Peter
 
Last edited:
To take my mind off the paint job issues, I opted to shift my focus to one of the upcoming events: laying the deck.
The kit comes with waterways and pre-printed/marked deck halves for the port side of the ship, which include the nibble strips and the deck planks, and the waterways and nibble planks for the starboard side.
This topic was already subject to an in-detail description by @Peter Voogt, but in short, the build description requires both deckhalves and nibble planks for the fore- and aft decks to be laid on top of the deckbeams, on top of which the waterways are supposed to be laid. This means the waterways (and scuppers) are sitting above deck level, which most likely was not the case for the Bluenose original.
So, following more or less Peter's example, I first put in the waterways and then started to demolish the pre-printed decks and nibble planks. I wanted to preserve the nibble planks and lay the deck myself. I decided to reduce the width of the nibble planks, since the nibble planks are now supposed to sit adjacent to the waterways, instead of laying underneath the waterways, sitting against the stanchions.
Not changing the nibble planks would result in the first deckplanks being forced to move inboard, with, in my view, disproportionate deck esthetics.

In all I reduced the width of the nibble planks by about 1,5mm. I didn't dare doing more, given the fragility of the remaining parts. The parts shown below are grosse, they still need to be trimmed to their final measurements.
On the left side of the picture the scrap of the pre-printed deckparts can be seen; no way back, that's for sure... So I'm committed to a scratch build deck.

View attachment 327221
And another big step in the build. The start looks promising, Johan. A lot of fitting and sanding, but it will give a personal touch to your BN. Looking forward to the first laid results.
Regards, Peter
 
Last edited:
Too bad the paint didn't give the desired result
When you showed me the first photo (and I'm familiar with Vallejo's opacity) I expected that continuing with several layers would get the desired result

A famous football player once said " Every disadvantage has its advantage"

1 You gained experience again
2 The hull has been sanded even more flat
Greeting
Henk
Well, your advice was sound, so I gave it a few days. I also put on another two layers of blue, but it became progressively worse. After dragging my feet a little I gave up and admitted defeat to using Vallejo.
Back to square one it is!
 
The hull is a major point of view. If it’s not satisfied and it would be always a big GGGGRRRRR.
With a little advantage, with the sanding of this layer of paint, you a bit more solid base for the next layer.
I'll lay low for a little while, hoping to have something to show for in Duizel on Sunday the 18th...
 
And another big step in the build. The start looks promising, Johan. A lot of fitting and sanding, but it will give a personal touch to your BN. Looking forward to the first laid results.
Regards, Peter
So far it wasn't as bad of a job as I expected, although a lot of patience was needed.
 
I usually try to thin water based paints a lot when painting wood, so that the paint soaks in the boards more like ink, verses filling in the wood grain. I like to be able to still see the individual boards. But there are no rules, so I trust you will come up with something pleasant. ;)
 
I usually try to thin water based paints a lot when painting wood, so that the paint soaks in the boards more like ink, verses filling in the wood grain. I like to be able to still see the individual boards. But there are no rules, so I trust you will come up with something pleasant. ;)
To be honest, I didn't thin the paint, so that's one. Second, we experienced higher temps, like in the mid eighties and thirdly the humidity was rather high, hovering between 60 and 70 percent relative humidity.
When applying the paint, it almost dried upon touching the wood. I applied three layers and, like I said, it became progressively worse. Removed the paint and tried again... :mad: Same result.
So currently I'm in the process of cleaning the hull, applying Humbrol paint and doing it again, because of the colors being unsatisfactory. The majority of the boards are no longer visible, but I'm okay with that. By the way, when looking at pictures of the BN, old or new, almost every individual board can be seen.
In order to get that effect I would have to rip off all boards and start the planking process all over again, not going there... :cool:
After being almost nine months into the build, I can honestly say I am on a very steep learning curve, with a large number of "lessons learned" and an overflowing curse jar.
As soon as I've gotten something useful to share I'll do so. For now it's back to the paint brush...
I would not advise ripping boards off! However, if you are willing to do the extra work, I suggest adding a thin veneer (second planking) on that one side. That would give you the board lines again. But you still have to be able to paint without filling in all the gaps. Once again, water down the paint to a very diluted mix. Or use a wood stain. They have colored wood stains.
Anyway, just a few suggestions. ;)
Hey Dean,

Thanks for your advice!
Currently I'm looking into your suggestion to apply a veneer second planking; checking availability and see if this option is feasible, think "rebate". Also, I'm waiting for the current paint layer to dry properly and after that I intend to apply some semi gloss varnish to see how that turns out in terms of esthetics. If not satisfactory, I might be forced to go for a second planking oprion on the port side...
 
Last edited:
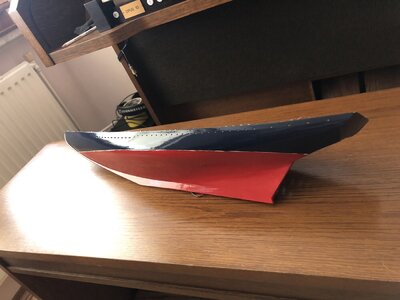
Wanted a semi gloss finish. The colors I went shopping for are nearly impossible to obtain.
So to my great dismay I have to settle for gloss, since matt paint is no option for me.
I also had to do quite a bit of paint mixing

CA2597B1-FFEB-418B-B1FD-3292D9825146.jpeg
 
Wanted a semi gloss finish. The colors I went shopping for are nearly impossible to obtain.
So to my great dismay I have to settle for gloss, since matt paint is no option for me.
I also had to do quite a bit of paint mixing

View attachment 327882
I wonder if you could knock down the gloss with steel wool or something? Then again, that might be a disaster...
 
I wonder if you could knock down the gloss with steel wool or something? Then again, that might be a disaster...
Nothing abrasive is going to touch that paint again... Sick I've gained some experience in that particular field over the past two weeks.
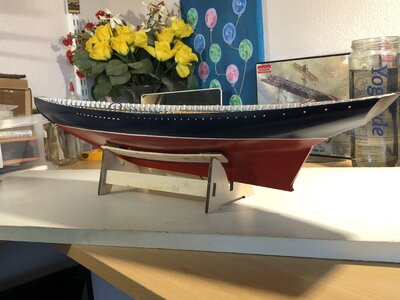
Instead of any abrasive action, I applied a semi gloss varnish.
 
After applying a semi gloss varnish the gloss shine has been reduced considerably.
I'll leave the paint job for now, let her sit for a couple of days and see if I (and the Admiral of course) still like it; Dean's suggestion is still on the table...
Now it's touch-up time, tidying up the waterline and cleaning out the scuppers.

AD4994FF-9638-4102-BC3C-2AA57AC345EE.jpeg
 
After applying a semi gloss varnish the gloss shine has been reduced considerably.
I'll leave the paint job for now, let her sit for a couple of days and see if I (and the Admiral of course) still like it; Dean's suggestion is still on the table...
Now it's touch-up time, tidying up the waterline and cleaning out the scuppers.

View attachment 327894
Wow ....... Johan. After seeing the gloss paint, this is much much much much better! This must be a GREAT relief.
Regards, Peter
 
Wow ....... Johan. After seeing the gloss paint, this is much much much much better! This must be a GREAT relief.
Regards, Peter
Yep, the gloss paint was real scary to look at... :eek:
I expected it to look bad, but the result was far worse than I thought it would be.

So when the varnish was applied, it was indeed a huge relief to see the effect the semi gloss had on her looks, phew...
 
Last edited:
Back
Top