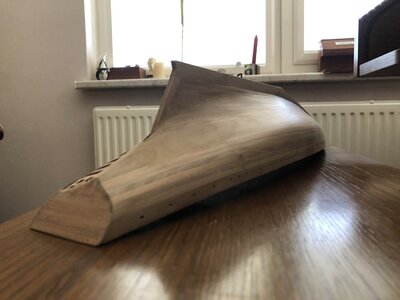
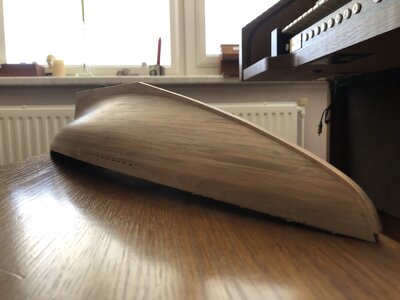
Great job Johan! 
-

Win a Free Custom Engraved Brass Coin!!!
As a way to introduce our brass coins to the community, we will raffle off a free coin during the month of August. Follow link ABOVE for instructions for entering.
-

PRE-ORDER SHIPS IN SCALE TODAY!
The beloved Ships in Scale Magazine is back and charting a new course for 2026!
Discover new skills, new techniques, and new inspirations in every issue.
NOTE THAT OUR FIRST ISSUE WILL BE JAN/FEB 2026
- Home
- Forums
- Ships of Scale Group Builds and Projects
- Bluenose PoF Group Build
- Bluenose Group Build Logs
You are using an out of date browser. It may not display this or other websites correctly.
You should upgrade or use an alternative browser.
You should upgrade or use an alternative browser.
- Joined
- Sep 3, 2021
- Messages
- 5,197
- Points
- 738

Thanks, Dean, though not entirely deserving... See my next post.Great job Johan!
- Joined
- Sep 3, 2021
- Messages
- 5,197
- Points
- 738

How time flies when you're having fun, or in my case when you run into unexpected issues.
About a week ago I completed the starboard planking of the hull and, If I may say so myself, it really looked well. Also the port side, which I than had planked as far as the starboard side, looked very promising.
So, optimistically, I ventured south, towards the keel. The first planks went on smoothly and all went well until I had to navigate "kaap de Goede Hoop", or, in this particular case, the transition to the deadwood.
That's where I discovered that my earlier beveling of the frames was sub standard; I could clearly see and feel a dent in the planking. What was worse, I was already upto five planks down, before I fully realized what was going on. First I thought about removing the affected planks. After trying that on the last plank, I quickly abonded that idea; too much risk of damaging a large number of frames, plus the removed planks would be next to unusable. Second option I considered and even tried to implement was to put some waste planks together and to file and sand that to size and thickness. That was an idea for the waste bin; I couldn't get it right, neither in terms of thickness variation, nor in the correct size, nor in esthetics. The last point is somewhat moot; the port side of the hull will be painted...
After disregarding the first to options, I went for the option to use a filler...
The next plank was attached, using shims on the frames 46, 47 and 48. The thickness was established by letting a plank touch the higher frames to see which frames were the culprits and to establish the required shimthicknesses. Once this plank was in place I could apply the filler.
After seemingly endless hours of measuring shims and planks, sanding, filing, checking I was able to complete the planking of the port side.
Unfortunately, it's far from perfect, but I decided to continue with what I have.
For a potential next build I would approach the char removal and frame beveling a little differently; the inside of the frames close to net shape and the outside of the frames well outside of the mark lines and use those lines as references during beveling. Furthermore, check once, check twice and check once again, even when you think your beveling is okay.
(Note to self: stay away as far as you possible can from pré-twentieth century sailing vessels with their blunt bows and sterns.)
The dent filled: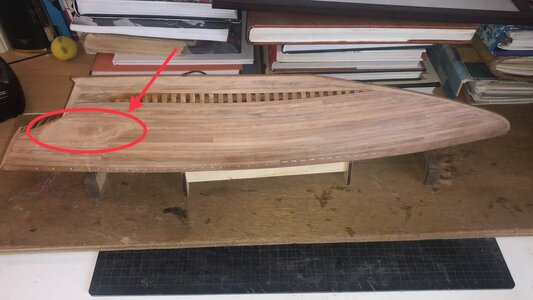
From another perspective:
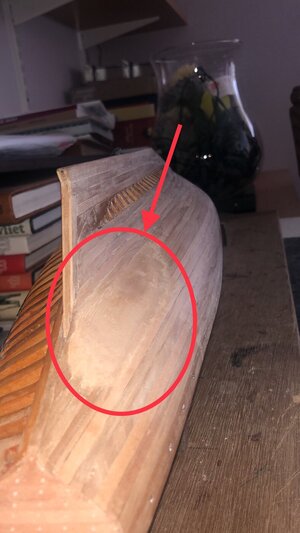
The port planking complete, pré sanding:
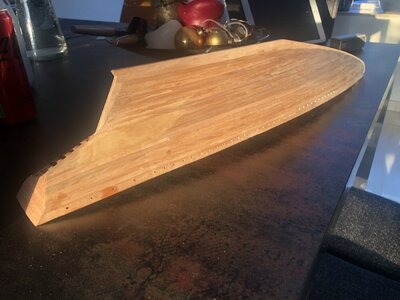
About a week ago I completed the starboard planking of the hull and, If I may say so myself, it really looked well. Also the port side, which I than had planked as far as the starboard side, looked very promising.
So, optimistically, I ventured south, towards the keel. The first planks went on smoothly and all went well until I had to navigate "kaap de Goede Hoop", or, in this particular case, the transition to the deadwood.
That's where I discovered that my earlier beveling of the frames was sub standard; I could clearly see and feel a dent in the planking. What was worse, I was already upto five planks down, before I fully realized what was going on. First I thought about removing the affected planks. After trying that on the last plank, I quickly abonded that idea; too much risk of damaging a large number of frames, plus the removed planks would be next to unusable. Second option I considered and even tried to implement was to put some waste planks together and to file and sand that to size and thickness. That was an idea for the waste bin; I couldn't get it right, neither in terms of thickness variation, nor in the correct size, nor in esthetics. The last point is somewhat moot; the port side of the hull will be painted...
After disregarding the first to options, I went for the option to use a filler...

The next plank was attached, using shims on the frames 46, 47 and 48. The thickness was established by letting a plank touch the higher frames to see which frames were the culprits and to establish the required shimthicknesses. Once this plank was in place I could apply the filler.
After seemingly endless hours of measuring shims and planks, sanding, filing, checking I was able to complete the planking of the port side.
Unfortunately, it's far from perfect, but I decided to continue with what I have.
For a potential next build I would approach the char removal and frame beveling a little differently; the inside of the frames close to net shape and the outside of the frames well outside of the mark lines and use those lines as references during beveling. Furthermore, check once, check twice and check once again, even when you think your beveling is okay.
(Note to self: stay away as far as you possible can from pré-twentieth century sailing vessels with their blunt bows and sterns.)
The dent filled:

From another perspective:

The port planking complete, pré sanding:

Hi Johan. TheHow time flies when you're having fun, or in my case when you run into unexpected issues.
About a week ago I completed the starboard planking of the hull and, If I may say so myself, it really looked well. Also the port side, which I than had planked as far as the starboard side, looked very promising.
So, optimistically, I ventured south, towards the keel. The first planks went on smoothly and all went well until I had to navigate "kaap de Goede Hoop", or, in this particular case, the transition to the deadwood.
That's where I discovered that my earlier beveling of the frames was sub standard; I could clearly see and feel a dent in the planking. What was worse, I was already upto five planks down, before I fully realized what was going on. First I thought about removing the affected planks. After trying that on the last plank, I quickly abonded that idea; too much risk of damaging a large number of frames, plus the removed planks would be next to unusable. Second option I considered and even tried to implement was to put some waste planks together and to file and sand that to size and thickness. That was an idea for the waste bin; I couldn't get it right, neither in terms of thickness variation, nor in the correct size, nor in esthetics. The last point is somewhat moot; the port side of the hull will be painted...
After disregarding the first to options, I went for the option to use a filler...
The next plank was attached, using shims on the frames 46, 47 and 48. The thickness was established by letting a plank touch the higher frames to see which frames were the culprits and to establish the required shimthicknesses. Once this plank was in place I could apply the filler.
After seemingly endless hours of measuring shims and planks, sanding, filing, checking I was able to complete the planking of the port side.
Unfortunately, it's far from perfect, but I decided to continue with what I have.
For a potential next build I would approach the char removal and frame beveling a little differently; the inside of the frames close to net shape and the outside of the frames well outside of the mark lines and use those lines as references during beveling. Furthermore, check once, check twice and check once again, even when you think your beveling is okay.
(Note to self: stay away as far as you possible can from pré-twentieth century sailing vessels with their blunt bows and sterns.)
The dent filled:View attachment 326024
From another perspective:
View attachment 326025
The port planking complete, pré sanding:
View attachment 326026
 is for the 'restoration' of the planking. With in mind, this side will be painted, then you have chosen for the right option with the filler.
Regards, Peter
That’s unfortunate Johan…but as Peter said, if you are going paint, then the filler is ok. However I would suggest after sanding to the final profile, that you put light grooves with an xacto knife to simulate board edges. Otherwise the filler will still be noticeable. I would try using tape to extend the edges through the filler and follow that with the blade. Then once painted, it will still look like a continuation of the boards.
- Joined
- Sep 3, 2021
- Messages
- 5,197
- Points
- 738

Thanks Dean,That’s unfortunate Johan…but as Peter said, if you are going paint, then the filler is ok. However I would suggest after sanding to the final profile, that you put light grooves with an xacto knife to simulate board edges. Otherwise the filler will still be noticeable. I would try using tape to extend the edges through the filler and follow that with the blade. Then once painted, it will still look like a continuation of the boards.
Just recently I had a conversation with Peter (@Peter Voogt) on restoring the board edges of the first pre-printed planks of the top row. Especially the ones on the starboard side were barely visible to begin with and after a little sanding, they all but disappeared. He gave me similar advise on how to inscribe those edges again and his suggestion is similar to your advice. Great minds think alike!
- Joined
- Jan 9, 2020
- Messages
- 10,566
- Points
- 938

Hi Johan. That is how one learns. I have never faired a hull where it was perfect the first time. Sometimes, it's a good idea and to walk away from the hull for a day or two. When one is constantly busy with it, you later start to miss certain things simply because you have been staring at it for too long. Having said that, the fact that you have already planned a future approach, shows you just how much experience you have gained. Don't fret about the filler if you are going to paint the hull in any case. Just follow @Dean62 Dean's advice about scribing the planks - it's an excellent suggestion.
When unfinished wood shines you know you’ve got something!
That looks good, Johan. Her lines becomes smooth again.Applied wood filler and sanded the port side for a second time.
She ain't looking half bad...
View looking fwd:
View attachment 326184
View looking aft:
View attachment 326185
Regards, Peter
- Joined
- Oct 28, 2018
- Messages
- 760
- Points
- 403

Looks very different already Johan
Nice work
Nice work
- Joined
- Sep 3, 2021
- Messages
- 5,197
- Points
- 738

Stained the starboard side and applied one coat of clear, semi-gloss varnish.
I asked the Admiral for input on the finish of the starboard side; I wasn't even given an alternative, this is what it has to be.
Also reinscribed the plank lines of the upper part, holding the scuppers. Although visible, it's not as pronounced as I would have liked. I followed both Dean's and Peter's earlier given advice on the filled port side, but I didn't dare trying to follow the same line thrice...
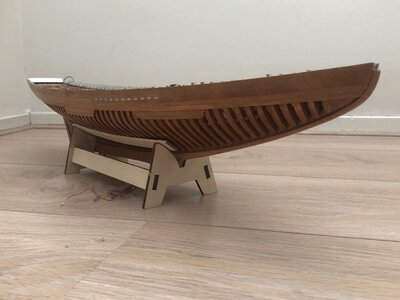
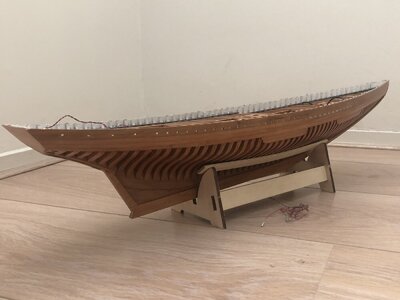


As usual, your Admiral is rightStained the starboard side and applied one coat of clear, semi-gloss varnish.
I asked the Admiral for input on the finish of the starboard side; I wasn't even given an alternative, this is what it has to be.
Also reinscribed the plank lines of the upper part, holding the scuppers. Although visible, it's not as pronounced as I would have liked. I followed both Dean's and Peter's earlier given advice on the filled port side, but I didn't dare trying to follow the same line thrice...
View attachment 326299
View attachment 326301
And about the reinscribing of the planks: you can try the desired visibility on the aft between 2 scuppers.
But maybe they'll add a little more once the stain is completely absorbed. That took me a few days too.
Regards, Peter
- Joined
- Sep 3, 2021
- Messages
- 5,197
- Points
- 738

As usual, your Admiral is right, Johan.

- Joined
- Sep 3, 2021
- Messages
- 5,197
- Points
- 738

I’ll wait a couple of days before deciding.But maybe they'll add a little more once the stain is completely absorbed. That took me a few days too.
Fortunately I am pretty much otherwise occupied upto and including Sunday...
Very tidy planking work JohanApplied wood filler and sanded the port side for a second time.
She ain't looking half bad...
View looking fwd:
View attachment 326184
View looking aft:
View attachment 326185

Good afternoon, Johan. Oh Boy. That must have been a sinking feeling when you saw the planking. Your fix is looking good. Just shows how this hobby throws these curve balls at us. I do think your admiral got it spot on. The starboard side is beautiful. Cheers GrantStained the starboard side and applied one coat of clear, semi-gloss varnish.
I asked the Admiral for input on the finish of the starboard side; I wasn't even given an alternative, this is what it has to be.
Also reinscribed the plank lines of the upper part, holding the scuppers. Although visible, it's not as pronounced as I would have liked. I followed both Dean's and Peter's earlier given advice on the filled port side, but I didn't dare trying to follow the same line thrice...
View attachment 326299
View attachment 326301
- Joined
- Sep 3, 2021
- Messages
- 5,197
- Points
- 738

Planking completed initiated a next step in this build; the finish of the hull.
I was raised by my old man to use Humbrol paints on models, so I used those paints for the restauration of my father's Bluenose.
Going through a lot of build logs on SoS mentioning a myriad of possible paints, I decided to order some Vallejo paints for the hull. A white paint was ordered for the water line, the upper half would receive a very dark blue color, whereas the lower half would see a red paint applied.
As primer I used Tamiya, for its supposedly filling properties.
The results were worse than expected. The water-based paints, especially the blue one, are very difficult to apply with a brush. The paint appears to dry very quickly, so basically the paint has to be applied right with one brush stroke only. Unfortunately, I am just not capable enough to pull that off.
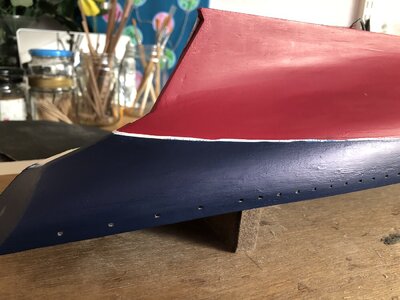
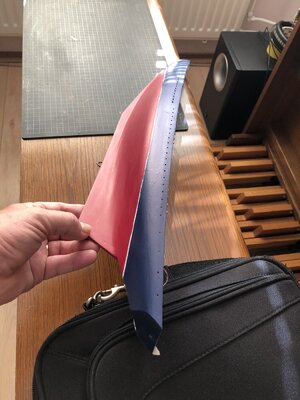
I had a conversation with @Henk Liebre on this topic and his advice was to accept the results and just continue the build.
After looking at this lousy paint job for a couple of days, I just couldn't stomach it anymore: this just wouldn't do.
So I removed the offending paint layers.
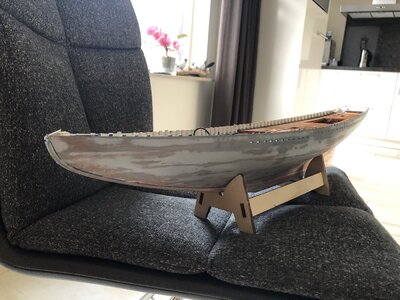
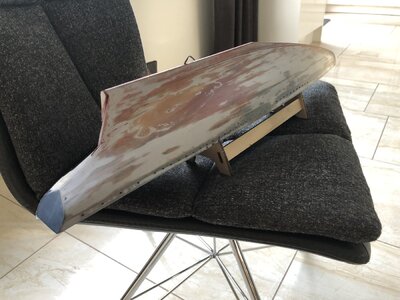
The only area where the Vallejo paint stuck true was on the transom. I'm considering not to apply an additional primer layer, but instead go for the white for the waterline and the red and black paints for below and above the waterline.
First step though is to mark the waterline again.
What do y'all think, do I now qualify for a do-over certificate?
I was raised by my old man to use Humbrol paints on models, so I used those paints for the restauration of my father's Bluenose.
Going through a lot of build logs on SoS mentioning a myriad of possible paints, I decided to order some Vallejo paints for the hull. A white paint was ordered for the water line, the upper half would receive a very dark blue color, whereas the lower half would see a red paint applied.
As primer I used Tamiya, for its supposedly filling properties.
The results were worse than expected. The water-based paints, especially the blue one, are very difficult to apply with a brush. The paint appears to dry very quickly, so basically the paint has to be applied right with one brush stroke only. Unfortunately, I am just not capable enough to pull that off.


I had a conversation with @Henk Liebre on this topic and his advice was to accept the results and just continue the build.
After looking at this lousy paint job for a couple of days, I just couldn't stomach it anymore: this just wouldn't do.

So I removed the offending paint layers.


The only area where the Vallejo paint stuck true was on the transom. I'm considering not to apply an additional primer layer, but instead go for the white for the waterline and the red and black paints for below and above the waterline.
First step though is to mark the waterline again.
What do y'all think, do I now qualify for a do-over certificate?
- Joined
- Sep 3, 2021
- Messages
- 5,197
- Points
- 738

Very tidy planking work Johan
Nomad, Grant,Good afternoon, Johan. Oh Boy. That must have been a sinking feeling when you saw the planking. Your fix is looking good. Just shows how this hobby throws these curve balls at us. I do think your admiral got it spot on. The starboard side is beautiful. Cheers Grant
Thanks for your compliments!
Apart from my bevelling issues, the planking itself was quite straightforward.
What helped me a lot was to ensure the next applied plank fitted snugly against the previous one.
Next challenge now is to solve my paint job issue.
Johan, you definitely qualify for a re-do certificate. In fact, having the courage to strip the unsatisfactory paint off your hull means you are well on your way to obtaining a re-do degree, possibly even a doctorate. Seriously though, I think you've done the right thing. If you were not happy with the result then you never would be. This way you get to have another crack at meeting your own expectations, and who can ask better than that? I also think your renewed choice of colour ('but instead go for the white for the waterline and the red and black paints for below and above the waterline') is spot on. Deeper, richer colours. I believe you will come out on top after this re-do and we look forward to seeing the outcome, good luck 


