True storyBeautiful work Johan. Yes, overthinking is available in abundance on this forum. And just when we think we have it all just right we look again and exclaim: "what was I thinking?"
-

Win a Free Custom Engraved Brass Coin!!!
As a way to introduce our brass coins to the community, we will raffle off a free coin during the month of August. Follow link ABOVE for instructions for entering.
-

PRE-ORDER SHIPS IN SCALE TODAY!
The beloved Ships in Scale Magazine is back and charting a new course for 2026!
Discover new skills, new techniques, and new inspirations in every issue.
NOTE THAT OUR FIRST ISSUE WILL BE JAN/FEB 2026
- Home
- Forums
- Ships of Scale Group Builds and Projects
- Bluenose PoF Group Build
- Bluenose Group Build Logs
You are using an out of date browser. It may not display this or other websites correctly.
You should upgrade or use an alternative browser.
You should upgrade or use an alternative browser.
Good morning Johan. Fantastic! Really good work. Cheers GrantAfter dragging my feet for awhile, I could no longer postpone the installation of the bulwarks. The reason for delaying this step was that I had no idea how to position the partsforming the bulwarks onto the hull in a robust manner.
One has to consider that free passage of the later to be installed chainplates has to be maintained, the stanchions are nicely covered by the bulwarks and that the offset of the outer edge of the bulwarks, relative planking of the hull, is similar over the length of the hull.
After much reading and tinkering with the bulwark parts I came to the following process;
- Use a 0,5mm/0.020" thin strip to simulate the chainplates and insert that through one of the chainplates holes, see also @Peter Voogt's build, it's his idea, I think.
- Align the inner edge of the bulwark at the fwd and aft end of the parts with the inner edges of the stanchions.
- Drill holes 0,8mm/0,037" through and through and use some small nails of matching diameters, together with the chain plate simulation, to fix the position of the bulwark.
- Determine two other locations to drill fixation holes, depending on the deviations between the pre-cut bulwark parts and the hull (which is, of course, perfectly build...)
- After insertion another two nails, check the overall dry fit of the bulwark. Not that there's much you can do about it after drilling holes...
- Once satisfied, apply adhesive, reposition the bulwark and insert toothpicks through the earlier drilled holes and apply some pressure to ensure proper seating of the bulwark gains the upper edge of the first plank.
- Clean up any excessive adhesive and after allowing the adhesive to cure, cut off the toothpicks and there it is, a bulwark installed.
Below a picture of the first two bulwarks installed. The bulwark on the right hand/lower side is ready for touch-up, the left hand/upper side (as seen in the picture) bulwark is waiting for the adhesive to cure.
The red arrow indicates the fake chainplate, ensuring the bulwark doesn't move inwards, the blue toothpicks ensure robust retention of the position of the bulwark on the first plank. The green arrows indicate the bulwarks themselves.
View attachment 331965
The following picture shows, see green arrows, five of the bulwarks installed.
Still two to follow. Apparently I build my BN about 4mm/0,16" too short; I need to shorten the last two bulwarks by just that amount.
View attachment 331966
- Joined
- Sep 3, 2021
- Messages
- 5,199
- Points
- 738

Thanks so much, Grant.Good morning Johan. Fantastic! Really good work. Cheers Grant
One of the funnier aspects of modeling is that one can split up the build in various sub-projects, like building the keel, the frames, planking, but also rigging, etc, etc. And each of the sub-projects pose their own challenges, requiring their own solutions. Finding what works for me is becoming an ever increasing source of satisfaction.
- Joined
- Sep 3, 2021
- Messages
- 5,199
- Points
- 738

Two of the vertical left- and right monkey rail parts were pre-formed in the xy-plane. Like I said, the process I use works pretty good.
Unfortunately, due to the sheer of the hull, I need a compound curvature on those two parts, otherwise I end up with pre-tension in those parts. Since I dislike pre-tension, I decided to try and add a compound curvature to these parts. Therefore I used the same setup,ensuring to maintain the desired xy-curvature and, to obtain the desired curvature in the xz-direction, I put some distance blocks (red arrows) at the extreme ends of the part and clamped the part down in the middle. And now we wait...
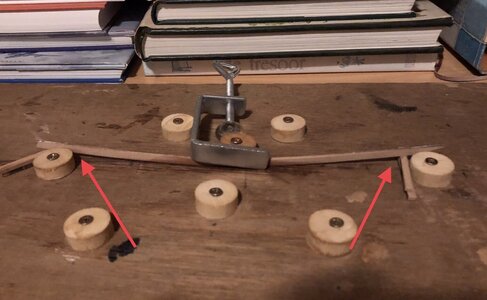
Unfortunately, due to the sheer of the hull, I need a compound curvature on those two parts, otherwise I end up with pre-tension in those parts. Since I dislike pre-tension, I decided to try and add a compound curvature to these parts. Therefore I used the same setup,ensuring to maintain the desired xy-curvature and, to obtain the desired curvature in the xz-direction, I put some distance blocks (red arrows) at the extreme ends of the part and clamped the part down in the middle. And now we wait...

- Joined
- Sep 4, 2022
- Messages
- 127
- Points
- 113

Could you share any observations about how the Red Beech or Wild Pear (not sure which?) reactss from the soaking and bend forming? Is the grain-raising effect from the water hopefully less than objectionable or possibly even unnoticeable?
- Joined
- Sep 3, 2021
- Messages
- 5,199
- Points
- 738

Hey Alf,Could you share any observations about how the Red Beech or Wild Pear (not sure which?) reactss from the soaking and bend forming? Is the grain-raising effect from the water hopefully less than objectionable or possibly even unnoticeable?
As far as I know the wood is pear. Experiences upto now are that the wood responds favorably to soaking and bending, provided the curvature is benign, as was evident when trying to bent monkeyrail at the transom. There the small required radius turned out to be too much, see post #700.
Grain raising is definitely noticeable, requiring sanding.
Regards, Johan
Nice to see how xy and xz comes together in this xyz-solution.Two of the vertical left- and right monkey rail parts were pre-formed in the xy-plane. Like I said, the process I use works pretty good.
Unfortunately, due to the sheer of the hull, I need a compound curvature on those two parts, otherwise I end up with pre-tension in those parts. Since I dislike pre-tension, I decided to try and add a compound curvature to these parts. Therefore I used the same setup,ensuring to maintain the desired xy-curvature and, to obtain the desired curvature in the xz-direction, I put some distance blocks (red arrows) at the extreme ends of the part and clamped the part down in the middle. And now we wait...
View attachment 332579
Regards, Peter
- Joined
- Sep 3, 2021
- Messages
- 5,199
- Points
- 738

We'll have to wait and see how this plays out once we have the fourth dimension run its time.Nice to see how xy and xz comes together in this xyz-solution.
Regards, Peter
Last edited:
- Joined
- Sep 3, 2021
- Messages
- 5,199
- Points
- 738

I'm so sorry, I am just assuming too much...Heinrich is lost - as he is every time that anything Mathematical is mentioned. I will, however, anxiously await the outcome!
In the picture below:
Blue arrow: x-axis,
Green arrow: y-axis,
Red arrow: z-azis
xy is the plane through both axis x and y, basically a horizontal plane (this is the plane unto which both the bottom- or top views are projected).
xz is the plane through axis x and z, perpendicular to plane xy. This is the plane unto which the side view is projected.
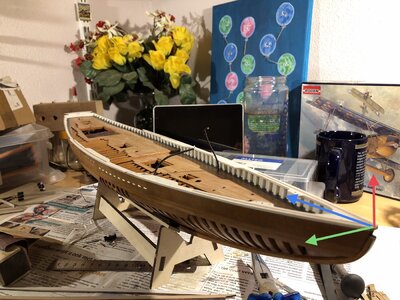
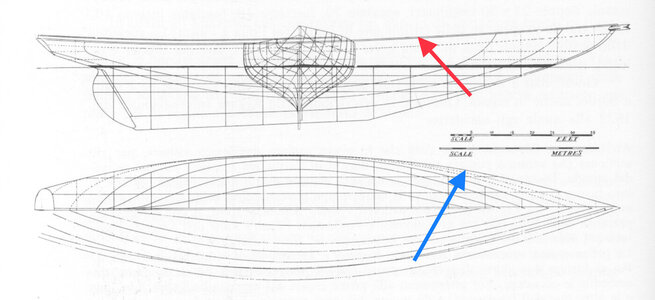
The monkey rail parts, I mentioned earlier, have curvatures in both planes, since they have to follow the curvature of the bulwark parts in both planes; they have to follow the models hull in two different directions.
In the picture below the side view, the xy-plane, shows the curvature, due to the sweep of the hull. I indicated that curve with the red arrow.
In the bottom, the xy-plane, I indicated the curve that needs to be followed with a blue arrow.
I hope this makes a little more sense...
What? Oh, sorry, I was looking at the flowers...I hope this makes a little more sense...
 .
.- Joined
- Sep 3, 2021
- Messages
- 5,199
- Points
- 738

For a next explanation I'll make sure there are no distractions in view...What? Oh, sorry, I was looking at the flowers....
- Joined
- Sep 3, 2021
- Messages
- 5,199
- Points
- 738

Especially for the so easily distracted @dockattner , I took some pictures outside with minimal background noise, I hope. 
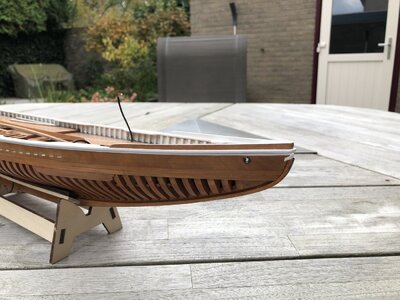
This afternoon I fitted the first preformed parts, in this case the breakwater (is this the correct term?) parts upfront. It was a walk in the park, the preform was close to spot on and I'm very pleased with the end result.
Port side:
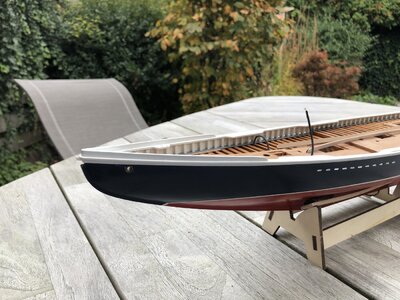 Starboard side:
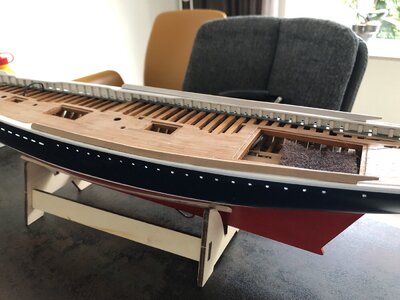
A dry fit was performed on the vertical rail parts of the monkeyrail. Looks promising, I will probably need a minimum effort to have them bonded:
I also bonded in place the transom vertical parts of the monkeyrail, amongst others the selfmade cornerpieces. Also this caused me no issues during bonding.
A dry fit of the transom monkeyrail part confirms my earlier choices.
View on the inside of the monkeyrail transom:
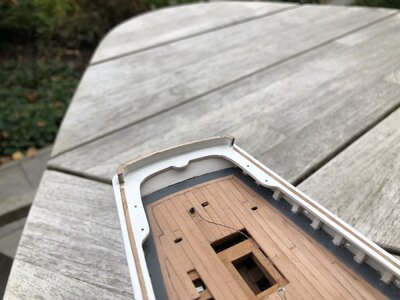
Outside view of the monkeyrail transom
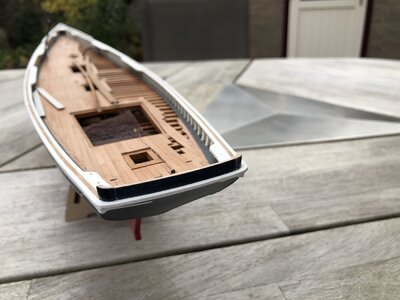
This picture shows a dry fit of the transom of the monkeyrail:
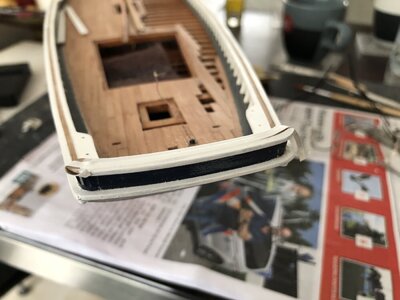
This afternoon I fitted the first preformed parts, in this case the breakwater (is this the correct term?) parts upfront. It was a walk in the park, the preform was close to spot on and I'm very pleased with the end result.
Port side:
 Starboard side:
A dry fit was performed on the vertical rail parts of the monkeyrail. Looks promising, I will probably need a minimum effort to have them bonded:

I also bonded in place the transom vertical parts of the monkeyrail, amongst others the selfmade cornerpieces. Also this caused me no issues during bonding.
A dry fit of the transom monkeyrail part confirms my earlier choices.
View on the inside of the monkeyrail transom:

Outside view of the monkeyrail transom

This picture shows a dry fit of the transom of the monkeyrail:

Last edited:
In the front, it's the Buffalo Rail, Johan. It looks nice. And the rest is looking 'promising'.Especially for the so easily distracted @dockattner , I took some pictures outside with minimal background noise, I hope.
This afternoon I fitted the first preformed parts, in this case the breakwater (is this the correct term?) parts upfront. It was a walk in the park, the preform was close to spot on and I'm very pleased with the end result.
Port side:
View attachment 332990Starboard side:
View attachment 332991
I also performed a dry fit on the vertical rail parts of the monkeyrail. Looks promising, I will probably need a minimum of effort to have them bonded.
I also bonded in place the transom vertical parts of the monkeyrail, amongst others the selfmade cornerpieces. Also this caused me no issues during bonding.
A dry fit of the transom monkeyrail part confirms my earlier choices.
View on the inside of the monkeyrail transom:
View attachment 332992
Outside view of the monkeyrail transom
View attachment 332993
This picture shows a dry fit of the transom of the monkeyrail.
View attachment 332995
Regards, Peter
- Joined
- Sep 3, 2021
- Messages
- 5,199
- Points
- 738

Ah, thanks Peter, didn't know that.In the front, it's the Buffalo Rail, Johan. It looks nice. And the rest is looking 'promising'.
Regards, Peter
This is becoming rather quickly "Noah's Ark"; bul(l)wark, monkeyrail, buffalorail, what more can I expect to come my way?
Good morning. Monkeys, Buffalo - are you guys sure William James Roue was not visiting the Kuger Park when he designed this ship…In the front, it's the Buffalo Rail, Johan. It looks nice. And the rest is looking 'promising'.
Regards, Peter
Lovely Garden JohanEspecially for the so easily distracted @dockattner , I took some pictures outside with minimal background noise, I hope.
This afternoon I fitted the first preformed parts, in this case the breakwater (is this the correct term?) parts upfront. It was a walk in the park, the preform was close to spot on and I'm very pleased with the end result.
Port side:
View attachment 332990Starboard side:
View attachment 332991
A dry fit was performed on the vertical rail parts of the monkeyrail. Looks promising, I will probably need a minimum effort to have them bonded:
View attachment 332996
I also bonded in place the transom vertical parts of the monkeyrail, amongst others the selfmade cornerpieces. Also this caused me no issues during bonding.
A dry fit of the transom monkeyrail part confirms my earlier choices.
View on the inside of the monkeyrail transom:
View attachment 332992
Outside view of the monkeyrail transom
View attachment 332993
This picture shows a dry fit of the transom of the monkeyrail:
View attachment 332995
 . Seriously tho she is beautiful. Cheers Grant
- Joined
- Sep 3, 2021
- Messages
- 5,199
- Points
- 738

Thanks Grant, unfortunately autumn is coming, thus the decay of colors has made its entrance.Lovely Garden Johan. Seriously tho she is beautiful. Cheers Grant
You're now in the spring season, aren't you? Lucky b....ds.
- Joined
- Sep 3, 2021
- Messages
- 5,199
- Points
- 738

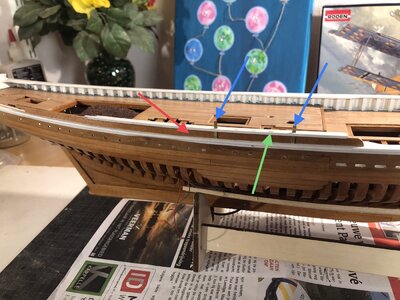
After spending quite some time on planning and preparing the monkey rail parts for installation, I was finally able to install the right hand side vertical rail parts. After dry fitting the parts and marking where the start of the rail was suppl send to be, I used dummy chainplates to ensure the proper position of the rail part.
Both planning and preparation paid off; the bonding of the part was an anticlimax. No excessive force was needed to ensure proper adhesion. Again, I am pleased with the results, especially having the part curved in two directions worked miracles.
In the attached picture, the red arrow points towards the double curved rail part, the green arrow points to one off the ten very small slotted holes in the horizontal parts of both bulwarks and monkey rails. Through these holes the chainplates will be installed, so those holes need to be properly aligned. To align those holes I used two copper strips as dummy chainplates,see blue arrows.

- Joined
- Jan 9, 2020
- Messages
- 10,566
- Points
- 938

Thank you for the explanation, Johan. It does make more sense - now I just need to learn how to think in 3D!  Your build is coming along very well, and those top railings look first class. That is also something waiting for me ... again ...
 Your build is coming along very well, and those top railings look first class. That is also something waiting for me ... again ...