No surprise to me that turned out so well. Careful planning with skilled craftsmanship generally wins the day (until it doesn't).
-

Win a Free Custom Engraved Brass Coin!!!
As a way to introduce our brass coins to the community, we will raffle off a free coin during the month of August. Follow link ABOVE for instructions for entering.
-

PRE-ORDER SHIPS IN SCALE TODAY!
The beloved Ships in Scale Magazine is back and charting a new course for 2026!
Discover new skills, new techniques, and new inspirations in every issue.
NOTE THAT OUR FIRST ISSUE WILL BE JAN/FEB 2026
- Home
- Forums
- Ships of Scale Group Builds and Projects
- Bluenose PoF Group Build
- Bluenose Group Build Logs
You are using an out of date browser. It may not display this or other websites correctly.
You should upgrade or use an alternative browser.
You should upgrade or use an alternative browser.
You did it really well. Good explanation with graphs are easier for showing coordinates.For a next explanation I'll make sure there are no distractions in view...
- Joined
- Sep 3, 2021
- Messages
- 5,197
- Points
- 738

Thanks, Paul.No surprise to me that turned out so well. Careful planning with skilled craftsmanship generally wins the day (until it doesn't).
Honestly, I had a plan B ready. Too frequently met the "until it doesn't".
- Joined
- Sep 3, 2021
- Messages
- 5,197
- Points
- 738

Thanks, sometimes I assume everyone knows about axis systems, coordinates and reference planes.You did it really well. Good explanation with graphs are easier for showing coordinates.
- Joined
- Sep 3, 2021
- Messages
- 5,197
- Points
- 738

After spending a lot of time preparing the 23 parts which constitute the the bulwarks, buffalorail and the monkeyrail, I finally installed the last parts of the railings.
A lot of planning ahead went into this step, as well as a lot of preparing the parts.
Parts needed to be painted or stained before installation; painting after installation would be bothersome at least, parts had to be pre-formed, to avoid too much pretension and parts had to be made, see post #700.
Again it struck me how relatively straight forward the binding process was, just a little tweaking here and there was necessary, but other than that, no issues.
Below YQ'S monkeyrail:

Below my version of the monkeyrail


The two wave breakers, see below, required some attention, since they were too thick. Some sanding did the trick.
And this is how she looks right now. I think I'm in love...

 Just a little touch up here and there and then it's on to the next sub-project.
A lot of planning ahead went into this step, as well as a lot of preparing the parts.
Parts needed to be painted or stained before installation; painting after installation would be bothersome at least, parts had to be pre-formed, to avoid too much pretension and parts had to be made, see post #700.
Again it struck me how relatively straight forward the binding process was, just a little tweaking here and there was necessary, but other than that, no issues.
Below YQ'S monkeyrail:

Below my version of the monkeyrail


The two wave breakers, see below, required some attention, since they were too thick. Some sanding did the trick.

And this is how she looks right now. I think I'm in love...


 Just a little touch up here and there and then it's on to the next sub-project.
Last edited:
That time investment gives you now a BN with beautiful lines, Johan. Another chapter closed.After spending a lot of time preparing the 23 parts which constitute the the bulwarks, buffalorail and the monkeyrail, I finally installed the last parts of the railings.
A lot of planning ahead went into this step, as well as a lot of preparing the parts.
Parts needed to be painted or stained before installation; painting after installation would be bothersome at least, parts had to be pre-formed, to avoid too much pretension and parts had to be made, see post #700.
Again it struck me how relatively straight forward the binding process was, just a little tweaking here and there was necessary, but other than that, no issues.
Below YQ'S monkeyrail:
View attachment 333586
Below my version of the monkeyrail
View attachment 333587
View attachment 333588
The two wave breakers, see below, required some attention, since they were too thick. Some sanding did the trick.
View attachment 333589
And this is how she looks right now. I think I'm in love...
View attachment 333590View attachment 333591
View attachment 333593Just a little touch up here and there and then it's on to the next sub-project.
View attachment 333592
Regards, Peter
Bravo Johan! Stunning. Cheers GrantParts needed to be painted or stained before installation; painting after installation would be bothersome at least, parts had to be pre-formed, to avoid too much pretension and parts had to be made, see post #700.
Again it struck me how relatively straight forward the binding process was, just a little tweaking here and there was necessary, but other than that, no issues.
Below YQ'S monkeyrail:
View attachment 333586
Below my version of the monkeyrail
View attachment 333587
View attachment 333588
The two wave breakers, see below, required some attention, since they were too thick. Some sanding did the trick.
View attachment 333589
And this is how she looks right now. I think I'm in love...
View attachment 333590View attachment 333591
View attachment 333593Just a little touch up here and there and then it's on to the next sub-project.
View attachment 333592
- Joined
- Sep 3, 2021
- Messages
- 5,197
- Points
- 738

That time investment gives you now a BN with beautiful lines, Johan. Another chapter closed.
Regards, Peter
Great work on those rails Johan, very clean and tidy
@Peter Voog, @Nomad and @GrantTyler ,Bravo Johan! Stunning. Cheers Grant
Thanks for your compliments and encouragement, it's highly appreciated.
- Joined
- Sep 3, 2021
- Messages
- 5,197
- Points
- 738

Based on my experience and possibly others as well, I would like to caution our fellow YQ modelers, who aren't as far along yet.
It concerns parts 19 & 65, which form the backbone of the transom. You are to prepare two bonded assemblies, which are in turn bonded to the keel.
The red arrow in the picture below identifies the bonded assembly. It is critical to position these two parts as accurate as you can get it, small variations at the root of the transom lead to significant deviations at the aft end of the transom. For sake of argument, a misalignment of 0,2mm at the fwd end, over a length of 90mm, leads to a deviation of 1,8mm.

Another tricky step of the build is the installation of the spiderlegs(?)
It pays if you spend time getting these parts positioned correctly.
I don't think there is one single way to approach this part of the build, but small deviations could cause large effects.

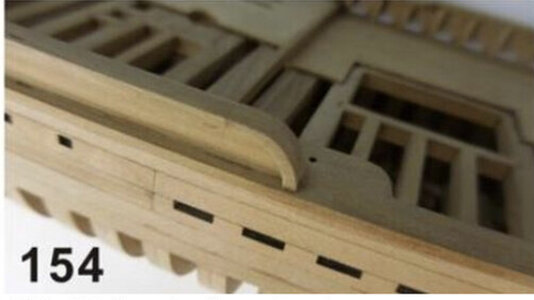
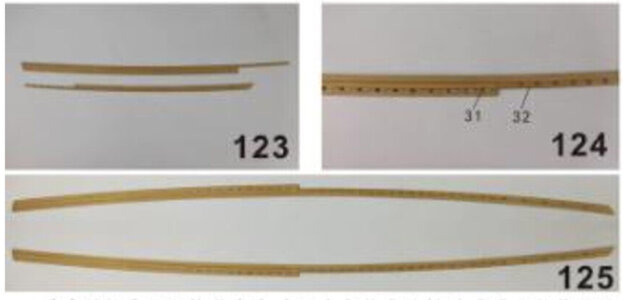
To this day, whenever I look at the stern of my Bluenose, I think the stern sweeps up just a little too much, but based on the first pre-printed planks, parts 31 and 32, picture below, that attach to the frames, I might have the transom positioned too low.
It concerns parts 19 & 65, which form the backbone of the transom. You are to prepare two bonded assemblies, which are in turn bonded to the keel.
The red arrow in the picture below identifies the bonded assembly. It is critical to position these two parts as accurate as you can get it, small variations at the root of the transom lead to significant deviations at the aft end of the transom. For sake of argument, a misalignment of 0,2mm at the fwd end, over a length of 90mm, leads to a deviation of 1,8mm.

Another tricky step of the build is the installation of the spiderlegs(?)
It pays if you spend time getting these parts positioned correctly.
I don't think there is one single way to approach this part of the build, but small deviations could cause large effects.

To this day, whenever I look at the stern of my Bluenose, I think the stern sweeps up just a little too much, but based on the first pre-printed planks, parts 31 and 32, picture below, that attach to the frames, I might have the transom positioned too low.

- Joined
- Sep 4, 2022
- Messages
- 127
- Points
- 113

This reminder is timely for me and I appreciate that you are infusing it with a sense of special importance. I will keep this in mind as I reach that step. Personal experience from those who went before is invaluable to those coming after.Based on my experience and possibly others as well, I would like to caution our fellow YQ modelers, who aren't as far along yet.
It concerns parts 19 & 65, which form the backbone of the transom. You are to prepare two bonded assemblies, which are in turn bonded to the keel.
The red arrow in the picture below identifies the bonded assembly. It is critical to position these two parts as accurate as you can get it, small variations at the root of the transom lead to significant deviations at the aft end of the transom. For sake of argument, a misalignment of 0,2mm at the fwd end, over a length of 90mm, leads to a deviation of 1,8mm.
View attachment 333677
Another tricky step of the build is the installation of the spiderlegs(?)
It pays if you spend time getting these parts positioned correctly.
I don't think there is one single way to approach this part of the build, but small deviations could cause large effects.
View attachment 333678
To this day, whenever I look at the stern of my Bluenose, I think the stern sweeps up just a little too much, but based on the first pre-printed planks, parts 31 and 32, picture below, that attach to the frames, I might have the transom positioned too low.
View attachment 333679
- Joined
- Sep 3, 2021
- Messages
- 5,197
- Points
- 738

Some minor, in terms of effort, but visually not so, work done.
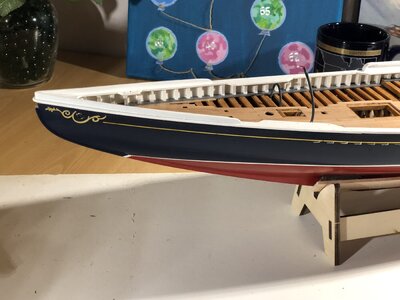
I added the yellow line below the bulwarks and bonded the swirls to the bow.
The swirls I applied came from the kit. Not correct, I know, but for me, at this point in time, good enough.
Next up is the Bluenose name tag. So far I'm rather undecided how to get a somewhat satisfying name tag on the bow. One thing is certain though, the nameplates from the kit are not what I am looking for.
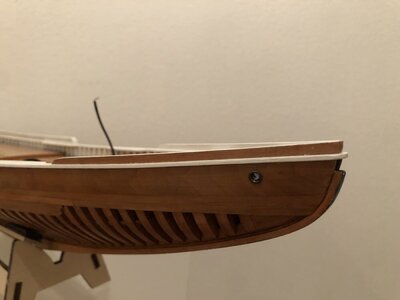
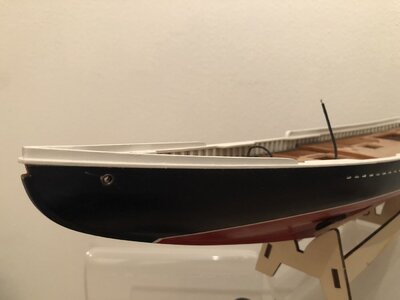
Two pictures from both the starboard- and port bow areas, showing the swirl and the yellow line.


Still amazing how such small lines can give so much line to a hull. Nice, Johan.Some minor, in terms of effort, but visually not so, work done.
I added the yellow line below the bulwarks and bonded the swirls to the bow.
The swirls I applied came from the kit. Not correct, I know, but for me, at this point in time, good enough.
Next up is the Bluenose name tag. So far I'm rather undecided how to get a somewhat satisfying name tag on the bow. One thing is certain though, the nameplates from the kit are not what I am looking for.
Two pictures from both the starboard- and port bow areas, showing the swirl and the yellow line.
View attachment 334032View attachment 334033
Regards, Peter
- Joined
- Sep 3, 2021
- Messages
- 5,197
- Points
- 738

Once the lines were on, they really resulted in a "wow" moment.Still amazing how such small lines can give so much line to a hull. Nice, Johan.
Regards, Peter
Agreed. Such a small detail adds so much to the overall look. Cool!
- Joined
- Sep 3, 2021
- Messages
- 5,197
- Points
- 738

Agreed. Such a small detail adds so much to the overall look. Cool!
Very neat and precise Johan, looking forward to what you do for the ship's name
As with some other build details, I gave the yellow line a lot of thought and did read some other build logs as well, to see how others are applying that line. Some are applying the stripe by hand, while others used a narrow tape of the appropriate color for that line. One might even consider foregoing on that detail, but that was a no-go for me. (And after seeing the line on the hull, very justifiable.)Still amazing how such small lines can give so much line to a hull. Nice, Johan.
Regards, Peter
As far as the color of that line goes, sources indicate that the swirls, the lettering of the name ánd the line running from bow to stern have the color "gold".
On the restauration of my father's Bluenose, since the swirls and name tags were in white, I handpainted a white stripe. I could have gone for a similar approach, a handpainted golden-like stripe, but my painting skills are marginal at best. To add to the dilemma, I wanted a real narrow strip, like no more than 1mm. In real life that would be a strip of 72mm, close to 3", which is, IMHO, still too wide, but smaller than 1mm would look out-of-proportion, when even visible.
After considering my options I went looking for a golden colored tape. I ended up in the local nailshop, upon my daughter's advice, where I purchased a roll of golden striping tape.
Applying the tape on the hull was straightforward; first I applied Tamiya masking tape, giving me a very small ridge to align the striping tape to and to make sure the tape would follow the right curve.
Then the striping tape was applied, followed by the application of a layer of varnish (after removal of the Tamiya tape) to try and seal the strip.

Hi Johan.As with some other build details, I gave the yellow line a lot of thought and did read some other build logs as well, to see how others are applying that line. Some are applying the stripe by hand, while others used a narrow tape of the appropriate color for that line. One might even consider foregoing on that detail, but that was a no-go for me. (And after seeing the line on the hull, very justifiable.)
As far as the color of that line goes, sources indicate that the swirls, the lettering of the name ánd the line running from bow to stern have the color "gold".
On the restauration of my father's Bluenose, since the swirls and name tags were in white, I handpainted a white stripe. I could have gone for a similar approach, a handpainted golden-like stripe, but my painting skills are marginal at best. To add to the dilemma, I wanted a real narrow strip, like no more than 1mm. In real life that would be a strip of 72mm, close to 3", which is, IMHO, still too wide, but smaller than 1mm would look out-of-proportion, when even visible.
After considering my options I went looking for a golden colored tape. I ended up in the local nailshop, upon my daughter's advice, where I purchased a roll of golden striping tape.
Applying the tape on the hull was straightforward; first I applied Tamiya masking tape, giving me a very small ridge to align the striping tape to and to make sure the tape would follow the right curve.
Then the striping tape was applied, followed by the application of a layer of varnish (after removal of the Tamiya tape) to try and seal the strip.
View attachment 334071
If you can paint that stripe nicely by hand, I am sure you will be invited by BMW-Motorrad for helping in there “719 Option” painting program:

Unbelievable what they do!
Regards, Peter
- Joined
- Sep 3, 2021
- Messages
- 5,197
- Points
- 738

I can't deny feeling some jealousy, watching the clip. What an art...Hi Johan.
If you can paint that stripe nicely by hand, I am sure you will be invited by BMW-Motorrad for helping in there “719 Option” painting program:
A screen-shot:
View attachment 334102
Unbelievable what they do!
Regards, Peter
- Joined
- Sep 3, 2021
- Messages
- 5,197
- Points
- 738

Beautiful looking stripes, aren't they? Too bad it's too low, on the model about 4mm.Some minor, in terms of effort, but visually not so, work done.
I added the yellow line below the bulwarks and bonded the swirls to the bow.
The swirls I applied came from the kit. Not correct, I know, but for me, at this point in time, good enough.
Next up is the Bluenose name tag. So far I'm rather undecided how to get a somewhat satisfying name tag on the bow. One thing is certain though, the nameplates from the kit are not what I am looking for.
Two pictures from both the starboard- and port bow areas, showing the swirl and the yellow line.
View attachment 334032View attachment 334033
When I was scrolling through some old pictures of the original Bluenose, I noticed that the stripes on the actual ship were way closer to the bulwark railings than I thought. Admittedly, I followed YQ's drawings, placing the stripes and failed to check...

And the good news? I ain't gonna change, no, dear friends, no re-do on this detail. When I looked at her this morning, I was completely okay with what I saw; the swirls, not accurate and the stripes, positioned too low, they still give this old lady a very sophisticated and classy look.
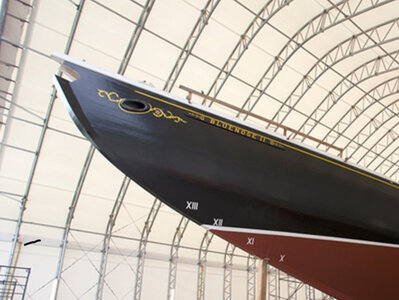
The detail below (the picture is not mine) shows the stripe sitting above the swirl and running up to the opening for the bowsprit.
The swirls are much more intricate than what YQ delivers, but as I said, I am okay with that.
Of notice is the location of the name-plate; in those picture (and in a lot of others) the name plate sits between the stripe and the bulwark railing.
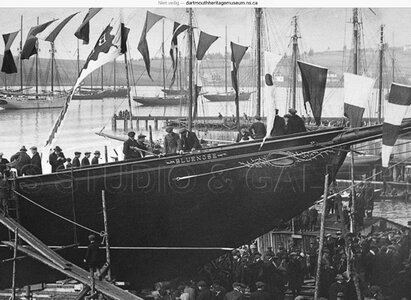
I came also across a picture (again not mine) of the BN II, where the nameplate was positioned below the stripe. Also, the swirl seems to have been simplified as well.
