YQ Bluenose by Johan [COMPLETED BUILD]

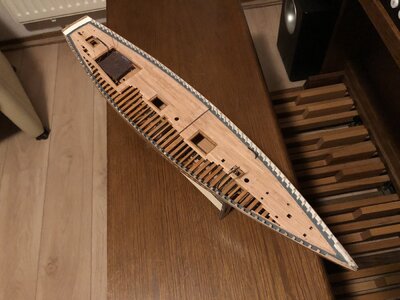
After working in the garden this morning, I spent some time in the afternoon laying the quarter deck.
Laying the decks took a lot longer than I anticipated; using the YQ decks would have been a lot easier and would have taken considerable less lead time, but laying the deck myself gives a feel of accomplishment a pre-printed part can't give you. It's measuring, clipping, checking, trimming, checking, bonding, repeat and so on, and so on.
My lack of build experience also rears it's ugly head every now and then; small, undetected errors and misalignments made themselves known in no uncertain ways. I used a thin strip and my index finger to check the alignment of the deck beams,gladly I thought I didn't feel any humps or bumps. Unfortunately, they were there... The realization came too late to take it all out and redo the planking.
After the upcoming deck sanding I'll take a closer look at the planking to see if the decks are acceptable enough to continu with the build.

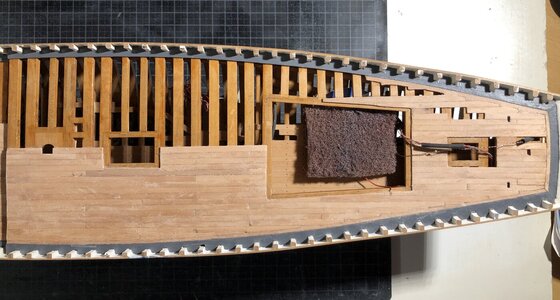
The almost complete planking of the quarter deck. The perimeters of both the aft cabin and hatches still need to be completed.
D708792B-8F4C-46B1-B8F6-7B2B6FA34C63.jpeg

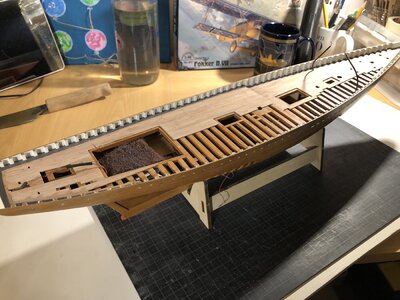
A view on both decks, slowly but surely she's coming together.
E6F41C45-E75D-4B3D-956F-FA8435234CCA.jpeg
 
After working in the garden this morning, I spent some time in the afternoon laying the quarter deck.
Laying the decks took a lot longer than I anticipated; using the YQ decks would have been a lot easier and would have taken considerable less lead time, but laying the deck myself gives a feel of accomplishment a pre-printed part can't give you. It's measuring, clipping, checking, trimming, checking, bonding, repeat and so on, and so on.
My lack of build experience also rears it's ugly head every now and then; small, undetected errors and misalignments made themselves known in no uncertain ways. I used a thin strip and my index finger to check the alignment of the deck beams,gladly I thought I didn't feel any humps or bumps. Unfortunately, they were there... The realization came too late to take it all out and redo the planking.
After the upcoming deck sanding I'll take a closer look at the planking to see if the decks are acceptable enough to continu with the build.

The almost complete planking of the quarter deck. The perimeters of both the aft cabin and hatches still need to be completed.
View attachment 330247

A view on both decks, slowly but surely she's coming together.
View attachment 330248
On this pictures and this angle, the deck looks nice, Johan. But I can understand that you have many experiences richer with this chapter. Hopefully the sanding will give a desired improvement.
Regards, Peter
 
On this pictures and this angle, the deck looks nice, Johan. But I can understand that you have many experiences richer with this chapter. Hopefully the sanding will give a desired improvement.
Regards, Peter
Thanks Peter,
Indeed building this POF-kit gicoves one ample experience. One of the main lessons I learned is to take nothing for granted.
I had a closer look at pictures I took and indeed, it doesn't look that bad at all. So fingers crossed for the, hopefully improved, results of some sandng
 
Last edited:
Today I completed the planking if the quarter deck and sanded and scraped both decks.
Below my take on the fwd and quarter decks. All openings are surrounded by planks to have uninterrupted surfaces for the masts, the hatches and aft cabin. Depending on further customizations I still might have to add some planks here and there, but ist the basis. Now it's touch-up time and some more sanding and scraping and then comes the application of the varnish, after a little testing.

009CF6AC-9869-4F16-8138-F1A8689EF505.jpeg
 
Last edited:
Excellent work and congratulations on this step as well, Johan. I will obviously be watching closely to see what you choose to finish the deck and how it turns out. For once, I will have the benefit of foresight! ;)
 
Today I completed the planking if the quarter deck and sanded and scraped both decks.
Below my take on the fwd and quarter decks. All openings are surrounded by planks to have uninterrupted surfaces for the masts, the hatches and aft cabin. Depending on further customizations I still might have to add some planks here and there, but ist the basis. Now it's touch-up time and some more sanding and scraping and then comes the application of the varnish, after a little testing.

View attachment 330430
You have made a nice pattern with the deck planking, Johan. I have also installed some parts of planks later, when I had made my deck structures. The sanding etc. will make your deck stand out even more beautifully.
Regards, Peter
 
Today I completed the planking if the quarter deck and sanded and scraped both decks.
Below my take on the fwd and quarter decks. All openings are surrounded by planks to have uninterrupted surfaces for the masts, the hatches and aft cabin. Depending on further customizations I still might have to add some planks here and there, but ist the basis. Now it's touch-up time and some more sanding and scraping and then comes the application of the varnish, after a little testing.

View attachment 330430
Good morning Johan. All looking fabulous. I like the pattern the deck follows for the open section. How you finish this will make it really amazing. From my point of view I hope it won’t darken too much. Cheers Grant
 
Good morning Johan. All looking fabulous. I like the pattern the deck follows for the open section. How you finish this will make it really amazing. From my point of view I hope it won’t darken too much. Cheers Grant
Hello Grant, thanks for your compliments.
I ran some tests this afternoon and it's a good thing I did. One of the options, a Humbrol varnish, turned out to ge way too dark. A water-based varnish yielded way better results.
 
You have made a nice pattern with the deck planking, Johan. I have also installed some parts of planks later, when I had made my deck structures. The sanding etc. will make your deck stand out even more beautifully.
Regards, Peter
Thanks Peter. Laying the individual planks yourself is very satisfying, maybe not as crisp as a pre-printed sheet, but so much more authentic...
 
Sanding and scraping, sanding and scraping. Now it's time to set her aside and see how this looks in the morning.

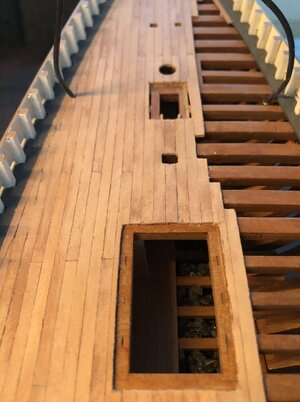
The front deck, after a lot of sanding and scraping.
AC147356-46A8-478C-AF4A-64F58B0CAC65.jpeg
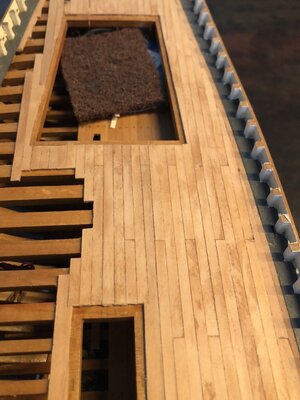
The quarter deck after a similar treatment.
169C5078-17FE-4C29-8064-ED607AE1112F.jpeg
 
Sanding and scraping, sanding and scraping. Now it's time to set her aside and see how this looks in the morning.

The front deck, after a lot of sanding and scraping.
View attachment 330601
The quarter deck after a similar treatment.
View attachment 330600
Good morning Johan. I think your earlier concerns with your deck have been put to rest for sure. It is looking great. Question: what do you use as as a scraper? The deck has transformed from your earlier photos. Cheers Grant
 
Good morning Johan. I think your earlier concerns with your deck have been put to rest for sure. It is looking great. Question: what do you use as as a scraper? The deck has transformed from your earlier photos. Cheers Grant
Thanks so much, Grant.
As I said before, this definitely beats a ready-to-use deck. Looking forward to applying some varnish. For a scraper I used a very sharp and rather flexible, razor-blade like scraper.
 
Beautiful work Johan! I like it a lot, especially the way you made the open side appear to be a work in progress with the staggered boards. ;)
Thanks for your compliments, Dean.
This model poses challenges with every step. The same with the decks. Having seen a lot of methods on open decks; jagged, smooth, chamfered, or the "Dean" treatment, I decided to experiment a little n the below deck's bulkheads and floors. Since I liked the staggered floors below decks and I like to be somewhat consistent, I decided to apply that look on the upper decks as well.
Tonight I applied the first layer of varnish on the upper decks; it looks really promising...
 
Frequently I use the "Saga" as a reference, but apart from being usable as input for my build, it's also entertaining to go through the pages and look at all the details in Jenson's drawings.
On one of those occasions I happened to come across page 49, when I noticed something peculiar. There appear to be two different quarter deck levels, namely when looking at the cabin entrance, the deck is higher than when looking at the left cabin window.
With the redline in the picture below, I indicated what I think is the deck level, based on the entrance threshold.
I also added a blue line, indicating what I assume is the deck level, based on the position of the cabin window. If the stairs is any indication, one could guess the difference is about 40, 45cm, (16, 18") based on a step height of 30cm, 12".
It doesn't change anything to my build, but maybe someone among us has a very creative explanation...

2E8021FB-422B-4AC4-BF84-208A1BD9439C.jpeg
 
Last edited:
After completing the planking of the forward- and quarterdecks, I shifted my attention to the railings.
After dry fitting, where I found deviations between the upper contours of my hull and the pre-cut YQ railing parts, I started the painting of the railing parts, since, once installed, some of the surfaces to be painted are not really accessible. The paining of the parts gave me ample time to consider my options on how to install the railings. For now I'm leaning towards drilling holes through the railings into the stanchions and to use some toothpicks to positively fix the railings to the hull. The first railing to be installed consists of seven parts. I will not make a sub assembly of these parts; too much adhesive to apply at once, so instead I'll install them one at a time.
Luckily for me the paint is still drying, but the moment draws near I have to use my drills...

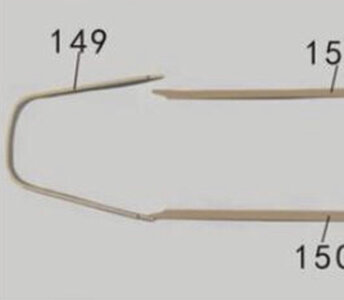
One of the issues I encountered with part 149, part of the monkey rail, see picture below, is that even though I let the part soak and used a heat source the facilitate bending, the first thing happening to me was that the railing part broke... Sick

2F36ACA8-2847-4517-96FD-79DF6F669946.jpeg

Also, the radius in the picture appears to be quite large, but when looking at the drawings, the radius should be rather small. I did some sketching, where I found that the radius should be around 3,5mm/0,14".
The picture below shows my interpretation (shaded) of the monkey rail at the stern. As you can see, a larger radius is not feasible, the railing would creep from under the horizontal part of the rail; not acceptable.

1D52C7CC-D492-4A6C-87D4-3F2AF8A77D61.jpeg

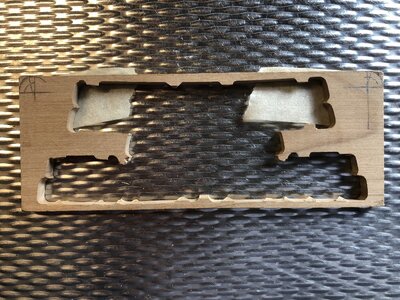
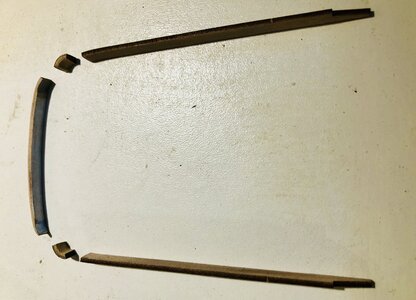
Based on the picture above, I decided to make two separate corner pieces from a piece of scrap with the correct thickness, see picture below.
E128A579-E9B5-43D9-86DA-901A41172FE6.jpeg

After drilling, sawing and trimming, I am now close to what might become an acceptable monkey rail. The constriction at the outer ends of the left part will be trimmed at a later stage:
F83B9239-44A2-46BA-AFC5-F6D5477815E7.jpeg
 
Back
Top