- Joined
- Sep 3, 2021
- Messages
- 5,197
- Points
- 738

Right in one...Hmmm…one less hinge I guess?.
 |
As a way to introduce our brass coins to the community, we will raffle off a free coin during the month of August. Follow link ABOVE for instructions for entering. |
 |
 |
The beloved Ships in Scale Magazine is back and charting a new course for 2026! Discover new skills, new techniques, and new inspirations in every issue. NOTE THAT OUR FIRST ISSUE WILL BE JAN/FEB 2026 |
 |

Right in one...Hmmm…one less hinge I guess?.

That are some nice improvements of little items, Johan.Things are progressing slowly, mainly due to making quite a few parts myself, instead of using the YQ supplied parts. I blame some not-to-be-mentioned friends, who are setting some standards here.
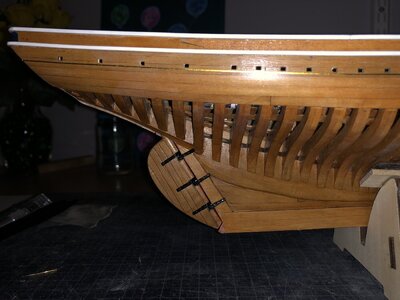
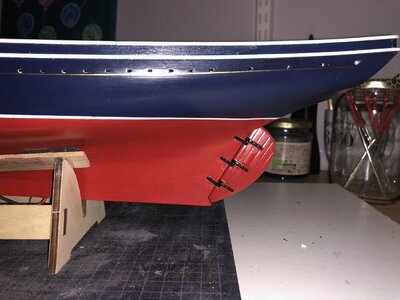
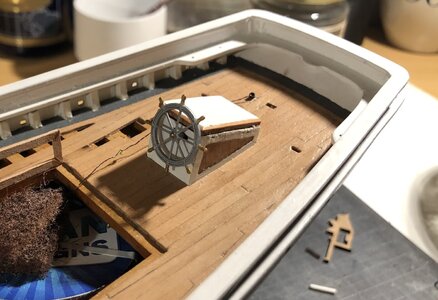
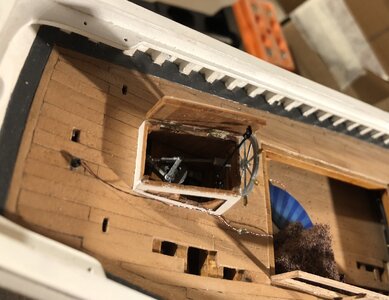
What was achieved though was the installation of the rudder, where I used the YQ parts, slightly modified and the wheel house was also completed and installed.
The wheel house also accommodates the steering mechanism, with a big thanks to @Henk Liebre; that being the main reason I couldn't use the standard parts.
Rudder installation starboard side:
View attachment 343090
Rudder installation port side:
View attachment 343091
Wheel house closed:
View attachment 343092
Wheel house opened:
View attachment 343096

Thanks Peter.That are some nice improvements of little items, Johan.Building it will have cost you the necessary time, but it is now paying off again.
With beautiful recessed hinges in the hatch of the wheelhouse!
Regards, Peter

Thanks, Lawrence,Hello Johan, Golly but you guys are sure setting some very High Standard's, Do not know if I will be able to compete with you, but will try.
Finally started working in my Old Ship Yard again
Off to a very slow start but it sure feels good to be back again.
Regards Lawrence
Hello Johan, Golly but you guys are sure setting some very High Standard's, Do not know if I will be able to compete with you, but will try.
Finally started working in my Old Ship Yard again
Off to a very slow start but it sure feels good to be back again.
Regards Lawrence
I agree with Johan: Nice to see you back on the shipyard and see the updates in your build-log.Thanks, Lawrence,
I can’t tell how pleased I am that you found your way to the shipyard again. Slow isn’t bad; it gives you time to think and think ahead. I find I am enjoying myself with tinkering with stuff, while turning ideas around in my head, imagining how things could look. That sometimes can be disappointing; the end result then looks exactly as I imagined...
#restlessly waiting for your updates#


Thanks Paul,Impressive!
It’s looking nice and well thought out, Johan. It’s a complicated part.As before, work continues on the elements found on deck. Now I find myself occupied with the main cabin.
I didn't want to use the YQ supplied parts, because I want to have a partially open roof structure, second, the proposed configuration of the main cabin panels are copied form the BN II, which shows a horizontal orientation of the planks, whereas the original BN most likely had vertically orientated planks. The final two reason for scratchbuilding the aft cabin are the two lights, which need to be attached to the ceiling somehow.
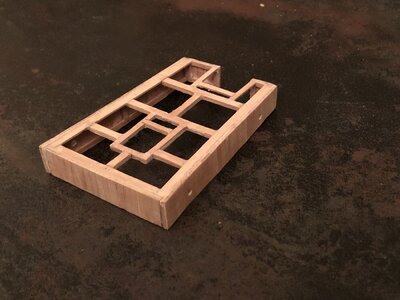
First I build some panels. The panels constitutes a frame, complemented by planks. I again used the YQ supplied parts as template. Since the panels are asymmetric, they warp like crazy. The only option I have to avoid this, is to make the panels double sided. That would result in quite some bulky panels, which I don't prefer.
After having build the panels, I constructed the roof structure. It has provisions for the skylight and the cabins' entrance.
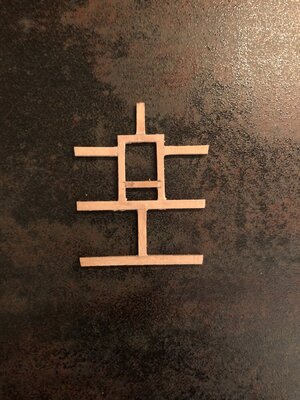
The framework looked like some Chinese character:
View attachment 343941
Below the coarse build of the aft cabin, with a completed roof frame. The construction is incredibly fragile, plus the warpage of the panels is frustrating. Now I am in the planning stage of the entrance parts.
The cabin is about 80mm long, 57mm wide and max 12,5mm high.
View attachment 343942

Thanks Peter, I whole-heartedly agree with "complicated" and I'm not out of the woods yet...It’s looking nice and well thought out, Johan. It’s a complicated part.
Regards, Peter
Good morning Johan. Stunning. Have you change nationality or are you just commiserating with the belgiums going out of the World CupAs before, work continues on the elements found on deck. Now I find myself occupied with the main cabin.
I didn't want to use the YQ supplied parts, because I want to have a partially open roof structure, second, the proposed configuration of the main cabin panels are copied form the BN II, which shows a horizontal orientation of the planks, whereas the original BN most likely had vertically orientated planks. The final two reason for scratchbuilding the aft cabin are the two lights, which need to be attached to the ceiling somehow.
First I build some panels. The panels constitutes a frame, complemented by planks. I again used the YQ supplied parts as template. Since the panels are asymmetric, they warp like crazy. The only option I have to avoid this, is to make the panels double sided. That would result in quite some bulky panels, which I don't prefer.
After having build the panels, I constructed the roof structure. It has provisions for the skylight and the cabins' entrance.
The framework looked like some Chinese character:
View attachment 343941
Below the coarse build of the aft cabin, with a completed roof frame. The construction is incredibly fragile, plus the warpage of the panels is frustrating. Now I am in the planning stage of the entrance parts.
The cabin is about 80mm long, 57mm wide and max 12,5mm high.
View attachment 343942
 . I see the boys in orange are through to the last 8. Nice! Don’t shoot me but I am supporting England for this World Cup- must be the Victory’s influence
 . Cheers Grant
Morning Grant, thanks, the build of the aft cabin poses a real challenge, but it's very satisfying once the bits and pieces start coming together.Good morning Johan. Stunning. Have you change nationality or are you just commiserating with the belgiums going out of the World Cup. I see the boys in orange are through to the last 8. Nice! Don’t shoot me but I am supporting England for this World Cup- must be the Victory’s influence
. Cheers Grant

Nice work Johan! Wherever did you get that miniature steering mechanism?Things are progressing slowly, mainly due to making quite a few parts myself, instead of using the YQ supplied parts. I blame some not-to-be-mentioned friends, who are setting some standards here.
What was achieved though was the installation of the rudder, where I used the YQ parts, slightly modified and the wheel house was also completed and installed.
The wheel house also accommodates the steering mechanism, with a big thanks to @Henk Liebre; that being the main reason I couldn't use the standard parts.
Rudder installation starboard side:
View attachment 343090
Rudder installation port side:
View attachment 343091
Wheel house closed:
View attachment 343092
Wheel house opened:
View attachment 343096

Thanks, Dean.Nice work Johan! Wherever did you get that miniature steering mechanism?

Always nice if you can help each otherherever did you get that miniature steering mechanism
Thanks, it was fun to work with Peter on the scale and dimensions required to make the steering mechanism model. And your printing of the resin parts was a key contribution. Everyone contributed, and I am very happy that our efforts are coming to fruition on models now. That makes it worth time spent!Always nice if you can help each other
The anchors you made are at the printer to soon shine on Johan's model
Nice addition Dean, still happy with it
Regards Henk
