- Joined
- Sep 3, 2021
- Messages
- 5,197
- Points
- 738

Modeling is trying to replicate something, knowing one can impossibly remain true to scale.Love this sentence...
 |
As a way to introduce our brass coins to the community, we will raffle off a free coin during the month of August. Follow link ABOVE for instructions for entering. |
 |
 |
The beloved Ships in Scale Magazine is back and charting a new course for 2026! Discover new skills, new techniques, and new inspirations in every issue. NOTE THAT OUR FIRST ISSUE WILL BE JAN/FEB 2026 |
 |

Modeling is trying to replicate something, knowing one can impossibly remain true to scale.Love this sentence...

Pro:
- Definitely less obtrusive.
Con:
- The original BN casing shows three hinges.
- Increased vulnerability of the two remaining hinges

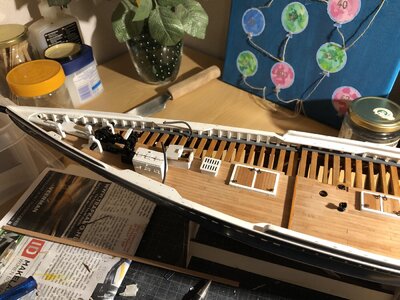
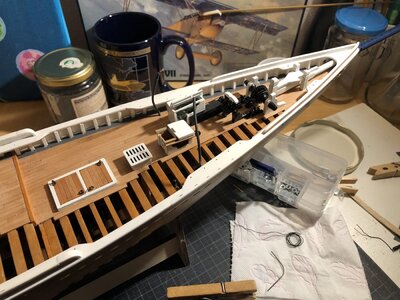
How a few small things can create big thought musings. Both with you and with fellow builders who think along with you.@Frank48, @dockattner, @Dean62, @Heinrich.
Thank you so much for your time reading through my posts ánd for taking the time to share your insights and ideas with me.
Your frank and brutally honest observations at least made me reconsider earlier made decisions.
1. What's undisputed is the fact that the functional hinges are too large for scale 1:72.
2. A few months back I was gifted the engine by @Henk Liebre. From that moment onward there was one overruling requirement, it should be possible to show the engine. That led in my simpleton mind to the second, non-negotiable requirement: both access covers should be able to be opened and closed. About eight months later I found myself dealing with the afore mentioned requirements.
3. While trying to come up with a functional set of hinges, I quickly realised, well quickly, it took me three attempts, that functional hinges would not match the scale.
4. My selfmade hinges severely lacked robustness, resulting in the decision to apply OTS hinges. By the way, fixing the access covers in the open position, as suggested by Dean, did not get past the design review committee: it failed requirement 2.
5. It was suggested by Paul to reduce the number of hinges to minimize the visual impact of the out-of-scale hinges. I still haven't come to terms with this suggestion; the engine casing has been painted, allowing me to frequently walk up to the shipyard to evaluate my response to the current three hinge layout.
After careful considerations, I have decided to maintain the current configuration, with the possibility to eventually reduce the number of hinges.
Again, my heartfelt thanks for your time and wise words, they áre appreciated.
Johan
View of the LH-side, access covers closed.
View attachment 340438
View of the RH-side, top access cover opened
View attachment 340437

The devil is in the details...How a few small things can create big thought musings.

Thanks for your praise, Peter.The result is something you are comfortable with. And if it looks like this, with the white lacquer and from a normal viewing distance, then you have earned a big compliment. And seen from the starboard side ....... you don't even see them because the hatch is open, one of your goals. Mission accomplished, Johan.
Regards, Peter

When I was detailing the box, I hoped for the paint to visually soften the hinges. Luckily it did just that.I think just painting it all white made the hinges fade back. Nicely done.

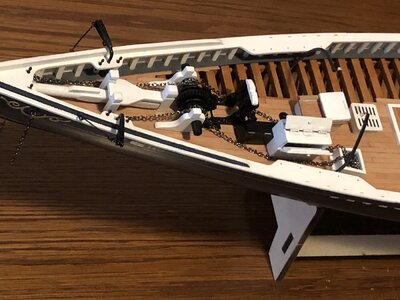
It’s looking very nice, Johan. And a big difference with the other BN.Some more foredeck details saw daylight; the two davids and the chain box were assembled, painted and bonded to the deck.
I also did some blackening of copper hardware, like nails and eyebolts. Some blackening liquid was purchased, but... submerging the parts for the adviced (and beyond) time didn't yield the required results, other than a slight discoloration of the parts. So... I took a 12V power supply and connected a cathode to the parts to be blackened (submerged in the liquid) and inserted an anode into the liquid and thát worked rather brilliantly.
The foredeck is now nearing completion, apart from various hardware bits: the chimney for the stove, the anchors and the bits for the standing and running rigging.
The picture below show the current status of the foredeck. It sure looks pretty crowded, imagine having to find your way there in heavy seas, wind howling, sub-zero temperatures, ropes all over the place and Murphy lurking in the shadows... Not my idea of a safe working environment.
View attachment 341125
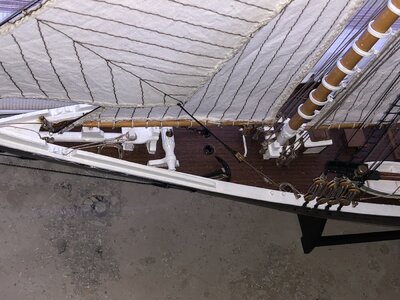
For comparison, I also took a picture, see below, of the same area of my other Bluenose. Mind that this model is between 35 and 40 years of age, but the YQ kit is, despite all its inaccuracies, significantly more detailed and presents overall a more convincing model.
View attachment 341126
Since I'm dragging my feet to start the dories, that would logically be next, following a route from fore- to quarter deck, my next focus will instead be the rudder, wheel house and aft cabin. At least, that's the current plan...
In my preparations for the rudder-project, I had to conclude that the aft part of the quarter deck indeed sweeps up more than it is supposed to, due to fact that in the very early stages of the build the spiderlegs were slightly rotated, causing the up sweep of the aft deck. Nothing to it now, I just have to deal with it.
For my fellow Bluenose builders, in the early stages of the build; check, check and double check again the position of the spiderlegs and make sure they are as accurate as you can get it. I checked the position a couple of times, but the tiniest mistake at the root will give you a huge headache later on. I think this is one of the most critical (not to be mistaken for "complex") parts of the build so far. This concerns the parts 19 and 65, the parts on the left side of the picture.
View attachment 341133

Thanks Heinrich,The foredeck looks lovely, Johan, and more importantly, very realistic. The color contrast between the black and white fittings is most convincing.

Thank you Peter.It’s looking very nice, Johan. And a big difference with the other BN.
Regards, Peter
Good afternoon Johan. Great work. All those little details are making this a busy and wonderful model of the BN. I’m not going to restart the interesting debate on the hinges however I would have gone for smaller hinges or only 2 as Dean and Paul suggested. Hey I am a mere observer and this is your BN@Frank48, @dockattner, @Dean62, @Heinrich.
Thank you so much for your time reading through my posts ánd for taking the time to share your insights and ideas with me.
Your frank and brutally honest observations at least made me reconsider earlier made decisions.
1. What's undisputed is the fact that the functional hinges are too large for scale 1:72.
2. A few months back I was gifted the engine by @Henk Liebre. From that moment onward there was one overruling requirement, it should be possible to show the engine. That led in my simpleton mind to the second, non-negotiable requirement: both access covers should be able to be opened and closed. About eight months later I found myself dealing with the afore mentioned requirements.
3. While trying to come up with a functional set of hinges, I quickly realised, well quickly, it took me three attempts, that functional hinges would not match the scale.
4. My selfmade hinges severely lacked robustness, resulting in the decision to apply OTS hinges. By the way, fixing the access covers in the open position, as suggested by Dean, did not get past the design review committee: it failed requirement 2.
5. It was suggested by Paul to reduce the number of hinges to minimize the visual impact of the out-of-scale hinges. I still haven't come to terms with this suggestion; the engine casing has been painted, allowing me to frequently walk up to the shipyard to evaluate my response to the current three hinge layout.
After careful considerations, I have decided to maintain the current configuration, with the possibility to eventually reduce the number of hinges.
Again, my heartfelt thanks for your time and wise words, they áre appreciated.
Johan
View of the LH-side, access covers closed.
View attachment 340438
View of the RH-side, top access cover opened
View attachment 340437

Thanks Grant,Good afternoon Johan. Great work. All those little details are making this a busy and wonderful model of the BN. I’m not going to restart the interesting debate on the hinges however I would have gone for smaller hinges or only 2 as Dean and Paul suggested. Hey I am a mere observer and this is your BN. Awesome modelling Johan. Cheers Grant
Hmmm…one less hinge I guess?And the unimaginable has happened...
View attachment 342021
 .
.Less is more …….?And the unimaginable has happened...
View attachment 342021
