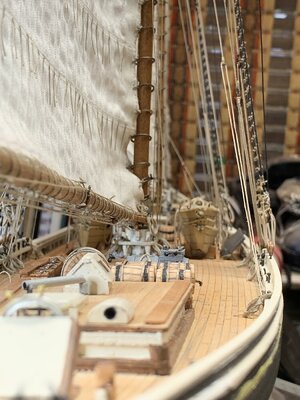
YQ Bluenose by Johan [COMPLETED BUILD]

Everyday, other activities permitting, I put some time into this build. I'm now processing one frame per day; cutting, sanding, bonding, beveling, filing, sanding and fitting ánd sometimes a necessary repair. The repairs are mainly caused by my clumsiness and sometimes by the rather brittle wood of the frames. The fix I described in post #49, works well for me. The repairs or reinforcements might not always be necessary, but they give me some confidence.
So unless I have something out of the ordinary to share, I will not post the progress I made on the frame production, since it's more of the same.
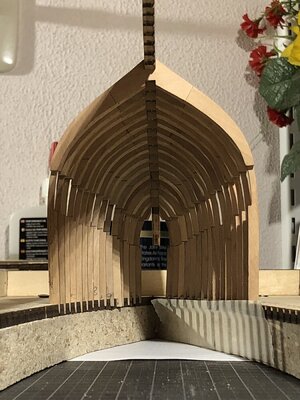
Rest assured, I will be working on the frames and once I am able to share the apparent obligatory "cathedral" view, I will share those pictures. See y'all later!
And when you have completed your Bluenose you can also post a Celebratory Cathedral View, as from my own BN
Bluenose Stbd view 3.jpg
Just a thought! Enjoy the voyage of your build. Rich (PT-2)
 
Okay, just this morning I wrote that, unless I have something to share, I wouldn't post my progress on the frames.
And now, not even a day has passed and I think I'm in trouble, in really deep trouble. 15 Frames have been bonded, beveled, filed, sanded and fit checked. When I started to check a little more carefully I found a lot amiss... I tried to perform the beveling as well as I could, but when checking the curvature of the hull I found that I still need a lot beveling in order for the frames to line up. Although I checked the frames against the drawings; in general the are reasonably well within specs, the fit in the jig is not really optimal and that's an euphemism; frame 4 for instance does not sit in line with the adjacent frames, so it's not possible to draw a nice imaginary smooth curve through the bottom of the frames.
I also tried to fit the frames to the keel, while keeping the frames in the jig as well. Here I found that when the frames meet with the keel, various frames started to slightly move in the jig, in the vertical axis.
The root course, I think, is my lack of experience with building a POF model, plus I'm a rather theoretically versed, rather than artisanal.
So I welcome any advice on how to proceed; start anew (ordering a new set of frames), continue as is and perform the final beveling at the appropriate the assembly step, or check frame by frame, correct the beveling where necessary and continue with the following frames... What is wisdom?

Port side frame misalignment, especially frame 13. The bevel of frame 12 is also too shallow.
E677B5AE-1D92-4BB2-864F-85468188F2FD.jpeg

Starboard side frame misalignment, especially frame 13. The bevel of frame 12 is also too shallow
0C016F79-D4C8-4287-A9C2-7A21C44E84CC.jpeg

Very poor partial cathedral view, showing numerous inaccuracies.
5C60DF98-86DA-4138-BA33-FDD3AECED6EC.jpeg

Side view, not too bad...
A2FE72BF-E327-4F9F-BC3F-8FAD35A9987A.jpeg
 
Last edited:
Johan it is so difficult to make a call based on pictures. At this stage, you must remember that nothing is glued, so proper alignment will be impossible to check. The one tip I can give you if you want to check for fitment on the keel, is to make sure that the frames are fully inserted into the notches and as close as possible to the rabbet line. At this stage, I wouldn't worry too much about the alignment of frames in the jig, because they are also sitting loose and final beveling is done when everything is assembled and glued. Looking at your cathedral view I cannot see anything that is obviously wrong.

But to quote your words in the WB log - let's wait for the heavies to advise.
Thanks Heinrich, for now I'll continue frame building and pay extra attention to both the beveling ánd the fit of the frames to the keel, in relation to the rebate.
In the meantime, in between building frames, I'll keep my fingers crossed...
 
Okay, just this morning I wrote that, unless I have something to share, I wouldn't post my progress on the frames.
And now, not even a day has passed and I think I'm in trouble, in really deep trouble. 15 Frames have been bonded, beveled, filed, sanded and fit checked. When I started to check a little more carefully I found a lot amiss... I tried to perform the beveling as well as I could, but when checking the curvature of the hull I found that I still need a lot beveling in order for the frames to line up. Although I checked the frames against the drawings; in general the are reasonably well within specs, the fit in the jig is not really optimal and that's an euphemism; frame 4 for instance does not sit in line with the adjacent frames, so it's not possible to draw a nice imaginary smooth curve through the bottom of the frames.
I also tried to fit the frames to the keel, while keeping the frames in the jig as well. Here I found that when the frames meet with the keel, various frames started to slightly move in the jig, in the vertical axis.
The root course, I think, is my lack of experience with building a POF model, plus I'm a rather theoretically versed, rather than artisanal.
So I welcome any advice on how to proceed; start anew (ordering a new set of frames), continue as is and perform the final beveling at the appropriate the assembly step, or check frame by frame, correct the beveling where necessary and continue with the following frames... What is wisdom?

Port side frame misalignment, especially frame 13. The bevel of frame 12 is also too shallow.
View attachment 281825

Starboard side frame misalignment, especially frame 13. The bevel of frame 12 is also too shallow
View attachment 281826

Very poor partial cathedral view, showing numerous inaccuracies.
View attachment 281827

Side view, not too bad...
View attachment 281828
Hi Johan. Send you a PM. Talking Directly-Dutch is perhaps a bit more easy.
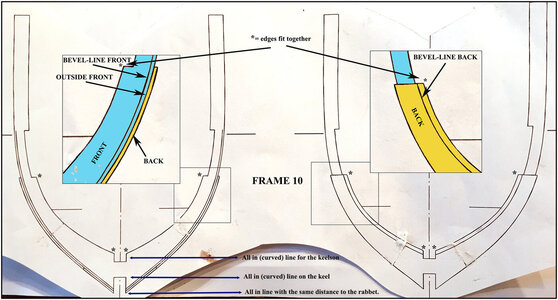
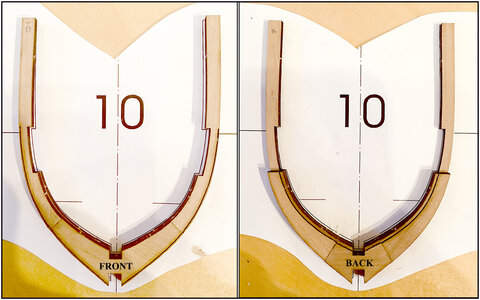
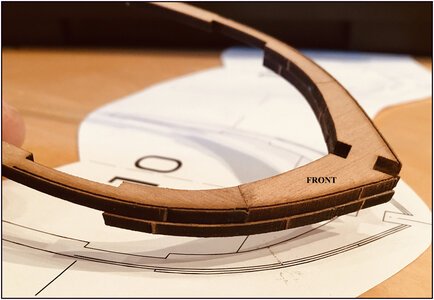
With this pictures as a first help:
Frames10-1.jpg
Frames10-2.jpg
Frames10-3.jpg
Perhaps it gives already a aha.
Regards, Peter
 
@Peter Voogt Thank you, Peter. That was what I was trying to say yesterday - you just explained it much better. ThumbsupTo me it looked as if all frames are not equally deep in the jig and/or the keel notches.
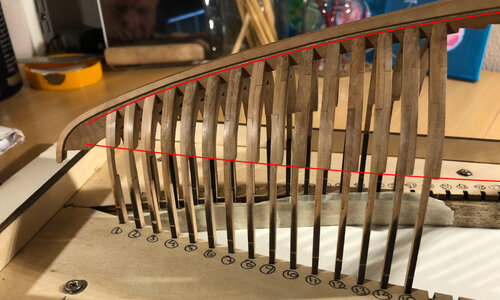
 
@Peter Voogt Thank you, Peter. That was what I was trying to say yesterday - you just explained it much better. ThumbsupTo me it looked as if all frames are not equally deep in the jig and/or the keel notches.
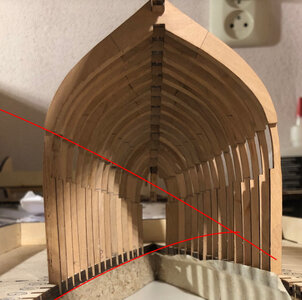
That was the point I didn’t make; when the frames are all sitting in their respective positions in the keel, they are not sitting aligned in the jig and vice versa; when aligned in the jig, the frames are not positioned properly in the keel notches. Oh, that means I need to check the frames against the drawings; parts shifted during bonding or not having paid enough attention to correct alignment of the respective frame parts... At best massive rework. Sick
 
That was the point I didn’t make; when the frames are all sitting in their respective positions in the keel, they are not sitting aligned in the jig and vice versa; when aligned in the jig, the frames are not positioned properly in the keel notches. Oh, that means I need to check the frames against the drawings; parts shifted during bonding or not having paid enough attention to correct alignment of the respective frame parts... At best massive rework. Sick
I seem to have been pulling the same oars as you as I too often have to remake things two or three times to get it right. Part of the hobby I guess. I am confident that you will come out well as you proceed from one phase to the next as each one depends upon the correct fit of the prior. As the Irish song goes, "Don't give up 'til it's over. Don't quit if you can!" Rich
 
That was the point I didn’t make; when the frames are all sitting in their respective positions in the keel, they are not sitting aligned in the jig and vice versa; when aligned in the jig, the frames are not positioned properly in the keel notches. Oh, that means I need to check the frames against the drawings; parts shifted during bonding or not having paid enough attention to correct alignment of the respective frame parts... At best massive rework. Sick
Just a small addition, before we meet 'life':
Checking the frames on the drawings is important. They came out of the YQ 3D design, with all of there connecting measurements.
The even aligned placement in and on the keel is now the most important for these frames. Because you cut the frames later on the thin ends. And make the top of the boards even.
And if the frames do not flow with the drawing …… try to refit……. But then it is important how you made the already made bevels.
We can judge that when we meet tomorrow.
There height in the jig is an extra indication. Because the top of the rear parts of the frames should actually also lie on an even curved line. This is where the bearing breams come along and the deck beams on the noses.
So many items are related to each other.
Regards, Peter
 
A small part can already be explained, Johan.
At fixed points, all frames must align.
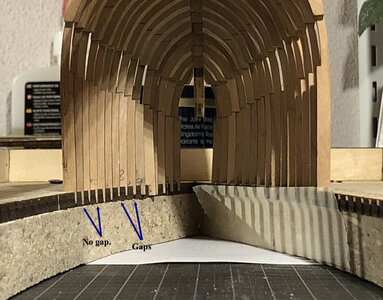
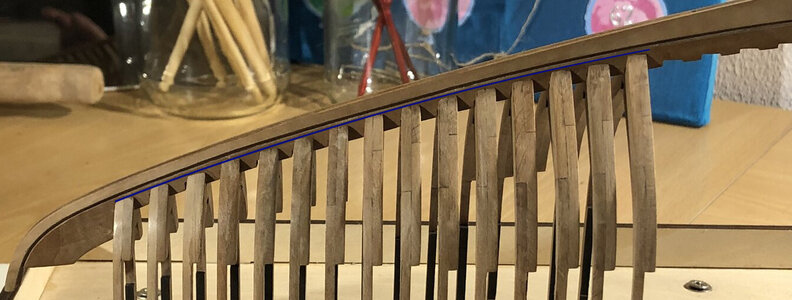
Here at the bottom of your jig, on 1 straight line.
View attachment 282072

And no matter how close to the rabbet, but every frame with the same space:
View attachment 282073
Regards, Peter
Looking at the side view, frame 13 is twisted. So be sure to use a spacer block between each frame to ensure they are equally spaced and are parallel to one another and finally that they are perpendicular to the keel.
 
Today Peter and I met at my home in Loosdrecht.
As far as I'm concerned, we had a very enjoyable afternoon, where we discussed not only the Bluenose, but also a myriad of other topics.
Peter brought his Bluenose along, so the Admiral and I could witness in person this fantastic build taking shape. To see his pictures on SoS is one thing, but seeing this Bluenose in real life is something else altogether.
We also discussed my build and the issues I ran into. Here he had some pretty sound advice, mainly on which interface points to keep a close eye on; frame/keel and frame/keelson, frame/floorbeams, but also frame assembly, as described in Peter's build log and final beveling of the frames.
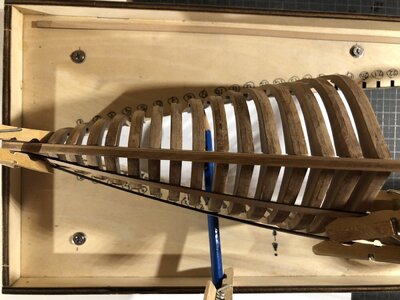
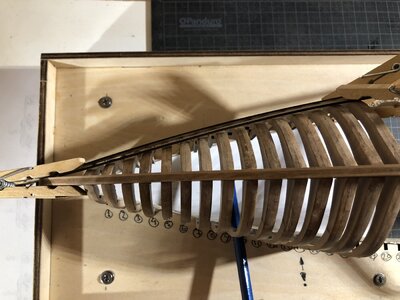
I'm in need for some elbow grease, but all is not lost; with Peter's advice I started reworking the already assembled frames. The pictures below show the results.

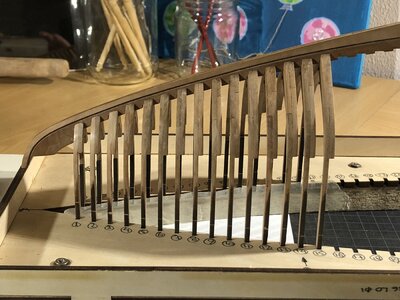
Frame/keel interface adjusted, closer to rebate and properly in line with one another.
Floorbeam supports lign up within limits.
D06F942A-3168-451D-94D1-229ECDBF6C76.jpeg

Frame top ends (bottom) connecting with jig, again within limits. The same applies flor the floorbeam supports. Not perfect but workable.
CA4F0693-EB43-445F-99BC-30F83CE884FF.jpeg
 
Looking at the side view, frame 13 is twisted. So be sure to use a spacer block between each frame to ensure they are equally spaced and are parallel to one another and finally that they are perpendicular to the keel.
Hey Dean,

It's been a while since I've seen any posts from you, I hope it's you enjoying the Texan sun, but I suspect it's for different reasons...

I'll take a closer look at frame 13. When taking yet again a closer look, I noted that possibly 11 also suffers from twisting. Driven by your advice, I measured the distance between the frames at their largest cross section. The variation I found is in the order of 0,3mm (0,012"). One of the suspects for this variation is the thickness variation of the bond, but also the thickness variations of the frame parts are contributing; I ran some thickness measurements and sofar I found a maximum delta of 0,15mm (0,006").
With respect to the spacer blocks; I've seen that option in one of the build blogs, I think it was Henk Liebre's.
Per YQ design, the frames are supported by the keel on one side and by the jig on the other. One might say that there are three support points, one on the keel and two on the jig, which means that mathematically one can define a plane through these points. Theoretically, adding spacer blocks would make the frame-positioning overconstrained. Checking theory against real life however, spacer blocks appear to be added value; the flexibility of the frames is just too much, especially so for the larger frames...

Thanks for your advice!

Johan
 
Last edited:
Today Peter and I met at my home in Loosdrecht.
As far as I'm concerned, we had a very enjoyable afternoon, where we discussed not only the Bluenose, but also a myriad of other topics.
Peter brought his Bluenose along, so the Admiral and I could witness in person this fantastic build taking shape. To see his pictures on SoS is one thing, but seeing this Bluenose in real life is something else altogether.
We also discussed my build and the issues I ran into. Here he had some pretty sound advice, mainly on which interface points to keep a close eye on; frame/keel and frame/keelson, frame/floorbeams, but also frame assembly, as described in Peter's build log and final beveling of the frames.
I'm in need for some elbow grease, but all is not lost; with Peter's advice I started reworking the already assembled frames. The pictures below show the results.

Frame/keel interface adjusted, closer to rebate and properly in line with one another.
Floorbeam supports lign up within limits.
View attachment 282386

Frame top ends (bottom) connecting with jig, again within limits. The same applies flor the floorbeam supports. Not perfect but workable.
View attachment 282387
Hi Johan. I also experienced our contact as very pleasant. And there were more common interests than just model building. As far as I'm concerned, it certainly wasn't a one-off. Possibly also together with Henk. Because in terms of mutual distances, we live in an advantageous position in the small Netherlands.
Regards, Peter
 
Back
Top