
I think it would look nice. But ultimately your choice. You’re doing great work!The tween deck beams cleaned up, installed and clear coated.
View attachment 226462
Separating, sanding prepping main deck beams. These are the "single" beams, clear coated on the tops and sides, need to flip and do the bottoms.
View attachment 226463
I separated all the parts from the sprues. These are grouped for the pre install assembly groups, waiting to be cleaned up.
View attachment 226464
I sanded the outer radius on the mini disk sander. This allowed me to remove the bevel from that side.
View attachment 226465
Then, laying it on the bench on a sandpaper disk to help hold it steady, sanded the inside curve to remove the little ridge and spru bits. By holding the stick with PSA paper on it parallel to the bench, it removed the bevel from that side so it is now square.
View attachment 226466
View attachment 226467
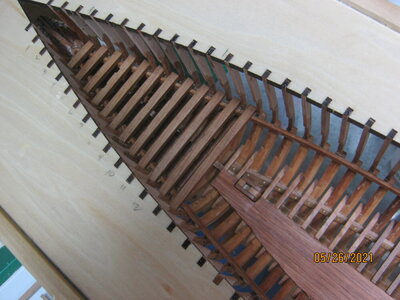
Question - I have to assume that the bilge deck beams and the tween deck beams both had deck planking on them. I've been wondering if it would be appropriate to lay some deck planks on them (partially covering the beams) , similar to the partially covered main deck? Perhaps decking the port side half?
View attachment 226471
I will need to make that decision now, as it would be impossible to do after the main deck beams go in. I do have some pear strips I could run through the thickness sander to thin down a bit for that purpose.
Opinions anyone?

-

SUBSCRIBE TO SHIPS IN SCALE TODAY!
The beloved Ships in Scale Magazine is back and charting a new course for 2026!
Discover new skills, new techniques, and new inspirations in every issue.
NOTE THAT OUR NEXT ISSUE WILL BE July/August 2026 -

Win a Free Custom Engraved Brass Coin!!!
As a way to introduce our brass coins to the community, we will raffle off a free coin during the month of August. Follow link ABOVE for instructions for entering.
- Home
- Forums
- Ships of Scale Group Builds and Projects
- Bluenose PoF Group Build
- Bluenose Group Build Logs
You are using an out of date browser. It may not display this or other websites correctly.
You should upgrade or use an alternative browser.
You should upgrade or use an alternative browser.
Interesting. Looking at a few practicums, I have not seen any that apply decking below the main deck. Two builds I saw have a lower deck, but the next deck up is located in the stern area instead of the bow area. Hmm.
I'm gonna continue as is though, but I will deck 1/2 of the two lower decks on the port side. I was able to cut planking from the main deck beam frets to do what I wanted on the upper deck in the bow area. I don't have enough pear for the lower deck, but I do have some stuff to cut decking from some cherry. There will be some color difference, but the deck didn't look like the framing anyway, so that might be a good thing.
Meanwhile, moving along on cleaning up and clear coating the main deck beams.
As I said before, I'm using marine spar poly varnish for the first coat because I like the color, but the finish was gloss.
The second coat, I used crystal clear satin poly. That turned out to be a bit to glossy for me.
I then tried some matte poly, but that was too flat for sure.
Finally, I had poured some of the satin into a 1 ounce bottle for use. The can had been sitting on the shelf for about 2 weeks. I opened the can, being careful not to stir it up, then using a small baster I have that I use like a giant eye dropper, I removed about 1/3 of the liquid from the top of the can, putting it in another container temporarily. Then stirred the rest up well and used that to fill another 1 ounce bottle. All the other stuff went back in the can and sealed up.
I then tested the new "satin" mix. As it had a higher percentage of the flattening agent, It came out a little flatter than the original satin did, and more to my liking.
I guess it's a "custom satin blend" now.
I'll have the lower deck in the bow done and finished tomorrow, pictures then.
Last edited:
A nice interview and summary of The Saga. I was a little ‘reluctant’ to post photos of drawings of the inside of the BN-II out of The Saga. I'm not sure this is allowed on our forum, for instructive, non-commercial purposes?Gentlemen, does this help?
Advice from my side: Invest some money in The Saga. But thats not included the drawings. In The Saga are ‘small version’ of those drawings.
Regards, Peter
Last edited:
I finished the 1/2 decking on the deck below the main deck forward. These planks were cut from the scrap frets of the main deck cross beams.
For the bottom deck, I made some cherry strips from a chunk I had in the shop. 3/64" X 1/8" X about 26" long. You can see in both picks the clear coated color.


It's just a tad pinker than the pear, but will be ok I think. Just enough color shift from framing to decking. I like the decking on the interior. If I had more data to show additional deck levels and locations, I might be tempted to do more. This is a rabbit hole though, as it might prompt planking on the interior of the frames, partitions, etc., so I'll just leave it lie as the two decks.
No work on her for a few days. I have a time sensitive set of construction drawings to do for a client's 3 season porch.
For the bottom deck, I made some cherry strips from a chunk I had in the shop. 3/64" X 1/8" X about 26" long. You can see in both picks the clear coated color.
It's just a tad pinker than the pear, but will be ok I think. Just enough color shift from framing to decking. I like the decking on the interior. If I had more data to show additional deck levels and locations, I might be tempted to do more. This is a rabbit hole though, as it might prompt planking on the interior of the frames, partitions, etc., so I'll just leave it lie as the two decks.
No work on her for a few days. I have a time sensitive set of construction drawings to do for a client's 3 season porch.
Hi EJ,I finished the 1/2 decking on the deck below the main deck forward. These planks were cut from the scrap frets of the main deck cross beams.
For the bottom deck, I made some cherry strips from a chunk I had in the shop. 3/64" X 1/8" X about 26" long. You can see in both picks the clear coated color.
View attachment 227335
View attachment 227336
It's just a tad pinker than the pear, but will be ok I think. Just enough color shift from framing to decking. I like the decking on the interior. If I had more data to show additional deck levels and locations, I might be tempted to do more. This is a rabbit hole though, as it might prompt planking on the interior of the frames, partitions, etc., so I'll just leave it lie as the two decks.
No work on her for a few days. I have a time sensitive set of construction drawings to do for a client's 3 season porch.
This planking looks very nice.
PS: I send you a PM.
Regards, Peter
I just discovered I've been banned from Model ship world too. I wonder if they will still send me the the rest of my subscription to the magazine - Nautical Research Journal?
I don't really care, but I'd like to get what I paid for. Must be they are looking about on this forum, searching out people that are working on a bluenose, so they can ban them. I never really post anything on MSW, just look around. No more I guess. So be it.
I don't really care, but I'd like to get what I paid for. Must be they are looking about on this forum, searching out people that are working on a bluenose, so they can ban them. I never really post anything on MSW, just look around. No more I guess. So be it.
Last edited:
WELCOME YOU ARE IN GREAT, GREAT, GREAT COMPANY, WONDERFUL NEWS LOL LOL LOL LOL. GOD BLESS STAY SAFE YOU AND YOURS DON
Nothing to worry about. You have freedom now, and this is most important. As for the NRJ subscription, I can assure you will continue to receive journals. One thing you buying kits, another you keep afloat their budget.I just discovered I've been banned from Model ship world too. I wonder if they will still send me the the rest of my subscription to the magazine - Nautical Research Journal?
I don't really care, but I'd like to get what I paid for. Must be they are looking about on this forum, searching out people that are working on a bluenose, so they can ban them. I never really post anything on MSW, just look around. No more I guess. So be it.
 (double-standard)
- Joined
- Nov 15, 2018
- Messages
- 267
- Points
- 168

EJ - It reflects more on their tunnel-visioned admin than on you so do not take it personally. It is unsettling however that some self-appointed copyright cop(s) have nothing better to do than to lurk around here like some creepy voyeur dishing out their version of punishment to fellow members. I hope that they reimburse you for whatever you are owed or at least keep sending you the journals as one thing has nothing to do with the other. Take pride in knowing that you are a member here, at least you are not forced to suffer fools. ")
Kind of harshly said, though. I assume the banning had something to do with perceived copyright infringements?

EJ....what can I say..welcome to the sin bin. I have not once revisted since getting a written warning for joining SOS... and I miss them like a hole in the head.
John
John
Amen to that. It's always somehow, about the money.Nothing to worry about. You have freedom now, and this is most important. As for the NRJ subscription, I can assure you will continue to receive journals. One thing you buying kits, another you keep afloat their budget.
Finally got some bench time. The gas company put in new gas mains, requiring new pipes to every house. My gas meter was inside, but they won't allow that anymore.
Here, I have removed the top 4 rows of shelving over my model bench so they could have access. I didn't want a couple pipe fitters working over my builds, so moved a lot of stuff in the room out of the way.
Now, I fixed the shelves and re-installed them. Gave me a chance to straiten out the cave a bit too.

Finished the lower deck decking. Somehow, deck beams with no decking didn't seem right to me, so I half decked the lower and tween deck area. The strips I used on the lower deck were made from a chunk of cherry I had in the shop.


Now, installing some of the main deck beams. I had prepped and finished them a while back. I had left them stuck to the blue tape that was marked in order. That was a mistake, as some of the adhesive came off on the parts and required some cleaning to get it off before installation.

Now I'm up to the first "group" assembly, cleaned up and ready for fitting.

I've been using the following "system" for hand cleaning all these parts. I stuck a piece of PSA sandpaper to the glass bench top. Placing the parts on this while sanding helps keep them from moving around. I use PSA sandpaper, stuck to a stick of basswood about 3/8" X 1/2" X 10" long. Makes a nice flat sander, keeping the faces of the work square and flat. Four sanding surfaces, two coarser and two finer, with a long enough "handle" to fit my hand. Easy to peel off and renew when worn out.

Moving along now -
Here, I have removed the top 4 rows of shelving over my model bench so they could have access. I didn't want a couple pipe fitters working over my builds, so moved a lot of stuff in the room out of the way.
Now, I fixed the shelves and re-installed them. Gave me a chance to straiten out the cave a bit too.
Finished the lower deck decking. Somehow, deck beams with no decking didn't seem right to me, so I half decked the lower and tween deck area. The strips I used on the lower deck were made from a chunk of cherry I had in the shop.
Now, installing some of the main deck beams. I had prepped and finished them a while back. I had left them stuck to the blue tape that was marked in order. That was a mistake, as some of the adhesive came off on the parts and required some cleaning to get it off before installation.
Now I'm up to the first "group" assembly, cleaned up and ready for fitting.
I've been using the following "system" for hand cleaning all these parts. I stuck a piece of PSA sandpaper to the glass bench top. Placing the parts on this while sanding helps keep them from moving around. I use PSA sandpaper, stuck to a stick of basswood about 3/8" X 1/2" X 10" long. Makes a nice flat sander, keeping the faces of the work square and flat. Four sanding surfaces, two coarser and two finer, with a long enough "handle" to fit my hand. Easy to peel off and renew when worn out.
Moving along now -
Attachments

Your selection will provide a very rich presentation of the framing and interiors. We will all be looking forward to your progress. RichGreat progress EJ. I think the Cherry and Pear wood complement each other nicely! The cherry is certainly not out of place.
Workin on the deck beam assembly. Boy, those are fussy little buggers to clean up and fit.
The notches in the short parts seemed to be offset a bit, so I placed them with the notch setting more to the aft. I hope that's correct.

The notches in the short parts seemed to be offset a bit, so I placed them with the notch setting more to the aft. I hope that's correct.
Slow going, but making progress. Makes my patience level even out a bit.
The first assembly installed, plus the next 3 beams.

The next assembly assembled and the first "color" coat of poly. The satin coat in the morning, then install tomorrow evening.

In the meantime - start fitting the parts for the 3rd and 4th assemblies.
The first assembly installed, plus the next 3 beams.
The next assembly assembled and the first "color" coat of poly. The satin coat in the morning, then install tomorrow evening.
In the meantime - start fitting the parts for the 3rd and 4th assemblies.
That’s looking very good! Great work Eugene.Slow going, but making progress. Makes my patience level even out a bit.
The first assembly installed, plus the next 3 beams.
View attachment 237866
The next assembly assembled and the first "color" coat of poly. The satin coat in the morning, then install tomorrow evening.
View attachment 237867
In the meantime - start fitting the parts for the 3rd and 4th assemblies.