Looks sweet, clean, and precise!
-

Win a Free Custom Engraved Brass Coin!!!
As a way to introduce our brass coins to the community, we will raffle off a free coin during the month of August. Follow link ABOVE for instructions for entering.
-

PRE-ORDER SHIPS IN SCALE TODAY!
The beloved Ships in Scale Magazine is back and charting a new course for 2026!
Discover new skills, new techniques, and new inspirations in every issue.
NOTE THAT OUR FIRST ISSUE WILL BE JAN/FEB 2026
- Home
- Forums
- Ships of Scale Group Builds and Projects
- Bluenose PoF Group Build
- Bluenose Group Build Logs
You are using an out of date browser. It may not display this or other websites correctly.
You should upgrade or use an alternative browser.
You should upgrade or use an alternative browser.
Well, This morning, before I put on the flat coat on the second assembly, I test fitted it. Shoulda done that before I put on the coulor coat.
The test fit showed I had installed the parts 57 backwards. The narrow spacing should be to the stern, so none of the short beams lined up with the ribs.
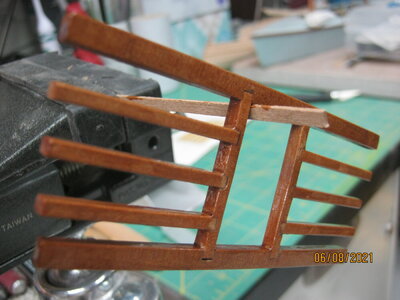
So, though I dislike extremely, un assembling things, especially things I should have checked first, apart the assembly came. Cleaned out the mortices and the beam ends, re-installed the parts #57 and 4 of the short beams, CHECKING EVERYTHING THIS TIME. Waiting for the glue to dry so I can TEST FIT, then touch up the coulor coat. I really need to watch what I'm doing a bit closer.
Another issue was, I had tacked the assembly in place with CA adhesive. Apparently, I rushed putting in the satin poly coat, with not a long enough period to allow the CA to fully cure? Every place there was CA, the satin poly (or the CA) turned white. This morning it was all hard. So, with a scalpel, I cleaned out all the white I could and touched up the finish coats. They look OK now. Gotta be more careful of cure times too I guess.
The test fit showed I had installed the parts 57 backwards. The narrow spacing should be to the stern, so none of the short beams lined up with the ribs.

So, though I dislike extremely, un assembling things, especially things I should have checked first, apart the assembly came. Cleaned out the mortices and the beam ends, re-installed the parts #57 and 4 of the short beams, CHECKING EVERYTHING THIS TIME. Waiting for the glue to dry so I can TEST FIT, then touch up the coulor coat. I really need to watch what I'm doing a bit closer.
Another issue was, I had tacked the assembly in place with CA adhesive. Apparently, I rushed putting in the satin poly coat, with not a long enough period to allow the CA to fully cure? Every place there was CA, the satin poly (or the CA) turned white. This morning it was all hard. So, with a scalpel, I cleaned out all the white I could and touched up the finish coats. They look OK now. Gotta be more careful of cure times too I guess.
Last edited:
Been there, done thatWell, This morning, before I put on the flat coat on the second assembly, I test fitted it. Shoulda done that before I put on the coulor coat.
The test fit showed I had installed the parts 57 backwards. The narrow spacing should be to the stern, so none of the short beams lined up with the ribs.
View attachment 237954
So, though I dislike extremely, un assembling things, especially things I should have checked first, apart the assembly came. Cleaned out the mortices and the beam ends, re-installed the parts #57 and 4 of the short beams, CHECKING EVERYTHING THIS TIME. Waiting for the glue to dry so I can TEST FIT, then touch up the coulor coat. I really need to watch what I'm doing a bit closer.
Another issue was, I had tacked the assembly in place with CA adhesive. Apparently, I rushed putting in the satin poly coat, with not a long enough period to allow the CA to fully cure? Every place there was CA, the satin poly (or the CA) turned white. This morning it was all hard. So, with a scalpel, I cleaned out all the white I could and touched up the finish coats. They look OK now. Gotta be more careful of cure times too I guess.
Well, my issue of Nautical Research Journal (Model Ship World) came today. Just a couple weeks after I was banned from Model ship world forum. My subscription to the publication expires with the next edition.I just discovered I've been banned from Model ship world too. I wonder if they will still send me the the rest of my subscription to the magazine - Nautical Research Journal?
I don't really care, but I'd like to get what I paid for. Must be they are looking about on this forum, searching out people that are working on a bluenose, so they can ban them. I never really post anything on MSW, just look around. No more I guess. So be it.
I tried to go to the Journal website, but it has erased / deleted my e-mail address and password.
So apparently banned from the forum and apparently even the on line access to a subscription to the magazine that has not yet expired.
I would love to say what I'm thinking, but it would not be appropriate here.
I guess even subscription money doesn't matter to these people. Kinda seems counter-productive to running a profitable business.
Sorry for the trouble, Eugene. As the matter of fact, it does matter! One thing you have bunned from a forum, where you didn't pay a cent, a completely different story is your paid subscription. You should fight to return your money, whatever left from the missing subscriptions. You should write an email to them, and CC your attorney (there should be many public\free attorneys for small claims court). Don't give up! Fight back!I would love to say what I'm thinking, but it would not be appropriate here.
I guess even subscription money doesn't matter to these people. Kinda seems counter-productive to running a profitable business.
Well, I did get this issue of the publication. I'm supposing they will fulfill the next issue as well and that would be my last issue.Sorry for the trouble, Eugene. As the matter of fact, it does matter! One thing you have bunned from a forum, where you didn't pay a cent, a completely different story is your paid subscription. You should fight to return your money, whatever left from the missing subscriptions. You should write an email to them, and CC your attorney (there should be many public\free attorneys for small claims court). Don't give up! Fight back!
What bummed me was that they blocked / dropped my e-mail and password to get on the publication site. I can't even re-instate my address or password, so I'm assuming that is blocked as well.
Well, to **ll with them. Some people just like to throw their weight around I guess. Maybe the guy is a politician. They like to do that too.
Last edited:
It is just unfortunate (or fortunate, perhaps)  for you, and really sad for the hobby in general. While the forums like SOS are trying to help gain back the interest in our wonderful hobby, others make everything apposite.
If such actions will make them happy, let them have joy. How many of us left...?
If such actions will make them happy, let them have joy.
Well, I got the boogerd assembly re-assembled and the finish touched up. Looks good. Will wait to install it tomorrow. Got the parts prepped, fitted and assembled for the next assembly and will start the finish on it tomorrow. Also the parts prepped but not fitted yet for the following set. Should get that fitted and assembled tomorrow too. Maybe some finish on that as well. And, this time I got the parts in the right direction so they actually FIT!
Next is the long opening set. That looks a bit tricky. We'll see. Gotta look at Dean 62's pics on that baby first.
Pics tomorrow.
Next is the long opening set. That looks a bit tricky. We'll see. Gotta look at Dean 62's pics on that baby first.
Pics tomorrow.
Assembly taken apart, re assembled CORRECTLY and finish applied. Installed, along with two more full beams. Up to the break in the deck.
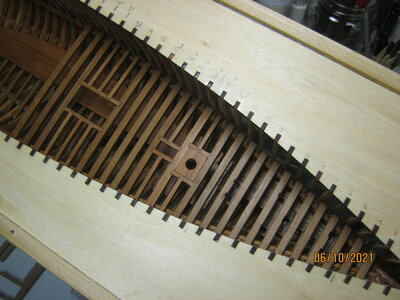
Next assembly assembled and finish applied. Yes, it fits correctly.
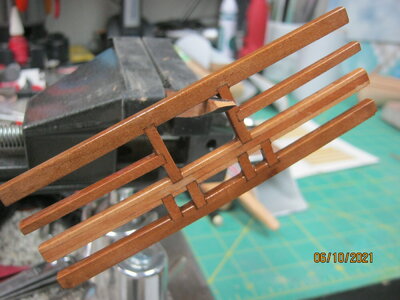
Tomorrow another assembly and 5 more beams. I've got all the full beams cleaned up and a finish on them so they just drop in.
The end is in sight for the main deck beams! I want to put a rope coil or two in the foredeck below, so i need to do that before I can't reach in there anymore. Shoulda done that about 15 frames back, but hey, that would be too easy, right?

Next assembly assembled and finish applied. Yes, it fits correctly.

Tomorrow another assembly and 5 more beams. I've got all the full beams cleaned up and a finish on them so they just drop in.
The end is in sight for the main deck beams! I want to put a rope coil or two in the foredeck below, so i need to do that before I can't reach in there anymore. Shoulda done that about 15 frames back, but hey, that would be too easy, right?
Looking very good! Soon you will be installing the deck.Assembly taken apart, re assembled CORRECTLY and finish applied. Installed, along with two more full beams. Up to the break in the deck.
View attachment 238134
Next assembly assembled and finish applied. Yes, it fits correctly.
View attachment 238135
Tomorrow another assembly and 5 more beams. I've got all the full beams cleaned up and a finish on them so they just drop in.
The end is in sight for the main deck beams! I want to put a rope coil or two in the foredeck below, so i need to do that before I can't reach in there anymore. Shoulda done that about 15 frames back, but hey, that would be too easy, right?
The long assembly all fitted, ready for glue up. After the first 12 short ribs it went quite well and quickly. 
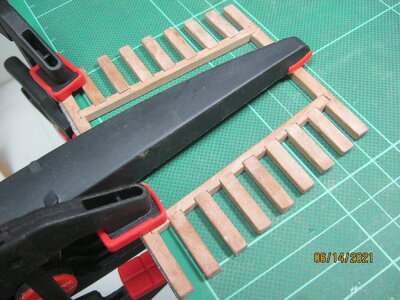
Glued up.
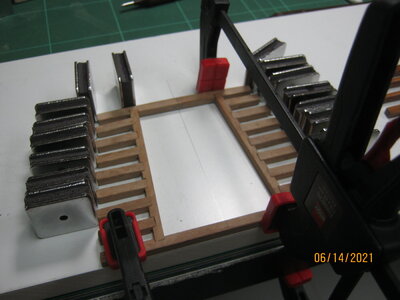
Will touch up the sanding and first coat of poly tomorrow.
Bumped this one with the chair, hanging from the vice with the first coat of finish drying. Fell on the floor, broke one short rib loose and loosened a double joint on one of the main beams.
Minor repair, I think it will heal nicely with no stitches. The finish is still sticky.
Tomorrow, touch sand and the satin coat goes on. Then, install this set, install 5 main ribs, then the long assembly and one more long rib.
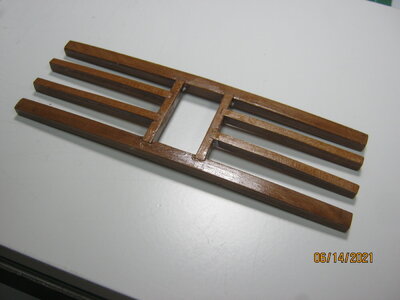
I can see daylight at the end of the tunnel. Soon, (in about a year maybe), I'll catch up with Dean22.

I did stab my left thumb with a mini chisel. Just below the thumbnail. Geeze, does that hurt. I don't wanna do that again.
Next is some decking I believe. I think I'm gonna use some pear strips from the stash instead of the sheet. I'll try cutting the jig jag part off for use along the deck edges though. I'll use the sheet as a kinda template for laying out the strips.

Glued up.

Will touch up the sanding and first coat of poly tomorrow.
Bumped this one with the chair, hanging from the vice with the first coat of finish drying. Fell on the floor, broke one short rib loose and loosened a double joint on one of the main beams.
Minor repair, I think it will heal nicely with no stitches. The finish is still sticky.
Tomorrow, touch sand and the satin coat goes on. Then, install this set, install 5 main ribs, then the long assembly and one more long rib.

I can see daylight at the end of the tunnel. Soon, (in about a year maybe), I'll catch up with Dean22.
I did stab my left thumb with a mini chisel. Just below the thumbnail. Geeze, does that hurt. I don't wanna do that again.
Next is some decking I believe. I think I'm gonna use some pear strips from the stash instead of the sheet. I'll try cutting the jig jag part off for use along the deck edges though. I'll use the sheet as a kinda template for laying out the strips.
Nicely done. Question to expand my brain box. . . I like the long nose clamp across the frame but am puzzled by the metal blocks at the short frame ends. Are those magnetic? How do they stay in place without sliding? Where did you obtain them? They seem to serve you very well. Thanks for your explanations. Rich (PT-2)The long assembly all fitted, ready for glue up. After the first 12 short ribs it went quite well and quickly.
View attachment 238880
Glued up.
View attachment 238881
Will touch up the sanding and first coat of poly tomorrow.
Bumped this one with the chair, hanging from the vice with the first coat of finish drying. Fell on the floor, broke one short rib loose and loosened a double joint on one of the main beams.
Minor repair, I think it will heal nicely with no stitches. The finish is still sticky.
Tomorrow, touch sand and the satin coat goes on. Then, install this set, install 5 main ribs, then the long assembly and one more long rib.
View attachment 238882
I can see daylight at the end of the tunnel. Soon, (in about a year maybe), I'll catch up with Dean22.
I did stab my left thumb with a mini chisel. Just below the thumbnail. Geeze, does that hurt. I don't wanna do that again.
Next is some decking I believe. I think I'm gonna use some pear strips from the stash instead of the sheet. I'll try cutting the jig jag part off for use along the deck edges though. I'll use the sheet as a kinda template for laying out the strips.
The base is a piece of 10 guage, painted steel plate, glued to a piece of MDF board with contact cement. The magnets I got from MicroMark, but I'm sure they are available lots of other places. They work great for holding frames in place. I've even used them to hold bulkheads in a 90 degree position for gluing up.Nicely done. Question to expand my brain box. . . I like the long nose clamp across the frame but am puzzled by the metal blocks at the short frame ends. Are those magnetic? How do they stay in place without sliding? Where did you obtain them? They seem to serve you very well. Thanks for your explanations. Rich (PT-2)
Some I use just to stick the plan sheet to the front of the spray booth so it's easy to reference.
The long nose clamp I don't use too often, but it does have about a 4 inch reach, so in this case they work great. My bench is about 1 1/2" thick, plus the 3/4" of the metal board and they just fit for this application. You just can't have to many different styles and sizes of clamps.
Out in the wood shop I have about 200 clamps, maybe more, c clamps, pipe clamps, specialty clamps, bar clamps Jorgensen wood clamps, welding clamps, vice grip pad clamps, you name it, of all different sizes. I have clamped up vertical track type drafting tables made of 4' X 6' sheets of plywood, edge glued and splined together, for an engineering company once that were 60 feet long with pipe clamps.
My kids will wonder what the heck when they have to get rid of all this stuff.
Thanks for the explanations. From your shop tools it sounds like you should build a small vessel of some type: canoe, sail boat, dory, etc. . . then be able to take your kids out for fun proving that tools have a purpose. RichThe base is a piece of 10 guage, painted steel plate, glued to a piece of MDF board with contact cement. The magnets I got from MicroMark, but I'm sure they are available lots of other places. They work great for holding frames in place. I've even used them to hold bulkheads in a 90 degree position for gluing up.
Some I use just to stick the plan sheet to the front of the spray booth so it's easy to reference.
The long nose clamp I don't use too often, but it does have about a 4 inch reach, so in this case they work great. My bench is about 1 1/2" thick, plus the 3/4" of the metal board and they just fit for this application. You just can't have to many different styles and sizes of clamps.
Out in the wood shop I have about 200 clamps, maybe more, c clamps, pipe clamps, specialty clamps, bar clamps Jorgensen wood clamps, welding clamps, vice grip pad clamps, you name it, of all different sizes. I have clamped up vertical track type drafting tables made of 4' X 6' sheets of plywood, edge glued and splined together, for an engineering company once that were 60 feet long with pipe clamps.
My kids will wonder what the heck when they have to get rid of all this stuff.
Great job!The long assembly all fitted, ready for glue up. After the first 12 short ribs it went quite well and quickly.
View attachment 238880
Glued up.
View attachment 238881
Will touch up the sanding and first coat of poly tomorrow.
Bumped this one with the chair, hanging from the vice with the first coat of finish drying. Fell on the floor, broke one short rib loose and loosened a double joint on one of the main beams.
Minor repair, I think it will heal nicely with no stitches. The finish is still sticky.
Tomorrow, touch sand and the satin coat goes on. Then, install this set, install 5 main ribs, then the long assembly and one more long rib.
View attachment 238882
I can see daylight at the end of the tunnel. Soon, (in about a year maybe), I'll catch up with Dean22.
I did stab my left thumb with a mini chisel. Just below the thumbnail. Geeze, does that hurt. I don't wanna do that again.
Next is some decking I believe. I think I'm gonna use some pear strips from the stash instead of the sheet. I'll try cutting the jig jag part off for use along the deck edges though. I'll use the sheet as a kinda template for laying out the strips.
You definitely want to plank the deck with individual boards!
I had few xacto cuts before I finished the deck beams…sigh!
You’ll catch me in no time, I’m down to a crawl on all the tedious rigging stuff!
Nice work, EJ. And yes, on every tunnel, there is a end. But some long tunnels ..........The long assembly all fitted, ready for glue up. After the first 12 short ribs it went quite well and quickly.
View attachment 238880
Glued up.
View attachment 238881
Will touch up the sanding and first coat of poly tomorrow.
Bumped this one with the chair, hanging from the vice with the first coat of finish drying. Fell on the floor, broke one short rib loose and loosened a double joint on one of the main beams.
Minor repair, I think it will heal nicely with no stitches. The finish is still sticky.
Tomorrow, touch sand and the satin coat goes on. Then, install this set, install 5 main ribs, then the long assembly and one more long rib.
View attachment 238882
I can see daylight at the end of the tunnel. Soon, (in about a year maybe), I'll catch up with Dean22.
I did stab my left thumb with a mini chisel. Just below the thumbnail. Geeze, does that hurt. I don't wanna do that again.
Next is some decking I believe. I think I'm gonna use some pear strips from the stash instead of the sheet. I'll try cutting the jig jag part off for use along the deck edges though. I'll use the sheet as a kinda template for laying out the strips.
And about the mini chisel: some like it to hit the guiding hand. Like some small dogs ....
Regards, Peter
Actually, the base is a piece of 1/2" white corian countertop material from a sink cutout. Really flat, has weight to keep it from sliding around. The sheet of steel was glued to it with contact cement.Thanks for the explanations. From your shop tools it sounds like you should build a small vessel of some type: canoe, sail boat, dory, etc. . . then be able to take your kids out for fun proving that tools have a purpose. Rich
I have built several rowboats and canoes. Here in Michigan, nearly everyone has a boat of some kind. Lots of lakes. Each of my kids have a boat I built for them. Next will be for my grandkids because they are all in or graduating collage now. Used to be there was almost always a boat of some kind "on the ways" in dad's (my) workshop. My "kids" are 49 and 56 years old.
Oh how time flies as we progress. Good thing to have memories of those shared events. RichActually, the base is a piece of 1/2" white corian countertop material from a sink cutout. Really flat, has weight to keep it from sliding around. The sheet of steel was glued to it with contact cement.
I have built several rowboats and canoes. Here in Michigan, nearly everyone has a boat of some kind. Lots of lakes. Each of my kids have a boat I built for them. Next will be for my grandkids because they are all in or graduating collage now. Used to be there was almost always a boat of some kind "on the ways" in dad's (my) workshop. My "kids" are 49 and 56 years old.
Another assembly and 5 more full beams in place.
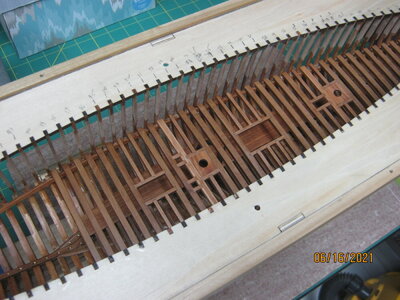
The longest assembly done and the satin coat drying.
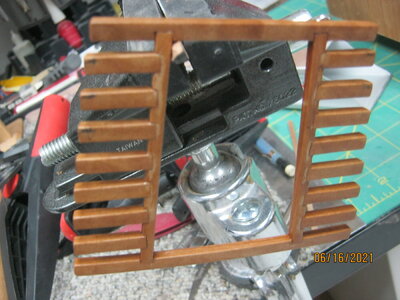
Next, this assembly goes in, then one single beam. Need to fit the dinky little assembly, the last one, and finish it and then, THE LAST TWO BEAMS!
Now, to think about decking. dug out the pearwood stash.

The longest assembly done and the satin coat drying.

Next, this assembly goes in, then one single beam. Need to fit the dinky little assembly, the last one, and finish it and then, THE LAST TWO BEAMS!
Now, to think about decking. dug out the pearwood stash.


