YUANQING BLUENOSE - Peter Voogt [COMPLETED BUILD]

We ar
Macro shots have advantages and disadvantages. You see everything. ;)
So I wasn't completely satisfied with what I saw now (even better). Adjusted a few things.

View attachment 240035
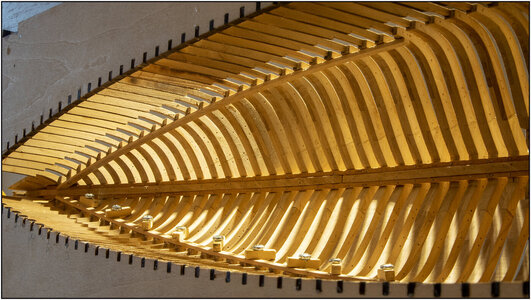
The bearing beam #102 runs against frames 1 to 27.
Not all 27 notches will be exactly aligned in a row. Therefore 5 temporary deck beams placed over an equal distance. With the advantage that I can press the beam against it when gluing in to get into place. Because only visually will not work;
All the holes for the nails marked and pre-drilled. Like the keelson, this is a beam that should give strength to the construction. So also with each frame 2 nails, both one in the front and the rear frame part.

View attachment 240036
The connection at the front to the keelson was not neat (enough). So a little extra sanding.

View attachment 240037
Looking a bit ahead at the connection of both beams to the middle deck. Made a small chamfer between the connecting parts because the space between the lower (#102) and upper (#103) beam was just not the thickness of a beam. It's not much, but enough to not fit correct.

Regards, Peter
We are used to seeing quality work from you Peter! ;)
 
...this is exactly what I called an acceptance level ;)
Peter, both you and Dean have stimulated me to take a big leap back off the transom and completely remake the four lower shroud assemblies as my attempt to splice the top bight around the lower mast tops failed when done and examined. I will have to figure out how to remove the crane assemblies from the masts along with the fittings that are related to each.
Your high bar standard for what should be done and not the low bar of just getting by is greatly appreciated by me. Thank you.
Your fine work will keep me in line.
Rich (PT-2)
Well, Rich, that's a compliment where I have to think about. ;)
The fact, Dean and my build is a reason for (partly) disassembling your BN, is a new aspect for me. Or should I have misinterpreted your post?
If it's a part that you already disliked before, then it's a good decision. Because you would always have looked at it with a frown :confused:. I hope to see soon in your build-log a result that satisfies you.
And eh ........ now some parts of the Eclips lyrics are in my head. (Not the Lunatics ;))
Regards, Peter
 
Last edited:
Well, Rich, that's a compliment where I have to think about. ;)
The fact, Dean and my build is a reason for (partly) disassembling your BN, is a new aspect for me. Or should I have misinterpreted your post?
If it's a part that you already disliked before, then it's a good decision. Because you would always have looked at it with a frown :confused:. I hope to see soon in your build-log a result that satisfies you.
And eh ........ now some parts of the Eclips lyrics are in my head. (Not the Lunatics ;))
Regards, Peter
My back tracking was caused by my loosing sequence of assembling parts. . . the already finished lower shrouds/ratlines/oval blocks, for and main masts, which I was satisfied with but had not placed over the mast top BEFORE installing and soldering the crane which passes through the mast in two locations, OVER the aft side of the shrouds' bights.
I thought that POSSIBLY I could save things by cutting the bight and then after bending it around the mast and behind the crane I would be able to splice the ends together.
It turned out that I had to slightly overlap the ends and then serve over and around them. It made a larger diameter and obvious bulge that became more objectionable as I again tried with the next two with dismal results.

Sleeping on it planted the idea to back up, using acetate to loosen the crane assembly and then pull it out leaving the mast top open to receive the newly made lower shrouds.
This would not have been necessary had I not previously elected too make my presentation with all of the sails bent and up in the wind.
I still have some other smaller tasks to work on while remaking the four sets of lower shrouds.

I learn best by my mistakes but with age my memory of what has and has not been done and the necessary sequence of assembly has come to the fore. I find that I am making some things twice having forgotten the first completed task and where those were put aside. . . for future use. . LOL!!!

Oh well, what else have I got to do with my days and hours than my BN? Too much as not everything is being attend to sufficiently. I have not posted may photos as there has been too much jumping around to show a finishing progression as sometimes two or three things are going forward at the same time between glue drying/setting periods.

As I have said, "air skies, calm seas, . . . and happy modeling!"
Rich
 
Thanxs Henk,
The store nearby: Nice to see you again ..... Busy building something?
And also the postman, again with a package.
Regards, Peter

Certainly

I'm working for a "construction board" to make to move the keel, with some facilities therefor, to the rafters first align them for me later in the mold instead

Photo follow later
 
My back tracking was caused by my loosing sequence of assembling parts. . . the already finished lower shrouds/ratlines/oval blocks, for and main masts, which I was satisfied with but had not placed over the mast top BEFORE installing and soldering the crane which passes through the mast in two locations, OVER the aft side of the shrouds' bights.
I thought that POSSIBLY I could save things by cutting the bight and then after bending it around the mast and behind the crane I would be able to splice the ends together.
It turned out that I had to slightly overlap the ends and then serve over and around them. It made a larger diameter and obvious bulge that became more objectionable as I again tried with the next two with dismal results.

Sleeping on it planted the idea to back up, using acetate to loosen the crane assembly and then pull it out leaving the mast top open to receive the newly made lower shrouds.
This would not have been necessary had I not previously elected too make my presentation with all of the sails bent and up in the wind.
I still have some other smaller tasks to work on while remaking the four sets of lower shrouds.

I learn best by my mistakes but with age my memory of what has and has not been done and the necessary sequence of assembly has come to the fore. I find that I am making some things twice having forgotten the first completed task and where those were put aside. . . for future use. . LOL!!!

Oh well, what else have I got to do with my days and hours than my BN? Too much as not everything is being attend to sufficiently. I have not posted may photos as there has been too much jumping around to show a finishing progression as sometimes two or three things are going forward at the same time between glue drying/setting periods.

As I have said, "air skies, calm seas, . . . and happy modeling!"
Rich
Upon closer examination I saw that I had soldered the top part of the crane to the mast band as well as the lower leg with an eye to a through bolt fully penetrating the mast lower down with also soldered washer/nut/and eye for a jib stay. So that eliminates removing the crane and forcing me to cut off the spliced shrouds and make fully new ones where the top can be passed around the mast, behind the crane, and then tediously spliced/served the shrouds coming up. Not nearly as neat as it would have been with the bight and served in my jig BEFORE putting them in place before the upper crane band and those above were set in place. DUMB. I should have worked bottom upwards for all of the pieces.
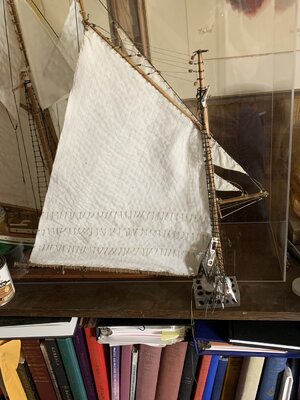
Here is the main mast with sail bent in front of my previously completed pilot boat (schooner rig also)
Mainmast head with spliced shrouds under crain.jpg

Now lets get closer to the crane area
Main mast crane closer view.jpg
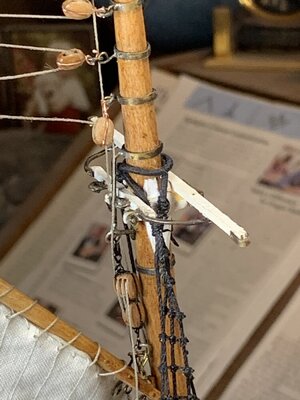
working upwards we have the upper crane mast band above those poorly spliced bandaid shrouds
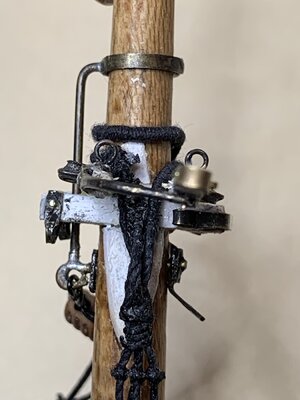
and now closer to the crane itself all soldered in place with upper and lower mast through bolts secured with solder on the forward side of the mast.Main Mast Crane.jpg
the finish of the crosstrees and fittings in this are really got marred by my trying to splice the shroud around the mast in an overlapped manner. Next time it will be a longer piece that can be spliced/served below the crosstree where there will be more but not much working space. I hope that these view of my blunder come to mind if any of the other YQ builders want to make their own sails and bend them on in a fully flying manner and not just furled on the spars. :-( Rich:mad:
 
My back tracking was caused by my loosing sequence of assembling parts. . . the already finished lower shrouds/ratlines/oval blocks, for and main masts, which I was satisfied with but had not placed over the mast top BEFORE installing and soldering the crane which passes through the mast in two locations, OVER the aft side of the shrouds' bights.
I thought that POSSIBLY I could save things by cutting the bight and then after bending it around the mast and behind the crane I would be able to splice the ends together.
It turned out that I had to slightly overlap the ends and then serve over and around them. It made a larger diameter and obvious bulge that became more objectionable as I again tried with the next two with dismal results.

Sleeping on it planted the idea to back up, using acetate to loosen the crane assembly and then pull it out leaving the mast top open to receive the newly made lower shrouds.
This would not have been necessary had I not previously elected too make my presentation with all of the sails bent and up in the wind.
I still have some other smaller tasks to work on while remaking the four sets of lower shrouds.

I learn best by my mistakes but with age my memory of what has and has not been done and the necessary sequence of assembly has come to the fore. I find that I am making some things twice having forgotten the first completed task and where those were put aside. . . for future use. . LOL!!!

Oh well, what else have I got to do with my days and hours than my BN? Too much as not everything is being attend to sufficiently. I have not posted may photos as there has been too much jumping around to show a finishing progression as sometimes two or three things are going forward at the same time between glue drying/setting periods.

As I have said, "air skies, calm seas, . . . and happy modeling!"
Rich
Upon closer examination I saw that I had soldered the top part of the crane to the mast band as well as the lower leg with an eye to a through bolt fully penetrating the mast lower down with also soldered washer/nut/and eye for a jib stay. So that eliminates removing the crane and forcing me to cut off the spliced shrouds and make fully new ones where the top can be passed around the mast, behind the crane, and then tediously spliced/served the shrouds coming up. Not nearly as neat as it would have been with the bight and served in my jig BEFORE putting them in place before the upper crane band and those above were set in place. DUMB. I should have worked bottom upwards for all of the pieces.
Here is the main mast with sail bent in front of my previously completed pilot boat (schooner rig also)
View attachment 240271

Now lets get closer to the crane area
View attachment 240272
working upwards we have the upper crane mast band above those poorly spliced bandaid shrouds
and now closer to the crane itself all soldered in place with upper and lower mast through bolts secured with solder on the forward side of the mast.View attachment 240273
the finish of the crosstrees and fittings in this are really got marred by my trying to splice the shroud around the mast in an overlapped manner. Next time it will be a longer piece that can be spliced/served below the crosstree where there will be more but not much working space. I hope that these view of my blunder come to mind if any of the other YQ builders want to make their own sails and bend them on in a fully flying manner and not just furled on the spars. :-( Rich:mad:
Thanxs Rich, for both reply’s.
Now it becomes more clear to me. And probabiliteit the other readers to.
I will have it in mind. But for now, seen from the hull, it's still too far ‘above my haed’ for me.;)
Regards, Peter
 
Last edited:
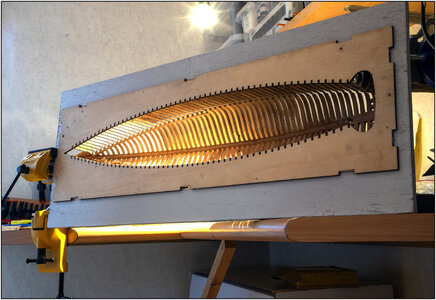
I was just checking this afternoon the glued port bearing beam and removing the spacers when I was charmed by the light.
The mounting frame in my new vise:
172 Work.jpg
Can rotate 360 degrees, so I can put the jig in any position I want.

With the light:
173 Light.jpg
I just wanted to share with you.

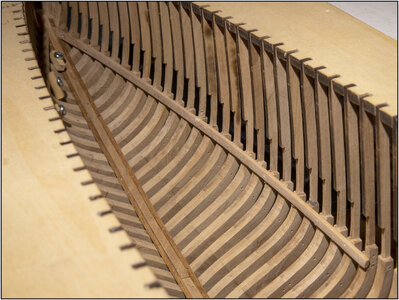
Then also the starboard beam that has its nails:
174 Starboard.jpg

Regards, Peter
 
The mounting frame in my new vise:
Can rotate 360 degrees, so I can put the jig in any position I want.

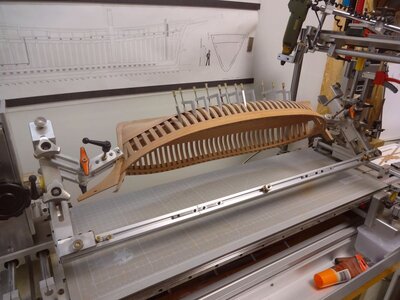
Rotating by 360° is a small dream for me
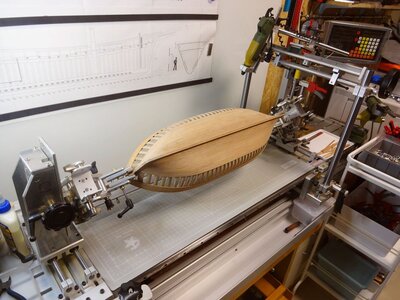
-> Once I copied some photos of such a "dream-tool" (I think from a chinese modeler building the Boudriot Chebec)
(sorry, but I do not know exactly from where I have this photo. I hope, that the owner agrees to show it here, otherwise please contact me and I will delete)

DSC00573.JPG.51a74f4f75efe72726d12b142abb20d0.jpg


DSC00579.JPG.26cc2157e2b687817133b41ffeb3c27b.jpg
 
Rotating by 360° is a small dream for me
-> Once I copied some photos of such a "dream-tool" (I think from a chinese modeler building the Boudriot Chebec)
(sorry, but I do not know exactly from where I have this photo. I hope, that the owner agrees to show it here, otherwise please contact me and I will delete)

View attachment 240443


View attachment 240444
Thanks for your reply and pictures, Uwe. What a impressive build: The model as well as the rotating standerd!
The builders should be proud of this.
Regards, Peter
 
Back
Top