YUANQING BLUENOSE - Peter Voogt [COMPLETED BUILD]

You are following a very good path by using dry fit as templates securing the part to be glued in a logical sequence. The sanding blocks are better than my use of fine sand paper rubber cemented to a hardwood backer block. Excellent work as you progress. Rich (PT-2)
Rich,
Thanxs for the compliment.
I suppose every builder does dry-fit. For me it’s ‘common sens’ to combine it during the build and glueing.
I bought those blocks year ago. And by the start I got a blinck: now I can use them. But as always: where have I stored them;). But the files and sandpaper are also necessarily.
Regards, Peter
 
Last edited:
Terry,
Thanxs for watching. But I am not going fast. A Lee and a Duc needs also attention. I hoop I can compleet The Lee very soon, so I can give the Bluenose full attention.
Regards, Peter
The Robert E. Lee has come too far to stop now! It is such a great build! I’m sure this ship will be just as nice. ;)
 
The Robert E. Lee has come too far to stop now! It is such a great build! I’m sure this ship will be just as nice. ;)
Dean, you are absolutely right. For now a little bit of Duc, but then The Lee gets again under steam.
And I am figuring something out for the Bluenose. When the time is there, you’ll see.
I wish for 2021, there will be more hours in a day and more days in a week.
Renards, Peter
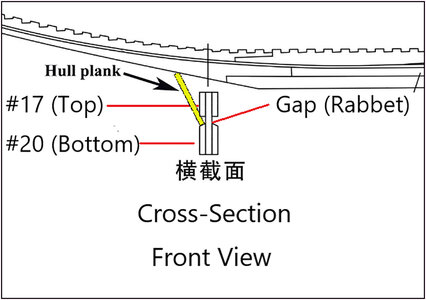
 
In the back of my mind was still the discussion we had about the detail drawing of YuanQing (YQ). I also had the completely closed left side of the hull in view.
First, @Heinrich : We have already changed our minds about this in the PM. It kept playing in my head.

In addition, during the construction of The Lee, I often hung over the drawings for hours. And partly because of my work, always asked the questions:
What do I see?
Why was that done?
How do I do that?
At the Bluenose I am also looking a lot dry-fitting ahead.
With the hull open on the right side with the visible frames and on the left the completely planked hull. And I want to apply the same technique on both sides and make it visible.

The small YQ figure and my drawn hull plank:
023 Rabbet.jpg
And whether or not there should be a bevel in the rabbet at the top of #20.

To clarify my thought:
024 Rabbet1.jpg
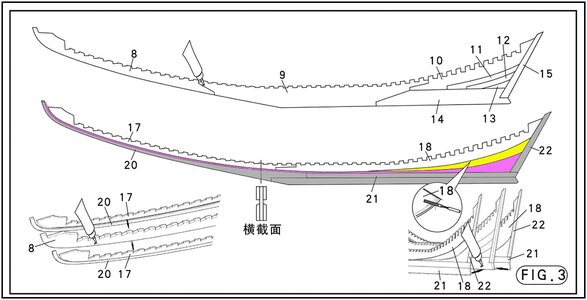
#21 are two lower keel beams. (I'll show you them in a picture later.)
#22 the closing bar
#18 with the part that needs to be beveled, in yellow.
In blue at the end of the keel the (lower) deadwood, the parts #10/#11/#12/#13/#14. And to the front the lower parts #8/#9.
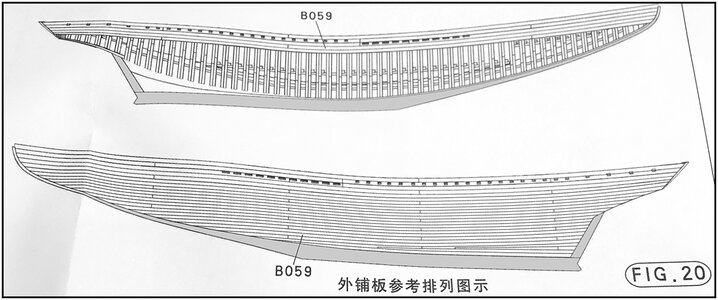
The ends of hull planks will be located in there. They fill up this lower part. See drawing 8-2, fig.20:
030 Rabbet.jpg

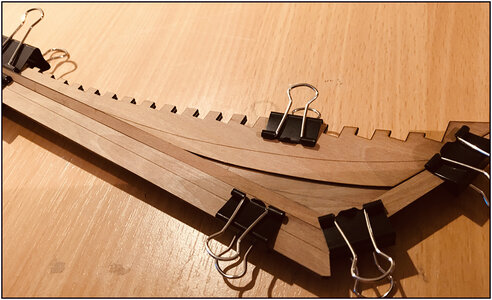
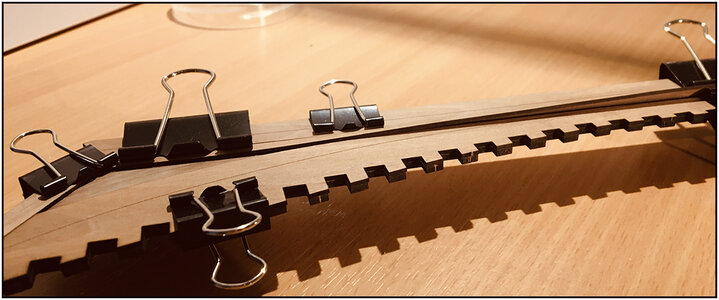
In dry-fit I put it together:
025 Rabbet.jpg
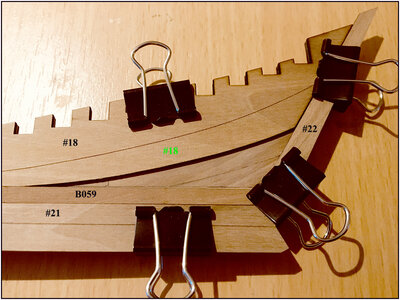
On the deadwood, you see the lowest hull plank B059, twisted towards in transition to the frames.
I used frame 35 as a referee:
026 Rabbet.jpg
The twisted hull planks is fitted between 2 clamps. And although it looks like the hull plank fits neatly on the keel #21, by a close look you can see two 90 degree angles witch hang a little against each other. Not a nice decent fit.

For these pictures I removed the frame.
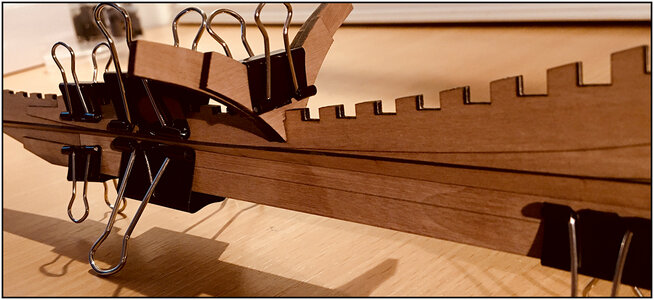
You can see this lowest hull plank has to connect at an angle on the keel #21:
027 Rabbet.jpg
028 Rabbet.jpg
You can also see why I think the rest of the lower part of #18, in the direction of the front, including #17, should get a little bevel.
And parts #20 and #21 must have a bevel at the top.
I believe the bevel on the back of #18 has also te be a little bit hollow. To make the twisting of hull planks more beautiful, less angular.

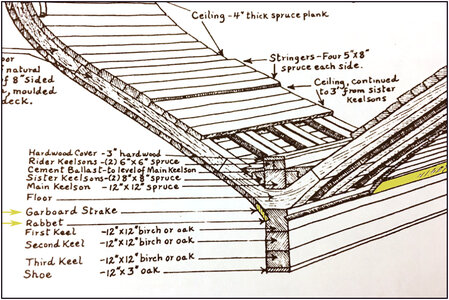
An image in the book "Bluenose II Saga of the Great Fishing Schooners by L.B. Jenson" shows all this:
029 Rabbet.jpg
With a lot of details, such as the keel beams, imitated by the parts #21.
Although it is the BN-II, I think a lot of the details comes from the BN-I.
My BN will not be total historical correct, but I want to build her with a result that satisfies me.

So,for this moment my thoughts and how I'm intended to work it out.
Input and discussion is of corse very welcome.

On the parts I will give it the beginning of the bevel. But when the frames are fitted, then the bevels gets there final form.
Therefore also my opinion: the detail drawing of YQ with the little bevel on the parts #20 is correct.
PS:
I will give the keel also his shoe ;). Thats part of the (super) detailing.

Regards, Peter
 
Last edited:
Peter all is good, when the frames are faired properly and the bottom of the frame sits at the top of the rabbit there will be no twisting of the plank. The frame you are using may be in the wrong slot but it is not sitting properly in the notch. See the pictures below:

IMG_3878[1].JPG
IMG_3879[1].JPG
Although the frame(#20) is not totally faired properly I am holding this plank in place with little or not effort, it is not being twisted. Once all the frames are in position and properly faired the plank will rest in the rabbit and against the frames with no problem and there will be no radical twisting.
So as they say "don't worry be happy" and get back to the R. E. Lee!! :)
I like your idea about adding the "shoe"
 
Gentlemen - this is a very tricky one for me to comment on. Remember - I have to adopt an "official" approach here. All I can do from my side is to relate the information to members as given to me by YuanQing.

Part #20 is not beveled. This is underlined by the fact that there is no bevel line on the Part. The cross-section drawing is confusing as it is a combination of Part #20 and Part #21 (the latter which is beveled at the top). YuanQing has already indicated that they will replace that cross-section drawing with a 3D drawing similar to the one that Dean has so kindly posted for us on my build log.

@Peter Voogt Peter, obviously you can go ahead with the rabbet, but I would suggest waiting at least until you have dry-fitted a few properly-faired ribs. As @DonRobinson Don has indicated, that may provide the answer.
 
Peter all is good, when the frames are faired properly and the bottom of the frame sits at the top of the rabbit there will be no twisting of the plank. The frame you are using may be in the wrong slot but it is not sitting properly in the notch. See the pictures below:

View attachment 202980
View attachment 202981
Although the frame(#20) is not totally faired properly I am holding this plank in place with little or not effort, it is not being twisted. Once all the frames are in position and properly faired the plank will rest in the rabbit and against the frames with no problem and there will be no radical twisting.
So as they say "don't worry be happy" and get back to the R. E. Lee!! :)
I like your idea about adding the "shoe"
Hi Don,
For the picture, I left a little gap between the frame and plank. The frame must indeed more to the line.
But the first plank(s), seen from stern to bow, must twist from laying on the deadwood in verticaal position, and running to the frames with there angle. Further on the frames, this plank will only bend, not twist.
Regards, Peter
 
Last edited:
Gentlemen - this is a very tricky one for me to comment on. Remember - I have to adopt an "official" approach here. All I can do from my side is to relate the information to members as given to me by YuanQing.

Part #20 is not beveled. This is underlined by the fact that there is no bevel line on the Part. The cross-section drawing is confusing as it is a combination of Part #20 and Part #21 (the latter which is beveled at the top). YuanQing has already indicated that they will replace that cross-section drawing with a 3D drawing similar to the one that Dean has so kindly posted for us on my build log.

@Peter Voogt Peter, obviously you can go ahead with the rabbet, but I would suggest waiting at least until you have dry-fitted a few properly-faired ribs. As @DonRobinson Don has indicated, that may provide the answer.
Hi Heinrich and all the others,
The post was not mentioned to point the manual is wrong. I wantend to show how I think about the building. There are now 26 kits delivered? Perhaps, when all of them are making a build-log, we can see 26, in tiny details, different buildings.

And your manual is the base and the official approach for the building. And so it must be for the other builders!
Therefor it is not tricky to comment Thumbs-Up
With my interpretations and detailing in my build-log. Like the adding of the shoe, fitted with trennels. There will come (a lot of) trennels. Also not pointes in the manual ;)
I apologize if my contribution has given noise on the line.
Regards, Peter
 
Last edited:
Hey Peter, here is a close up:

IMG_3880[1].JPG
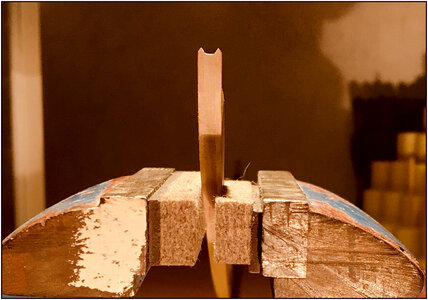
When the frame is sitting correctly this is how it will look, the edge of the frame is up against the rabbit, so the plank will slide in missing the edge of the rabbit. Bevelling the edge of the rabbit would just move the edge up and under the frame, which is really not accomplishing anything. If there are frames missing or falling short of the rabbit maybe then bevelling it will help, I agree with that.
This is just my thoughts.
 
@Peter Voogt Peter - absolutely NO NOISE! This is WONDERFUL! Thumbsup This is exactly why I am so excited having you here as part of the Bluenose Group Build. We HAVE to discuss these things - I cannot say enough how important this kind of discussion is for all members. And believe me - the Instruction Manual is by no means a Holy Script - we have already pointed out that the cross-section drawing which was confusing, we have pointe out the stern decorations which were incorrect and so forth. So , my dear friend, please keep it coming. This is what we need and this is what makes this Group Build so great.

My only concern - as echoed by @DonRobinson Don - if if you bevel where it is not required, you may end up with an imperfect fit. That is why I suggested dry-fitting before you make that decision.
 
Hey Peter, here is a close up:

View attachment 203003
When the frame is sitting correctly this is how it will look, the edge of the frame is up against the rabbit, so the plank will slide in missing the edge of the rabbit. Bevelling the edge of the rabbit would just move the edge up and under the frame, which is really not accomplishing anything. If there are frames missing or falling short of the rabbit maybe then bevelling it will help, I agree with that.
This is just my thoughts.
Thanxs Don, beautiful macro!
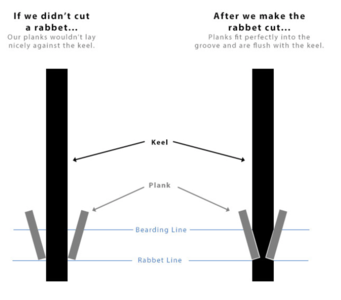
This makes it clear #17 and #18 did not need a bevel In the rabbet. Just the ‘big bevel’ on the end.
This was my reference:
1609602337297.png
And the drawing in The Saga.
So, thats the theory.
Regards, Peter
 
Last edited:
@Peter Voogt Peter - absolutely NO NOISE! This is WONDERFUL! Thumbsup This is exactly why I am so excited having you here as part of the Bluenose Group Build. We HAVE to discuss these things - I cannot say enough how important this kind of discussion is for all members. And believe me - the Instruction Manual is by no means a Holy Script - we have already pointed out that the cross-section drawing which was confusing, we have pointe out the stern decorations which were incorrect and so forth. So , my dear friend, please keep it coming. This is what we need and this is what makes this Group Build so great.

My only concern - as echoed by @DonRobinson Don - if if you bevel where it is not required, you may end up with an imperfect fit. That is why I suggested dry-fitting before you make that decision.
Thanks Heinrich,
I think, all the clamps gave a good impression of 'Dry-Fitting"? ;)
I have also in mind not to bevel the frames, but wait until I can fit them in the keel in the jig. Only then you can see how the beautiful curved lines of the BN are running. And with a loose bar you can check and ontrol the course of the rounding, frame by frame.
Regards, Peter
 
I've been built on the keel of the Bluenose for a few days.

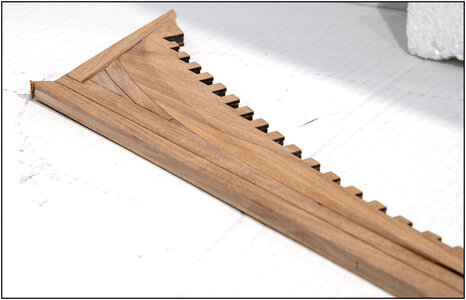
The beveled part #18.
That's hard to get a picture of. Still an attempt:
031 Kiel.jpg

Slightly clearer after it is applied on the keel. Sanded and polished.
The parts 21 imitates the keel bars. They will get some scarf, because those keel bars are not as long as the whole keel.
032 Kiel.jpg

The entire keel complete.
033 Kiel.jpg

And a sharper picture of my solution for the on top at the bow beveled parts #20. 2 little bevels on the inside gives 2 little /\'s.
034 Kiel.jpg
And a tip: Those vilt blocks with magnets works perfectly in a screw to protect your work.

Regards, Peter
 
Back
Top