YUANQING BLUENOSE - Peter Voogt [COMPLETED BUILD]

It is interesting to me to see how different readers and looks at the Saga Bluenose (II) book and illustrations are being selected and used in the build(s). I would have liked to be able to see the full size boards that the drawings were executed upon; about 40 x 48 inches from what I read separately. The microscopic hand written text and notes make finding information an archeological search project in themselves but diamonds come in small pieces, often hidden inside the outer rough surround. I see some very careful and precise work coming forth from the shipyards !!! Rich
Hi Rich,
You are correct, the handwriting is tiny and the information is often hidden. But after the first 2 or 3 overviews and than a detaild reading, you found every time mote interesting details. It still gives me some more ideas to work out on the comming parts to build.
Regards, Peter
 
Great work Peter! You guys are killing me...lol.
I’m trying not to rush the rest of my build on the Cazador, but I’m starting to lose my patience on getting started on the Bluenose! I have only unpacked and sorted the pieces in preparation to start building. :(
I do think I can finish the Cazador in another two weeks. Then I will build the case for it on the side while working on the BN.
Hi Dean,
The proces your are now in, I have had it also. It took some time, but the balance will come. Finishing The Lee is my priority, but sometime a few days working on the BN is fine. Because the detail-ideas in my head, has to get out, before rumbling to much.
Don’t hurry with the Cazador. She disurves your stand of quality.
Regards, Peter
 
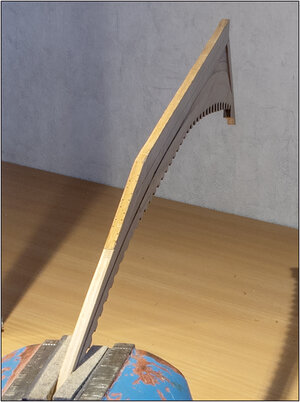
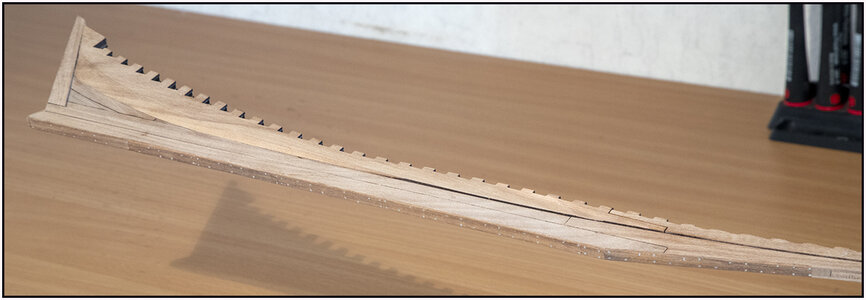
When the 2e big part of the shoe was dry, I could sand the whole. And drilled the holes a few mm deeper:
041 Shoe7.jpg

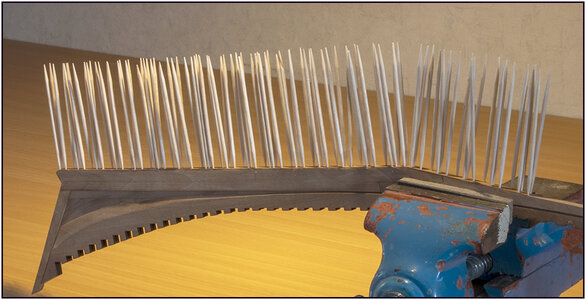
After the 7 test piece trennels, 93 other toothpicks glued. The mohawk/roosteram/porcupine is ready ;):
042 Shoe8.jpg

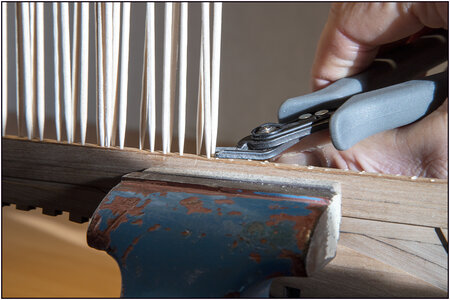
Once dry I could cut them off. With the upcoming sun, it gives a nice contrast:
043 Shoe9.jpg
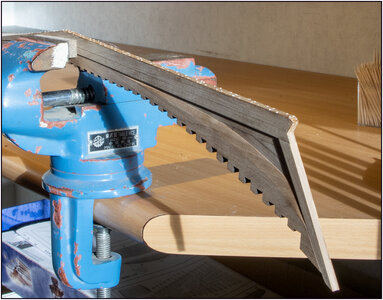
All cut off:
044 Shoe10.jpg

And after sanding and polishing:
045 Shoe11.jpg
Depending on how the light shines over the wood, it always changes color and intensity.

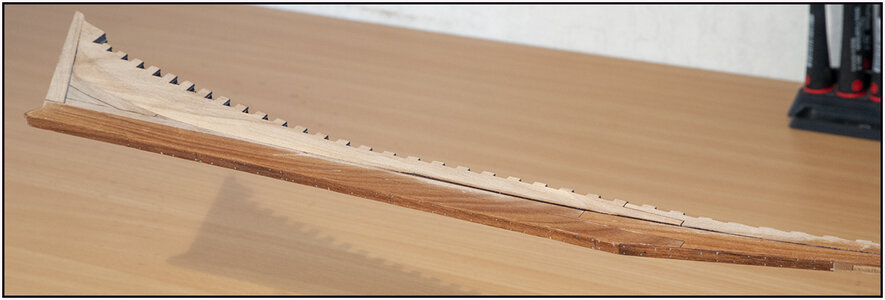
This is what it looks like when the wood is wet.
046 Shoe12.jpg
For an indication as the wood gets a protection layer. Maybe just a layer of matte varnish?
Opinions there for are welcome.

All in all, I am satisfied with the result :D.

Regards, Peter
 
Last edited:
And rightly satisfied you should be! It is a lot of extra and hard work, but the results speak for themselves. Well done Peter! Thumbsup
 
At least rather than
Hi Rich,
You are correct, the handwriting is tiny and the information is often hidden. But after the first 2 or 3 overviews and than a detaild reading, you found every time mote interesting details. It still gives me some more ideas to work out on the comming parts to build.
Regards, Peter
sharing build assists as you progress I have tried to bring more understanding and information to bear on the tack that is being undertaken. Glad to have been of assistance to this point and hope to share more as I come across it and it seems relevant and not just trivia. Rich
 
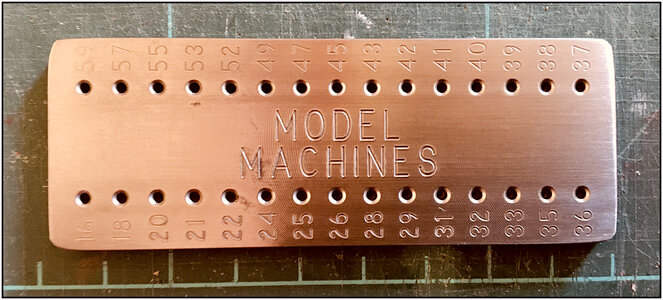
Today arrived: the Byrnes DrawPlate, ordered bij Model Machines in Orlando:
047 DrawPlate.jpg
Now I can some experiment with making the little treenails for the frame-parts.
I don't know if this is going to work and happy with the results. Otherwise, I will fall back on the toothpicks or some of the examples I have recently found elsewhere in this forum.
Regards, Peter
 
Today arrived: the Byrnes DrawPlate, ordered bij Model Machines in Orlando:
View attachment 211285
Now I can some experiment with making the little treenails for the frame-parts.
I don't know if this is going to work and happy with the results. Otherwise, I will fall back on the toothpicks or some of the examples I have recently found elsewhere in this forum.
Regards, Peter
Good luck sir, they will be tiny! But I am sure you will do a great job!
I got so excited to put frames on the keel, I forgot about the treenails! So I had to go with bolt heads. ;)
 
Last edited:
Hi Dean,
And my post about the drawplate reminds you to make the treenails? Then I am happy I posted it :).
Regards, Peter
Treenails for BN if you are thinking about scale. . . the ones in the original BN (Saga p. 41 with sketch) were a rout 1-1/8 inch diameter for 19 inches before the end five inches square at 1-5/8" to drive them into the augered holes. Inboard an oak wedge was driven into the projecting end before being cut off and likewise the outside remaining portions were sawn off. At the 1:70 something scale of the model these would be about a hair in diameter by my estimation and not visible. Likewise decking had fasteners at scale too small to be more than a .3 or .5 mm pencil dot and were countersunk and plugged. According to Saga there were 18,000 - 19,000 used in BN II. Setting scale aside the reward in in your build and what you want to see at the end. Just a thought.
Rich (Who is a laggard on the pier and not confronting your build challenges at this point as I have my own with the MS2130 kit whose winch and windlass have consumed me for several days figuring out the small cast metal parts, some of which are the size of a grain of rice. I have noticed that YQ greatly simplified this equipment to almost disregarding it.)
Thanxs Rich, for the reply. For sure, I take it serious!
I have the Saga and have read the sizes of the treenails and the amount of them.
By almost every building of a model and using treenails, they are almost out of scale.
On my Lee there are also parts out of scale.

But I have one point of view: Size does matter.
With sometimes a change in: Size does not matter.
And a proverd as a former windmiller: North wind is always cold, no matter from what direction it comes.
About the 18.000 - 19.000 treenails: Time does not matter. The duration of the build of The Lee was 34 years. ;)
What I want to say: mostly everthing is relative.

PS: I am lucky my wife has thick hair. I use that as my starting point for looking a acceptabel starting point. ;):)
I agree that we are probably in this for the build itself, meaning the hobby time, and not particularly an historic scaled end result. Rich
 
FRAMES:
Time to get started with the frames. When there is a frame with nr. 1, then I get started with nr. 1.

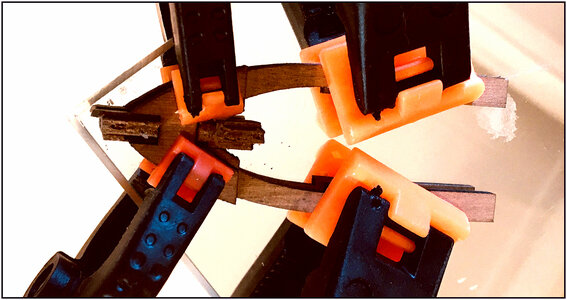
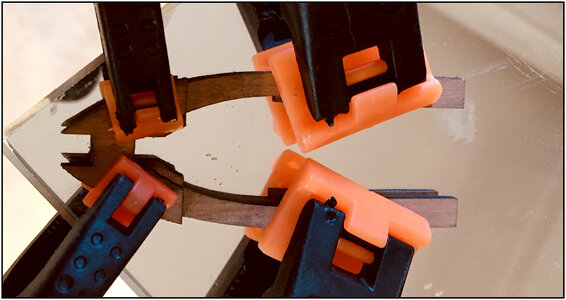
First made 2 little blocks, on one side squared, to fit in the lower and upper cutouts:
048 Frame 1-1.jpg
I am glueing on the rirror. Easy to clean and the glue doesn't attach.
When the frames are composed out of multiple parts, the sample drawing goes below.

When clamped, the 2 blocks removed:
049 Frame 1-2.jpg
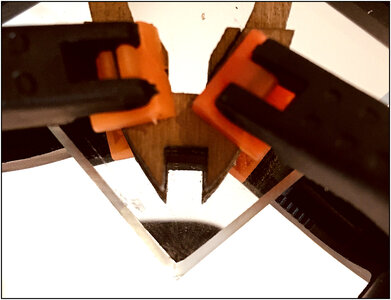
The mirror give a double view, also from below. So I can check the position.

From another angle:
050 Frame 1-3.jpg

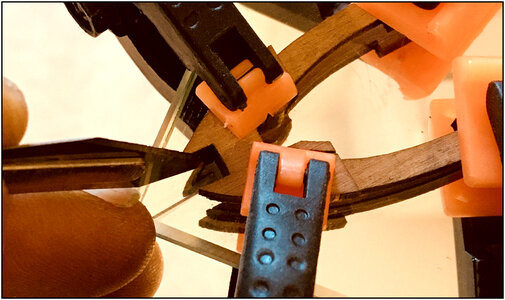
And with the tip of the scalpel I can feel it the front and back part fit neatly:
051 Frame 1-4.jpg
Just my check - check - double check.
Regards, Peter
 
Last edited:
TREENAILS:
While drying frame 1, I made some test with making treenails.
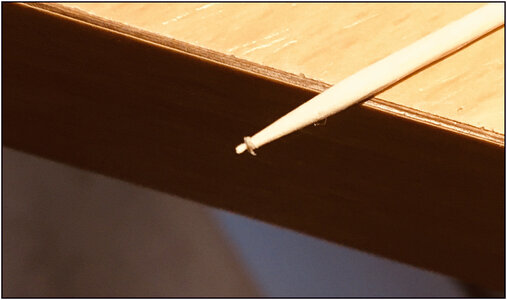
I pointed some tooth sticks in different positions in the Byrnes Drawplate:
052 Treenail 1.jpg

In different diameters:
0,3 mm / 0,0118 inch
0,4 mm / 0,0157 inch = drawplate 16
0,5 mm / 0,0198 inch = drawplate 20
0,6 mm / 0,0236 inch = drawplate 24
0,7 mm / 0,0275 inch = drawplate 28
0,8 mm / 0,0314 inch = drawplate 32
With the results:
053 Treenail 2.jpg
The wood is some spare parts from the first frame. You see a hight of 5 mm. Almost the same as the upper parts of the frames.
After drilling, nailing and sanding, the wood protected with one layer are mat varnish.
0,5, 06 and 0,7 gives a nice view. But you have to see it later with the frames installed.
0,5 and 0,6 looks almost the same, but I used 2 types of drills.
It won't be 1-to-1 to the original size of the treenails. It's to caress the eye.;)
I made the treenails in the keel with holes of 0,7 mm.
I like 0,6 the most.
Regards, Peter
 
FRAMES:
Time to get started with the frames. When there is a frame with nr. 1, then I get started with nr. 1.

First made 2 little blocks, on one side squared, to fit in the lower and upper cutouts:
View attachment 212698
I am glueing on the rirror. Easy to clean and the glue doesn't attach.
When the frames are composed out of multiple parts, the sample drawing goes below.

When clamped, the 2 blocks removed:
View attachment 212699
The mirror give a double view, also from below. So I can check the position.

From another angle:
View attachment 212700

And with the tip of the scalpel I can feel it the front and back part fit neatly:
View attachment 212701
Just my check - check - double check.
Regards, Peter
I also used blocks, top and bottom of the frame halves, to align properly at glue up. That will prevent any mismatch! ;)
 
Last edited:
TREENAILS:
While drying frame 1, I made some test with making treenails.
I pointed some tooth sticks in different positions in the Byrnes Drawplate:
View attachment 212702

In different diameters:
0,3 mm / 0,0118 inch
0,4 mm / 0,0157 inch = drawplate 16
0,5 mm / 0,0198 inch = drawplate 20
0,6 mm / 0,0236 inch = drawplate 24
0,7 mm / 0,0275 inch = drawplate 28
0,8 mm / 0,0314 inch = drawplate 32
With the results:
View attachment 212703
The wood is some spare parts from the first frame. You see a hight of 5 mm. Almost the same as the upper parts of the frames.
After drilling, nailing and sanding, the wood protected with one layer are mat varnish.
0,5, 06 and 0,7 gives a nice view. But you have to see it later with the frames installed.
0,5 and 0,6 looks almost the same, but I used 2 types of drills.
It won't be 1-to-1 to the original size of the treenails. It's to caress the eye.;)
I made the treenails in the keel with holes of 0,7 mm.
I like 0,6 the most.
Regards, Peter
Agreed, the treenails are going to look great!
 
I also used blocks, top and bottom of the frame halve, to align properly at glue up. That will prevent any mismatch! ;)
Agreed, the treenails are going to look great!
The 0.6 treenails look great.
Thanxs for the reply’s and liking. What was in my mind and what I have seen in the other build-logs, comes together in this further build. Also thanxs for sharing the like of 0,6mm!
Regards, Peter
 
Back
Top