YUANQING BLUENOSE - Peter Voogt [COMPLETED BUILD]

As far as the treenails go. On his Royal Caroline - which I still regard as the most definitive model build on SOS, @Maarten Maarten has used 0,8mm treenails - BUT Bear in mind the scale is 1:30. On a 1:72 scale model (both Bluenose and my Haarlem), he has advised 0,4mm. That does not suggest that 0.6mm is wrong by any means - it is just an interesting piece of information.
 
As far as the treenails go. On his Royal Caroline - which I still regard as the most definitive model build on SOS, @Maarten Maarten has used 0,8mm treenails - BUT Bear in mind the scale is 1:30. On a 1:72 scale model (both Bluenose and my Haarlem), he has advised 0,4mm. That does not suggest that 0.6mm is wrong by any means - it is just an interesting piece of information.
Thanxs Heinrich.
I had another little test in mind. The egde of the drilled holes accentuate a bit with a pensel. It maybe give the treenail a little accent. I’ll try it with the 0,4, 0,5 and 0,6.
Regards, Peter
 
In several build-logs I have seen the how to bevel the frames , with the techniques applied. Usually a matter of sanding up to the lines.
For me, this is new. When I beveled part #18 of the keel, it was filing, sanding, filing, sanding etc, just as long as I was on top of the laser lines and on the side the laser char was gone. So that was also producing a lot of dust.

With my 1st frame I did something else. Partly because I did come across some points that I have not yet seen specifically mentioned on the forum.
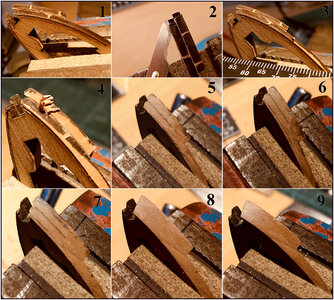
I have taken a picture of all the stages and will explain it in 9 steps:
054 Bevelline.jpg
I clamps the frame between the felt blocks, so it wont damage. And I can turn it in any position I wanted.
1: A laser line indicates where and how far the bevel goes.
2: But it's not a laser line but a laser groove. At the tip of the scalpel knife you can see how deep it is. With laser char inside.
3: To reduce the dust, I first started cutting with the scalpel blades. It was like a scrape. That gave a nice fine curl. Matter of using a new sharp knife, supporting the hands properly and not wanting too much at once.
4: For me this worked well. More and more beautiful curls.
5: When I got to the laser line, basically the end of the bevel, I switched to diamond filings. And the laser char of the groove slowly emerged. So that gives extra blacking on the frame you don't want to have.
6: The black of the laser groove over the full length still to be seen. So there's still some wood left to get rid of that black as well.
7: With a pencil always blackened the work to be edited, so you keep seeing on the other side (here on the right) you don't take anything too much away. Keep filing, sanding, blackening, filing, sanding, blackening....
8: Finally after the last sanding a satisfactory result.
9: Just polish and then move on to the other side.

The bevel is therefore in principle slightly bigger / further than the indicated line. But I don't think it's any different than sloping a little further to get rid of the filthy black.

And yes, this takes quite some time. But while doing so one learns and it will go quite a bit faster.
Anyway, 55 frames to go.....
Reghards, Peter
 
Last edited:
In several build-logs I have seen the how to bevel the frames , with the techniques applied. Usually a matter of sanding up to the lines.
For me, this is new. When I beveled part #18 of the keel, it was filing, sanding, filing, sanding etc, just as long as I was on top of the laser lines and on the side the laser char was gone. So that was also producing a lot of dust.

With my 1st frame I did something else. Partly because I did come across some points that I have not yet seen specifically mentioned on the forum.
I have taken a picture of all the stages and will explain it in 9 steps:
View attachment 213219
1: A laser line indicates where and how far the bevel goes.
2: But it's not a laser line but a laser groove. At the tip of the scalpel knife you can see how deep it is. With laser char inside.
3: To reduce the dust, I first started cutting with the scalpel blades. It was like a scrape. That gave a nice fine curl. Matter of using a new sharp knife, supporting the hands properly and not wanting too much at once.
4: For me this worked well. More and more beautiful curls.
5: When I got to the laser line, basically the end of the bevel, I switched to diamond filings. And the laser char of the groove slowly emerged. So that gives extra blacking on the frame you don't want to have.
6: The black of the laser groove over the full length still to be seen. So there's still some wood left to get rid of that black as well.
7: With a pencil always blackened the work to be edited, so you keep seeing on the other side (here on the right) you don't take anything too much away. Keep filing, sanding, blackening, filing, sanding, blackening....
8: Finally after the last sanding a satisfactory result.
9: Just polish and then move on to the other side.

The bevel is therefore in principle slightly bigger / further than the indicated line. But I don't think it's any different than sloping a little further to get rid of the filthy black.

And yes, this takes quite some time. But while doing so one learns and it will go quite a bit faster.
Anyway, 55 frames to go.....
Reghards, Peter
I found a dremel tool makes short work of it! I just used a low speed and didn’t rush it. Once near the bevel line, I sanded the rest by hand.
 
Last edited:
Hi Peter, you could also try a small plane (David schaaf). I use mine a lot, also to avoid dust ;). There is a little trick to get it adjusted, but you can make cuts as small as 0.1 mm deep.
Hi Gijsbert.
Thanxs for the reply. I have a David on the working table. But I think it gives to much craft on the frame. They are fragile. And when using it, you have for a moment no view on the frame. For this moment I am happy with the scalpels. Since the many meters of railing on The Lee, they are my friends. :)
Regards, Peter
 
Last edited:
I understand that. Which is why I work in the garage when making a mess! ;) But it’s getting into the 20s now! We are having snow for the next two days, which is rare for southern Texas!
When I have some experiance with the frames and how the bevels are curving, I am sure the Dremel is coming to help. But I already loved the carving now. The frames are made of a nice kind of wood.
And see the reply to Gijsbert: the scalpels are my friends. :)
Here in the Netherlands we had last week ‘much’ snow: 10 to 20 cm. And the last days its freezing -10 to -15 C. Half of the Netherlands is now on ice skates. But tomorrow it ends.
Regards, Peter
 
Last edited:
When I have some experiance with the frames and how the bevels are curving, I am sure the Dremel is coming to help. But I already loved the carving now. The frames are made of a nice kind of wood.
And see the reply to Gijsbert: the scalpels are my friends. :)
Here in the Netherlands we had last week ‘much’ snow: 10 to 20 cm. And the last days its freezing -10 to -15 C. Half of the Netherlands is now on ice skates. But tomorrow it ends.
Regards, Peter
I saw that there are some long distance skating races on the canals. Different for of propelling yourself on frozen water than cross country ski skating stride. Rich
 
Hi Peter. I know EXACTLY what you are saying about the scalpel and those railings. I am experiencing that myself at the moment and fully agree about the control that the scalpel gives you.
 
I made some extra samples for the treenails. The size of 0,5 mm gives me the best view.
Supported by the Saga-info:
The outside of the treenails was 1 3/8" = 1.375" = 34,925 mm.
On scale 1:72 34,925 mm = 0,485 mm = 0,019".
In the drilled holes of 0,5 mm, a toothpick pointed in the Drawplate 22 fits well.
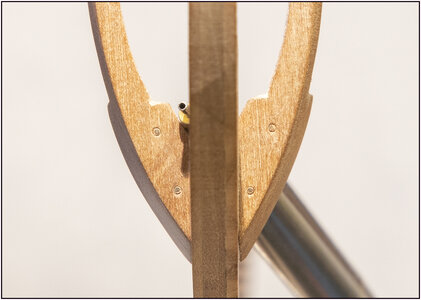
With this result on the finished frame 1, fitted in the keel:
055 Frame1 Treenail.jpg

I accentuated the treenails with the tip of a auto-pencil which is using 0.5mm fillings:
056 Frame1 Treenail.jpg
It is depending how flat the light floods over te frame to see more of less of the treenail it self or the accent.
The front and the back of the frame has 1 layer of mat varnish.

I also made a sample with the inside of the hole blackening with the pencil, but it gives no much extra on the view.
Regards, Peter
 
Last edited:
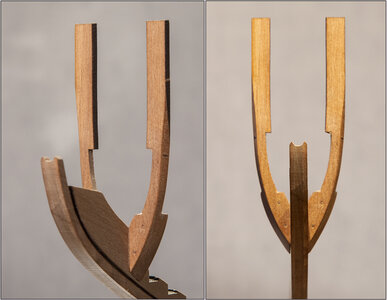
With this frame no. 1 I have run into something witch gave me no satisfaction. The keel is thicker than the cut-out between the tips at the bottom of the frame. Now I've widened that cutout so it fits over the keel. But it means something's going off the top of those tips. As a result, the bottom of the frame is further from rabbet in the keel.
I know: maybe I put too much of the need on it, but why do they invented this construction?
We're going to see it........

After a day of thinking ......
My idea is to press the wood from the keel on either side, where the frame slides over it. Draw edges neatly and apply some pressure between and along those lines. At frame 2, I'm going to see if that works.
Of course, you can also choose to phrase, sand or cut it slightly.
Or keep on widening the cutout and deepen the recess in the frames. But that affected the rest of the build of the structure of the hull.

With some parts of spare wood I will make a example and try the options.
Or settle for that space........ Didn't think so!;)
Regards, Peter
 
Last edited:
Back
Top