YUANQING BLUENOSE - Peter Voogt [COMPLETED BUILD]

Hello Peter. YuanQing reopens on Monday and then I will ask the test builders about your question. For now I tend to concur with @Dean62 . I would make sure that each frame is fully seated as deep as the notch allows it (after all laser char had been carefully removed). That way I would see what my ultimate line of the frames looks like and where individual adjustments have to be made.
 
Thank you for the reply Heinrich.
Of course, the final arrangement and alignment will come when all frames are ready. And no matter how they stand, there's always a solution.
And off course, the laser-char is removed. Otherwise you get no good glue connection.
I just have a bit of my own ideas and theory on it. And has already put too many words about it.
I’ll go on with the frames and post my results. Nobody has to follow my ideas. But its nice to see sone different builds.
And for sure, there will come some more ‘differents’.
Regards, Peter
 
Last edited:
I did some more tests to make the treenails.

Eventually I came up with the syringe needle technique shown by @Maarten :
Time for some scratch building.
On one side I will add the ceiling and planking.
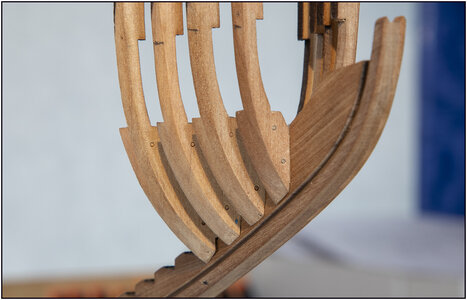
The hull back in its berth and we can start.
View attachment 203259.

For the extra thickstuf I will use cherry, for the ceiling planks I use basswood. The strakes of extra thickstuff are 1,5 x 5 mm, the ceilingplanks 0,8 x 5 mm. All wood I take from my wood stash and saw them on the saw table.
View attachment 203265
View attachment 203266

After a lot of trimming and fitting the first thickstuf plank fitted. I glue these with CA to speed up the process.
View attachment 203267

After the thickstuf time for the ceiling.
View attachment 203268
View attachment 203269

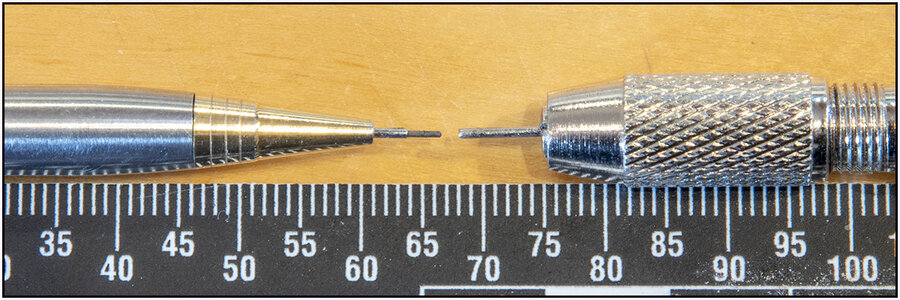
For the treenails of these planks I the seringe methode. Cut of a fine 0,7 mm seringe, sand the top flat and grind it around the edge to get a sharp pointed ring surface.
View attachment 203270

Heat the seringe tip and tap it on the wood.
This will give you perfect very fine treenails.
View attachment 203271

The first ceiling is finished, second one in progress.
View attachment 203272
View attachment 203273

After some extra time during Christmas and New Year it is now back to normal, that means less time for my hobby so progress wil slow down again.
and @Jimsky :
Many thanks to all for the interest, it gives me the motivation.

Since the Celling and all Thickstuff will require treenailing the subject for this evening discussion is - Treenail (verb) or imitate treenails or trunnels (you name it) Many methods already discussed, and from time-to-time, a new thread pops up, discussing yet another method as this seems a very 'hot' topic. For years, I am using one of the old methods - actual treenails made from 1 x 1 mm square stock and draw thru a drawplate. I like this method and it is well adapted among Russian modelers, but on the smallest scale it is impossible, well..., almost impossible to draw a 0.4mm treenail stick. But for the scale of 1:48 why not?
First I prepare the timber which I will use for the tests. Thre strips were cut on tablesaw and using my sophisticated sanding machine 'Handxxon' make them the same thickness. I lay all strips n the flat surface on the double-sticky tape (on the ends only) and using the tool made them the same.

View attachment 214187

Then, I glue the black paper to the entire stock. Once dry, using the sharp razor blade slice as individual planks. When I glue the planks, I choose a free pattern. It doesn't reflect a specific shift of the butts pattern, it is rather just for the test.

View attachment 214188 View attachment 214189

The first sample was made from 0.8mm x 5.00mm Castello. I use black paper to simulate caulking. It is divided into three rectangles:

View attachment 214190

Red rectangle: this is the 0.5mm hole and the lead (H) from a mechanical pencil (0.5mm) inserted and lightly twisted
Orange rectangle: this is just treenails from pearwood (no blackening of any kind)
Green rectangle: This is the treenail rod rubbed against graphite powder

Some macro images

View attachment 214191

View attachment 214192
View attachment 214193

Technically the 'red' and 'green' examples look the same, it seems that rubbing the treenail rod against graphite powder just easier than insert the lead into each hole. What I don't like is - a bit of 'fuzziness' around the hole, but this is MACRO, and the bare eye will not see it. The test is planned for the deck planking.
The next set of samples is the 'gamechanger', IMHO. No actual treenails, just imitation!!!! This is something I didn't expect myself. Frankly, I choose the base idea as the method my friend Maarten @Maarten uses in his Alert build log. Check it out, highly recommend it, with lots of learning materials and great craftsmanship.


So I use the syringe needle with an external diameter of 0.8mm (yellow color) to cut off the yellow head with a cut-off wheel.

View attachment 214202View attachment 214203View attachment 214204
Shaped around the edge to form a sharp-pointed ring. So far the same steps as Maarten did, but that's it. The tool is ready. I tight the needle in my rotary tool and start using it like a drill. The key to success is low speed and no pressure. Start by touching with age, just a bit of angle until it touches the surface, then immediately make it flat against the planks. Don't push too hard, it needs just a touch, otherwise, you will drill thru. With a bit of practice, I am sure you will grasp great results. I absolutely love the results, hope you like them too. It eliminates the need for drawing treenails and drill holes.

This is planned to use for deck planking. The sample below is Pear (it is off-white color). Same caulking techniques as for the above methods - black paper.

View attachment 214195

You will see different results. I was playing with speed and pressure. Also, at some point the working surface gets dull, You don't have to shape it again, just use a polishing paste against the hard felt. A few turns and the tool ready again. Below some MACRO. I love macro, it reveals all the flaws.

View attachment 214196

The last image is the combination of the Pear (will use for Celling) and Swishpear (will use for Thickstuff). This is without oil

View attachment 214201

This is with one coat of Linseed oil. The oil penetrates in grooves and emphasizes the color imitating perfect caulking. Not too dark, not light. For my taste. BTW, all drilling is freehand, I didn't use the pencil to line up, but think, it is a good idea to line up first.
View attachment 214198

...and macro

View attachment 214199

This is how natural Pear looks
View attachment 214200

That's it, for now, folks. It is your turn, and I need your opinion. Which example you like the most and why? Please ask me any question you will come with, I will be glad to answer.

see you soon and thanks for your feedback,

For the frames I use a needle with an internal diameter of 0.5 mm. I already had that size with the pointed toothpicks and the accent of the technical pencil. The needle is external 0.8 mm. Almost the same as the technical pencil.

First I provided the inside of the needle with some black of the 0.5 technical pencil:
061 Treenail 3.jpg
But like Maarten and Jimsky wrote, the blackening isn’t needed. The light gives the round its accent.
And what Jimsky wrote: The linseed oil penetrates in the grooves and emphasizes the color imitating perfect cailking.

On the first 4 frames:
062 Treenail 4.jpg
Frame 4 is a little bit tilted. And I have to make a little tool for the position of the top treenail. On frame 3, it's a little too low. But just looking with your eyes, a handsome boy with good eye's who's going to notice.

I also tried the 0.5/0,8 mm on the hull planks. Then 0.5/08 is a little too big.
063 Treenail 5.jpg
On the 2nd shelf I used a needle of external 0.5mm (25G). That's pretty close. Maybe another middle sized.
@Dean62 : Perhaps this info is useful for you?

Some more information about needle diameters (external):
20G= 0.9 mm
21G = 0.8 mm
22G = 0.7 mm
23G = 0.6 mm
25G = 0.5 mm
27G = 0.4 mm

Regards, Peter
 
Last edited:
I did some more tests to make the treenails.

Eventually I came up with the syringe needle technique shown by @Maarten :

Hms Alert by Maarten

Thx again for your comments and likes. Today I am stil working on the thickstuff and shelf clamps. The last three are placed of which the shelf clamp is the most critical. The SB shelfclamp had its wood grain positioned under and angle causing the strake to brake into pieces when steaming and...
shipsofscale.com

and @Jimsky :


For the frames I use a needle with an internal diameter of 0.5 mm. I already had that size with the pointed toothpicks and the accent of the technical pencil. The needle is external 0.8 mm.

First I provided the inside of the needle with some black of the 0.5 technical pencil:
View attachment 216286
But like Maarten Jimsky wrote, the blackening isn’t needed. The light gives the round its accent.
And what Jimsky wrote: The linseed oil penetrates in the grooves and emphasizes the color imitating perfect cailking.

On the first 4 frames:
View attachment 216287
Frame 4 is a little bit tilted. And I have to make a little fool for the position of the top treenail. On frame 3, it's a little too low. But just looking with your eyes, a handsome boy with good eye's who's going to notice.

I also tried the 0.5/0,8 mm on the hull planks. Then 0.5/08 is a little too big.
View attachment 216288
On the 2nd shelf I used a needle of external 0.5mm (25G). That's pretty close. Maybe another middle sized.
@Dean62 : Perhaps this info is useful for you?

Some more information about.b.t. needle diameters (external):
20G= 0.9 mm
21G = 0.8 mm
22G = 0.7 mm
23G = 0.6 mm
25G = 0.5 mm
27G = 0.4 mm

Regards, Peter
Looks great Peter!
 
Looks good Peter. I've used .6 mm wire on my keelson that works out to around 4.32 cm which I think is about the right size, however, they are real hard to notice. I'm hoping some finish will make them more noticeable.
Hi Don,
I have them on the hull of Le Mirage. From copper. After sanding with very fine sandpaper (1200) they got shining.
The keelson is for now some weeks to go. So, I can look to the others ;) .
 
Last edited:
Hi Jim, They look very usable. I’ll have a look where to find them.
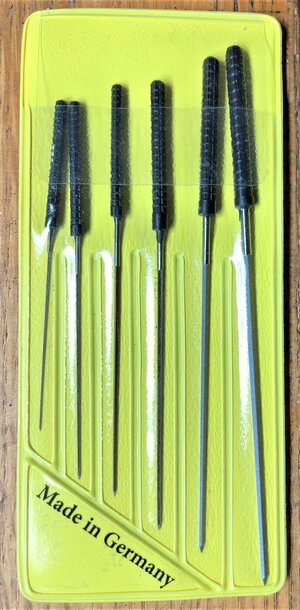
This particular set can be found as - Broach Set, 6 Piece Set | BRO-174.00 or WATCHMAKERS SMOOTHING BROACHES SET OF 6 (0.4MM-1.4MM)

 
This particular set can be found as - Broach Set, 6 Piece Set | BRO-174.00 or WATCHMAKERS SMOOTHING BROACHES SET OF 6 (0.4MM-1.4MM)

For my eye with scale the smallest syringe 27 ga ~ 0.4 mm is in scale while the larger diameters are too large. Just a side opinion without actual hand and eyes on the parts verification. I am continually thinking in scale more than visual presentation which does not always apply and dictate setting aside a preconceived notion of what is needed to be done or not in the model. Builders artistic license prevails overall. Rich
 
For my eye with scale the smallest syringe 27 ga ~ 0.4 mm is in scale while the larger diameters are too large. Just a side opinion without actual hand and eyes on the parts verification. I am continually thinking in scale more than visual presentation which does not always apply and dictate setting aside a preconceived notion of what is needed to be done or not in the model. Builders artistic license prevails overall. Rich
Rich, thanks for your point of view.
I am also looking and calculating to the right scale.
And what you see with the common eye and how ‘distorted’ it looks at a macro photo. Or in the other way: Is what is looking correct on that photo, also be seen on the model, standing in his final setup and environment. Then you have to over-dimension some tiny details.
You are correct, it’s the builders artistic license.
Regards, Peter
 
It looks wonderful Peter - you have achieved the correct balance between visibility and subtlety. The reamers suggested by Jimsky will be most valuable - also for future uses. As far as the diameter goes - my choice would be 0.4mm.
 
Showing details at the wrong scale can destroy the overall appearance of the model, specifically too large treenail heads and wide caulking. This is why, often time, modelers just omit to show those. However, the proper size\color will definitely attract the eyes. :)
 
At first: thanks you all for your reply's ThumbsupThumbsup and what you like about the treenails in a model. And particular for the BN.
Apparently an interesting topic. :)

In the digital environment we have the expression: WYSIWYG. Is this also by modeling?

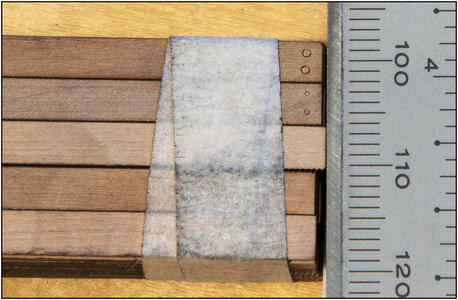
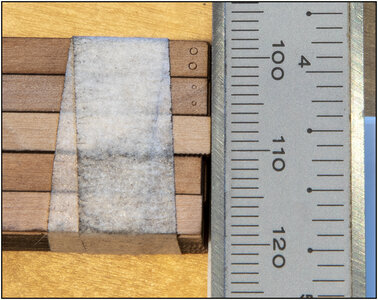
In reply #143 I posted my example of the treenails on 2 hull planks. With the needle external diameters of 0.8 mm (above plank) and 0.5 mm (2nd plank).
Here the macro, so you won't have to scroll above. Whit the ruler with mm and inches.
The size may be slightly smaller due to the oblique side of the needle.
064 Treenail 6.jpg

Several builders preferred 0.4 mm for the model treenails. (I assume this was the preference for the hull planks.)
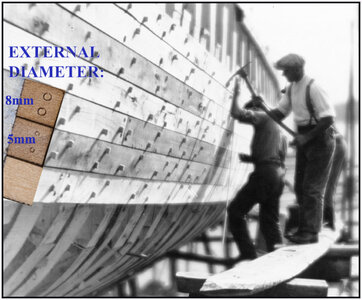
In the Bluenose Main Support Page we have this reply with pictures of the tree nailing of the hull planks:
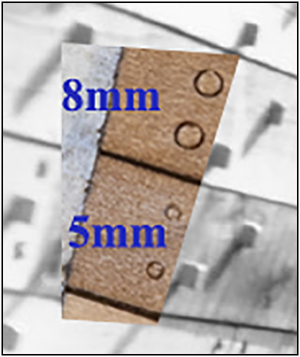
In Photoshop, I combined my image with the hull-plank-treenailing-picture and sized and rotated it in such a way that the shelves connect to each other.
And here comes WYSIWYG:
065 Treenail 7.jpg
(The 0. fell off the picture)
1614354175074.png
With an enlargement, both types of treenails slightly shifted to each others.
In my opinion, 0.8 mm is indeed to big and 0.5 mm is to small.;)

I will make a order for a 0.6 mm and 0.7 mm needle and will show later the results.
And I found out (but Jimsky wrote already) it matters how much pressure you put on the needle with or without twisting. More of both makes it wider.

Wow, what a lot of crowds for something so small.:D But I like the interacting with all of youThumbsup.
Regards, Peter
 
Last edited:
It looks wonderful Peter - you have achieved the correct balance between visibility and subtlety. The reamers suggested by Jimsky will be most valuable - also for future uses. As far as the diameter goes - my choice would be 0.4mm.
Showing details at the wrong scale can destroy the overall appearance of the model, specifically too large treenail heads and wide caulking. This is why, often time, modelers just omit to show those. However, the proper size\color will definitely attract the eyes. :)
Hi @Heinrich and @Jimsky,
Sorry for my reply after the reply I posted above.
All the reactions triggered me to much ....... ;)
Regards, Peter
 
But the story and comparison with the original is not yet complete . . . . . .
There was still some gnawing at the theory.
That's my professional deformity as a former CSI. ;)
And one of my rules: check - check - double check.

To complete the comparison picture of the treenails on the hull planks, the size of the planks must also be correct.
And then there's a flaw.
In The Saga is written:
"Planking 3 1/2" thick hardwood, average about 6" wide. Length of planks ranges from about 25 to 30 feet".

For me in metric: 6" = 15.24 cm = 152.4 mm. In scale 1:72 it is 2.11 mm.
And the hull planks in the kit are . . . . . 4.1 mm wide.

So for the right dimensions in the combined photo, the kit planks need to be half smaller.
Or for the right comparison: a 4.1 mm plank should be stretched over 2 original planks.
And the demo treenails got a different size. Then the possible 0.3 mm or 0.4 mm comes in view.

But ......
On the picture you can see a worker puts his hand on one of the planks:
1614364533993.png
From wrist to fingertip, my hand is 20 cm = 7.87". But maybe those robust shipbuilders have bigger hands.;)
Almost 25% more then the 'written' plank width of 15.24 cm / 6".
25% related to the possible 0.3 mm or 0.4 mm . . . . . .

I am going for the 0.5 mm or 0.6 mm. Just 1 more extra test.
Because I don't think I am going to change the kit planks.
And the treenails must be proportional to those planks.

End of the theoretical generosity, time to move on.
But nice to think about size relationships in model building.
Regards, Peter
 
Last edited:
At first: thanks you all for your reply's ThumbsupThumbsup and what you like about the treenails in a model. And particular for the BN.
Apparently an interesting topic. :)

In the digital environment we have the expression: WYSIWYG. Is this also by modeling?

In reply #143 I posted my example of the treenails on 2 hull planks. With the needle external diameters of 0.8 mm (above plank) and 0.5 mm (2nd plank).
Here the macro, so you won't have to scroll above. Whit the ruler with mm and inches.
The size may be slightly smaller due to the oblique side of the needle.
View attachment 216591

Several builders preferred 0.4 mm for the model treenails. (I assume this was the preference for the hull planks.)
In the Bluenose Main Support Page we have this reply with pictures of the tree nailing of the hull planks:
In Photoshop, I combined my image with the hull-plank-treenailing-picture and sized and rotated it in such a way that the shelves connect to each other.
And here comes WYSIWYG:
View attachment 216594
(The 0. fell off the picture)
View attachment 216595
With an enlargement, both types of treenails slightly shifted to each others.
In my opinion, 0.8 mm is indeed to big and 0.5 mm is to small.;)

I will make a order for a 0.6 mm and 0.7 mm needle and will show later the results.
And I found out (but Jimsky wrote already) it matters how much pressure you put on the needle with or without twisting. More of both makes it wider.

Wow, what a lot of crowds for something so small.:D But I like the interacting with all of youThumbsup.
Regards, Peter
In the old photo you have to remember that what you are seeing is the larger square end ( 1-3/8") for pounding the treenail in. These were cut off flush and ended up with the actual rough diameter published in Saga, of 1-1/8" which would have been somewhat reduced when pounded in. Just an observation to consider with your photoshop comparison. Rich
 
In the old photo you have to remember that what you are seeing is the larger square end ( 1-3/8") for pounding the treenail in. These were cut off flush and ended up with the actual rough diameter published in Saga, of 1-1/8" which would have been somewhat reduced when pounded in. Just an observation to consider with your photoshop comparison. Rich
Your are right with your observation, Rich.
Not everybody has The Saga and knows the shape. Then it's hard to put things you see in your right context. Here the drawing pag. 41 of the Saga:
066 Treenail 8.jpg
During the image comparison I at least looked at the surface of the plank.
The view of the cutoff treenails is somewhere between the 1-3/8 and the 1-1/8.
The corners of the square partly wriggle into the surrounding plank and are partly flattened by that plank. In any case, the view is more than 1-1/8.
So, 0.5 / 0.6 mm is still in control ;).

PS:
About the "almost 25%" between the 15.24 and 20?
Thats by counting down from 20. Counting up from 15.24 it's almost 33%. Just another tiny detail.;) But also a conformation for the 0.5 / 0.6 mm.:)

Regards, Peter
 
Your are right with your observation, Rich.
Not everybody has The Saga and knows the shape. Then it's hard to put things you see in your right context. Here the drawing pag. 41 of the Saga:
View attachment 216754
During the image comparison I at least looked at the surface of the plank.
The view of the cutoff treenails is somewhere between the 1-3/8 and the 1-1/8.
The corners of the square partly wriggle into the surrounding plank and are partly flattened by that plank. In any case, the view is more than 1-1/8.
So, 0.5 / 0.6 mm is still in control ;).

PS:
About the "almost 25%" between the 15.24 and 20?
Thats by counting down from 20. Counting up from 15.24 it's almost 33%. Just another tiny detail.;) But also a conformation for the 0.5 / 0.6 mm.:)

Regards, Peter
We both recognize that the diagonal of the square pounding end is wider than the side dimension so that random positioning could throw off a visual dimensioning but it doesn't matter that much in the scale of the model and the visual effect that you are seeking. Good research on your part. Rich
 
Back
Top