Wow Peter, that is a great practicum. Thank you for that.
Jan
Jan
 |
As a way to introduce our brass coins to the community, we will raffle off a free coin during the month of August. Follow link ABOVE for instructions for entering. |
 |
 |
The beloved Ships in Scale Magazine is back and charting a new course for 2026! Discover new skills, new techniques, and new inspirations in every issue. NOTE THAT OUR FIRST ISSUE WILL BE JAN/FEB 2026 |
 |


Your are correct about the cement and pig iron internal ballast in BN. It was formed out at the pumps creating a well in those locations. BN did not carry an external ballast that was a metal shoe or band on the very bottom of the keel. Just think, . . you too could simulate the internal ballast and pump wells LOL. . . nice work. RichHi all,
To let you know I am still building on the BN .......
Busy with 2 weeks holiday and my last year bought '90 BMW K1 once taken care of. Remove the entire fairing, cleaned everything ‘under the skin’ and have 4 parts re-sprayed. Everything's back on and it's fresh again. And some nice sunny days, good for riding my race-bike and MTB.
In the past week, the assembly of the frames has been resumed.
In the build-logs I have seen some subjects not (nice) and clearly on photo. That's why we have some extra pictures with explanations.
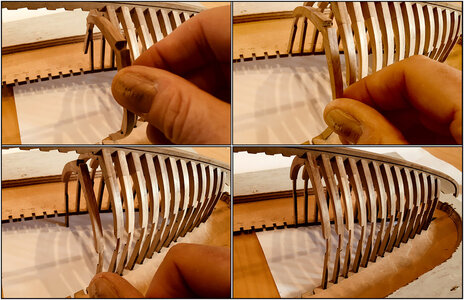
You can actually easily place the frames in the jig.
View attachment 225318
From top left to bottom right:
-Lift the jig a little and inserts the frame from above diagonally with 1 end into the corresponding recess.
-Slide it a little more down and tilt the frame under the keel and insert the other end into the recess.
-Lower it slightly so that the frame gets under the keel.
-Slide the frame into the recess and over the keel and lower the jig.
When placing the frames I noticed the jig wanted to tow. And despite the raised edges it was still a bit limp. Therefore, like some others already has done, I remove the edges and attach a shelf with recess to the jig plate.
As you will have noticed, sometimes I have a somewhat different view of the construction of this kit.
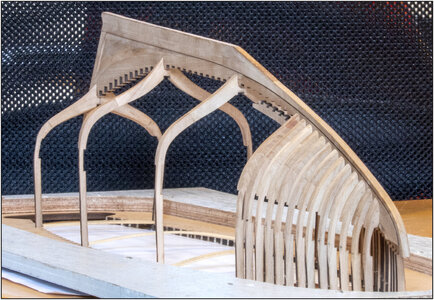
Until now I had placed 7 frames dry-fit in the jig with the keel on it.
To get everything nice and straight and angled, I first made the frames 23, 36 and 49.
I put these in the jig with the frames 1 to 7, with the keel over them.
View attachment 225314
For stability, I clamped the ends of the frames 23, 36 and 49 into the jig.
Then I placed the ready frames 8 to 13.
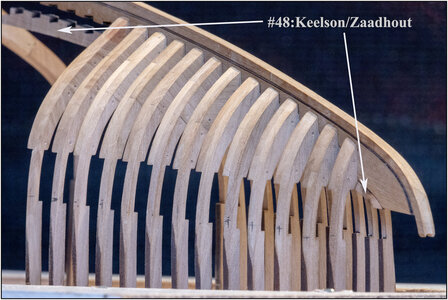
As you can see, I immediately made the keelson fit into the frames.
View attachment 225316
When I have a few frames ready now, I always fit all this entirety.
With the advantage I now get a very stable dry build.
For now some extra work, but soon it will save time and energy by working in the tiny space in the hull.
On this image, the treenails are also visible again. Pretty subtle, if I may say so myself.
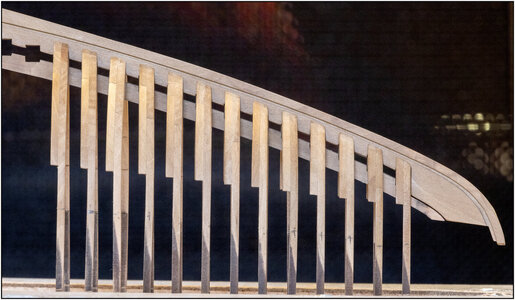
With another image from the side.
View attachment 225317
It is true that there is a recess between the keel and the keelson. According to a "Saga description" of the BN-II, this was filled with cement as ballast. I suppose by the Original also. In the front still a little gap, but by the final placing with gluing, it will be clamped together.
So, hopefully I can go back to making some meters now.
Regards, Peter
Looks nice and sleek Peter
I am very happy with your explanation in your construction
regards
Henk
Just beautifully executed Peter!
Looking good Peter!
Thanxs for your reply and compliments.Your are correct about the cement and pig iron internal ballast in BN. It was formed out at the pumps creating a well in those locations. BN did not carry an external ballast that was a metal shoe or band on the very bottom of the keel. Just think, . . you too could simulate the internal ballast and pump wells LOL. . . nice work. Rich
Current reading in Chapelle's American Fishing Schooners touched upon ballast in those after 1900 when the fore sections became more narrow and had more overhang before the waterline. In a series called Knockabouts (schooners without bow sprits) he wrote in part about the problem with less displacement forward the effect was a bow down condition which required more attention to trim ballast which could be shifted accordingly to trim out the hull. This was also a factor in the racing schooners which removed as much unnecessary fishing gear, stowage of anchors below decks as ballast, and then having the schooner measured for trim and conformance to the racing regulations. Chapelle notes that many schooners from Nova Scotia combined rocks and iron. American schooners and those build in Essex typically had their ballast using the iron rich clay and stones from the Essex River. Ballast and trim are not often thought of or considered in our models except occasionally for a visual presentation such as with stones. Just some trivia to pass along. RichYour are correct about the cement and pig iron internal ballast in BN. It was formed out at the pumps creating a well in those locations. BN did not carry an external ballast that was a metal shoe or band on the very bottom of the keel. Just think, . . you too could simulate the internal ballast and pump wells LOL. . . nice work. Rich
Hi Rich,Current reading in Chapelle's American Fishing Schooners touched upon ballast in those after 1900 when the fore sections became more narrow and had more overhang before the waterline. In a series called Knockabouts (schooners without bow sprits) he wrote in part about the problem with less displacement forward the effect was a bow down condition which required more attention to trim ballast which could be shifted accordingly to trim out the hull. This was also a factor in the racing schooners which removed as much unnecessary fishing gear, stowage of anchors below decks as ballast, and then having the schooner measured for trim and conformance to the racing regulations. Chapelle notes that many schooners from Nova Scotia combined rocks and iron. American schooners and those build in Essex typically had their ballast using the iron rich clay and stones from the Essex River. Ballast and trim are not often thought of or considered in our models except occasionally for a visual presentation such as with stones. Just some trivia to pass along. Rich
Thanxs Heinrich.Wow Peter - Now those details would add another dimension to her. Way to go!
It is interesting to go through his historical development commentary and hull drawings to see how the designs evolved to Bluenose which was basically not that different from other schooners in America 1915 - 1925. RichHi Rich,
I read it also in Chapelle’s book. Pig iron is also often named.
And reading that book ..........so many interesting details.
In an open part of the inner planking I want to show something of the ballast.
Inner planking? Yes, I will also make some inner planking. As partly for the fish hold, forecastle and cabin.
And what about ...... break beams, hanging knees, beam clamps and shelves ......
Lots to consider.
Regards, Peter
Peter, that would be very cool, but challenging, as reaching inside the ship with the extended frames is not fun, but doable. At that rate you should be planking the deck in about...say 5 years?Thanxs Heinrich.
I can’t wait ......... but first some 30 frames to go ........
Regards, Peter
Related to the photo that was posted of Columbia. . . I should say the newly constructed Columbia. . . I read in Chapelle that the original schooner was lost with all hands in a storm of August 24, 1927 off Sable Island. The same island was the one where Angus Walters was lashed to the helm of Bluenose to not be swept overboard in a hurricane which sunk many boats in that blast. I recall that Bluenose was on the lee side and not in the full force of the hurricane.It is interesting to go through his historical development commentary and hull drawings to see how the designs evolved to Bluenose which was basically not that different from other schooners in America 1915 - 1925. Rich
Hi Dean,Peter, that would be very cool, but challenging, as reaching inside the ship with the extended frames is not fun, but doable. At that rate you should be planking the deck in about...say 5 years?
Hi Rich,The curator of the historical museum in Lunenberg, Adrian Morrison, has told me that the most accurate model of Bluenose was built over many years by the captain who registered the schooner for the 1938 race as Walters had no international waters certification for the Gloucester event. The model is in the museum. That captain corresponded with other crew members about particular details over the years and their letters and drawings are at the museum. He may send me some photos of that model which I will pass along. Rich
I wish I could spend more time on the Bluenose, but maybe I build one for myself in the future? I also have the San Felipe to build and now Heinrich is talking about a new YQ ship! So I must move forward at a good pace!Hi Dean,
The more I read and see the more interesting the BN becomes. But it has to be realistic .........
But I still have some ideas for working inside. But that is for later to show ......... when I arrived at that stage.
And about the 5 years .......... It will always be less then the 34 years of The Lee. (And no son with a birthday in a few months ..........)
Regards, Peter
Wow Dean, a lot on your list.I wish I could spend more time on the Bluenose, but maybe I build one for myself in the future? I also have the San Felipe to build and now Heinrich is talking about a new YQ ship! So I must move forward at a good pace!
Also, I want to build the model airways wooden Sopwith Camel in 1/16 scale. So much to do...
True! I forgot to mention that I have the Sultan Arab Dhow by Artesania Latina, I bought it as a side project that will be fun. I plan to completely modify it to my own version of a merchant ship....lol.Wow Dean, a lot on your list.
I have looked also to that Sopwith Camel, (after the build-log of the Wright-Flyer). A very nice model with the 9-cilinder rotary engine.
Will see those build-logs in the future.
Regards, Peter
