-

Win a Free Custom Engraved Brass Coin!!!
As a way to introduce our brass coins to the community, we will raffle off a free coin during the month of August. Follow link ABOVE for instructions for entering.
-

PRE-ORDER SHIPS IN SCALE TODAY!
The beloved Ships in Scale Magazine is back and charting a new course for 2026!
Discover new skills, new techniques, and new inspirations in every issue.
NOTE THAT OUR FIRST ISSUE WILL BE JAN/FEB 2026
- Home
- Forums
- Ships of Scale Group Builds and Projects
- Bluenose PoF Group Build
- Bluenose Group Build Logs
You are using an out of date browser. It may not display this or other websites correctly.
You should upgrade or use an alternative browser.
You should upgrade or use an alternative browser.
YUANQING BLUENOSE - Peter Voogt [COMPLETED BUILD]
- Thread starter Peter Voogt
- Start date
- Watchers 74
There are more on the loose than there are stuck behind bars. Pleasantly disturbed is not a bad thing.openwork Silver Dollar ..... .....
OK ... so I've just been joined by another member in the Bluenose Asylum!

Regards, Peter
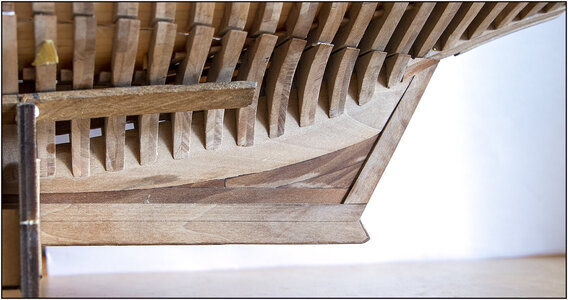
The ceiling with lime-wood and the floor with palm-wood closed:

The Metamorphosis:
The wall and floor sanded and then with the frames on the starboard side with a 1st layer of linseed oil:

The seams are starting to show a bit.
And after the 2nd and 3rd treatment:

And this is how the treated timber of the frames and keel looks like:

This matte look is exactly what I had in mind. Here is a happy man!
During the tests on the remaining frame planks I had already seen that the oil penetrates the entire wood. This can now also be seen on the untreated port side:

In the middle the parts that are built up from 1 layer and are therefore almost completely penetrated with oil. That is why I have not yet treated the frames on the port side. It must be covered with hull planks.
The lowered central part shown above must be filled with planks. Due to the oil, the glue will adhere less. But that is now an extra reason to fix the planks extra with treenails. Also tested on some scrap wood and it works.
Regards, Peter

The Metamorphosis:
The wall and floor sanded and then with the frames on the starboard side with a 1st layer of linseed oil:

The seams are starting to show a bit.
And after the 2nd and 3rd treatment:

And this is how the treated timber of the frames and keel looks like:

This matte look is exactly what I had in mind. Here is a happy man!
During the tests on the remaining frame planks I had already seen that the oil penetrates the entire wood. This can now also be seen on the untreated port side:

In the middle the parts that are built up from 1 layer and are therefore almost completely penetrated with oil. That is why I have not yet treated the frames on the port side. It must be covered with hull planks.
The lowered central part shown above must be filled with planks. Due to the oil, the glue will adhere less. But that is now an extra reason to fix the planks extra with treenails. Also tested on some scrap wood and it works.
Regards, Peter
Last edited:
That looks like a lot of work for a beautiful finish.
Jan
Jan
Looks great so far Peter!The ceiling with lime-wood and the floor with palm-wood closed:
View attachment 251938
The Metamorphosis:
The wall and floor sanded and then with the frames on the starboard side with a 1st layer of linseed oil:
View attachment 251939
The seams are starting to show a bit.
And after the 2nd and 3rd treatment:
View attachment 251940
And this is how the treated timber of the frames and keel looks like:
View attachment 251941
This matte look is exactly what I had in mind. Here is a happy man!
During the tests on the remaining frame planks I had already seen that the oil penetrates the entire wood. This can now also be seen on the untreated port side:
View attachment 251942
In the middle the parts that are built up from 1 layer and are therefore almost completely penetrated with oil. That is why I have not yet treated the frames on the port side. It must be covered with hull planks.
The lowered central part shown above must be filled with planks. Due to the oil, the glue will adhere less. But that is now an extra reason to fix the planks extra with treenails. Also tested on some scrap wood and it works.
Regards, Peter
- Joined
- Oct 28, 2018
- Messages
- 760
- Points
- 403

Wow
That's great
WeChats Moments' abbreviation is WTF
So I say WTF…
How big is this range Heinrich?
That's great
WeChats Moments' abbreviation is WTF
So I say WTF…
How big is this range Heinrich?
- Joined
- Jan 9, 2020
- Messages
- 10,566
- Points
- 938

@Henk Liebre WeChat in China is the same as What's App in the West. With one huge difference - there are more than a billion people subscribed to it, !!! So, trust me, Peter is getting huge exposure!
That looks like a lot of work for a beautiful finish.
Jan
Thanxs Jan&Dean.Looks great so far Peter!
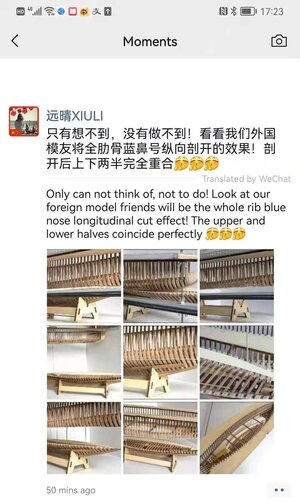
That is a great WOW-factor, Heinrich.Here is a nice surprise for your Peter! You are famous in China! Xiuli posted this on her WeChat Moments for all to see !
View attachment 252108
Which WTF explanation do you prefer, Henk?Wow
That's great
WeChats Moments' abbreviation is WTF
So I say WTF…
How big is this range Heinrich?
Thats more that 1.000.000.000 ....... Euuuhh .......@Henk Liebre WeChat in China is the same as What's App in the West. With one huge difference - there are more than a billion people subscribed to it, !!! So, trust me, Peter is getting huge exposure!
Let me stand with both feet on the ground with the likes of the SoS members.
regards, Peter
Wow, 1,000,000,000 fans of your work. IMPRESSIVE 

The next step in construction is a combination of activities. Both installing the deck beams and building the compartments below the deck.
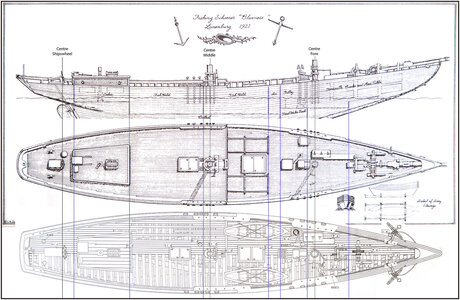
The aforementioned Saga includes on pag. 66 a sketch of the possible layout of the original BN. Thanks to Rich's @PT-2 attentiveness!
The author L.B. Jenson of The Saga adds to that sketch:
“As far as is known, no measured drawings of The Fishing Schooner 'Bluenose' were made. This drawing is based on The research conducted by John R. Stevens in1961 for The Maritime Museum of Canada, now part of The Nova Scotia Museum.”
I combined this Saga drawing with the YQ drawing of the deck structure. Because based on that deck structure I can determine where the walls of the different compartments will be:

Dimensions:
To get the correct measurements between both drawings, I first drew 2 lines through the drawn center of both masts in the Saga drawing. On both lines I scaled and positioned the YQ drawing.
It soon becomes clear that the position of various parts on the deck differs. But the main parts will all come back.
Now I can also add a drawing of the deck of the BN-II. But that has no added value for me, because the (inside) layout of the BN-II is (very) different.
Layout:
Then I looked at the front and back. By drawing a 3rd line through the center of the steering wheel, the YQ drawing showed the position of the Cabin and the WheelHouse with steering wheel slightly forward.
Then I drew (blue) lines from the drawn walls on the Saga drawing.
With the help of this combination drawing I can now pretty much determine where the walls of the ForeCastle will be with Bunks and MessTable, both FishHolds and Cabin. On the YQ drawing I can now find the corresponding deck beams against which I connect the walls.
The floors are also drawn. I can use that as an indication when applying it to the model. Perhaps I will ad also the Ice storage and Fresh Water Tank.
Order of build:
I'm going to start with the deck beams from the bow. The YQ model has a raised intermediate floor that is not shown on the Saga drawing. The standing beams are fixed in that floor to secure the bowsprit and windlass. In the beams of YQ for the intermediate floor and the deck, several recesses have already been cut out. I'm just going to use that.
The position of the windlass is different. I can't escape that. But I can give myself some freedom for the motor housing and the gearbox for the drive.
Once I get to the end of that intermediate floor, I determine where the back wall of the ForeCastle will be and I can start building it.
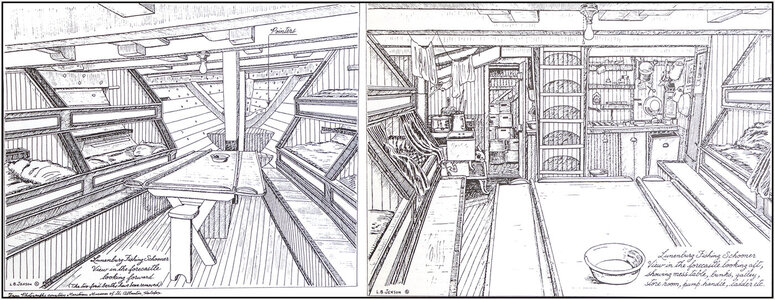
In the Saga there are 2 beautiful drawings L.B. Jenson. I can use that as inspiration for my layout:

And because there are no official drawings of the BN anyway, AL-FI sits on my shoulder and will help me.
Yes, all of these will also be 'half-open'.
Regards, Peter
The aforementioned Saga includes on pag. 66 a sketch of the possible layout of the original BN. Thanks to Rich's @PT-2 attentiveness!
The author L.B. Jenson of The Saga adds to that sketch:
“As far as is known, no measured drawings of The Fishing Schooner 'Bluenose' were made. This drawing is based on The research conducted by John R. Stevens in1961 for The Maritime Museum of Canada, now part of The Nova Scotia Museum.”
I combined this Saga drawing with the YQ drawing of the deck structure. Because based on that deck structure I can determine where the walls of the different compartments will be:

Dimensions:
To get the correct measurements between both drawings, I first drew 2 lines through the drawn center of both masts in the Saga drawing. On both lines I scaled and positioned the YQ drawing.
It soon becomes clear that the position of various parts on the deck differs. But the main parts will all come back.
Now I can also add a drawing of the deck of the BN-II. But that has no added value for me, because the (inside) layout of the BN-II is (very) different.
Layout:
Then I looked at the front and back. By drawing a 3rd line through the center of the steering wheel, the YQ drawing showed the position of the Cabin and the WheelHouse with steering wheel slightly forward.
Then I drew (blue) lines from the drawn walls on the Saga drawing.
With the help of this combination drawing I can now pretty much determine where the walls of the ForeCastle will be with Bunks and MessTable, both FishHolds and Cabin. On the YQ drawing I can now find the corresponding deck beams against which I connect the walls.
The floors are also drawn. I can use that as an indication when applying it to the model. Perhaps I will ad also the Ice storage and Fresh Water Tank.
Order of build:
I'm going to start with the deck beams from the bow. The YQ model has a raised intermediate floor that is not shown on the Saga drawing. The standing beams are fixed in that floor to secure the bowsprit and windlass. In the beams of YQ for the intermediate floor and the deck, several recesses have already been cut out. I'm just going to use that.
The position of the windlass is different. I can't escape that. But I can give myself some freedom for the motor housing and the gearbox for the drive.
Once I get to the end of that intermediate floor, I determine where the back wall of the ForeCastle will be and I can start building it.
In the Saga there are 2 beautiful drawings L.B. Jenson. I can use that as inspiration for my layout:

And because there are no official drawings of the BN anyway, AL-FI sits on my shoulder and will help me.
Yes, all of these will also be 'half-open'.
Regards, Peter
Last edited:
See first, then believe. Keep the log files coming.....Wow, 1,000,000,000 fans of your work. IMPRESSIVE
No offense, but I believe Jan is making a wild assumption!See first, then believe. Keep the log files coming.....
Yes, I believe 1 billion is how many subscribers there are using that app. But how many of those subscribers read the posts of Xiuli? And how many of those who read what she posts, actually appreciate it? I think it is substantially less than 1 billion, in fact no where close if we are to be realistic...lol. But the opportunity for exposure is certainly there!
Last edited:
It is about the intention and the experience. And that is worthy of admiration for Xiuli /YQModels.No offense, but I believe Jan is making a wild assumption!
Yes, I believe 1 million is how many subscribers there are using that app. But how many of those subscribers read the posts of Xiuli? And how many of those who read what she posts, actually appreciate it? I think it is substantially less than 1 million, in fact no where close if we are to be realistic...lol. But the opportunity for exposure is certainly there!
Regards, Peter
Yes... it is marketing for YQ, to get attention for the kit. I understand fully.It is about the intention and the experience. And that is worthy of admiration for Xiuli /YQModels.
Regards, Peter
Maybe not a million but I'll go out on a limb and declare you the first person on the planet to cut a YQ Models Bluenose in half! And successfully! Huzzah!
Thank you very much, Paul.Maybe not a million but I'll go out on a limb and declare you the first person on the planet to cut a YQ Models Bluenose in half! And successfully! Huzzah!
The contribution of a SoS member does more than .........
I am honored with every like, reply or post.

Regards, Peter
Yes, I believe it is those who actually build ship models, who will be most appreciative of what you are doing. And I think you know I appreciate your efforts and accomplishments. I have a windlass motor waiting for you!Thank you very much, Paul.
The contribution of a SoS member does more than .........
I am honored with every like, reply or post.
Regards, Peter
JOEPIE !!!!! YEH!!!!I have a windlass motor waiting for you!


