- Joined
- Sep 3, 2021
- Messages
- 5,190
- Points
- 738

Just raising the bar, that's all...Just wait, relax, don’t ask to quickly…. You never know ……
 |
As a way to introduce our brass coins to the community, we will raffle off a free coin during the month of August. Follow link ABOVE for instructions for entering. |
 |
 |
The beloved Ships in Scale Magazine is back and charting a new course for 2026! Discover new skills, new techniques, and new inspirations in every issue. NOTE THAT OUR FIRST ISSUE WILL BE JAN/FEB 2026 |
 |

Just raising the bar, that's all...Just wait, relax, don’t ask to quickly…. You never know ……
True! There is so much to do, that sometimes you don't know what to work on next!No problem, Dean. I'm just glad you posted it. All credits to you!
When printed and I am at the stage of installing it on the deck, it will be shining in the half open box ….. with the printed steering wheel.
When working from the front to aft, then first the windlass and motor …… or start at the aft ………
Well, so many things to do on the hull, I have time enough to consider that.
Regards, Peter

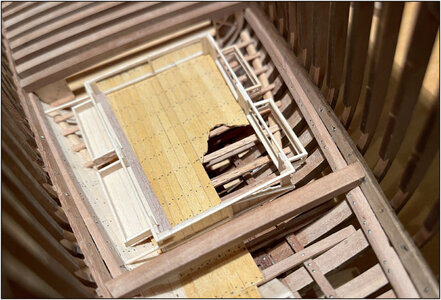
Dear PeterStarted customizing the frame for the Cabin under the deck beams, including the height:
View attachment 274588
Fitting under the beams:
View attachment 274590
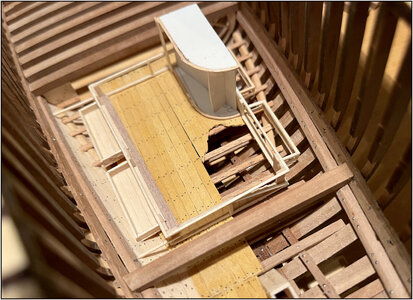
To get a bit of a picture of everything, my iPhone crammed into the hull.
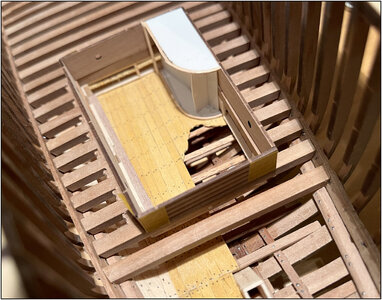
I will also use the theme that I used for the walls of the FishHold for the further building:
View attachment 274591
- the back wall has the nibbling planking from half;
- the port side has the wall coverings, 2 bunks and before that the bench with 'storage drawers';
- the starboard side remains open with the frame.
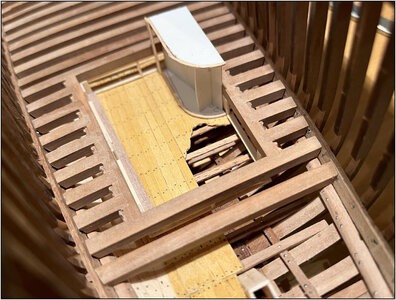
Dry-fit the frame of the deck beams again to fit:
View attachment 274593
The whole is located slightly inside the opening in the deck, but that has a reason because of the interior wall of the upper structure. It will slides in along the beams to the bottom frame.
With view through from the side:
View attachment 274594
The wall of the Cabin on the deck will also remain open to starboard so that you will also continue to have visibility when the BN has been completed.
Under de bench is no gap. It is the shadow of it, because of the light above.
Now finish the starboard side with the Captains Cabin, the frames for the bunks and the benches around.
Regards, Peter


Just like the original Olympic motto "Citius, Altius, Fortius" ....Just raising the bar, that's all...
Where have I recently read this in a other build-log .......... a Lion wispers ........True! There is so much to do, that sometimes you don't know what to work on next!
Thank you very much, Shota.Dear Peter
you are doing amazing things, well done

Where have I recently read this in a other build-log .......... a Lion wispers ........

Good to see the Dutch masters are still among us; this is becoming a true piece of art!The starboard side is open and here the bunks have only been given their frame:
View attachment 274785
Because the Captain really wanted a floor in his cabin, the floor was made a bit bigger. Then the stove will soon also have ground under its 4 legs.
Been busy with the preparations for the Captains Cabin.
Made a mold from Evergreen to neatly plank the curve:
View attachment 274786
It looks like the semi-circular Side Cabins of my Lee in miniature.
The plinth and ceiling edges are glued around it with glue that comes off easily.
The floor is still loose, because I first have to be sure that everything will fit and will be straight. I may have to glue the wall of the Captains Cabin to the floor first. So that I can easily access it when furnishing this cabin.
With the deck beams around it to get a view of the fitting:
View attachment 274787
The Cabin sticks out above this. But that has to.....
With the outer wall on the frame:
View attachment 274788
There will be another framework inside that wall and an inner wall up to the underside of the deck beams.
The premise is correct. With the Captain's and AL-FI's approval, I can proceed.
Regards, Peter

Please, when the Lion sleeps, let him sleep...Where have I recently read this in a other build-log .......... a Lion wispers ........
Looking great! Can’t wait for the stairs and doors.The starboard side is open and here the bunks have only been given their frame:
View attachment 274785
Because the Captain really wanted a floor in his cabin, the floor was made a bit bigger. Then the stove will soon also have ground under its 4 legs.
Been busy with the preparations for the Captains Cabin.
Made a mold from Evergreen to neatly plank the curve:
View attachment 274786
It looks like the semi-circular Side Cabins of my Lee in miniature.
The plinth and ceiling edges are glued around it with glue that comes off easily.
The floor is still loose, because I first have to be sure that everything will fit and will be straight. I may have to glue the wall of the Captains Cabin to the floor first. So that I can easily access it when furnishing this cabin.
With the deck beams around it to get a view of the fitting:
View attachment 274787
The Cabin sticks out above this. But that has to.....
With the outer wall on the frame:
View attachment 274788
There will be another framework inside that wall and an inner wall up to the underside of the deck beams.
The premise is correct. With the Captain's and AL-FI's approval, I can proceed.
Regards, Peter

Hi Johan. Please, feel free to ask what you want about my BN build.Hello Peter,
With great interest I try to follow your more than impressive build of the Bluenose.
Every now and then I'm faced with the odd question, I'm not able to answer myself. Here's one:
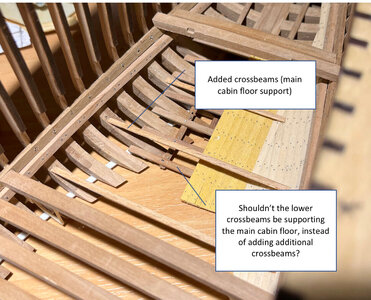
When looking directly below the main cabin, you introduced two set of cross beams; one set for the hold below the main cabin and one set for the main cabin floor itself.
The set, supporting the cabin floor makes sense to me, the second set supporting the floor of the hold not so much. I could easily imagine some paneling directly on top of the frames, aft of your aft fishhold bulkhead, creating some additional storage, but the crossbeams appear to be somewhat superfluous.
What am I missing out on?
Johan
View attachment 274832
Me too ......Looking great! Can’t wait for the stairs and doors.
What a loving care!

Hello Peter,Hi Johan. Please, feel free to ask what you want about my BN build.
The lower crossbeam are part off the Stringer floor.
In this post, 445, pag.23, I showed where I find it in The Saga:
-> Saga Stringer <-
The YQ model does now have that.
In this post, 518, pag.26, I installed them:
-> Installing Stingers <-
On another drawing / sketch from the Saga, it shows the horizontal floor of the Main Cabin.
The lower crossbeam you pointed, is to low and to far to the front to make the Main Cabin floor. And it would not align with the opening in the deck beam. And to the front, they are to narrow for the width of the cabin in the front.
For much of the build, I rely on YQ's design. If I'd had my whole plan in mind from the start, I would have done things differently.
But the BN was a completely new ship for me. Then you start building, you start reading and in the process you start seeing things that you still want to achieve. But that does mean doing consecrations.
The location of the Main Cabin is one of them. Ditto for the ForeCastle. The water tank should be located there under the horizontal floor. But given the construction of the YQ-BN, that was not possible.
I try to bring some originality to my build, but as mentioned before, I cannot build a compleet original BN with this kit. I put in what is possible, with the stated limitations.
Hopefully this answers (a bit) your question?
Regards, Peter
Thanxs for the responce, Johan.Hello Peter,
Thanks for the time you took to answer my question.
Prior to posting I checked the Saga, but that didn't give me that much clarity...
I guess, if you rigorously stick to YQ's build instructions, you'll never run into these kind of issues, but taking it a few seven-mile steps further, like you do, one could potentially open up a can of worms.
When reading your posts, I'm contemplating how far I want to go with detailing, once I get there....
I am considering to at least add part of the internal structure, but most definitely I will not cut the hull in half, like you did. That's also why I am genuinely interested in the why behind your choices.
Back to the crossbeams, I understand how you ended up with this configuration. Once I can start building, I want to have a look at the possibility to raise the main cabin crossbeams to the appropriate level. Don't know yet if that will be feasible at all...
Thanks again and enjoy your weekend.
Kind regards,
Johan

“The pointed crossbeam on the end of the stringer is too small, too low, too far forward and at the wrong angle for using for a cabinfloor.”


