- Joined
- Dec 11, 2021
- Messages
- 287
- Points
- 238

I tried to use straw oil (whale oil) on some spare parts but it darkens the various pieces especially the frames which become, in my opinion, too dark ...
 |
As a way to introduce our brass coins to the community, we will raffle off a free coin during the month of August. Follow link ABOVE for instructions for entering. |
 |
 |
The beloved Ships in Scale Magazine is back and charting a new course for 2026! Discover new skills, new techniques, and new inspirations in every issue. NOTE THAT OUR FIRST ISSUE WILL BE JAN/FEB 2026 |
 |


Strano che a me non è capitato , con un batuffolo di panno di lana lo strofino fino ad asciugarlo , po darsi che sia il tipo di legnoHo provato ad usare olio di paglia (olio di balena) su alcuni pezzi di ricambio ma scurisce i vari pezzi soprattutto i telai che diventano, secondo me, troppo scuri...
I tried to use straw oil (whale oil) on some spare parts but it darkens the various pieces especially the frames which become, in my opinion, too dark ...
The method of application really makes a difference. See below ........Strange that it did not happen to me, with a woolen cloth I rub it until it dries, maybe it is the type of wood


Buongiorno Pietro , se vuoi mi mandi la Tua Email?Ho fatto una nuova tavola con le unghie degli alberi. E applicato 2 strati di olio di lino con un panno. Durante il rilascio viene immediatamente lucidato.
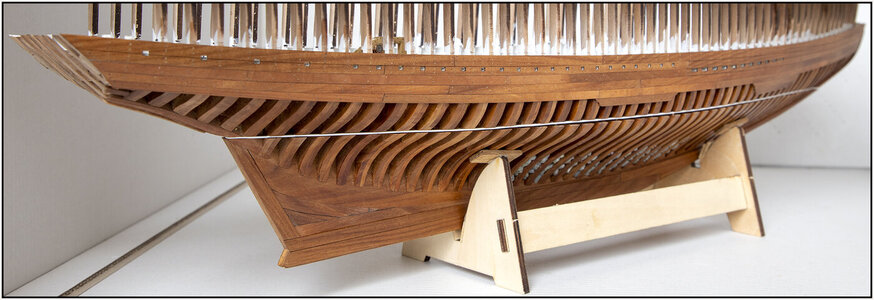
Durante l'asciugatura si carteggiano le tavole e le unghie sul lato di dritta:
View attachment 284124
Con luce diurna obliqua. Quindi vedi anche la colorazione mutevole del legno a seconda dell'angolo di incidenza della luce.
Con il nuovo test:
View attachment 284126
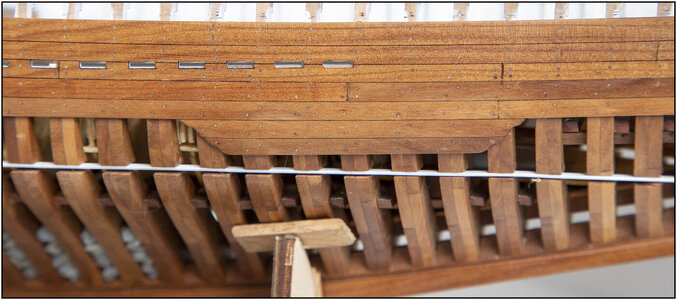
Con la luce che arriva direttamente dalla parte anteriore e laterale. Le unghie degli alberi escono bene qui secondo me. Più chiaro del legno e con un piccolo bordo scuro.
E non deludono nemmeno per le dimensioni.
Penso di sapere cosa sarà.
saluti, Pietro
I send you a PM with my e-mail adres.Hello Peter, if you want, can you send me your email?


Ciao Pietro , molto bello sia come aspetto che pulizia ,ComplimentiSono anche contento di non aver usato tutte le doghe per il fasciame. Inoltre, non erano così lunghi da percorrere l'intera lunghezza della fusoliera. Il disegno della venatura del legno ora cambia in corrispondenza delle transizioni della tavola. Ho tagliato dei pezzi di circa 12 cm. Cioè circa +/- 12 fotogrammi. È abbastanza simile all'originale da 25 a 30 piedi.
Ho usato una banda selvaggia perché sulle prime 2 parti composite di YQ le finte saldature della tavola erano distribuite su diversi numeri di telai. Ecco perché in alcuni posti ne usavano di più brevi.
Saluti, Pietro


Hallo Peter,First started with the hand-drill. After 10 holes, I broke my drill bit. Then with the Dremel with a few mm pointed drill and it went very well:
View attachment 283175
The toothpicks pointed into the Byrnes Drawplate in hole 26:
View attachment 283176
And started gluing:
View attachment 283177
Now get rid of a stock, cut off, repoint and reuse. 'We are economical'.
Regards, Peter
Thanxs Jan. I sit here with a big smile.That is absolutely gorgeous. A very pleasant, eye pleasing combination.
Jan
You also thanxs, Frank.Hi Pietro, very nice both in appearance and cleanliness, Complimenti
Thanxs, Paul. This half open site is till now my favorite side.A fine bit of work Peter. The POF shows nicely.
Grazie, Piero. As a wrote to Paul, the favorite side indeed. And .... then we sit together with the fingers up.Hi Peter, great work!
This result of yours is exactly what my ultimate goal will be! Not covering the starboard side with skate for planking was my idea from the start because it covers half a model of her beauty! In this way it will be possible to display Her on both sides because, clearly, the most attractive side is the one with the frames on sight.
In the meantime, I am busy cleaning the 10,248 beams of the upper and lower decks and my fingers have already reached the phalanges from the "relentless" use of files and sandpaper ...
Dankjewel Henk, Step by step and go for it.Your BN grows and grows...
And shines on the horizon
Hallo Peter,
this is a good odea to draw the tooth-picks into the drawplate - so you get a regular diameter - I guess a better result like I do without this working step -> I will try it also in this way
Many Thanks for showing this
Thanxs Uwe. I estimated that if you tap a toothpick with a tapered point in with these kind of small holes, you only widen that hole. You'll get a few tenths in no time. From then you might have to drill 0.5. And tapping it might end up at 0.8.Very good result - great appearance
I used boiled linseed oil. I first sanded the wood and then polished it. I have plastic blocks for that in 3 grades. You can also use finer sandpaper.... a couple more things I forgot Peter: did you use linseed oil? How long did you wait before using the sanding sandpaper, or did you just let it dry?

Processing a few hundred toothpicks as trenails in my already completed frames, 22 sofar. Fingerprint on my iPad is being refused....In the meantime, I am busy cleaning the 10,248 beams of the upper and lower decks and my fingers have already reached the phalanges from the "relentless" use of files and sandpaper ...
Haha, that was the same on my iMacProcessing a few hundred toothpicks as trenails. Fingerprint on my iPad is being refused....
