YUANQING BLUENOSE - Peter Voogt [COMPLETED BUILD]

She looks beautiful Peter! Well done indeed! ;)
In addition I commend you for your efforts to make the kit as accurate as possible! As this requires not only research, but a lot of extra effort!
Thanxs, Dean. Indeed, a lot of research and effort. But it is still great fun to do. Find some interesting pictures for the scroll and rigging for the bowsprit.
Regards, Peter
 
As indicated in my last build post, I first finish the hull. Because now I can easily turn it, lay it on its side etc.
A lot of old photos have already been posted on the 'Bluenose Main Support Page'. There, some details remain in the back of your mind and when you start working with a part, you look back again.
So now I'm working on a few things that have to do with the bow.
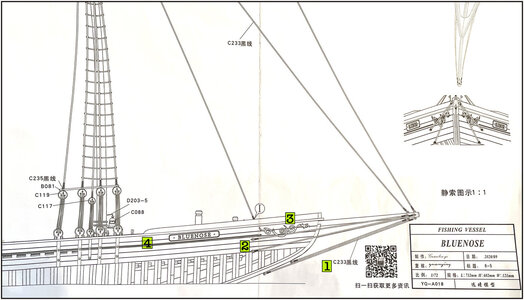
This is what YQ shows on the drawings:
744 Stay-Scroll.jpg
1: the inner and lower bobstay;
2: the attachment points of the Back rope (upper) and Shroud (lower);
3: the 'scroll' around the vault hole;
4: the stripe along the length of the hull that runs at the height of the bottom of the safe hole.

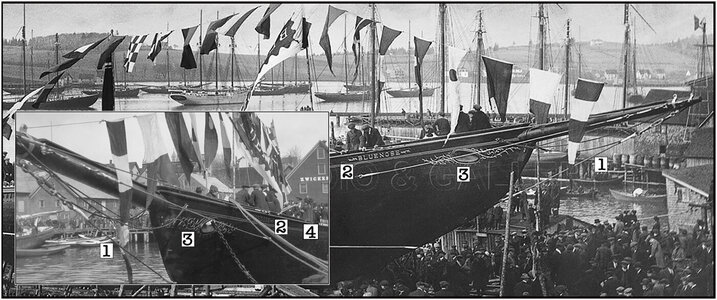
Several photos were taken of the launch in 1921.
The big picture of leaving the yard. In accordance with the print on the photo, it comes from the archive of Knickles Studio & Gallery. In the insert photo she is on the quay:
745 Stay-Scroll.jpg
A few things struck me with regard to the 4 points mentioned above:
1: only the lower bobstay can be seen;
2: the back rope and shrouid attachment is much further back, to the beginning of her name;
3: the scroll is very different from the BN-II and in shape of YQ;
4: the stripe looks more like the profile strip, which looks like a kind of double line and it pops up from the bottom of the bowsprit above the lock hole.

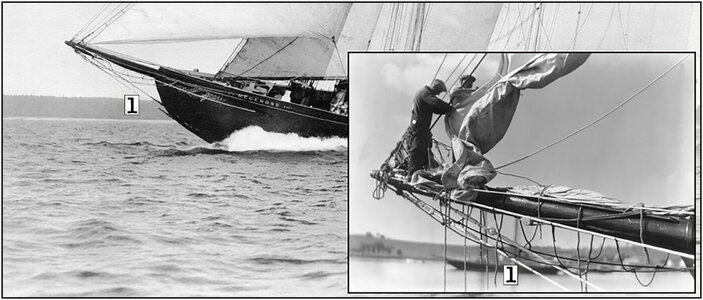
But I also came across these pictures of the original BN:
746 Stay-Scroll.jpg
With very clearly the inner and lower bobstay.
You can see both of these in many other photos and Jenson has also drawn the 2 attachment points in The Saga. So I assume that one may have placed the 2nd experimentally or at the launch that had not yet been installed.

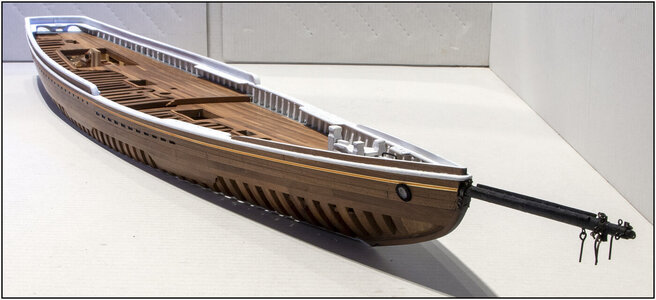
I made the stripe on the hull first. Jenson mentions that this one was 'gold clour'. From the construction of The Lee I still had gold foil. There I cut strips of +\- 1,2 mm wide:
747 Stripe.jpg
Fitted from the underside of the bowsprit, above the hawse hole and further parallel to the main rail from front to back.
To make it look visually like the 'double or profile strip', I applied a strip of about 0.5 mm in the middle, cut from semi-transparent orange adhesive film that I also had from The Lee.
A bit exaggerated :rolleyes: .......... crazy man, that Voogt ........;)
Oh, if I hadn't had that foil lying around, it would have turned into a different line. But if you have it lying around and the examples show......
Regards, Peter
 
Last edited:
As indicated in my last build post, I first finish the hull. Because now I can easily turn it, lay it on its side etc.
A lot of old photos have already been posted on the 'Bluenose Main Support Page'. There, some details remain in the back of your mind and when you start working with a part, you look back again.
So now I'm working on a few things that have to do with the bow.
This is what YQ shows on the drawings:
View attachment 310006
1: the inner and lower bobstay;
2: the attachment points of the Back rope (upper) and Shroud (lower);
3: the 'scroll' around the vault hole;
4: the stripe along the length of the hull that runs at the height of the bottom of the safe hole.

Several photos were taken of the launch in 1921.
The big picture of leaving the yard. In accordance with the print on the photo, it comes from the archive of Knickles Studio & Gallery. In the insert photo she is on the quay:
View attachment 310007
A few things struck me with regard to the 4 points mentioned above:
1: only the lower bobstay can be seen;
2: the back rope and shrouid attachment is much further back, to the beginning of her name;
3: the scroll is very different from the BN-II and in shape of YQ;
4: the stripe looks more like the profile strip, which looks like a kind of double line and it pops up from the bottom of the bowsprit above the lock hole.

But I also came across these pictures of the original BN:
View attachment 310008
With very clearly the inner and lower bobstay.
You can see both of these in many other photos and Jenson has also drawn the 2 attachment points in The Saga. So I assume that one may have placed the 2nd experimentally or at the launch that had not yet been installed.

I made the stripe on the fuselage first. Jenson mentions that this one was 'gold clour'. From the construction of The Lee I still had gold foil. There I cut strips of 1 mm wide:
View attachment 310009
Fitted from the underside of the bowsprit, above the hawse hole and further parallel to the main rail from front to back.
To make it look visually like the 'double or profile strip', I applied a strip of about 0.3 mm in the middle, cut from semi-transparent orange adhesive film that I also had from The Lee.
A bit exaggerated :rolleyes: .......... crazy man, that Voogt ........;)
Oh, if I hadn't had that foil lying around, it would have turned into a different line. But if you have it lying around and the examples show......
Regards, Peter
Hmmm…AL…I like it! ;)
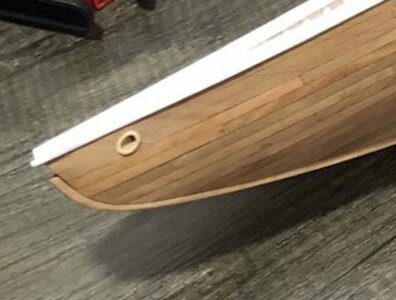
Isn’t the hawse hole elliptical, instead of round? If it’s drilled at an angle, it would be elliptical like the actual ship. Not sure how you ended up with a round surround on the hawse holes? Or is it an optical illusion that they look round? Just an observation.
If you remember, I used the scroll as a guide to mark the ellipse size and angle on the hull, prior to drilling the hole. I used a rat tail file to finish to the exact size and orientation. Hope I explained that clearly.
Then I made the surround out of wood to match. That way the scroll matched the opening.
However the actual ship was at more of an angle, that results in a sharper radius towards the bow.
E6EB4E2A-008F-475F-8F5D-9053FD32DA0E.jpegView attachment 31001219DA18CC-4B6D-4D46-A056-E0F1E5B37E19.jpeg
 
Last edited:
Thanxs Mark.
I really appreciate your response. And that you took the time to take and post the photos.Thumbs-Up
The producer AL also has its own interpretation of the pin rail position. With the slightly continuous Monkey rail and pin rail as shown on your pictures.
Taking into account that this is the BN-II.

The Saga is of course mainly about the BN-II and I have taken these 2 drawings there. The bottom part is part of a beautiful series of perspective drawings by Jenson:
View attachment 309249
With in the red ovals the Monkey rail up to the staggered deck. And the pin rail that is slightly set back.

I also come across that slightly set back pin rail in Bodnar's BN report, after Eisnor's drawings:
View attachment 309251

All in all, there are quite a few 'interpretation differences'.
So AL-FI has decided:
View attachment 309250
-Monkey rail: curved front flush with the front of the stanchion just before the deck offset;
-pin rails slightly back, at the front and back 'visually supported' by a stanchion.

I'm getting a little close to Heinrich's @Heinrich research to the location of the windlass on his WB. That's not clearly 'documented' either. ;)"Shared sorrow is half sorrow".
Lucky that the name is no problem! :)
Regardfs, Peter
Of course, I lose all focus when you post pictures that include and show off your deck planking. It really is an eye-catcher. Who cares where the pin-rails are located when you have a deck that looks that good ROTF
 
Hmmm…AL…I like it! ;)
Isn’t the hawse hole elliptical, instead of round? If it’s drilled at an angle, it would be elliptical like the actual ship. Not sure how you ended up with a round surround on the hawse holes? Or is it an optical illusion that they look round? Just an observation.
If you remember, I used the scroll as a guide to mark the ellipse size and angle on the hull, prior to drilling the hole. I used a rat tail file to finish to the exact size and orientation. Hope I explained that clearly.
Then I made the surround out of wood to match. That way the scroll matched the opening.
However the actual ship was at more of an angle, that results in a sharper radius towards the bow.
View attachment 310011View attachment 310012
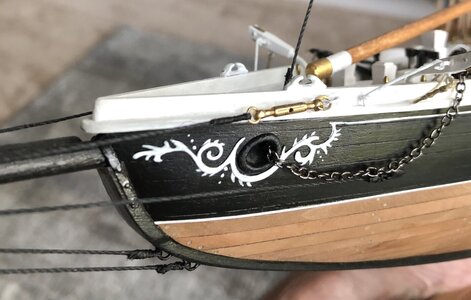
Hi Dean. Thank you for the concern. But I had your method in mind. Drilled the hole to 3.5mm. Then filed with the round file in the correct direction with a diameter of 4. The size of my used tube.
It is the camera point of view that gives the distortion.
748 Hawse hole.jpg
Auch ...... those macros .... When everything is attached on the hull, time for a big cleanup of her skin and a final layer of oil.

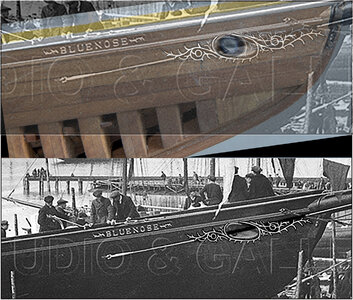
With regard to the size and position of the hawse hole and the scroll, I more or less make a comparison with that one old wharf picture:
749 Hawse hole.jpg
First put the two photos above each other. In the lower picture I redraw and high lighted the old scroll.
Then put a copy of the bottom photo in a layer on the top photo, made it 50% transparent and scaled to the right size.
On the underlying layer with my BN picture, I can now adjust the scroll to the size and shape of my hawse hole.
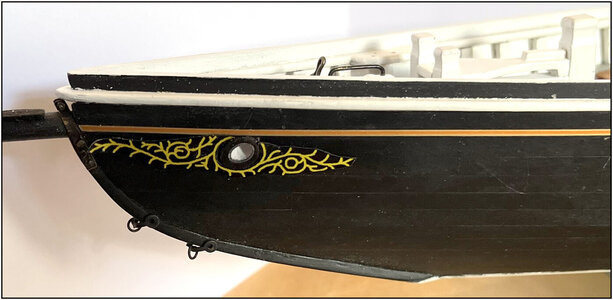
This is the first pre-print. It need some adjusting:
750 Scroll.jpg
The aft part must be turned a bit up.

Seeing those old photos, I consider making them to the original larger size and shape after all. Now I've moved the right side of the original hawse hole and right part of the scroll more to the left to form it into a more normal oval. But now I am adjusting 'the truth' with what I had in mind in terms of form ......... I have to sleep on it again ........
Regards, Peter
 
Last edited:
Of course, I lose all focus when you post pictures that include and show off your deck planking. It really is an eye-catcher. Who cares where the pin-rails are located when you have a deck that looks that good ROTF
Well Mark ............ I thinking about panting the white main en monkey rail pinky-blue with a yellow board. The deck attracts all the attention anyway....... ROTF
Regards, Peter
 
Hi Dean. Thank you for the concern. But I had your method in mind. Drilled the hole to 3.5mm. Then filed with the round file in the correct direction with a diameter of 4. The size of my used tube.
It is the camera point of view that gives the distortion.
View attachment 310092
Auch ...... those macros .... When everything is attached on the hull, time for a big cleanup of her skin and a final layer of oil.

With regard to the size and position of the hawse hole and the scroll, I more or less make a comparison with that one old wharf picture:
View attachment 310094
First put the two photos above each other. In the lower picture I redraw and high lighted the old scroll.
Then put a copy of the bottom photo in a layer on the top photo, made it 50% transparent and scaled to the right size.
On the underlying layer with my BN picture, I can now adjust the scroll to the size and shape of my hawse hole.
This is the first pre-print. It need some adjusting:
View attachment 310102
The aft part must be turned a bit up.

Seeing those old photos, I consider making them to the original larger size and shape after all. Now I've moved the right side of the original hawse hole and right part of the scroll more to the left to form it into a more normal oval. But now I am adjusting 'the truth' with what I had in mind in terms of form ......... I have to sleep on it again ........
Regards, Peter
I see...good plan! ;)

Ps - you can always use your printout as a template to paint the scroll on.
 
Last edited:
Sacrilege, Dean, plain sacrilege! You just can't have cannons on the Bluenose, no sir.
Instead, don't you have some room available on the NL for a couple of cannons more?
There is plenty of room on the NL, she has 72 cannons. However it’s an old joke that was made when I built my BN. We were discussing my use of artistic license and someone mentioned adding cannons while I’m at it. :p
 
There is plenty of room on the NL, she has 72 cannons. However it’s an old joke that was made when I built my BN. We were discussing my use of artistic license and someone mentioned adding cannons while I’m at it. :p
Still... Cannons on the Bluenose... Who in his right frame of mind comes up with these kind of ideas? :D
 
Just me …… pretty insane. ROTF
And ...... there are more walking around than there are behind bars. ;)
Well, since we're looking for ideas to pimp the Bluenose, why not add a heli-deck on an extension aft of the wheel house? Or just add a complete flight deck with catapults, arrester cables, the lot. Cut off the masts and install the flight deck on the two remaining stumps. :D
 
Back
Top