-

Win a Free Custom Engraved Brass Coin!!!
As a way to introduce our brass coins to the community, we will raffle off a free coin during the month of August. Follow link ABOVE for instructions for entering.
-

PRE-ORDER SHIPS IN SCALE TODAY!
The beloved Ships in Scale Magazine is back and charting a new course for 2026!
Discover new skills, new techniques, and new inspirations in every issue.
NOTE THAT OUR FIRST ISSUE WILL BE JAN/FEB 2026
- Home
- Forums
- Ships of Scale Group Builds and Projects
- Bluenose PoF Group Build
- Bluenose Group Build Logs
You are using an out of date browser. It may not display this or other websites correctly.
You should upgrade or use an alternative browser.
You should upgrade or use an alternative browser.
YUANQING BLUENOSE - Peter Voogt [COMPLETED BUILD]
- Thread starter Peter Voogt
- Start date
- Watchers 74
Superb, Peter, excellent craftsmanshipA productive day:
The remaining 45 of the 150 double knees placed.
Sanded the deck with grid 800 and polished with the 3 blocks.
Then taped the waterways to provide them the final gray paint:
View attachment 306841
The viscosity of the paint also allowed me to close all the cracks around the stanchions. The white on the inside comes later.
Then apply the linseed oil to the deck:
View attachment 306842
But also the deck beams:
View attachment 306843
View attachment 306844
And I could also provide the entire inside with linseed oil:
View attachment 306845
View attachment 306846
With 2 more pictures showing the direction of the planking:
View attachment 306847
When this layer of linseed oil is well absorbed, touch up some spots and another layer so that the last few cracks are closed.
Then it is the turn of the upper construction of the bulwark.
Regards, Peter

I am thoroughly enjoying keeping up with your build log Peter, very fascinating. That said, I read War and Peace several years ago, and between you (101 pages) and Heinrich (135 pages) I feel you are both giving Tolstoy a good run for his money!As with the aft deck, I also have some old photos as a source of inspiration for the foredeck and the bowsprit:
View attachment 308642
Here I also put all the names that I mentioned in the parts overview.
It took some time before I could place the bowsprit. I was not satisfied with the first paint result and I took everything apart again, sanded it and then mounted it in place. Then carefully removed from the deck and sprayed.
Then mounted all brackets and eyes, carefully slid back into the deck openings and glued:
View attachment 308643
In my enthusiasm I had applied a little too many eyepins for the turnbuckels. On the bowsprit itself there will be 4: for the 2 Bobstays at the bottom and the 2 shrouds on either side. The Back ropes has the turnbuckles nearby the hull.
YQ mentions placing an eyelet for the later attachment of the Fore Stay. However, the old photo, the Saga and MS drawings show a bail that runs over the bowsprit and is attached to the deck with 2 eyes.
And Chapelle wrote a few pages about the Gammon. A jump bar that runs over the bowsprit and is secured to the keel beam.
View attachment 308644
I made them myself. On top of the Gammon a M 0.8 mm bold and nut. Still in stock from another model building period.
Forward view:
View attachment 308645
I made the applied fittings from brass wire and residual material from the etched parts. It stands out nicely when you apply this 'copper colour'. But I stay more or less in the style of the original BN and have it blackened. It is not completely black, but more or less 'tanned' with Ballistol "Buntmetall-färber. They also call it 'browning'. I also have a jar of "Schnell-Brünierung", but the applied layer quickly fell off.
Then I can now continue building the bulwark.
Regards, Peter
Thanxs, Heinrich. I was happy to build the first part on the deck. But looking forward to so many items …….That re-painted bowsprit now looks the part Peter. Weights, tape, clips, clamps - what would we do without them?
Now a lot of pressure on the bulwark.
Regards, Peter
Last edited:
Thanxs, Mark. It took some time, with a nice result.Superb, Peter, excellent craftsmanship
Wow, that I am, with Heinrich, part of this equation by you. You make me speechless, Mark!I am thoroughly enjoying keeping up with your build log Peter, very fascinating. That said, I read War and Peace several years ago, and between you (101 pages) and Heinrich (135 pages) I feel you are both giving Tolstoy a good run for his money!
Regards, Peter
While waiting for the glued Buffalo rail to dry on the forecastle, I started making the Hawse pipes. Used 3 mm internal Evergreen tube and 1.2 mm plywood. And start drilling in the hull ............ holes of 4 mm:
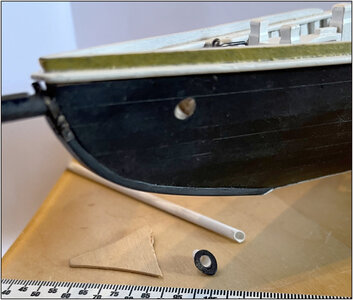
YQ had planned a hole-not for that, that would have to go straight in.
The result on port side:
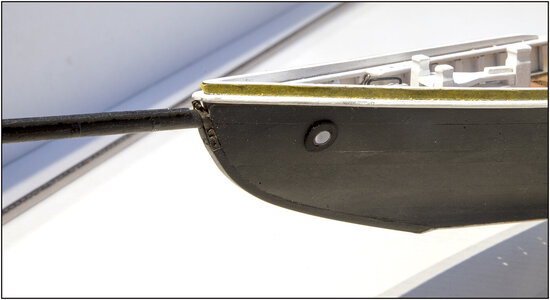
I have already made the outside of the Buffalo blue-black. And taped off for later when whitening the entire railing with the air-brush.
And on starboard also made black as an accent in combination with the the black bowsprit:
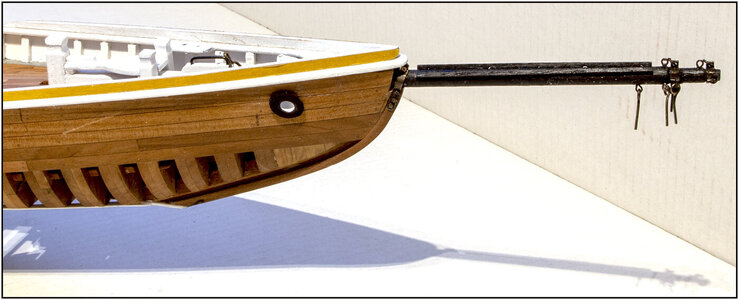
Here remains the side of the Buffalo bare wood. Also taped and after spraying it gets layers of linseed oil.
Now that I see them on the picture, I find them still a bit too coarse. Gonne do something about it.....
Regards, Peter

YQ had planned a hole-not for that, that would have to go straight in.
The result on port side:

I have already made the outside of the Buffalo blue-black. And taped off for later when whitening the entire railing with the air-brush.
And on starboard also made black as an accent in combination with the the black bowsprit:

Here remains the side of the Buffalo bare wood. Also taped and after spraying it gets layers of linseed oil.
Now that I see them on the picture, I find them still a bit too coarse. Gonne do something about it.....
Regards, Peter
Last edited:
I forgot to include Paul's Vasa, now on page 140! Keeping up with you guys leaves very little time for our own modelsThanxs, Mark. It took some time, with a nice result.
Wow, that I am, with Heinrich, part of this equation by you. You make me speechless, Mark!
Regards, Peter

This morning I had freed the hull from all the tape, after some extra spots of glue, when Johan @RDN1954 came on the line. Had I looked at the location of the nail benches besides the masts in particular?
Last year I had already put the drawings of YQ and De Saga next to each other and then I should have noticed that already. Put together a little more 'information', just to be sure.
In the following steps:
In the overall picture first placed the drawing "1" from the Saga and picture "2" from my BN and put together in the same dimensions from bow to stern:
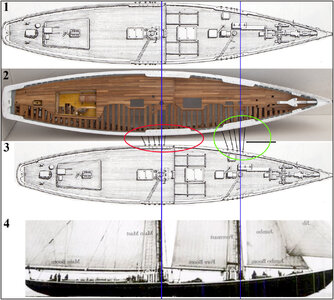
The 2 blue lines drawn through the mast openings of my BN.
-The masts and the deck transition from low to high in the Saga are more to the rear. Including the cabine on the aft deck.
Then drawing "1" scaled to the distance between the masts and put as "3" under my photo "2".
-Then the deck transition also comes into position of the YQ model. Also the cabin on the aft deck. Only the aft deck became too long.
-In the red circle you can see that the nail banks at the main mast do not match. They are too far forward on the model.
The ones near the foremast in the yellow circle are quite similar.
-To complete the comparison, I have aligned the positions of the chain-plates with the little black line. That's also pretty nice.
In my collected photos of the original BN I had one with an almost perpendicular view to the hull. These were cut out a bit, flipped and placed on the dimensions of the masts as photo "4".
-The extended Monkey board and rail ends closer to the main mast.
-The YQ Monkey (not on the picture "2") leeds to far to over the deck transition.
Extended across the entire width of the photo frame, the photo would again match the drawing from the Saga.
Conclusion:
-As noted before, the YQ-BN has quite a few 'deviations'.
-My Main rail is going off again and I'm going to make some changes on the Main- and Monkey rail.
-Johan @RDN1954 : Thanks for keeping me sharp again!
Regards, Peter
Last year I had already put the drawings of YQ and De Saga next to each other and then I should have noticed that already. Put together a little more 'information', just to be sure.
In the following steps:
In the overall picture first placed the drawing "1" from the Saga and picture "2" from my BN and put together in the same dimensions from bow to stern:

The 2 blue lines drawn through the mast openings of my BN.
-The masts and the deck transition from low to high in the Saga are more to the rear. Including the cabine on the aft deck.
Then drawing "1" scaled to the distance between the masts and put as "3" under my photo "2".
-Then the deck transition also comes into position of the YQ model. Also the cabin on the aft deck. Only the aft deck became too long.
-In the red circle you can see that the nail banks at the main mast do not match. They are too far forward on the model.
The ones near the foremast in the yellow circle are quite similar.
-To complete the comparison, I have aligned the positions of the chain-plates with the little black line. That's also pretty nice.
In my collected photos of the original BN I had one with an almost perpendicular view to the hull. These were cut out a bit, flipped and placed on the dimensions of the masts as photo "4".
-The extended Monkey board and rail ends closer to the main mast.
-The YQ Monkey (not on the picture "2") leeds to far to over the deck transition.
Extended across the entire width of the photo frame, the photo would again match the drawing from the Saga.
Conclusion:
-As noted before, the YQ-BN has quite a few 'deviations'.
-My Main rail is going off again and I'm going to make some changes on the Main- and Monkey rail.
-Johan @RDN1954 : Thanks for keeping me sharp again!
Regards, Peter
Last edited:
Great piece of analysis Peter. When I read this I went to see how the pin-racks and chainplates had been configured on my AL model (even though I think AL have far more 'deviations' than YQ). The biggest difference when compared to picture no. 2 is the position of the pin-rack opposite the mainmast, which AL has in quite a similar position to drawing no. 3. I've included a couple of rather badly-taken (low light) photos of the position of the chainplates and pin-racks at the mainmast and foremast of my AL model. I tried to line up the shrouds on either side to give a reasonably accurate perpendicular view.

I don't think this will help much, but it may provide another point of comparison
Cheers, Mark

I don't think this will help much, but it may provide another point of comparison
Cheers, Mark
Peter thanks for sharing all of your great replies and instruction! And thanks on the box.
Thanxs Mark.Great piece of analysis Peter. When I read this I went to see how the pin-racks and chainplates had been configured on my AL model (even though I think AL have far more 'deviations' than YQ). The biggest difference when compared to picture no. 2 is the position of the pin-rack opposite the mainmast, which AL has in quite a similar position to drawing no. 3. I've included a couple of rather badly-taken (low light) photos of the position of the chainplates and pin-racks at the mainmast and foremast of my AL model. I tried to line up the shrouds on either side to give a reasonably accurate perpendicular view.
View attachment 309116
I don't think this will help much, but it may provide another point of comparison
Cheers, Mark
I really appreciate your response. And that you took the time to take and post the photos.

The producer AL also has its own interpretation of the pin rail position. With the slightly continuous Monkey rail and pin rail as shown on your pictures.
Taking into account that this is the BN-II.
The Saga is of course mainly about the BN-II and I have taken these 2 drawings there. The bottom part is part of a beautiful series of perspective drawings by Jenson:
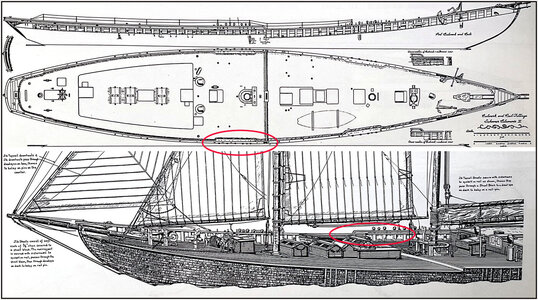
With in the red ovals the Monkey rail up to the staggered deck. And the pin rail that is slightly set back.
I also come across that slightly set back pin rail in Bodnar's BN report, after Eisnor's drawings:
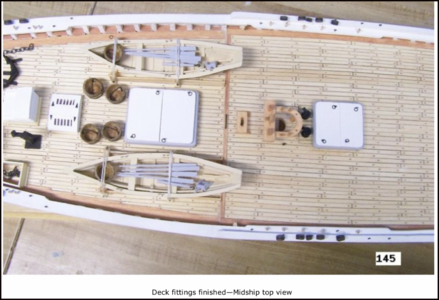
All in all, there are quite a few 'interpretation differences'.
So AL-FI has decided:
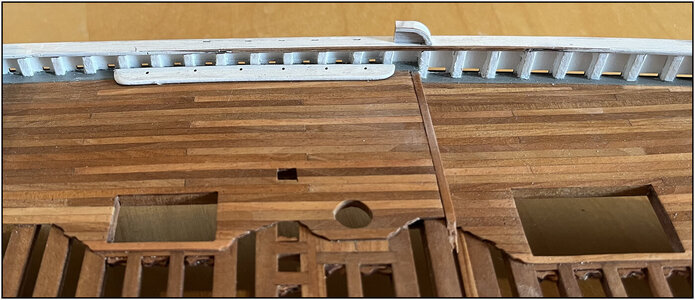
-Monkey rail: curved front flush with the front of the stanchion just before the deck offset;
-pin rails slightly back, at the front and back 'visually supported' by a stanchion.
I'm getting a little close to Heinrich's @Heinrich research to the location of the windlass on his WB. That's not clearly 'documented' either.
Lucky that the name is no problem!
Regardfs, Peter
Last edited:
Thank you, Joe. I'm glad I can be of assistance.Peter thanks for sharing all of your great replies and instruction! And thanks on the box.
Regards, Peter
After fixing both pin rails, glued the Main rail back to the hull:

Then along the raised aft deck the Monkey board with the Monkey rail glued:

Which I had already taped and cut the outside of that board. Then everything was taped to spray with the air-brush.
I sprayed it with Schmincke Aero Cloror 28101, Supra white opaque. That will give a silky gloss result:

After removing all the tape, this showed up.
With on this side the blank wooden parts, provided with the first layer of linseed oil. And with the small made hawse pipe.
With the blue-black side:

With here also the smaller hawse pipe.
Which gives nice lines at the back:

A few minor tweaks here and there. But I am satisfied with this result.
The next step is the lines on the hull under the Main rail, the 'scroll' around the hawse pipes and adding the nameplates.
Regards, Peter

Then along the raised aft deck the Monkey board with the Monkey rail glued:

Which I had already taped and cut the outside of that board. Then everything was taped to spray with the air-brush.
I sprayed it with Schmincke Aero Cloror 28101, Supra white opaque. That will give a silky gloss result:

After removing all the tape, this showed up.
With on this side the blank wooden parts, provided with the first layer of linseed oil. And with the small made hawse pipe.
With the blue-black side:

With here also the smaller hawse pipe.
Which gives nice lines at the back:

A few minor tweaks here and there. But I am satisfied with this result.
The next step is the lines on the hull under the Main rail, the 'scroll' around the hawse pipes and adding the nameplates.
Regards, Peter
Last edited:
- Joined
- Oct 28, 2018
- Messages
- 760
- Points
- 403

Looks very nice and sleek Peter
I didn't know that Schmincke is sprayable, did you have to dilute it?
Greeting
Henk
I didn't know that Schmincke is sprayable, did you have to dilute it?
Greeting
Henk
Thanxs, Henk. Yes it is spayable. I bought it years ago in a set of different colors together with the air-brush. I added a few drops of water on the amount of the air-brush cup.Looks very nice and sleek Peter
I didn't know that Schmincke is sprayable, did you have to dilute it?
Greeting
Henk
Regards, Peter
Thanxs, Johan. It took some time with glueing, re-glueing and re-glueing …… The spraying was quite exciting. Seams ..... chinks ....Awesome, just awesome...
Regards, Peter
Well, Heinrich, what can I say ….. ThanxsAll's well that ends well and the end result is very "well"!
Regards, Peter
She looks beautiful Peter! Well done indeed!After fixing both pin rails, glued the Main rail back to the hull:
View attachment 309521
Then along the raised aft deck the Monkey board with the Monkey rail glued:
View attachment 309522
Which I had already taped and cut the outside of that board. Then everything was taped to spray with the air-brush.
I sprayed it with Schmincke Aero Cloror 28101, Supra white opaque. That will give a silky gloss result:
View attachment 309523
After removing all the tape, this showed up.
With on this side the blank wooden parts, provided with the first layer of linseed oil. And with the small made hawse pipe.
With the blue-black side:
View attachment 309524
With here also the smaller hawse pipe.
Which gives nice lines at the back:
View attachment 309525
A few minor tweaks here and there. But I am satisfied with this result.
The next step is the lines on the hull under the Main rail, the 'scroll' around the hawse pipes and adding the nameplates.
Regards, Peter
In addition I commend you for your efforts to make the kit as accurate as possible! As this requires not only research, but a lot of extra effort!


