That's absolutely beautiful.
-

Win a Free Custom Engraved Brass Coin!!!
As a way to introduce our brass coins to the community, we will raffle off a free coin during the month of August. Follow link ABOVE for instructions for entering.
-

PRE-ORDER SHIPS IN SCALE TODAY!
The beloved Ships in Scale Magazine is back and charting a new course for 2026!
Discover new skills, new techniques, and new inspirations in every issue.
NOTE THAT OUR FIRST ISSUE WILL BE JAN/FEB 2026
- Home
- Forums
- Ships of Scale Group Builds and Projects
- Bluenose PoF Group Build
- Bluenose Group Build Logs
You are using an out of date browser. It may not display this or other websites correctly.
You should upgrade or use an alternative browser.
You should upgrade or use an alternative browser.
YUANQING BLUENOSE - Peter Voogt [COMPLETED BUILD]
- Thread starter Peter Voogt
- Start date
- Watchers 74
Thanks, Rodney. I am not the fastest builder of a YQ-BN, but ......... she now has here skin.That's absolutely beautiful.
Regards, Peter
I feel like I'm the slowest in the group. I've been working on the frames for I guess three weeks now. I'm so ready to move on.Thanks, Rodney. I am not the fastest builder of a YQ-BN, but ......... she now has here skin.
Regards, Peter
- Joined
- Sep 3, 2021
- Messages
- 5,197
- Points
- 738

One frame per day is, to me at least, an obtainable goal. More than that and the fun is gone.I feel like I'm the slowest in the group. I've been working on the frames for I guess three weeks now. I'm so ready to move on.
- Joined
- Sep 3, 2021
- Messages
- 5,197
- Points
- 738

Did as you suggested. Didn't get a very positive feedback, yet, on your suggestion...Here you have to look very closely to see them.
(And for Johan @RDN1954 : Show your Admiral this full-hull. Perhaps see admin it's a nice full-hull (and forget the sawing .....)
- Joined
- Sep 3, 2021
- Messages
- 5,197
- Points
- 738

I didn't dare commenting on that.I haven't seen the comment yet: So much work with treenails in the hull and frames, where are they on deck?
The deck looks very convincing without the treenails. When I saw your first pictures, I thought the deck didn't need to have those added.
Then we have to come up with something else ……. Tom Poes, verzin een list …….Did as you suggested. Didn't get a very positive feedback, yet, on your suggestion...

I didn't think so, Johan. I can take a lot .....I didn't dare commenting on that.
- Joined
- Sep 3, 2021
- Messages
- 5,197
- Points
- 738

Essentially, what I wanted to say, is that you'll probably be building frames for about 8 weeks, provided you're not interrupted.One frame per day is, to me at least, an obtainable goal. More than that and the fun is gone.
I feel like I'm the slowest in the group. I've been working on the frames for I guess three weeks now. I'm so ready to move on.
The added value of a build-log: I started with te frames on February 12th 2021 and finished them on the keel and in the jig on May 16th 2021.Essentially, what I wanted to say, is that you'll probably be building frames for about 8 weeks, provided you're not interrupted.
Looking better all the time!I haven't seen the comment yet: So much work with treenails in the hull and frames, where are they on deck?
Because I want to have them subtly visible on the deck, I chose to apply them between the first 2 layers of linseed oil. So that they don't draw too sharply. I applied them with a 0.3/0.5mm syringe:
View attachment 306977
Here you have to look very closely to see them.
(And for Johan @RDN1954 : Show your Admiral this full-hull. Perhaps see admin it's a nice full-hull (and forget the sawing .....)
They do sign off with floating light:
View attachment 306978
At @Dean62: The deck is getting something lighter now the oil is drying and getting into te wood. Much better!
Regards, Peter
Started with the dry-fit of the base plate of the railing, the Buffalo rail.
I'm already going to make the first change at the rear.
On the left what YQ came up with and on the right what I sawed:
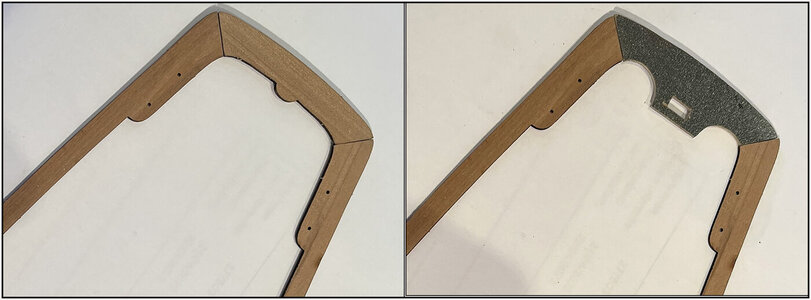
The curves are a bit distorted on the picture but they are indeed symmetrical.
Because I have posted this photo before and it is my inspiration for making the back:
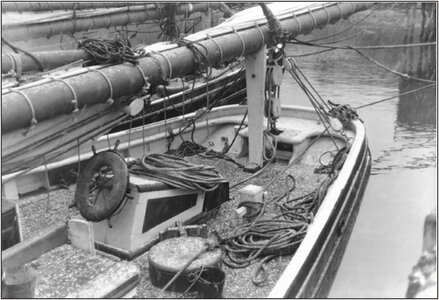
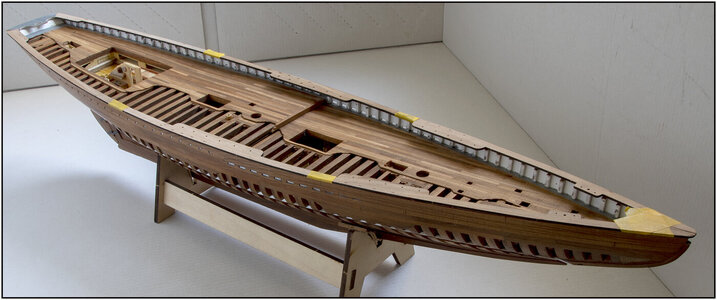
Dry fit:
This is how it shows on the back:
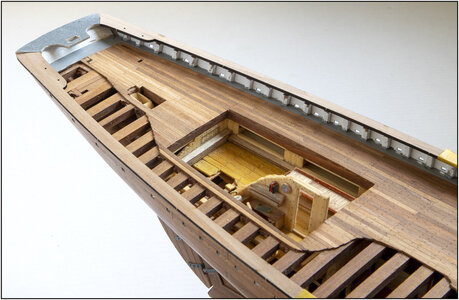
The next step is to fit everything so that the Chain plates can be neatly passed through and placed against the hull. Then prime, paint white and fix.
At the raised aft deck I also first dry-fit the Monkey-board. Later on, the Monkey-rail will be placed on that board. But I'll show that later.
Regards, Peter
I'm already going to make the first change at the rear.
On the left what YQ came up with and on the right what I sawed:

The curves are a bit distorted on the picture but they are indeed symmetrical.
Because I have posted this photo before and it is my inspiration for making the back:

Dry fit:

This is how it shows on the back:

The next step is to fit everything so that the Chain plates can be neatly passed through and placed against the hull. Then prime, paint white and fix.
At the raised aft deck I also first dry-fit the Monkey-board. Later on, the Monkey-rail will be placed on that board. But I'll show that later.
Regards, Peter
Last edited:
Thanxs, Dean. The oil needs to rest a bit.Looking better all the time!
Regards, Peter
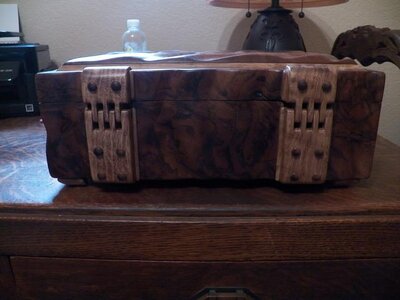
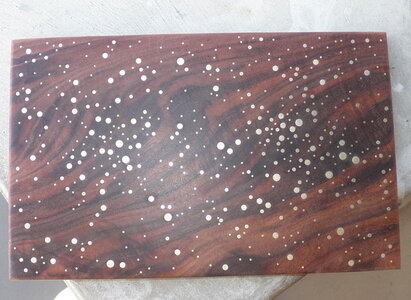
Hey Peter. Beautiful work and man after all of that work, did you have balls of steel cutting through the hull to separate the top and bottom! I've been a master woodworker over 40 years and know how tricky it can be to use thin-kerf and flexible jap saws - one must let the saw do the work otherwise it can wander! A few shots of the 300 boxes I've made over the years for clientele. The first five are of a box that went to my son as a wedding gift, called it Oregon Coast! As a complete newbie to model shipbuilding, I currently have my Yuan BN on the way and really like all of the extra trenneling your doing inside and out! You've inspired me to do the same but am wondering if you recall, what the predrilled hole and nail sizes were for the keelson, sister keelsons, and the other interior lengthwise pieces? Or do you have to cut the nails from Drydock and just insert the head - and how do you glue things that are that small and not have the glue seep into the wood and prevent proper staining as alot of glues can do? Is there a specific glue one uses - I've heard of Lineco glue as the best? Looks like the keel trennels were 0.7mm above but you stated 0.6mm might be better? Please let me know when you can and thanks a million!When the 2e big part of the shoe was dry, I could sand the whole. And drilled the holes a few mm deeper:
View attachment 206368
After the 7 test piece trennels, 93 other toothpicks glued. The mohawk/roosteram/porcupine is ready:
View attachment 206369
Once dry I could cut them off. With the upcoming sun, it gives a nice contrast:
View attachment 206370
All cut off:
View attachment 206371
And after sanding and polishing:
View attachment 206372
Depending on how the light shines over the wood, it always changes color and intensity.
This is what it looks like when the wood is wet.
View attachment 206373
For an indication as the wood gets a protection layer. Maybe just a layer of matte varnish?
Opinions there for are welcome.
All in all, I am satisfied with the result.
Regards, Peter
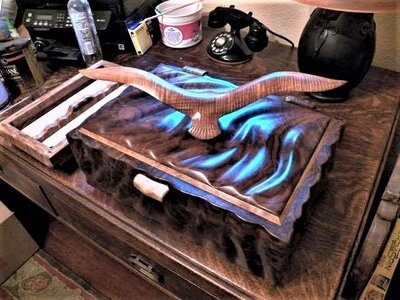
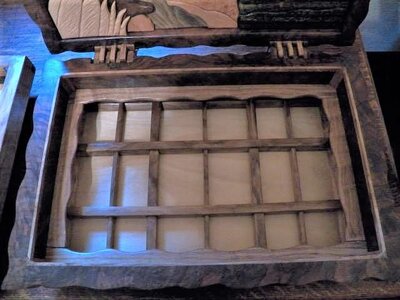
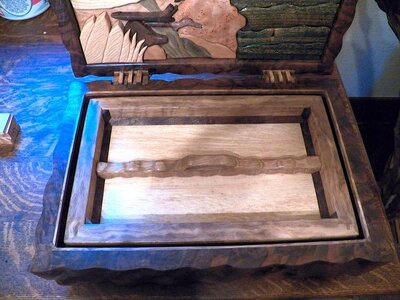
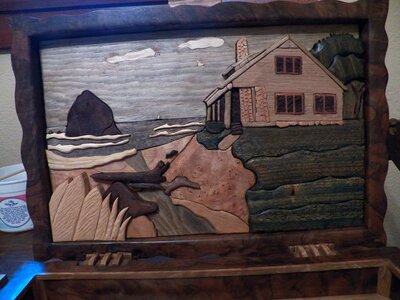
- Joined
- Sep 3, 2021
- Messages
- 5,197
- Points
- 738

That's next level woodworking!Hey Peter. Beautiful work and man after all of that work, did you have balls of steel cutting through the hull to separate the top and bottom! I've been a master woodworker over 40 years and know how tricky it can be to use thin-kerf and flexible jap saws - one must let the saw do the work otherwise it can wander! A few shots of the 300 boxes I've made over the years for clientele. The first five are of a box that went to my son as a wedding gift, called it Oregon Coast! As a complete newbie to model shipbuilding, I currently have my Yuan BN on the way and really like all of the extra trenneling your doing inside and out! You've inspired me to do the same but am wondering if you recall, what the predrilled hole and nail sizes were for the keelson, sister keelsons, and the other interior lengthwise pieces? Or do you have to cut the nails from Drydock and just insert the head - and how do you glue things that are that small and not have the glue seep into the wood and prevent proper staining as alot of glues can do? Is there a specific glue one uses - I've heard of Lineco glue as the best? Looks like the keel trennels were 0.7mm above but you stated 0.6mm might be better? Please let me know when you can and thanks a million!
View attachment 307262
View attachment 307263
View attachment 307264
View attachment 307265
View attachment 307266
View attachment 307267
How do you all make the blocks and how tight must the fit be?I also used blocks, top and bottom of the frame halves, to align properly at glue up. That will prevent any mismatch!
Hi Peter - great series of illustrations and one I've been wondering about how to accomplish!? What do use to give the final polish? I may try my Lie-Neilsen violin plane on these.In several build-logs I have seen the how to bevel the frames , with the techniques applied. Usually a matter of sanding up to the lines.
For me, this is new. When I beveled part #18 of the keel, it was filing, sanding, filing, sanding etc, just as long as I was on top of the laser lines and on the side the laser char was gone. So that was also producing a lot of dust.
With my 1st frame I did something else. Partly because I did come across some points that I have not yet seen specifically mentioned on the forum.
I have taken a picture of all the stages and will explain it in 9 steps:
View attachment 213219
I clamps the frame between the felt blocks, so it wont damage. And I can turn it in any position I wanted.
1: A laser line indicates where and how far the bevel goes.
2: But it's not a laser line but a laser groove. At the tip of the scalpel knife you can see how deep it is. With laser char inside.
3: To reduce the dust, I first started cutting with the scalpel blades. It was like a scrape. That gave a nice fine curl. Matter of using a new sharp knife, supporting the hands properly and not wanting too much at once.
4: For me this worked well. More and more beautiful curls.
5: When I got to the laser line, basically the end of the bevel, I switched to diamond filings. And the laser char of the groove slowly emerged. So that gives extra blacking on the frame you don't want to have.
6: The black of the laser groove over the full length still to be seen. So there's still some wood left to get rid of that black as well.
7: With a pencil always blackened the work to be edited, so you keep seeing on the other side (here on the right) you don't take anything too much away. Keep filing, sanding, blackening, filing, sanding, blackening....
8: Finally after the last sanding a satisfactory result.
9: Just polish and then move on to the other side.
The bevel is therefore in principle slightly bigger / further than the indicated line. But I don't think it's any different than sloping a little further to get rid of the filthy black.
And yes, this takes quite some time. But while doing so one learns and it will go quite a bit faster.
Anyway, 55 frames to go.....
Reghards, Peter
Hi again Peter - so are these actual nails or just circular impressions?Hi all,
It had been quiet in my report for a while. I had some other things to do.
But for the photo club I'm a member of, we had the assignment: "Abstract photography".
And because I really want to see my 'Cathedral view' of the BN, I decided to use the 'front porch'.
Put them on the working mirror. Like a waterfront. Only the mirror, also as the water, it has a different refractive indexes, so extra blur.
From different angles:
View attachment 221561
And just a picture of the frames so far with the treenails:
View attachment 221562
So, now it's building time again.
Regards, Peter
Hi Boshaken.Hey Peter. Beautiful work and man after all of that work, did you have balls of steel cutting through the hull to separate the top and bottom! I've been a master woodworker over 40 years and know how tricky it can be to use thin-kerf and flexible jap saws - one must let the saw do the work otherwise it can wander! A few shots of the 300 boxes I've made over the years for clientele. The first five are of a box that went to my son as a wedding gift, called it Oregon Coast! As a complete newbie to model shipbuilding, I currently have my Yuan BN on the way and really like all of the extra trenneling your doing inside and out! You've inspired me to do the same but am wondering if you recall, what the predrilled hole and nail sizes were for the keelson, sister keelsons, and the other interior lengthwise pieces? Or do you have to cut the nails from Drydock and just insert the head - and how do you glue things that are that small and not have the glue seep into the wood and prevent proper staining as alot of glues can do? Is there a specific glue one uses - I've heard of Lineco glue as the best? Looks like the keel trennels were 0.7mm above but you stated 0.6mm might be better? Please let me know when you can and thanks a million!
View attachment 307262
View attachment 307263
View attachment 307264
View attachment 307265
View attachment 307266
View attachment 307267
At first: that are some very nice boxes you have made.
I will point out the questions of your posts:
The size of the holes was the diameter of the point of my nails. So I could put them just with the beginning in the hole. For this nails I did not use any glue, because the nails has little ribs. And they grabbed themself by pushing further. As I wrote, those iron nails I had for almost 30 years in my 'collecting-box'. (For the SOS-insiders: no, not in my 'nothing-box 'what the predrilled hole and nail sizes were for the keelson, sister keelsons, and the other interior lengthwise pieces? Or do you have to cut the nails from Drydock and just insert the head ...
 )
)But when I did not have them, I would have ordered the tiny nails from Dry Dock. Cut the head and file them flat of use a cup-burr to make the top round. And for using them, I suppose to drill the holes minus 0.1 mm of the diameter of the nails. Then you don't have to use glue. But always first make some test in some spare parts!
For almost everything I use PVA wood glue. Here in the Netherlands we have 'Bison' and I use the D2 Professional. For the toothpick treenails in the hull I gave the tip of the tremel a little glue and rubbed the spoiled glue a.s.a.p. away with a damped cloth.and how do you glue things that are that small and not have the glue seep into the wood and prevent proper staining as alot of glues can do? Is there a specific glue one uses
The size of the trennels is depending of your personal tast. That's why I made some test with the provided planks for the hull. And also for using in other parts.Looks like the keel trennels were 0.7mm above but you stated 0.6mm might be better?
The 'fitting-blocks' for use by making the frames: we have made them ourself with some spare wood. It must have the size of the corresponding width of the keel and the keelson. How tight: when fitted, hold the frame upside down on the block and the frames must not fall off.How do you all make the blocks and how tight must the fit be?
Remember: the frames can be fitten frame by frame on the keel. But the keelson must fit over 1/3 of all the frames. Because the keelson is made out of 3 parts.
Therefor the pre-fit. Outerwise when fitting a keelson part and it does not slide over all the frames, you don't know which one is causing the trouble.
The nails in the front and back of the frames are made with a syringe. I have syringes of several diameters. Also here: a matter of tast. In the frames the bigger one. In de deck planks a smaller one.so are these actual nails or just circular impressions?
Some more information about needle diameters (external):
20G= 0.9 mm
21G = 0.8 mm
22G = 0.7 mm
23G = 0.6 mm
25G = 0.5 mm
27G = 0.4 mm
But Dean @Dean62 was also very inventive with making the nails of his frames.
For many years ago, I ordered with some air-brush paint, 3 synthetic polishing blocks with 3 different grades:What do use to give the final polish? I may try my Lie-Neilsen violin plane on these.
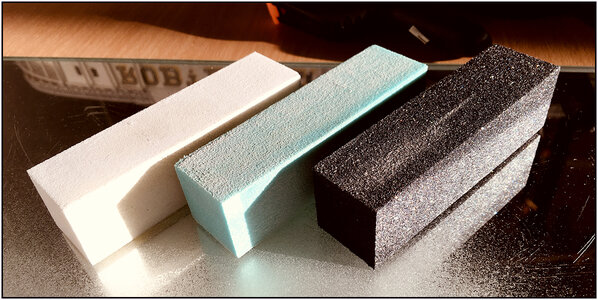
But every kind of polishing items can be used. If you can get into small corners.
Hopefully this is the information you can use when building your BN and that the postman quickly arrives at the door. We look forward to seeing your build log.
Regards, Peter
Last edited:
Oeps, something went wrong ..... double is deleted.
And afterwards: made myself post #2000 at the end of page 100. But that was not intended ........
And afterwards: made myself post #2000 at the end of page 100.
Last edited:


