Hey Jay you are progressing along nicely l like the way you have placed the rear cabin lighting I went with 1 led should have done 2 ahh well,I had a problem mainly me breaking the middle rear lamp off severing the wire to the LED tryed to repair but gave up so only have two lamps lit the middle one lets say ran out of oil. Keep up the build, deck looks great its got that dirty pirates dont give a hoot about swabbing decks.

-

SUBSCRIBE TO SHIPS IN SCALE TODAY!
The beloved Ships in Scale Magazine is back and charting a new course for 2026!
Discover new skills, new techniques, and new inspirations in every issue.
NOTE THAT OUR NEXT ISSUE WILL BE MARCH/APRIL 2026 -

Win a Free Custom Engraved Brass Coin!!!
As a way to introduce our brass coins to the community, we will raffle off a free coin during the month of August. Follow link ABOVE for instructions for entering.
You are using an out of date browser. It may not display this or other websites correctly.
You should upgrade or use an alternative browser.
You should upgrade or use an alternative browser.
ZHL Black Pearl 2019 Golden Edition-Newbie build [COMPLETED BUILD]
- Joined
- Apr 20, 2020
- Messages
- 313
- Points
- 278

Thanks @Hoffy.... Reggie here... Trying to learn as I go along... Am just glad (and relieved) that my LEDs all lit up... appreciate all the support.Hey Jay you are progressing along nicely l like the way you have placed the rear cabin lighting I went with 1 led should have done 2 ahh well,I had a problem mainly me breaking the middle rear lamp off severing the wire to the LED tryed to repair but gave up so only have two lamps lit the middle one lets say ran out of oil. Keep up the build, deck looks great its got that dirty pirates dont give a hoot about swabbing decks.
- Joined
- Apr 20, 2020
- Messages
- 313
- Points
- 278
Continuing from my last post, I next worked on trying to finish the deck planking. This was a fairly straightforward task, except maybe for the edges towards the bulwarks where I had to trim the strips to fit. I don't think I did this quite according to the rules because I simply trimmed to edge pieces to the shape required.


I wanted to show you also the way I hid the wires for the stern lanterns by double planking. Here is the finished product.

Speaking of the lanterns, if you recall in a previous post, I glued on the kit-provided pieces that go under the lanterns as shown below.

But, as I tried to put in the LEDs inside the lantern, I realised that the holes in the provided pieces were too small for the LED lead wires to pass through. I discovered that by gluing a couple of deadeyes below the lantern, the deadeye holes make for a perfect thruway for the lead wires of the lights. They provided a nice setting for the LED lights. See below.

Next on my task list is planking of the hull. I will start another post for that shortly.
I wanted to show you also the way I hid the wires for the stern lanterns by double planking. Here is the finished product.
Speaking of the lanterns, if you recall in a previous post, I glued on the kit-provided pieces that go under the lanterns as shown below.
But, as I tried to put in the LEDs inside the lantern, I realised that the holes in the provided pieces were too small for the LED lead wires to pass through. I discovered that by gluing a couple of deadeyes below the lantern, the deadeye holes make for a perfect thruway for the lead wires of the lights. They provided a nice setting for the LED lights. See below.
Next on my task list is planking of the hull. I will start another post for that shortly.
- Joined
- Apr 20, 2020
- Messages
- 313
- Points
- 278
I am trying to psych myself up for the next step of my build.... planking. I am a bit apprehensive because this is the first time that I will attempt this task and I've seen how it can be quite a challenge. I tried to read as much as I could on how others have done their planking. Although the basic principles were similar, I see how each person has their own style and approach to laying their planks. But I also know that no matter how much advance planning one does, in the end the planks have a mind of their own, and they will go wherever they please. Time to just dive in and may the planks fall where they lay.
It gives me a little bit of comfort that the Black Pearl will have double planking. So I can pretty much screw up my first layer of planks and with a bit of wood filler and sanding, my second layer can redeem all my mistakes. Nevertheless, I decided that I will try (and I emphasise TRY) to follow the basic principles of planking. I will try to lay the planks to their natural tendencies as much as possible. I will not bend the planks to the point where they break or crinkle. I will not taper any plank to less than half their normal width. But trying is never the same as actual doing, as I discovered later on.
The first thing I had to do is to plank the portion towards the bow, just beyond the cannon deck. But first, I laid down a temporary batten in order to establish my base line. Please note the bow piece that ZHL provided with the new edition of the kit to replace what previously was a DIY balsa piece in order to help in planking the bow section. As I realised later, this piece helped a little bit, but it left gaps in certain areas so the planks didn't have anywhere to cling to. I probably would have preferred to do the full balsa DIY piece to be honest.


By the way, I don't have a plank bending tool so I improvised by driving some nails on a wooden board which allowed me to bend the planks to the desired arc and then used a blow drier to dry the planks in shape. Luckily, the paulownia strips were pliable enough that all I needed was a quick soak in hot water (I used an old coffee tumbler). Excuse the messy jig... I was going for substance over form.. wink wink.

Then on to planking the rest of the hull. I divided the hull into three bands, each band approximately 7 planks wide. Here you can see the temporary battens that I pinned. I struggled a little bit as to how to bend and wrap the battens to curve towards the bow. In the end, after measuring the width of the widest bulkhead and compared it to the smallest bulkhead towards the bow, I estimated that I will need to trim my planks to about half their original width. But, planning is different from actual doing. As I proceeded with the actual gluing of the planks, I cheated a little bit and bent the battens just a tad in order to accommodate more trimmed planks towards the bow and stern. This way I can avoid doing too many drop planks.


Ha ha ha ha... a bit sloppy. Can you tell that this is my first planking attempt? Thankfully, I can sand and fill later on.

Oh, and I wanted to show you this one ambitious plank.... it's a regular plank pretending to be a garboard plank. I am not sure if this is the proper way to do this one plank but I lay it down near the keel. It basically lay almost at a 90degree angle to the keel towards the middle of the ship.. then as it approached the stern, it slowly twisted around and bent so that is lay flat against the keel in the deadwood area. By the way, I decided that I was not putting in a rabbet or bearding line on this one (maybe for the next project).


Here is the finished first planking layer. I had to move outside the house because I will need to do quite a bit of sanding and I didn't want to mess up some of my computer and audio/video equipment in my work room.


Not quite "A" work, but I was just relieved I got through it.


And here, after I put some wood filler and a bit of sanding.


Wheew... I am glad that was over. I made a lot of mistakes but one of the reasons I decided to do this build log was to show exactly how a newbie can navigate through a lot of the different aspects of the build and still come out with a small feeling of accomplishment afterwards.
Happy modelling to all.
It gives me a little bit of comfort that the Black Pearl will have double planking. So I can pretty much screw up my first layer of planks and with a bit of wood filler and sanding, my second layer can redeem all my mistakes. Nevertheless, I decided that I will try (and I emphasise TRY) to follow the basic principles of planking. I will try to lay the planks to their natural tendencies as much as possible. I will not bend the planks to the point where they break or crinkle. I will not taper any plank to less than half their normal width. But trying is never the same as actual doing, as I discovered later on.
The first thing I had to do is to plank the portion towards the bow, just beyond the cannon deck. But first, I laid down a temporary batten in order to establish my base line. Please note the bow piece that ZHL provided with the new edition of the kit to replace what previously was a DIY balsa piece in order to help in planking the bow section. As I realised later, this piece helped a little bit, but it left gaps in certain areas so the planks didn't have anywhere to cling to. I probably would have preferred to do the full balsa DIY piece to be honest.
By the way, I don't have a plank bending tool so I improvised by driving some nails on a wooden board which allowed me to bend the planks to the desired arc and then used a blow drier to dry the planks in shape. Luckily, the paulownia strips were pliable enough that all I needed was a quick soak in hot water (I used an old coffee tumbler). Excuse the messy jig... I was going for substance over form.. wink wink.
Then on to planking the rest of the hull. I divided the hull into three bands, each band approximately 7 planks wide. Here you can see the temporary battens that I pinned. I struggled a little bit as to how to bend and wrap the battens to curve towards the bow. In the end, after measuring the width of the widest bulkhead and compared it to the smallest bulkhead towards the bow, I estimated that I will need to trim my planks to about half their original width. But, planning is different from actual doing. As I proceeded with the actual gluing of the planks, I cheated a little bit and bent the battens just a tad in order to accommodate more trimmed planks towards the bow and stern. This way I can avoid doing too many drop planks.
Ha ha ha ha... a bit sloppy. Can you tell that this is my first planking attempt? Thankfully, I can sand and fill later on.
Oh, and I wanted to show you this one ambitious plank.... it's a regular plank pretending to be a garboard plank. I am not sure if this is the proper way to do this one plank but I lay it down near the keel. It basically lay almost at a 90degree angle to the keel towards the middle of the ship.. then as it approached the stern, it slowly twisted around and bent so that is lay flat against the keel in the deadwood area. By the way, I decided that I was not putting in a rabbet or bearding line on this one (maybe for the next project).
Here is the finished first planking layer. I had to move outside the house because I will need to do quite a bit of sanding and I didn't want to mess up some of my computer and audio/video equipment in my work room.
Not quite "A" work, but I was just relieved I got through it.
And here, after I put some wood filler and a bit of sanding.
Wheew... I am glad that was over. I made a lot of mistakes but one of the reasons I decided to do this build log was to show exactly how a newbie can navigate through a lot of the different aspects of the build and still come out with a small feeling of accomplishment afterwards.
Happy modelling to all.
Attachments

Nice Job !!! I am following your thread.
I have done 3 ships and still I do many mistakes with the 1st plank. Its not easy, but each time there will be improvements. I have in box 2 kits that only have 1 plank. I am still afraid of starting them. But just in case, when the times come to do them, I will have walnut strips with me for a second planking ... to cover my mistakes.") (normally many)
(normally many)
Cheers
Daniel
I have done 3 ships and still I do many mistakes with the 1st plank. Its not easy, but each time there will be improvements. I have in box 2 kits that only have 1 plank. I am still afraid of starting them. But just in case, when the times come to do them, I will have walnut strips with me for a second planking ... to cover my mistakes.
(normally many)Cheers
Daniel
- Joined
- Apr 20, 2020
- Messages
- 313
- Points
- 278
Thank you Daniel... I guess every mistake we make is another learning that we can add to our knowledge arsenal... It does help a lot that we have the safety net of being able to reach out to others in our group when we get stuck. Thanks for following my thread.Nice Job !!! I am following your thread.
I have done 3 ships and still I do many mistakes with the 1st plank. Its not easy, but each time there will be improvements. I have in box 2 kits that only have 1 plank. I am still afraid of starting them. But just in case, when the times come to do them, I will have walnut strips with me for a second planking ... to cover my mistakes.
Cheers
Daniel

I'm on my eighth build and still have problems bending planks. Just bought a steam generator and build a steambox. Hopefully, these will help
- Joined
- Apr 20, 2020
- Messages
- 313
- Points
- 278
Onwards to the part of the build that I dread the most ... the double planking using the black walnut strips provided in the kit. These are 0.5mm x 4.5mm x 400mm. Very nice color ... the hue is akin to chocolate brown. Right off the bat, I knew that I will have to cut the planks into bite-sized pieces because the 400mm length was not enough to traverse the entire hull from stem to stern. I guesstimated that a length of 105mm for each plank will convert to about 22 feet ... so that's how I decided to proceed. I also decided to stagger the butt joints every 3rd plank. For gluing the walnut strips, I used wood glue because I figured that it will be an easier clean up afterwards, and moreover, because I will be using natural oil finish later on, I didn't want any CA glue residue ruining the finish.
I decided that my first plank will follow the line of the main deck, by way of the bulwark piece. This was fairly straightforward and I was using full width planks the entire length from stem to stern.

But, before I got too far, I noticed that with the dark walnut strips laying on top of the beige coloured first layer paulownia planks, any gaps in the planking were very visible with the stark color contrast. So I thought I would paint the hull a dark color in order to somewhat hide any gaps in the planks. (Hindsight though, I was debating whether this was such a good idea because I was unsure if by painting, I have weakened the grip of the glue and the planks onto the hull). Anyway, here's what it looked like. I just used a very light wash of dark brown acrylic paint. I wasn't too worried about the patchy look of the paint.

I put up temporary battens to create planking bands to help me visualise the amount of trimming that I will have to do on the bow. I tried my best to let the batten lay naturally over the hull. Each band turned out to be about 7 planks wide. The vertical lines are just reference points to how much I had to trim the planks at various point in the hull. Turns out, except towards the forward-most part of the hull, the width for practically the entire length of the hull was almost exactly the same. But, as you can see, towards the bow, the hull narrows down quite severely so I knew I will have quite a challenge to try and fit the planks, even by trimming them. In the end, by doing quick calculations, I figured that if I trimmed the planks to about half their original size towards the end, I can have a fighting chance of getting it done. Unfortunately, I had to surrender to a couple of drop planks for it to work out. But so far, I was quite pleased because I managed to avoid forcing the planks to bend unnaturally.


Towards the lower side of the hull is where I started getting in trouble. I had too many planks left to put in a very narrow space. And, no matter what I did, I just could not get the planks to lay naturally and fill the gaps at the same time. I could force them to bend laterally towards the bow, but I would have had too much "rise" and crinkling in some spots. So I had to cheat a little bit. I discovered that if I cut the forward-most planks into shorter lengths, that I can make them lay flat on the hull and with a butt joint where the curve starts to bend, I can trim the planks to simulate a rounded edge.


I managed to get through most of the planks glued on, and at this point I only have to figure out how to close the remaining gap.

Towards the home stretch.

Now I can finally solder the side LEDs for the captain's quarters.

I was unsure how to finish planking the keel portion, especially towards the deadwood area. I didn't do a rabbet and the way I have it, I had the "garboard" plank extend all the way towards the edge of the stern (both the first layer 2mm paulownia planks, and the second layer 0.5mm walnut planks). I thought it looked kind of awkward with the drop off from 2.5mm thick to 0.5mm towards the bottom of the keel. Question please: should I have just double planked only up to the natural path of the last plank on the hull? Also, should I trim the double planks towards the back end of the deadwood area so that the very edge of the keel is only single planked? I hope I explained it clearly enough. I still have to learn how to draw lines on my photos. I can modify this area if necessary.

So finally, it's done. Not perfect, but lots of learnings and small bit of satisfaction that I got through it.


Thanks for dropping in. As always, comments and suggestions are welcome.
I decided that my first plank will follow the line of the main deck, by way of the bulwark piece. This was fairly straightforward and I was using full width planks the entire length from stem to stern.
But, before I got too far, I noticed that with the dark walnut strips laying on top of the beige coloured first layer paulownia planks, any gaps in the planking were very visible with the stark color contrast. So I thought I would paint the hull a dark color in order to somewhat hide any gaps in the planks. (Hindsight though, I was debating whether this was such a good idea because I was unsure if by painting, I have weakened the grip of the glue and the planks onto the hull). Anyway, here's what it looked like. I just used a very light wash of dark brown acrylic paint. I wasn't too worried about the patchy look of the paint.
I put up temporary battens to create planking bands to help me visualise the amount of trimming that I will have to do on the bow. I tried my best to let the batten lay naturally over the hull. Each band turned out to be about 7 planks wide. The vertical lines are just reference points to how much I had to trim the planks at various point in the hull. Turns out, except towards the forward-most part of the hull, the width for practically the entire length of the hull was almost exactly the same. But, as you can see, towards the bow, the hull narrows down quite severely so I knew I will have quite a challenge to try and fit the planks, even by trimming them. In the end, by doing quick calculations, I figured that if I trimmed the planks to about half their original size towards the end, I can have a fighting chance of getting it done. Unfortunately, I had to surrender to a couple of drop planks for it to work out. But so far, I was quite pleased because I managed to avoid forcing the planks to bend unnaturally.
Towards the lower side of the hull is where I started getting in trouble. I had too many planks left to put in a very narrow space. And, no matter what I did, I just could not get the planks to lay naturally and fill the gaps at the same time. I could force them to bend laterally towards the bow, but I would have had too much "rise" and crinkling in some spots. So I had to cheat a little bit. I discovered that if I cut the forward-most planks into shorter lengths, that I can make them lay flat on the hull and with a butt joint where the curve starts to bend, I can trim the planks to simulate a rounded edge.
I managed to get through most of the planks glued on, and at this point I only have to figure out how to close the remaining gap.
Towards the home stretch.
Now I can finally solder the side LEDs for the captain's quarters.
I was unsure how to finish planking the keel portion, especially towards the deadwood area. I didn't do a rabbet and the way I have it, I had the "garboard" plank extend all the way towards the edge of the stern (both the first layer 2mm paulownia planks, and the second layer 0.5mm walnut planks). I thought it looked kind of awkward with the drop off from 2.5mm thick to 0.5mm towards the bottom of the keel. Question please: should I have just double planked only up to the natural path of the last plank on the hull? Also, should I trim the double planks towards the back end of the deadwood area so that the very edge of the keel is only single planked? I hope I explained it clearly enough. I still have to learn how to draw lines on my photos. I can modify this area if necessary.
So finally, it's done. Not perfect, but lots of learnings and small bit of satisfaction that I got through it.
Thanks for dropping in. As always, comments and suggestions are welcome.
- Joined
- Nov 29, 2019
- Messages
- 74
- Points
- 103

Nice job. I like the way you have staggered the planks and reckon you have got the lengths just right. I find planking the most difficult and tedious of the entire build but it always seems worth the effort once completed.
Nice job !! Planking is not easy at all. Its worst when is single planking where you have to make it well in the first shot. Nevertheless, you always have the option of a second planking with walnut strips that are easy to manage.
Now a good sanding to make all the hull surface smooth and then the oil you mentioned. It will be beautiful.
Cheers
Daniel
Now a good sanding to make all the hull surface smooth and then the oil you mentioned. It will be beautiful.
Cheers
Daniel
- Joined
- Apr 20, 2020
- Messages
- 313
- Points
- 278
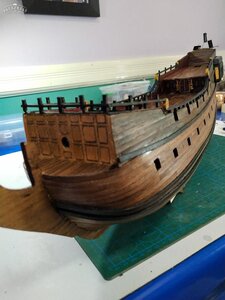
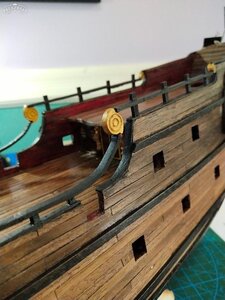
After completing the planking and doing some minor sanding of the hull, I am ready to take on the other (maybe more fun) aspects of the build. I worked on planking the inside of the bulwarks using the paulownia strips. I decided to use these 2mm strips in lieu of the thinner walnuts because, after measuring the railings that go on top of the bulwarks, the thicker planks will give me just a little more thickness to pin the rails. Somewhere I saw a picture of the Black Pearl with red paint on the inside of the bulwarks and I thought that looked kinda neat, so I went with a red acrylic(with a hint of burnt amber) and a very light black wash with diluted acrylic. I also started working on the railings, but only the base layer for now.

In order to install the railings, I had to make a couple of extreme bends. But fortunately, the railing strips were quite easy to work with. Just had to soak them in water for a few minutes, then work the bend using a soldering iron, making sure I don't try to bend too far all at once... then soak again, then heat from the soldering iron until I get the required shape.


Next up is gluing the wales. For the first wale, I followed the deck line, just below the bulwarks. I just had to make sure I measured the stern portion so it doesn't run into the captain's quarters which will be installed later on. I also wanted to make sure I didn't put the wale too close to the gun ports so as not to interfere with the port covers. The wales required some minor lateral bending towards the stem and stern, and for this, I went back to my bending jig, after soaking in warm water. I then used a blow dryer to set the shape in place.


Almost ready to apply my oil finish.... but first, I was looking at my previously tung-oiled deck planks and I wasn't very happy with it. I thought it looked too busy and looked unnatural with the overdone weathering (see first picture below). So I decided to sand it back down and redo the finish.


Here's the re-done deck. A little bit more subtle on the weathering.

Now, I am ready to apply my first coat of tung oil. I decided to apply a very light black acrylic wash on the upper portion of the hull in order to make it look a bit more interesting.

Then applied the first coat of tung oil. I used a clean rag to apply the oil, waited about 10 minutes then buffed it to even out any smears. Here's what it looks like after the first coat.


That's it for me for today. Thanks for dropping in.
In order to install the railings, I had to make a couple of extreme bends. But fortunately, the railing strips were quite easy to work with. Just had to soak them in water for a few minutes, then work the bend using a soldering iron, making sure I don't try to bend too far all at once... then soak again, then heat from the soldering iron until I get the required shape.
Next up is gluing the wales. For the first wale, I followed the deck line, just below the bulwarks. I just had to make sure I measured the stern portion so it doesn't run into the captain's quarters which will be installed later on. I also wanted to make sure I didn't put the wale too close to the gun ports so as not to interfere with the port covers. The wales required some minor lateral bending towards the stem and stern, and for this, I went back to my bending jig, after soaking in warm water. I then used a blow dryer to set the shape in place.
Almost ready to apply my oil finish.... but first, I was looking at my previously tung-oiled deck planks and I wasn't very happy with it. I thought it looked too busy and looked unnatural with the overdone weathering (see first picture below). So I decided to sand it back down and redo the finish.
Here's the re-done deck. A little bit more subtle on the weathering.
Now, I am ready to apply my first coat of tung oil. I decided to apply a very light black acrylic wash on the upper portion of the hull in order to make it look a bit more interesting.
Then applied the first coat of tung oil. I used a clean rag to apply the oil, waited about 10 minutes then buffed it to even out any smears. Here's what it looks like after the first coat.
That's it for me for today. Thanks for dropping in.
Attachments
- Joined
- Nov 29, 2019
- Messages
- 74
- Points
- 103
Looking great Warrlight -nice job with the hull and that decking looks so much better

The weathering of your deck looks great.
- Joined
- Apr 20, 2020
- Messages
- 313
- Points
- 278
Hello friends. It's been almost 4 weeks since my last update. I've been working on a lot of small stuff that have taken a lot more time than I initially thought. I guess with inexperience, one has to do quite a bit more preparing, thinking, researching, planning and doing trial and error in order to do seemingly basic stuff. I must have spent hours and hours trying to figure out how to do some things, doing a trial run, only to find out it won't work. So off to try another approach. I must say though, that I am actually enjoying the learning process.... even the mistakes.
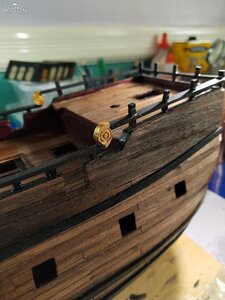
So, onwards to my build. Next up for me was to finish the railings. This was a tedious task that required patience in bending strips and pinning every baluster with copper wire and glue. To bend the strips, I soaked them in water and used my soldering iron to slowly bend it to shape (I don't have a plank bender tool yet).


I think I did this part wrong. I put the rail too far out where it starts to bend upwards, so it's just hanging out there. Perhaps I should have added another post towards the edge to get the railing closer to the edge.


At this point, I thought it will be a good time to apply a second coat of tung oil on the hull and deck. I must say, tung oil dries to a very nice satiny finish.


Next was installing the hull ladders and the two verticle strips (I don't know what they are called nor their purpose). The verticle strips that came with the kit seemed too small so I replaced them with diy ones.


Then it was on to installing the channels. These were pinned with copper wire and glued to the hull. They sit on top of the wale to give them more support.


I painted the deck grates using black acrilyc and topped off with rust colored weathering powder.


The ladders were quite a bit of a challenge for me, especially the one going up to the poop deck. The balusters were each pinned to the bottom rail at a precise angle so they will appear vertically aligned when the ladder is installed.


Oops... I've reached the maximum 25 photo attachments.. Will continue in another post.
So, onwards to my build. Next up for me was to finish the railings. This was a tedious task that required patience in bending strips and pinning every baluster with copper wire and glue. To bend the strips, I soaked them in water and used my soldering iron to slowly bend it to shape (I don't have a plank bender tool yet).
I think I did this part wrong. I put the rail too far out where it starts to bend upwards, so it's just hanging out there. Perhaps I should have added another post towards the edge to get the railing closer to the edge.
At this point, I thought it will be a good time to apply a second coat of tung oil on the hull and deck. I must say, tung oil dries to a very nice satiny finish.
Next was installing the hull ladders and the two verticle strips (I don't know what they are called nor their purpose). The verticle strips that came with the kit seemed too small so I replaced them with diy ones.
Then it was on to installing the channels. These were pinned with copper wire and glued to the hull. They sit on top of the wale to give them more support.
I painted the deck grates using black acrilyc and topped off with rust colored weathering powder.
The ladders were quite a bit of a challenge for me, especially the one going up to the poop deck. The balusters were each pinned to the bottom rail at a precise angle so they will appear vertically aligned when the ladder is installed.
Oops... I've reached the maximum 25 photo attachments.. Will continue in another post.
Attachments
Kurt Konrath
Kurt Konrath

Planking looking good, better than my first attempt.
Remember you can mix dust from sanding with dab of white glue and make a thick fill paste to put in gaps to sand when dry, has same look at planks as its made form exact same wood dust.
Remember you can mix dust from sanding with dab of white glue and make a thick fill paste to put in gaps to sand when dry, has same look at planks as its made form exact same wood dust.
- Joined
- Apr 20, 2020
- Messages
- 313
- Points
- 278
Continuing on to the ladders. I pinned the balusters to the bottom rail. I also intended to pin them to the upper rail, but decided against doing that because it would have been impossible to align the balusters properly. Instead, later on, I just glued the upper rail to the balusters and then pinned them from above.
I had trouble with trying to align the ladder to the railing on the poop deck. The two rails were supposed to meet up but I must have done something wrong because they were misaligned by several millimeters.
I had to gerry rig a curved piece at the top of the stairs to make them meet up. I wasn't very happy with the end result, but such is life.
I wish to mention also that the instructions supposedly requires the stairs to be wider at the bottom. The instructions call for part E6 but the laser cut treads are actually C6 and they are all the same width. I figured maybe they wanted us to use part E6 and cut each piece to the correct width... but I decided that wasn't worth the effort.


Trying to do more work on the deck. I installed the racks for the belay pins. I pinned them with copper wire and glue to the inside of the bulwark. This was fairly straightfoward, for a change.

I had trouble with trying to align the ladder to the railing on the poop deck. The two rails were supposed to meet up but I must have done something wrong because they were misaligned by several millimeters.
I had to gerry rig a curved piece at the top of the stairs to make them meet up. I wasn't very happy with the end result, but such is life.
I wish to mention also that the instructions supposedly requires the stairs to be wider at the bottom. The instructions call for part E6 but the laser cut treads are actually C6 and they are all the same width. I figured maybe they wanted us to use part E6 and cut each piece to the correct width... but I decided that wasn't worth the effort.
Trying to do more work on the deck. I installed the racks for the belay pins. I pinned them with copper wire and glue to the inside of the bulwark. This was fairly straightfoward, for a change.
For a first build you are doing just fine. Looks better than my first wooden ship, of course that was some 35 years ago...lol. I still have issues with hull planking at times even though I do enjoy butchering wood. One mistake that I have seen most beginners make is in the building of gun carriages. They usually taper to the front of the carriage and not the rear. I wouldn't worry about it at this stage, even I have done it and actually have about 1/2 dozen of them in a drawer somewhere. lol
- Joined
- Apr 20, 2020
- Messages
- 313
- Points
- 278
Planking looking good, better than my first attempt.
Remember you can mix dust from sanding with dab of white glue and make a thick fill paste to put in gaps to sand when dry, has same look at planks as its made form exact same wood dust.
Thanks Kurt... I will try that next time... I wasnt too happy with the wood filler that I used... It was flaky and tended to peel off.