-

Win a Free Custom Engraved Brass Coin!!!
As a way to introduce our brass coins to the community, we will raffle off a free coin during the month of August. Follow link ABOVE for instructions for entering.
-

PRE-ORDER SHIPS IN SCALE TODAY!
The beloved Ships in Scale Magazine is back and charting a new course for 2026!
Discover new skills, new techniques, and new inspirations in every issue.
NOTE THAT OUR FIRST ISSUE WILL BE JAN/FEB 2026
You are using an out of date browser. It may not display this or other websites correctly.
You should upgrade or use an alternative browser.
You should upgrade or use an alternative browser.
The Admiral sewed mine for me. As a result, they turned out pretty good! She says I break her machine every time I touch it. I break a lot of things: stove, sink, dishwasher, washer and dryer, and other things she normally uses. It’s interesting that I don’t really want to use them and she doesn’t want me to use them. Quite a coincidence, don’t you think?First I'll have to look them up and see what they are ( sounds a bit like skyhooks something you'd send the apprentice out for ) , most probably I'll just keep this one simple. I would like to do some sails if I can get permission to use the sewing machine.
Well I'm here to tell you being the man of my house I runs things around my house! Like the vacuum cleaner, dishwasher, wash machine etc.The Admiral sewed mine for me. As a result, they turned out pretty good! She says I break her machine every time I touch it. I break a lot of things: stove, sink, dishwasher, washer and dryer, and other things she normally uses. It’s interesting that I don’t really want to use them and she doesn’t want me to use them. Quite a coincidence, don’t you think?
I have the last words in my house: “Yes, dear!”Well I'm here to tell you being the man of my house I runs things around my house! Like the vacuum cleaner, dishwasher, wash machine etc.
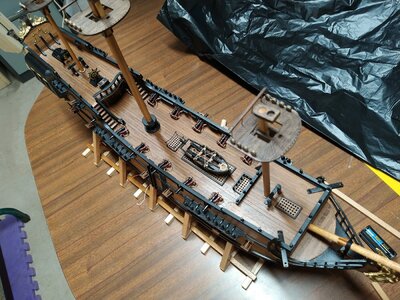
Fantastic looking!Just about finished the hull today so time for a few photos. I achieved something I don't do very often, see if you can spot it in the photos.
View attachment 228287
View attachment 228286
View attachment 228285
View attachment 228289
View attachment 228291
View attachment 228292
View attachment 228293
View attachment 228288
View attachment 228294
View attachment 228290
So what was my achievement? In order to take the photos I had to have a tidy up and put all my stuff away, first time since I started my BP. Next week will be spent looking for the tools I put away.
Last week I've been doing something different. A long time ago when I had access to a machine shop l made several tools to help me with model making one of these is for masts and yards. After l made it i striped it down and stored it as I had no time for modelling.
This week I was going to use it for the first time. But it took awhile to remember where the parts where and how they went together. Then there was a bit of fine tuning.
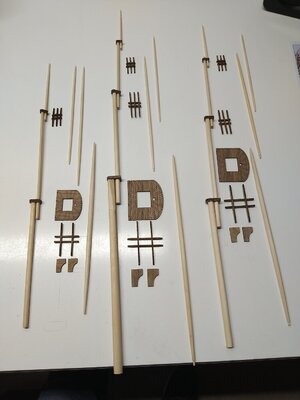
Finished all the masts and yards today nothing is glued just checking fit and length.
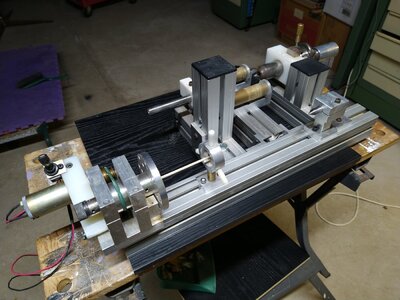
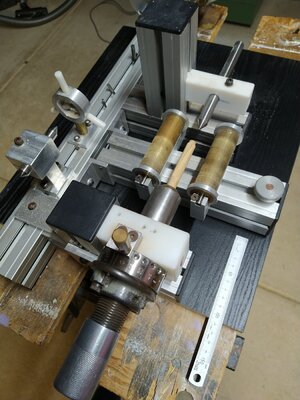
This is the tool/machine I made, the tapering is done on one side and flats on the other.
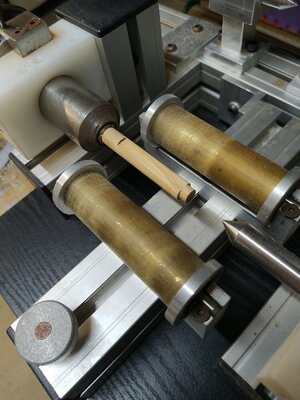
This is the main mast two parallel flats are needed for the tops. The mast is held in a collet and placed between two rollers then filed until the file comes in contact with the rollers and stops cutting. The two rings on the rollers can be moved to control the width of the flats and the rollers can be adjusted up and down to control the depth of the flats.
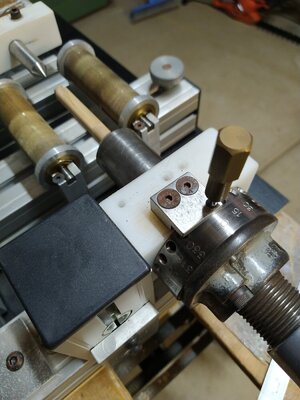
When the first flat is finished the mast is can be indexed in 15 degree increments by removing the locking pin and rotating the holder the required amount.
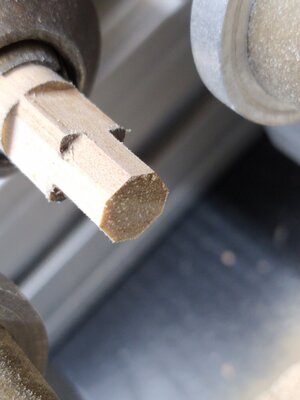
This test piece took around 20 minutes and has less than 0.1mm variation across the flats.
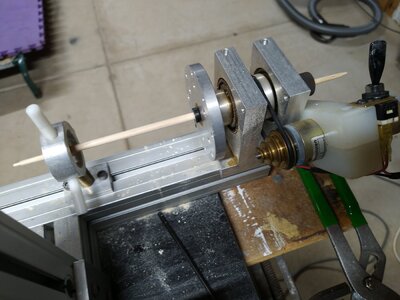
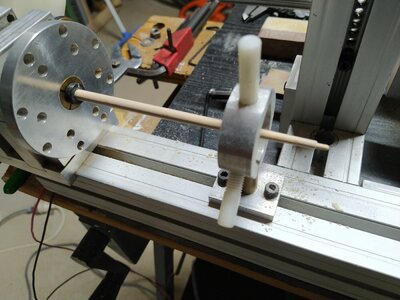
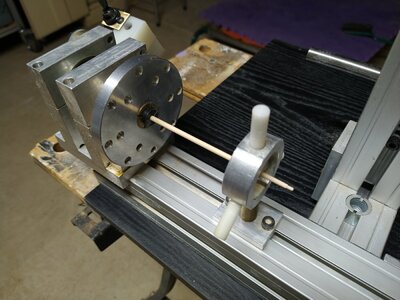
The yards are held in the middle and tapered, I used a steady to support the smaller parts while I finish the ends.
This week I was going to use it for the first time. But it took awhile to remember where the parts where and how they went together. Then there was a bit of fine tuning.

Finished all the masts and yards today nothing is glued just checking fit and length.


This is the tool/machine I made, the tapering is done on one side and flats on the other.

This is the main mast two parallel flats are needed for the tops. The mast is held in a collet and placed between two rollers then filed until the file comes in contact with the rollers and stops cutting. The two rings on the rollers can be moved to control the width of the flats and the rollers can be adjusted up and down to control the depth of the flats.

When the first flat is finished the mast is can be indexed in 15 degree increments by removing the locking pin and rotating the holder the required amount.

This test piece took around 20 minutes and has less than 0.1mm variation across the flats.


The yards are held in the middle and tapered, I used a steady to support the smaller parts while I finish the ends.
Last edited:
BRILLIANT! I'll be there this afternoon with my mast and yard blanks... Wait, Melbourne huh? Probably going to be late...
It's really interesting how we each bring our own skill sets to the task at hand.
It's really interesting how we each bring our own skill sets to the task at hand.
- Joined
- Mar 1, 2021
- Messages
- 315
- Points
- 168

I find it fascinating how you mates are capable of using and designing these incredible machines to do work on such fragile pieces. Outside of a mini belt sander and a drill press, I’m in the stone age! Love your work Tony! Always enjoy the knowledge and application you bring to light!Last week I've been doing something different. A long time ago when I had access to a machine shop l made several tools to help me with model making one of these is for masts and yards. After l made it i striped it down and stored it as I had no time for modelling.
This week I was going to use it for the first time. But it took awhile to remember where the parts where and how they went together. Then there was a bit of fine tuning.
View attachment 229689
Finished all the masts and yards today nothing is glued just checking fit and length.
View attachment 229703View attachment 229684
This is the tool/machine I made, the tapering is done on one side and flats on the other.
View attachment 229688
This is the main mast two parallel flats are needed for the tops. The mast is held in a collet and placed between two rollers then filed until the file comes in contact with the rollers and stops cutting. The two rings on the rollers can be moved to control the width of the flats and the rollers can be adjusted up and down to control the depth of the flats.
View attachment 229685
When the first flat is finished the mast is can be indexed in 15 degree increments by removing the locking pin and rotating the holder the required amount.
View attachment 229705
This test piece took around 20 minutes and has less than 0.1mm variation across the flats.
View attachment 229706View attachment 229707View attachment 229708
The yards are held in the middle and tapered, I used a steady to support the smaller parts while I finish the ends.
WOW! Amazing, I love it! You sir are a very talented man. Thank you for sharing this tool.Last week I've been doing something different. A long time ago when I had access to a machine shop l made several tools to help me with model making one of these is for masts and yards. After l made it i striped it down and stored it as I had no time for modelling.
This week I was going to use it for the first time. But it took awhile to remember where the parts where and how they went together. Then there was a bit of fine tuning.
View attachment 229689
Finished all the masts and yards today nothing is glued just checking fit and length.
View attachment 229703View attachment 229684
This is the tool/machine I made, the tapering is done on one side and flats on the other.
View attachment 229688
This is the main mast two parallel flats are needed for the tops. The mast is held in a collet and placed between two rollers then filed until the file comes in contact with the rollers and stops cutting. The two rings on the rollers can be moved to control the width of the flats and the rollers can be adjusted up and down to control the depth of the flats.
View attachment 229685
When the first flat is finished the mast is can be indexed in 15 degree increments by removing the locking pin and rotating the holder the required amount.
View attachment 229705
This test piece took around 20 minutes and has less than 0.1mm variation across the flats.
View attachment 229706View attachment 229707View attachment 229708
The yards are held in the middle and tapered, I used a steady to support the smaller parts while I finish the ends.
BRILLIANT! I'll be there this afternoon with my mast and yard blanks... Wait, Melbourne huh? Probably going to be late...
It's really interesting how we each bring our own skill sets to the task at hand.I find it fascinating how you mates are capable of using and designing these incredible machines to do work on such fragile pieces. Outside of a mini belt sander and a drill press, I’m in the stone age! Love your work Tony! Always enjoy the knowledge and application you bring to light!WOW! Amazing, I love it! You sir are a very talented man. Thank you for sharing this tool.
Last edited:
Thanks for the kind words I have some other Health Robinson inspired gadgets that I haven't used on a model, if they work I'll post them.
Hi this has been a very special week for me. My son received a distinguished service award for his role in Afghanistan, we drove to Canberra to see the presentation. It was a small ceremony at government house and the award was presented by the Governor General.
Not much work has been done on the Pearl, still finishing off the masts.
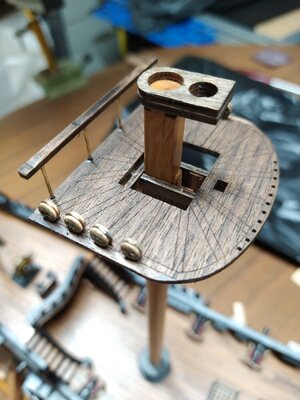
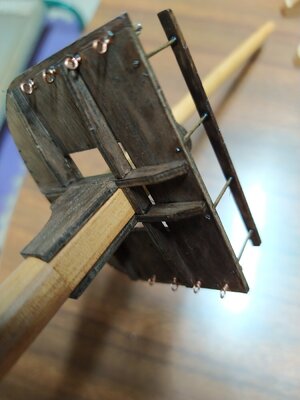
Tops are glued together and placed on the mast to check the fit.
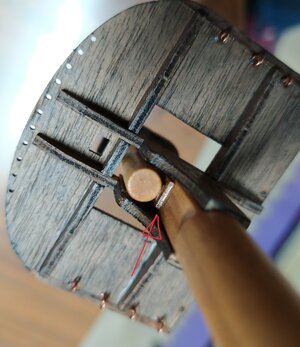
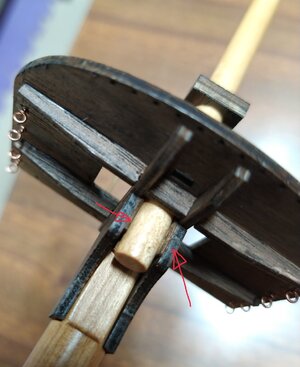
When the next section was fitted it was quite loose so I added some spacers to hold it tight.
The hard part now, while doing the hardware I'm trying to figure out how to run the rigging. The standing rigging looks OK but the running rigging and belaying points are very confusing the drawings are terrible. I have some books on rigging so I might make my own rigging plan.
Not much work has been done on the Pearl, still finishing off the masts.


Tops are glued together and placed on the mast to check the fit.


When the next section was fitted it was quite loose so I added some spacers to hold it tight.

The hard part now, while doing the hardware I'm trying to figure out how to run the rigging. The standing rigging looks OK but the running rigging and belaying points are very confusing the drawings are terrible. I have some books on rigging so I might make my own rigging plan.
My congratulations to your son. I look forward to seeing your rigging. Are you using kit supplied line or aftermarket line?
Hey Tony, I'll add my congratulations to your son. You must be very proud of his accomplishments.
Also, from my side, congrats to you and your son! I cannon thanks enough for their service! To those in the uniform- we salute you!Hi this has been a very special week for me. My son received a distinguished service award for his role in Afghanistan, we drove to Canberra to see the presentation. It was a small ceremony at government house and the award was presented by the Governor General.
Congrats to your son! Tell him, “Thank you for your service!” for us. Now the fun stuff begins for you—the rigging.Hi this has been a very special week for me. My son received a distinguished service award for his role in Afghanistan, we drove to Canberra to see the presentation. It was a small ceremony at government house and the award was presented by the Governor General.
Not much work has been done on the Pearl, still finishing off the masts.
View attachment 231822View attachment 231818
Tops are glued together and placed on the mast to check the fit.
View attachment 231821View attachment 231823
When the next section was fitted it was quite loose so I added some spacers to hold it tight.
View attachment 231813
The hard part now, while doing the hardware I'm trying to figure out how to run the rigging. The standing rigging looks OK but the running rigging and belaying points are very confusing the drawings are terrible. I have some books on rigging so I might make my own rigging plan.
- Joined
- Mar 1, 2021
- Messages
- 315
- Points
- 168

Hey Vic...have you started the Le Soleil yet?Congrats to your son! Tell him, “Thank you for your service!” for us. Now the fun stuff begins for you—the rigging.
Nope. Finishing up honey do list.Hey Vic...have you started the Le Soleil yet?
Thanks Daniel, ZHL only supplied black line. I will be using tan lines as well most of which l have in my stash.My congratulations to your son. I look forward to seeing your rigging. Are you using kit supplied line or aftermarket line?


