
Great Project, and amazing finish! Make sure to invite for dinner, once the pig will roast! Booz on me...

-

SUBSCRIBE TO SHIPS IN SCALE TODAY!
The beloved Ships in Scale Magazine is back and charting a new course for 2026!
Discover new skills, new techniques, and new inspirations in every issue.
NOTE THAT OUR NEXT ISSUE WILL BE MARCH/APRIL 2026 -

Win a Free Custom Engraved Brass Coin!!!
As a way to introduce our brass coins to the community, we will raffle off a free coin during the month of August. Follow link ABOVE for instructions for entering.
- Home
- Forums
- Ships of Scale Group Builds and Projects
- HMS Alert 1777 1:48 PoF Group Build
- HMS Alert 1777 1:48 Group Build Logs
You are using an out of date browser. It may not display this or other websites correctly.
You should upgrade or use an alternative browser.
You should upgrade or use an alternative browser.

G'day Maarten

Mmmmm

Happymodeling
Greg
I can smell the pig spit and I can taste the cracking.
Mmmmm
Lovely!
Almost as good as your brilliant craftsmanship. Happymodeling
Greg
Last edited:

Not to much of an update, but between the fun of building the stove also the ribs continue towards the end, stil 16 to go.


Hopefully towards Christmas all ribs will be finished.
Hopefully towards Christmas all ribs will be finished.
G'day Maarten
This kit is absolutely magnificent, and I believe that any kit's manufacturer should give you their kits for free!
When you post your brilliant ingenuity in consultation, so many others members would buy the said kits.
Greg
This kit is absolutely magnificent, and I believe that any kit's manufacturer should give you their kits for free!
When you post your brilliant ingenuity in consultation, so many others members would buy the said kits.
You would be a great advertisement for them.
Happymodeling Greg

Madness accrues! Just kidding - looking great, including that pig roast. Thanks.Now the tile floor joints are next.
I paint these with oil paint, white and Van Dijck brown.
View attachment 198650
As these joints are so small the paint which is outside the joints needs to be removed. My wife did this for me with a brush and some turpentine. She also gave some retouches to the tiles, resulting in my finished floor.
View attachment 198651
In the mean time I gave my pig some extra color.
When the paint and clay is hardened I will give some extra detail to the pig by scratching into the clay.
But for now this is it.
View attachment 198652
View attachment 198653
View attachment 198654
View attachment 198655
View attachment 198656
And to give you an idea about size.
View attachment 198657
This was a nice little project.
When I see this huge number of frames -> looks like the framing of the CAF Le Coureur is an "Easy Going" or a "Walk in the Park"
Looking very good
Looking very good
Hi Gents, thx again for all your comments and likes.When I see this huge number of frames -> looks like the framing of the CAF Le Coureur is an "Easy Going" or a "Walk in the Park"
Looking very good
Uwe, dont forget the shape of your frames. You have to file them all, bit by bit.
With Alert you can sand them in one go on the disc sander. I do not envy you Le Coureur builders with its stepped frames.
") a walk in a very big park with hills.
a walk in a very big park with hills.Due to some extra hobby time these days my frames are finished, so now the major repetative work is done it will be more and more fun to build.

For sanding the inside of the hull I made foam pieces with sanding linnen glued to it with hotmelt glue, this helps you to properly sand all the inside curvatures without sanding dents into it. I made them with course 150, 220 and 320 to get a smooth surface.


After sanding the inside.


For sanding the inside of the hull I made foam pieces with sanding linnen glued to it with hotmelt glue, this helps you to properly sand all the inside curvatures without sanding dents into it. I made them with course 150, 220 and 320 to get a smooth surface.
After sanding the inside.
- Joined
- Oct 26, 2020
- Messages
- 38
- Points
- 78

This precision is incredible!
I wish you a Merry Christmas and continued success in building the Alert.
Best regards
Fritz Baur
I wish you a Merry Christmas and continued success in building the Alert.
Best regards
Fritz Baur
Excellent...  and nothing more to say, mon Amie!!! A very special way to end this year. Yet, another milestone!
Happy New Year!
and nothing more to say, mon Amie!!! A very special way to end this year. Yet, another milestone!Happy New Year!
Outstanding job, Maarten! Gorgeous! You must be itching to cut her out of the building berth. After installing deck clamps? Thanks for sharing.Due to some extra hobby time these days my frames are finished, so now the major repetative work is done it will be more and more fun to build.
View attachment 201326
For sanding the inside of the hull I made foam pieces with sanding linnen glued to it with hotmelt glue, this helps you to properly sand all the inside curvatures without sanding dents into it. I made them with course 150, 220 and 320 to get a smooth surface.
View attachment 201328
View attachment 201327
View attachment 201329
After sanding the inside.
View attachment 201330
View attachment 201331
View attachment 201332
View attachment 201333
Thx gents for your comments and likes, hope you all had a nice Christmas. And @Gennaro yes hopfully she will be released from her berth in the coming two weeks.
Today I had some time to work on the keelson.
The keelson consists of 3 large timber pieces joined together with scarphs and an additional knee at the stern. I decided to glue these together outside the ship as I use black pva for these joints.

For later fitment of the limber boards I milled a space in the top of the keelson to counter sink the limber boards into.


After sanding the keelson with 220 emery paper followed by steelwool it can be dry fitted.

The keelson is bolted to every second frame with 1" bolts, 0,8 mm to scale.

I pre drill these holes in the keelson outside the ship. After drilling all holes I pin the keelson in place with a needle pin in the front and stern.


Now with the keelson in place I drill all the holes into the frames and keel. And after removing the keelson all the holes are in place.

For fitting the keelson I use spots of pva and 0,8 mm brass wire.

The brass wire I prise into the 0,75 mm drilled holes with some pliers.

With the wire in place I cut of the remaining part flush on the keelson.


Then with a jewelers cup burr I transform the wire into a countersunk round bolthead.

Continueing until the keelson is finished.


Next will be fitting the limberstrakes, thickstuff and shelfclamps.
Today I had some time to work on the keelson.
The keelson consists of 3 large timber pieces joined together with scarphs and an additional knee at the stern. I decided to glue these together outside the ship as I use black pva for these joints.
For later fitment of the limber boards I milled a space in the top of the keelson to counter sink the limber boards into.
After sanding the keelson with 220 emery paper followed by steelwool it can be dry fitted.
The keelson is bolted to every second frame with 1" bolts, 0,8 mm to scale.
I pre drill these holes in the keelson outside the ship. After drilling all holes I pin the keelson in place with a needle pin in the front and stern.
Now with the keelson in place I drill all the holes into the frames and keel. And after removing the keelson all the holes are in place.
For fitting the keelson I use spots of pva and 0,8 mm brass wire.
The brass wire I prise into the 0,75 mm drilled holes with some pliers.
With the wire in place I cut of the remaining part flush on the keelson.
Then with a jewelers cup burr I transform the wire into a countersunk round bolthead.
Continueing until the keelson is finished.
Next will be fitting the limberstrakes, thickstuff and shelfclamps.
Last edited:
- Joined
- Jul 9, 2019
- Messages
- 497
- Points
- 323

This is an interesting technique. Do you use a power rotary tool for this, or just a cup burr in a pin vise with hand turning?Then with a jewelers cup burr I transform the wire into a countersunk round bolthead.
Could you recommend a set of cup burrs? I see many online--diamond/carbide? Any brands that are known to be more durable?
Last edited:
I use Busch burrs for this on my proxon micro drill, works perfect.This is an interesting technique. Do you use a power rotary tool for this, or just a cup burr in a pin vise with hand turning?
Could you recommend a set of cup burrs? I see many online--diamond/carbide? Any brands that are known to be more durable?
Busch has the smallest 0,8 mm increasing by 0,1 mm up to 2,3 mm.
See page 22 in the attached brochure.
Attachments
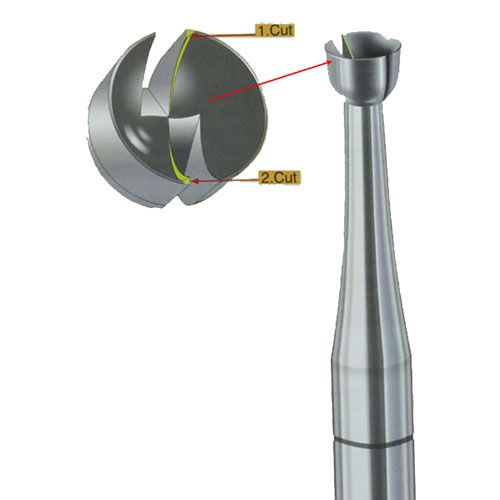
Is this the burr cutter you are using?:I use Busch burrs for this on my proxon micro drill, works perfect.
Busch has the smallest 0,8 mm increasing by 0,1 mm up to 2,3 mm.
See page 22 in the attached brochure.

I was able to find this retailer for Australian buyers:
BUSCH 411T TWIN CUT CUP BUR
All burs have a standard shank diameter of 2.32mm, which fit Jewellery Industry standard handpieces. These burs are supplied by Busch from Germany, who have been manufacturing their high quality burs since 1905 when Ernst and Otto Busch set up their dental bur factory Busch & Co. The...
 www.jewellerssupplies.com.au

Yes this is the one I use for the 0,4 mm wire. For the 0,8 I used the 1,2 mm to get the countersunk effect.Is this the burr cutter you are using?:
View attachment 201647
I was able to find this retailer for Australian buyers:
BUSCH 411T TWIN CUT CUP BUR
All burs have a standard shank diameter of 2.32mm, which fit Jewellery Industry standard handpieces. These burs are supplied by Busch from Germany, who have been manufacturing their high quality burs since 1905 when Ernst and Otto Busch set up their dental bur factory Busch & Co. The...
Small update. I am now working on the limber strake, the thickstuff and the shelf clamp. These provide rigidity in the frame structure.
First I put in some clamps marking the positions of these timbers, again a handy tool of Trident.


The first is the limber strake along the keel.
In the kit these are one piece of cherry timber, I have carved scarph joints in these to make them look as three parts as mentioned in the AOTS.

The carved scarph joint I fill with a pencil to accentuate the scarph joint

The second strake is called the thickstuff, in the kit 2mm thick. Here also I simulated the scarphs. These are the first to glue into the hull. First I steam it to twist and bend to a fit. For this I use a simple household steam cleaner and a copper pipe. Put the strake in the pipe and steam it.

As the copper pipe gets hot you can directly use it to bend the wood on top of it.

The dry fit the strake, file it to a perfect fit on both ends. When finally dry fitting I pull a knive along the stroke to mark the area for the glue. It leaves a very subtle mark.

Then glue with a small drop of Pva on frame 1 CA on frame 2 and so on. Put in the stroke and clamp it.


This process should be repeated for all. For the shelf clamps I use the positions of the slots for the deck beams to position the correctly along the hull. You can easily take the correct position and frame number from the drawing and mark it inside your hull. Now the limber strakes, thickstuff and shelf clamp for the lower deck is fitted. The small white plank is a limber board sample.


First I put in some clamps marking the positions of these timbers, again a handy tool of Trident.
The first is the limber strake along the keel.
In the kit these are one piece of cherry timber, I have carved scarph joints in these to make them look as three parts as mentioned in the AOTS.
The carved scarph joint I fill with a pencil to accentuate the scarph joint
The second strake is called the thickstuff, in the kit 2mm thick. Here also I simulated the scarphs. These are the first to glue into the hull. First I steam it to twist and bend to a fit. For this I use a simple household steam cleaner and a copper pipe. Put the strake in the pipe and steam it.
As the copper pipe gets hot you can directly use it to bend the wood on top of it.
The dry fit the strake, file it to a perfect fit on both ends. When finally dry fitting I pull a knive along the stroke to mark the area for the glue. It leaves a very subtle mark.
Then glue with a small drop of Pva on frame 1 CA on frame 2 and so on. Put in the stroke and clamp it.
This process should be repeated for all. For the shelf clamps I use the positions of the slots for the deck beams to position the correctly along the hull. You can easily take the correct position and frame number from the drawing and mark it inside your hull. Now the limber strakes, thickstuff and shelf clamp for the lower deck is fitted. The small white plank is a limber board sample.

Looks just perfect. Very accurately made. I like it very much.