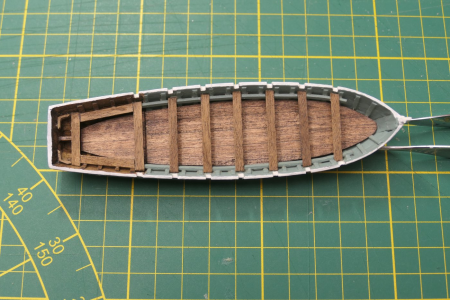
Fantastic idea with the netting very well thought out and executed Will. Great build25 The nets
The nets: I want to knot the nets myself. Does anyone have any experience with this? What yarn should I use? Can this be white or is it better to colour it? What is the best way to go about this?
For several weeks I had been running with this idea in my head and had a complete clarity on how to go about it. For my ship, it comes down to making about 2m of netting, varying from 15 to 50 mm width.
The idea was to tie all knots around needles in a sort of 1.5 mm triangle.
View attachment 524189
The start was good, on each needle a string double and then at each subsequent row with a string from an adjacent pair to the next row of needles for another knot.
View attachment 524190
To keep the whole thing a bit apart, I used lace bobbins and made some notches in the edge of the worktop.
View attachment 524191
A little arithmetic (2000/1.5) x (30/1.5) = 27,000 knots. CRAZY WORK!
I made about 4 layers on the worktop and quit.
Apart from the fact that my yarn was a bit too thick, it became a shapeless piece of cloth, with nothing to do.
End of exercise.
But then what?
I looking for something else. Isn't there a material that is very finely meshed?
All sorts of things passed through. From fly screen, curtain fabric, lace to brass sieve. None of it. All too stiff, not pretty or has no look.
Then I came up with the idea of bandages. My whole first aid box upside down, but all rolls of elastic bandages. Not what I was looking for. You used to have those little rolls that don't stretch anyway and you often can't do anything with. An additional problem was that the nets had to have a diagonally woven pattern. So a narrow strip was no good either.
Until my eye fell on a 10x10cm gauze pad. If you unfold this you get a patch of about 30 by 40cm. Very delicate material, where the slightest touch damages the diamond-shaped pattern.
View attachment 524192
View attachment 524193
So first very carefully ironed and fixed the patch with diluted wood glue. Clamped on either side between a couple of slats and laid flat on the worktable. Then carefully stamp with the diluted wood glue so as not to disturb the diamond structure. Then hung vertically to dry. I coloured the wood glue with some strong tea and a little Buisman. In the photo, the colour looks too violently brown, but after drying it becomes a lot lighter.
View attachment 524194
View attachment 524195
After drying, a fine material emerged with a stable net structure. Depending on the sizes needed, I cut strips from this diagonally. However, only after I glued a piece of yarn on both edges.
View attachment 524196
Then lined a piece of plywood with a piece of rubbish bag and bent the strip of net around it and smeared it again with diluted wood glue.
View attachment 524197
View attachment 524198
In between, all the U-shaped frames for the nets were attached to the hull and fitted with a rope, which I first ran through the superglue to create a somewhat stiffer and more form-fitting yarn. This was secured at both ends with a small drop of superglue.
View attachment 524199
After the net has hardened again, it can be removed from the plastic very easily, creating a net in a U-profile.
View attachment 524200
This can then be inserted into the U-shaped frames. What remains after that is to secure it with glue and Wil is done.
View attachment 524202
On the advice of a colleague, I have brought forward a number of vulnerable items in the planning, because I will hardly be able to reach them properly once the masts and rigging are in place I am not quite sure whether the same applies to the hatches. However, I will make the lanterns ready for mounting. Hanging the rudder and anchors with their cables can also wait, I think.
Still a little earlier than expected, the subproject of the nets was completed today. This topic has kept me busy for quite some time. After all, I wanted to put it off until later because the whole netting thing is quite fragile. But now that it is finished, I am convinced that this has been the moment. It was a delightful process figuring out how to get to the end result with the gauze. And as always, everything falls apart in hindsight. Or do you forget about time when you are as absorbed in your hobby as I am. I think the latter anyway.
While finalising the netting for the bulwarks, the further completion of the two stairs to the poop deck also came up. The photos of the real Victory that I have give a somewhat messy picture. This may also be because on site, at the time we were there, some kind of temporary walkway had been installed. In my case, it concerns my own interpretation. I also briefly considered using the very thin twine to thread the nets, fitted with an edge rope, onto the rope already stretched in the hammock frames. I did not opt for this, as it would ultimately give a less sleek look. I therefore chose to secure the nets with very small bits of super glue. Oh yes, I also closed the ends of the rows of nets with a net. This is not the case on the real Victory, but it seemed quite illogical to me.
First a few pictures of what this looks like in reality
View attachment 524203
View attachment 524204
View attachment 524205
The photos below give an overview of the final result achieved.
View attachment 524206
View attachment 524207
View attachment 524208
View attachment 524209
View attachment 524210
Meanwhile, we are another month on. The completion of the vulnerable parts is progressing slowly. Logical because it is all visible work.
During the netting project, I already noticed regularly that the slightest touch led to distortion or damage of made work. During the rope work later on, this will certainly also be a major risk. Therefore, I built a real riser, say railing, around the hull. I can even hang onto it now and then it's like standing at a vieuwpoint with your arms on the railing and enjoying what you see in front of you. The whole railing consists of four M10 threaded ends, two slats and the necessary nuts and bolts.
View attachment 524211
Meanwhile, the carronades have also been assembled in place. To be honest, assembling the carronades was one of the first things I did when I started building the kit. After all, I had to get some sense that I was working on a warship. The ropework is from the last few weeks, though.
View attachment 524212
-

Win a Free Custom Engraved Brass Coin!!!
As a way to introduce our brass coins to the community, we will raffle off a free coin during the month of August. Follow link ABOVE for instructions for entering.
-

PRE-ORDER SHIPS IN SCALE TODAY!
The beloved Ships in Scale Magazine is back and charting a new course for 2026!
Discover new skills, new techniques, and new inspirations in every issue.
NOTE THAT OUR FIRST ISSUE WILL BE JAN/FEB 2026
You are using an out of date browser. It may not display this or other websites correctly.
You should upgrade or use an alternative browser.
You should upgrade or use an alternative browser.
HMS Victory of Caldercraft by Wil
- Thread starter Scheepshoorn
- Start date
- Watchers 27
-
- Tags
- caldercraft victory
- Joined
- Jul 17, 2024
- Messages
- 75
- Points
- 113

26 The hammocks
In between jobs, I am fiercely studying how to do it all later with all those ropes. To be continued.
Anyway we pick up where we left off. There were still two sloops in half, which still had to be finished. And I had an idea how I was going to make the hammocks, which should be in the nets. Again, my idea started with the application of bandage gauze. After all, the kit says nothing about the nets and the hammocks and then filling things in as you see fit is also a lot of fun.
My intention was to make small rolls of 3 to 4 mm in diameter and approx. 8 mm in length from gauze. The starting point is gauze that is 8 cm wide and not elastic. From this you cut strips about 6 cm long. And you coat these with diluted wood glue, which has been coloured. In my case, I had some left over from the nets. The idea behind it is that the hammocks on the ship will not have been too clean over time and there will be some nuance in this as well.
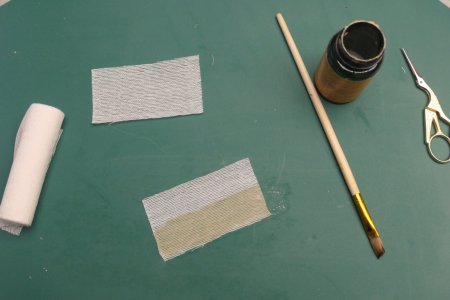
I then took a 1 mm bar of brass and rolled the smeared gauze around it as tightly as possible.
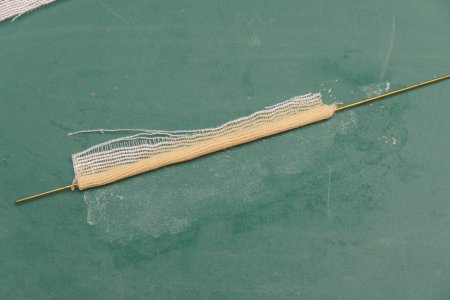
Then set this roll aside and carefully pull out the brass bar and let the roll harden. Hard is a big word here, because the highly diluted wood glue keeps the roll somewhat flexible
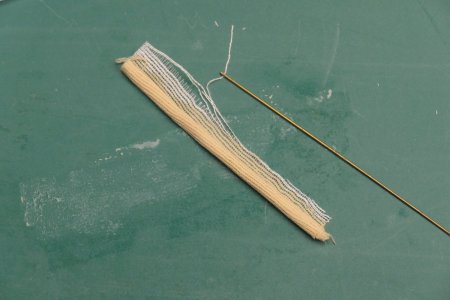
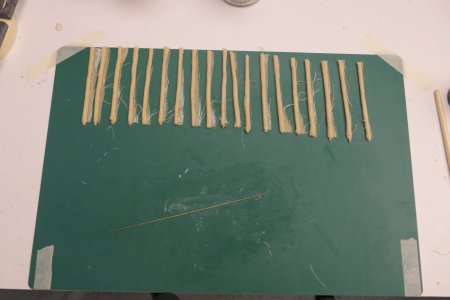
After a day, the rolls have hardened and the excess can be cut off with sharp scissors. Then cut the rolls into pieces, I vary a little between 8 and 10 mm, so 9 to 10 hammocks will come out of 1 roll.
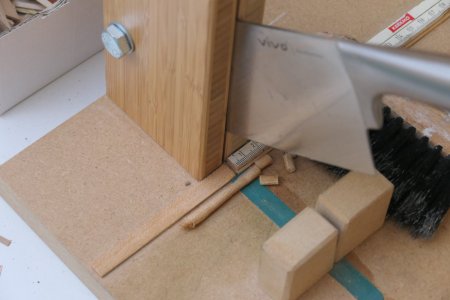
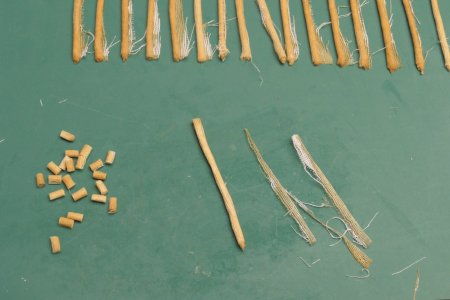
And then it's packing. Depending on the depth of the nets, I put 0, 1 or 2 layers horizontally at the bottom and alternately 2 horizontally and 3 vertically on top. All vertical is also possible, of course. In fact, varying a little will be more realistic.
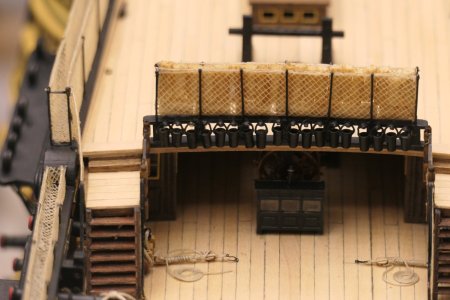
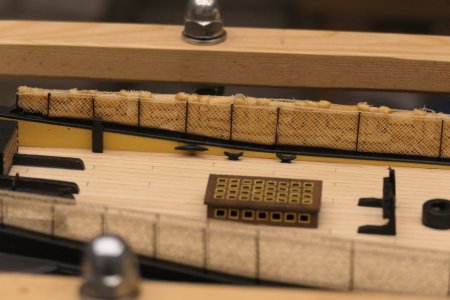
I made the hammocks that are in the nets in the photos above yesterday and put them in the nets quite soon after, when they were actually not quite cured yet. No patience of course. The effect, though, is that they are then much more elastic and allow themselves to form nicely. Yesterday at the end of the day, I processed the 19 rolls shown in previous photos. Those were slightly harder this morning, but I think doable. Trimming in both cases went very well with the Japanese kitchen knife, which works like a guillotine and which I also use to trim all my laths etc. Razor-sharp and cuts great.
I currently have 28 rolls of material, good for about 250 hammocks. I estimate enough for half a Victory. For nuance in colour (degree of soiling), I want to apply some darker wood glue here and there at the end, and for fixing I want to apply matt floor varnish. We'll see.
After a few days, all the nets were filled with these hammocks. I did not count them, but estimate that there will be about 500. Although I was dreading it quite a bit beforehand, this part turned out to be much better than I expected. Now that I look at the photos again, they look like huge bales of straw. The sleek look of the hull so far has been somewhat destroyed by this, which is a pity I think. I really have to get used to this "messy" addition. On the other hand, once all the ropework is in place and huge amounts of rope have been put up here and there on the deck, it will not be so bad, I hope.
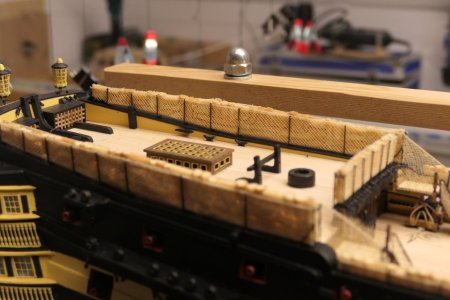
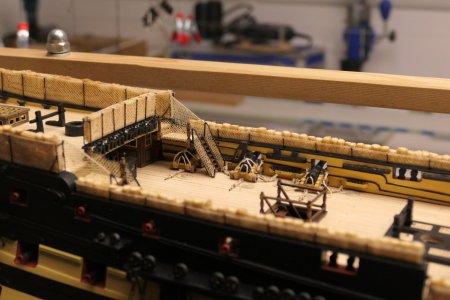

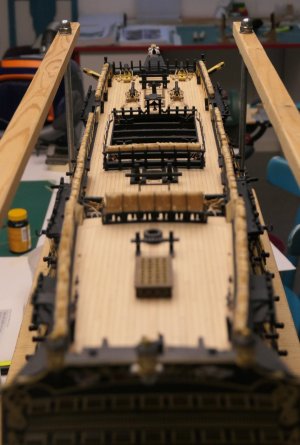
With this, my hull is now almost finished. In fact, only the hatches remain to be fitted. The nets and hammocks are a personal addition, as the kit does not provide these (only the black brackets are in the kit). I believe this definitely adds something.
In between jobs, I am fiercely studying how to do it all later with all those ropes. To be continued.
Anyway we pick up where we left off. There were still two sloops in half, which still had to be finished. And I had an idea how I was going to make the hammocks, which should be in the nets. Again, my idea started with the application of bandage gauze. After all, the kit says nothing about the nets and the hammocks and then filling things in as you see fit is also a lot of fun.
My intention was to make small rolls of 3 to 4 mm in diameter and approx. 8 mm in length from gauze. The starting point is gauze that is 8 cm wide and not elastic. From this you cut strips about 6 cm long. And you coat these with diluted wood glue, which has been coloured. In my case, I had some left over from the nets. The idea behind it is that the hammocks on the ship will not have been too clean over time and there will be some nuance in this as well.

I then took a 1 mm bar of brass and rolled the smeared gauze around it as tightly as possible.

Then set this roll aside and carefully pull out the brass bar and let the roll harden. Hard is a big word here, because the highly diluted wood glue keeps the roll somewhat flexible


After a day, the rolls have hardened and the excess can be cut off with sharp scissors. Then cut the rolls into pieces, I vary a little between 8 and 10 mm, so 9 to 10 hammocks will come out of 1 roll.


And then it's packing. Depending on the depth of the nets, I put 0, 1 or 2 layers horizontally at the bottom and alternately 2 horizontally and 3 vertically on top. All vertical is also possible, of course. In fact, varying a little will be more realistic.


I made the hammocks that are in the nets in the photos above yesterday and put them in the nets quite soon after, when they were actually not quite cured yet. No patience of course. The effect, though, is that they are then much more elastic and allow themselves to form nicely. Yesterday at the end of the day, I processed the 19 rolls shown in previous photos. Those were slightly harder this morning, but I think doable. Trimming in both cases went very well with the Japanese kitchen knife, which works like a guillotine and which I also use to trim all my laths etc. Razor-sharp and cuts great.
I currently have 28 rolls of material, good for about 250 hammocks. I estimate enough for half a Victory. For nuance in colour (degree of soiling), I want to apply some darker wood glue here and there at the end, and for fixing I want to apply matt floor varnish. We'll see.
After a few days, all the nets were filled with these hammocks. I did not count them, but estimate that there will be about 500. Although I was dreading it quite a bit beforehand, this part turned out to be much better than I expected. Now that I look at the photos again, they look like huge bales of straw. The sleek look of the hull so far has been somewhat destroyed by this, which is a pity I think. I really have to get used to this "messy" addition. On the other hand, once all the ropework is in place and huge amounts of rope have been put up here and there on the deck, it will not be so bad, I hope.


With this, my hull is now almost finished. In fact, only the hatches remain to be fitted. The nets and hammocks are a personal addition, as the kit does not provide these (only the black brackets are in the kit). I believe this definitely adds something.
Great idea and technique
Good morning Wil. Kudos on those nets. They are not easy and yours are one of the neatest I have seen. I also like your hammocks and some additional details always add to the ship. You are building and impressive Victory26 The hammocks
In between jobs, I am fiercely studying how to do it all later with all those ropes. To be continued.
Anyway we pick up where we left off. There were still two sloops in half, which still had to be finished. And I had an idea how I was going to make the hammocks, which should be in the nets. Again, my idea started with the application of bandage gauze. After all, the kit says nothing about the nets and the hammocks and then filling things in as you see fit is also a lot of fun.
My intention was to make small rolls of 3 to 4 mm in diameter and approx. 8 mm in length from gauze. The starting point is gauze that is 8 cm wide and not elastic. From this you cut strips about 6 cm long. And you coat these with diluted wood glue, which has been coloured. In my case, I had some left over from the nets. The idea behind it is that the hammocks on the ship will not have been too clean over time and there will be some nuance in this as well.
View attachment 526031
I then took a 1 mm bar of brass and rolled the smeared gauze around it as tightly as possible.
View attachment 526032
Then set this roll aside and carefully pull out the brass bar and let the roll harden. Hard is a big word here, because the highly diluted wood glue keeps the roll somewhat flexible
View attachment 526033
View attachment 526034
After a day, the rolls have hardened and the excess can be cut off with sharp scissors. Then cut the rolls into pieces, I vary a little between 8 and 10 mm, so 9 to 10 hammocks will come out of 1 roll.
View attachment 526035
View attachment 526036
And then it's packing. Depending on the depth of the nets, I put 0, 1 or 2 layers horizontally at the bottom and alternately 2 horizontally and 3 vertically on top. All vertical is also possible, of course. In fact, varying a little will be more realistic.
View attachment 526037
View attachment 526038
I made the hammocks that are in the nets in the photos above yesterday and put them in the nets quite soon after, when they were actually not quite cured yet. No patience of course. The effect, though, is that they are then much more elastic and allow themselves to form nicely. Yesterday at the end of the day, I processed the 19 rolls shown in previous photos. Those were slightly harder this morning, but I think doable. Trimming in both cases went very well with the Japanese kitchen knife, which works like a guillotine and which I also use to trim all my laths etc. Razor-sharp and cuts great.
I currently have 28 rolls of material, good for about 250 hammocks. I estimate enough for half a Victory. For nuance in colour (degree of soiling), I want to apply some darker wood glue here and there at the end, and for fixing I want to apply matt floor varnish. We'll see.
After a few days, all the nets were filled with these hammocks. I did not count them, but estimate that there will be about 500. Although I was dreading it quite a bit beforehand, this part turned out to be much better than I expected. Now that I look at the photos again, they look like huge bales of straw. The sleek look of the hull so far has been somewhat destroyed by this, which is a pity I think. I really have to get used to this "messy" addition. On the other hand, once all the ropework is in place and huge amounts of rope have been put up here and there on the deck, it will not be so bad, I hope.
View attachment 526039
View attachment 526040
View attachment 526041
View attachment 526042
With this, my hull is now almost finished. In fact, only the hatches remain to be fitted. The nets and hammocks are a personal addition, as the kit does not provide these (only the black brackets are in the kit). I believe this definitely adds something.
Yes Richard, Norfolk bor!
- Joined
- Jul 24, 2016
- Messages
- 540
- Points
- 188

Send me your address and ill send some If its not good just bin ItYes Richard, Norfolk bor!
richardjjs@yahoo.co.uk
- Joined
- Jul 24, 2016
- Messages
- 540
- Points
- 188

i am not sure that netting was applied to the ladders . would need proof of that - the netting was for the hammocks which provided some protection for the crew26 The hammocks
In between jobs, I am fiercely studying how to do it all later with all those ropes. To be continued.
Anyway we pick up where we left off. There were still two sloops in half, which still had to be finished. And I had an idea how I was going to make the hammocks, which should be in the nets. Again, my idea started with the application of bandage gauze. After all, the kit says nothing about the nets and the hammocks and then filling things in as you see fit is also a lot of fun.
My intention was to make small rolls of 3 to 4 mm in diameter and approx. 8 mm in length from gauze. The starting point is gauze that is 8 cm wide and not elastic. From this you cut strips about 6 cm long. And you coat these with diluted wood glue, which has been coloured. In my case, I had some left over from the nets. The idea behind it is that the hammocks on the ship will not have been too clean over time and there will be some nuance in this as well.
View attachment 526031
I then took a 1 mm bar of brass and rolled the smeared gauze around it as tightly as possible.
View attachment 526032
Then set this roll aside and carefully pull out the brass bar and let the roll harden. Hard is a big word here, because the highly diluted wood glue keeps the roll somewhat flexible
View attachment 526033
View attachment 526034
After a day, the rolls have hardened and the excess can be cut off with sharp scissors. Then cut the rolls into pieces, I vary a little between 8 and 10 mm, so 9 to 10 hammocks will come out of 1 roll.
View attachment 526035
View attachment 526036
And then it's packing. Depending on the depth of the nets, I put 0, 1 or 2 layers horizontally at the bottom and alternately 2 horizontally and 3 vertically on top. All vertical is also possible, of course. In fact, varying a little will be more realistic.
View attachment 526037
View attachment 526038
I made the hammocks that are in the nets in the photos above yesterday and put them in the nets quite soon after, when they were actually not quite cured yet. No patience of course. The effect, though, is that they are then much more elastic and allow themselves to form nicely. Yesterday at the end of the day, I processed the 19 rolls shown in previous photos. Those were slightly harder this morning, but I think doable. Trimming in both cases went very well with the Japanese kitchen knife, which works like a guillotine and which I also use to trim all my laths etc. Razor-sharp and cuts great.
I currently have 28 rolls of material, good for about 250 hammocks. I estimate enough for half a Victory. For nuance in colour (degree of soiling), I want to apply some darker wood glue here and there at the end, and for fixing I want to apply matt floor varnish. We'll see.
After a few days, all the nets were filled with these hammocks. I did not count them, but estimate that there will be about 500. Although I was dreading it quite a bit beforehand, this part turned out to be much better than I expected. Now that I look at the photos again, they look like huge bales of straw. The sleek look of the hull so far has been somewhat destroyed by this, which is a pity I think. I really have to get used to this "messy" addition. On the other hand, once all the ropework is in place and huge amounts of rope have been put up here and there on the deck, it will not be so bad, I hope.
View attachment 526039
View attachment 526040
View attachment 526041
View attachment 526042
With this, my hull is now almost finished. In fact, only the hatches remain to be fitted. The nets and hammocks are a personal addition, as the kit does not provide these (only the black brackets are in the kit). I believe this definitely adds something.
- Joined
- Jul 17, 2024
- Messages
- 75
- Points
- 113

27 The sloops
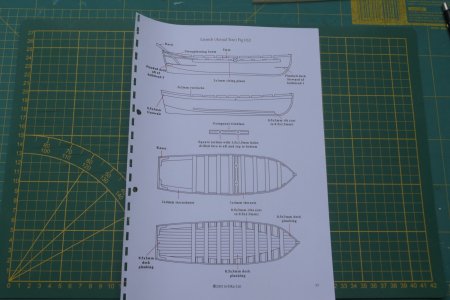
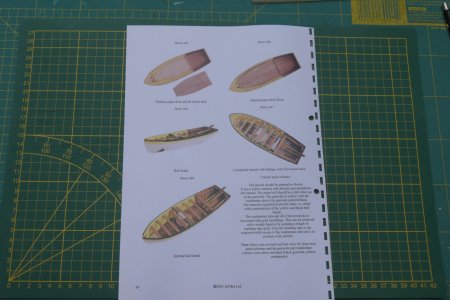
In between business, I started working on one of the four sloops. The construction description speaks of the following names: launch, barge, pinnace and cutter.
All 4 are very different and it is recommended to work on only one sloop at a time.
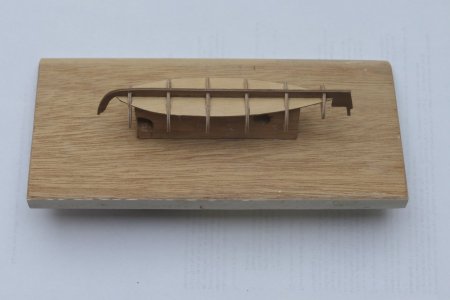
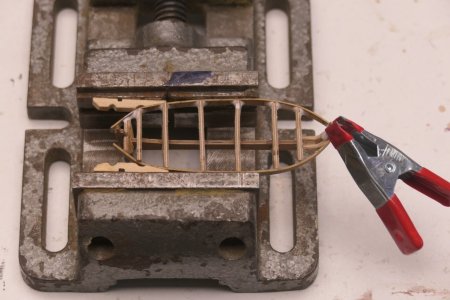
First I glued the bulkheads and keel together again, after which the first planking could begin. I had glued the boat on a support, thinking this would be easier and it would be easier to keep the whole thing straight. Not so, you can't move in any direction with your clamps. So I took everything off the support again.
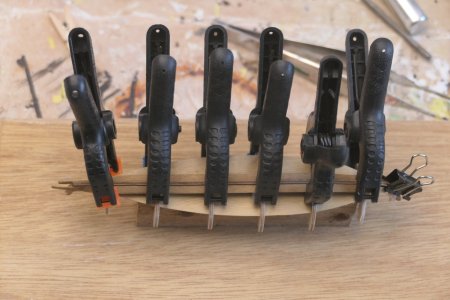
Then I found out that the rear bulkhead was not in the right place, so I ended up with a sloop with a sharp rear end. I adjusted things again and started again with the first planking.
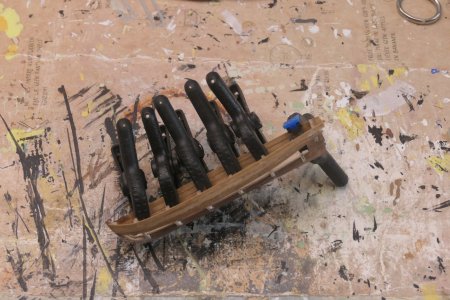
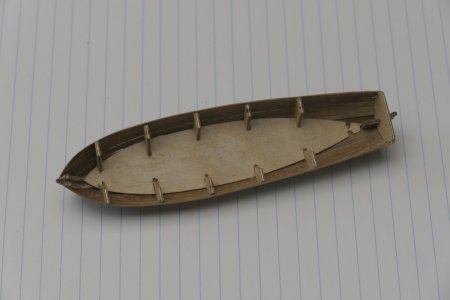
Then started the second planking with 3x0.5 mm slats.
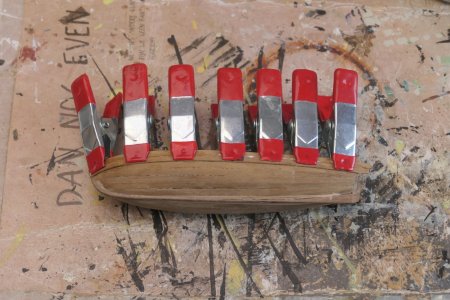
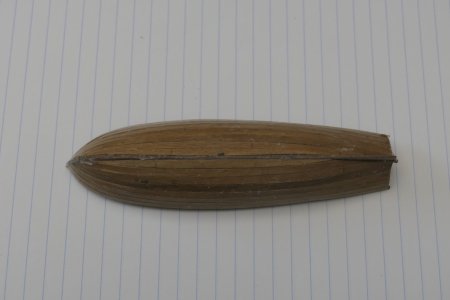
The 4 sloops should all eventually be placed on the skid beams above the pit. There is a drawing in the building instructions of how this should be done. They will then lie tightly against each other. Now that I have finished one sloop, I wonder if this will work. We shall see.
Question: Does anyone know how these sloops were secured to the deck? The underlying boat cleats are included, but no doubt there will be ropework involved.
Meanwhile, the barge is ready and furnished.
Once the second planking was ready, the top part of the bulkheads could be broken out of the boat, after which the bottom could be put into the boat. Meanwhile, on a piece of millimetre paper, the bottom had been planked and could be sanded into shape.
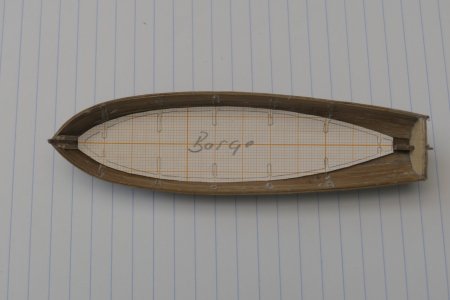
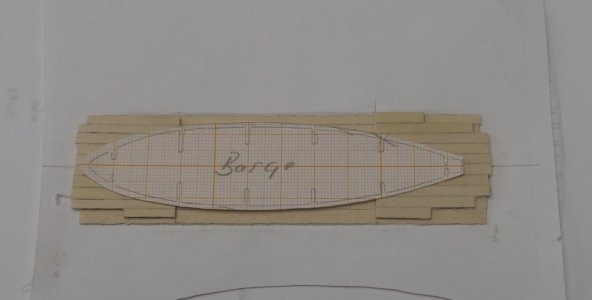
For placing the (fake) rafters, I used two strips of millimetric paper to apply the correct distribution.
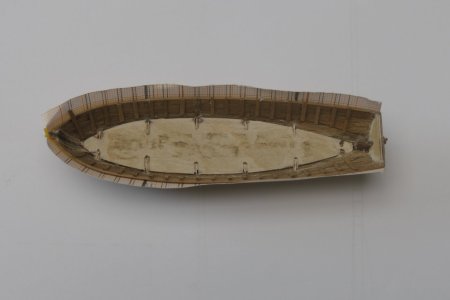
And then the painting work begins.
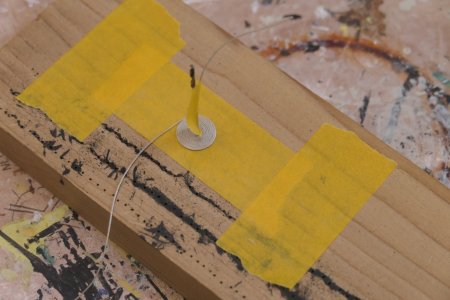
For the coiled rope, I use an inverted piece of tape, with a drill in it, to which I attach one end of the rope. Then, little by little, twist around and use tweezers to press the rope onto the tape. When done, smear it with diluted wood glue.
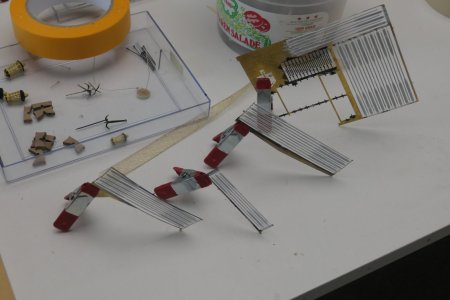
The straps are already preformed in the brass etching plates. First paint with primer and then paint white and add a red dot. By the way, I recommend priming all brass work first so that the paint adheres better. I did not do this at first (yet) and found that the paint did not adhere well to some parts.
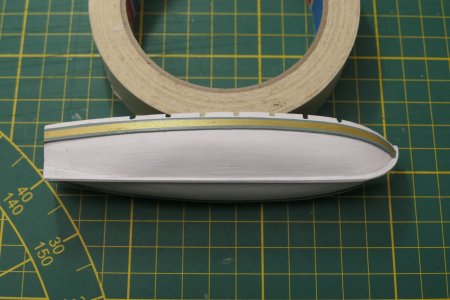
I made the wale around the barque from a 4x0.5mm strip of walnut, which I first wetted and bent into the right shape. I then painted this gold and then applied the two olive-green edges to it.
In the photo below, the keel can also be clearly seen. The original keel is almost impossible to maintain while sanding the first and second planking. I chose to sand away the existing keel completely, and apply a (fake) keel later when the boat is in the right shape. What remains in the picture is the rudder. That is still to come.
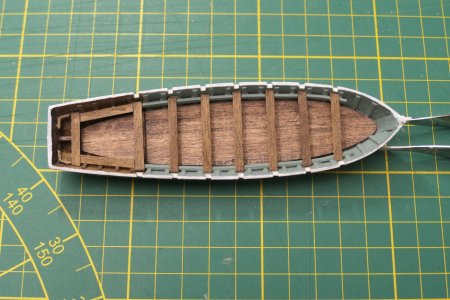
As usual, the last thing everything gets another coat of matt clear varnish, which, among other things, removes all the shiny stains from the superglue.
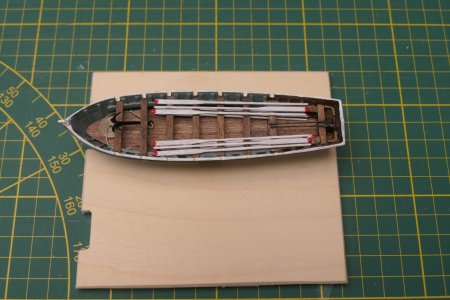
And finally, all ingredients are brought on board and secured with varnish.
De sloep is inmiddels ook helemaal af en ingericht. Om een idee te krijgen, heb ik alvast een plek boven de kuil uitgemeten, samen met de bak.
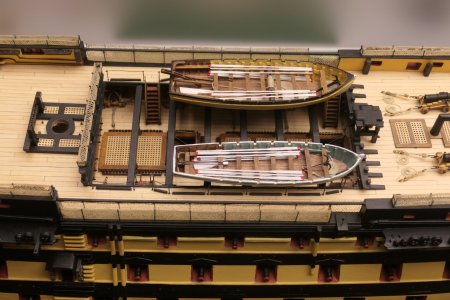
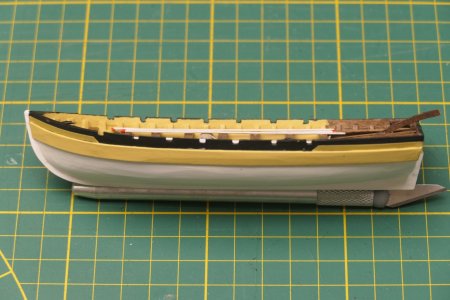
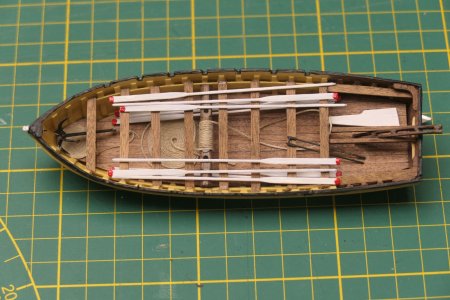
The second planking of the pinnacle has also been applied, but it still has to be finished. I have just started on the cutter. The 1st planking is on. The roster is in front of the cutter.
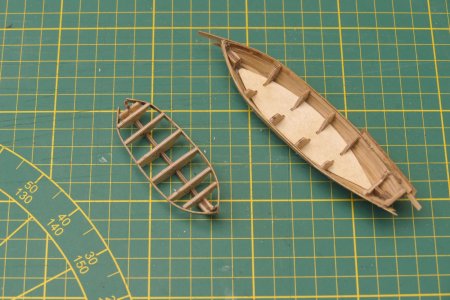
In between business, I started working on one of the four sloops. The construction description speaks of the following names: launch, barge, pinnace and cutter.
All 4 are very different and it is recommended to work on only one sloop at a time.


First I glued the bulkheads and keel together again, after which the first planking could begin. I had glued the boat on a support, thinking this would be easier and it would be easier to keep the whole thing straight. Not so, you can't move in any direction with your clamps. So I took everything off the support again.


Then I found out that the rear bulkhead was not in the right place, so I ended up with a sloop with a sharp rear end. I adjusted things again and started again with the first planking.


Then started the second planking with 3x0.5 mm slats.


The 4 sloops should all eventually be placed on the skid beams above the pit. There is a drawing in the building instructions of how this should be done. They will then lie tightly against each other. Now that I have finished one sloop, I wonder if this will work. We shall see.
Question: Does anyone know how these sloops were secured to the deck? The underlying boat cleats are included, but no doubt there will be ropework involved.
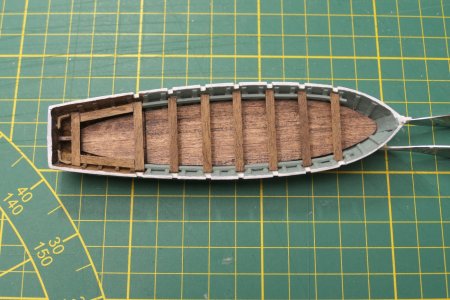
Meanwhile, the barge is ready and furnished.
Once the second planking was ready, the top part of the bulkheads could be broken out of the boat, after which the bottom could be put into the boat. Meanwhile, on a piece of millimetre paper, the bottom had been planked and could be sanded into shape.


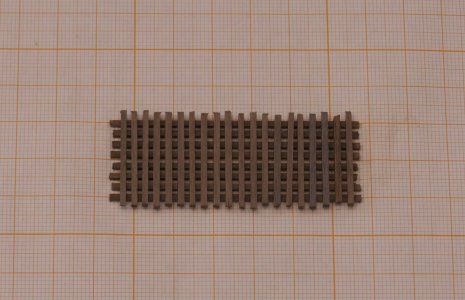
For placing the (fake) rafters, I used two strips of millimetric paper to apply the correct distribution.

And then the painting work begins.
For the coiled rope, I use an inverted piece of tape, with a drill in it, to which I attach one end of the rope. Then, little by little, twist around and use tweezers to press the rope onto the tape. When done, smear it with diluted wood glue.

The straps are already preformed in the brass etching plates. First paint with primer and then paint white and add a red dot. By the way, I recommend priming all brass work first so that the paint adheres better. I did not do this at first (yet) and found that the paint did not adhere well to some parts.

I made the wale around the barque from a 4x0.5mm strip of walnut, which I first wetted and bent into the right shape. I then painted this gold and then applied the two olive-green edges to it.
In the photo below, the keel can also be clearly seen. The original keel is almost impossible to maintain while sanding the first and second planking. I chose to sand away the existing keel completely, and apply a (fake) keel later when the boat is in the right shape. What remains in the picture is the rudder. That is still to come.

As usual, the last thing everything gets another coat of matt clear varnish, which, among other things, removes all the shiny stains from the superglue.

And finally, all ingredients are brought on board and secured with varnish.

De sloep is inmiddels ook helemaal af en ingericht. Om een idee te krijgen, heb ik alvast een plek boven de kuil uitgemeten, samen met de bak.


The second planking of the pinnacle has also been applied, but it still has to be finished. I have just started on the cutter. The 1st planking is on. The roster is in front of the cutter.


Last edited:
Hi Will27 The sloops
In between business, I started working on one of the four sloops. The construction description speaks of the following names: launch, barge, pinnace and cutter.
All 4 are very different and it is recommended to work on only one sloop at a time.
View attachment 527457
View attachment 527458
First I glued the bulkheads and keel together again, after which the first planking could begin. I had glued the boat on a support, thinking this would be easier and it would be easier to keep the whole thing straight. Not so, you can't move in any direction with your clamps. So I took everything off the support again.
View attachment 527459
View attachment 527460
Then I found out that the rear bulkhead was not in the right place, so I ended up with a sloop with a sharp rear end. I adjusted things again and started again with the first planking.
View attachment 527461
View attachment 527462
Then started the second planking with 3x0.5 mm slats.
View attachment 527463
View attachment 527464
The 4 sloops should all eventually be placed on the skid beams above the pit. There is a drawing in the building instructions of how this should be done. They will then lie tightly against each other. Now that I have finished one sloop, I wonder if this will work. We shall see.
Question: Does anyone know how these sloops were secured to the deck? The underlying boat cleats are included, but no doubt there will be ropework involved.
Meanwhile, the barge is ready and furnished.
Once the second planking was ready, the top part of the bulkheads could be broken out of the boat, after which the bottom could be put into the boat. Meanwhile, on a piece of millimetre paper, the bottom had been planked and could be sanded into shape.
View attachment 527465
View attachment 527466
For placing the (fake) rafters, I used two strips of millimetric paper to apply the correct distribution.
View attachment 527468
And then the painting work begins.
For the coiled rope, I use an inverted piece of tape, with a drill in it, to which I attach one end of the rope. Then, little by little, twist around and use tweezers to press the rope onto the tape. When done, smear it with diluted wood glue.
View attachment 527469
The straps are already preformed in the brass etching plates. First paint with primer and then paint white and add a red dot. By the way, I recommend priming all brass work first so that the paint adheres better. I did not do this at first (yet) and found that the paint did not adhere well to some parts.
View attachment 527470
I made the wale around the barque from a 4x0.5mm strip of walnut, which I first wetted and bent into the right shape. I then painted this gold and then applied the two olive-green edges to it.
In the photo below, the keel can also be clearly seen. The original keel is almost impossible to maintain while sanding the first and second planking. I chose to sand away the existing keel completely, and apply a (fake) keel later when the boat is in the right shape. What remains in the picture is the rudder. That is still to come.
View attachment 527471
As usual, the last thing everything gets another coat of matt clear varnish, which, among other things, removes all the shiny stains from the superglue.
View attachment 527472
And finally, all ingredients are brought on board and secured with varnish.
View attachment 527473
De sloep is inmiddels ook helemaal af en ingericht. Om een idee te krijgen, heb ik alvast een plek boven de kuil uitgemeten, samen met de bak.
View attachment 527475
View attachment 527476
View attachment 527477
The second planking of the pinnacle has also been applied, but it still has to be finished. I have just started on the cutter. The 1st planking is on. The roster is in front of the cutter.
View attachment 527498
View attachment 527478
View attachment 527479
View attachment 527480
Nicely done
you are moving fast ...
Bravo on the ships boats Wil. At a 1:72 scale these are beautifully detailed and accurate. Cheers Grant27 The sloops
In between business, I started working on one of the four sloops. The construction description speaks of the following names: launch, barge, pinnace and cutter.
All 4 are very different and it is recommended to work on only one sloop at a time.
View attachment 527457
View attachment 527458
First I glued the bulkheads and keel together again, after which the first planking could begin. I had glued the boat on a support, thinking this would be easier and it would be easier to keep the whole thing straight. Not so, you can't move in any direction with your clamps. So I took everything off the support again.
View attachment 527459
View attachment 527460
Then I found out that the rear bulkhead was not in the right place, so I ended up with a sloop with a sharp rear end. I adjusted things again and started again with the first planking.
View attachment 527461
View attachment 527462
Then started the second planking with 3x0.5 mm slats.
View attachment 527463
View attachment 527464
The 4 sloops should all eventually be placed on the skid beams above the pit. There is a drawing in the building instructions of how this should be done. They will then lie tightly against each other. Now that I have finished one sloop, I wonder if this will work. We shall see.
Question: Does anyone know how these sloops were secured to the deck? The underlying boat cleats are included, but no doubt there will be ropework involved.
Meanwhile, the barge is ready and furnished.
Once the second planking was ready, the top part of the bulkheads could be broken out of the boat, after which the bottom could be put into the boat. Meanwhile, on a piece of millimetre paper, the bottom had been planked and could be sanded into shape.
View attachment 527465
View attachment 527466
For placing the (fake) rafters, I used two strips of millimetric paper to apply the correct distribution.
View attachment 527468
And then the painting work begins.
For the coiled rope, I use an inverted piece of tape, with a drill in it, to which I attach one end of the rope. Then, little by little, twist around and use tweezers to press the rope onto the tape. When done, smear it with diluted wood glue.
View attachment 527469
The straps are already preformed in the brass etching plates. First paint with primer and then paint white and add a red dot. By the way, I recommend priming all brass work first so that the paint adheres better. I did not do this at first (yet) and found that the paint did not adhere well to some parts.
View attachment 527470
I made the wale around the barque from a 4x0.5mm strip of walnut, which I first wetted and bent into the right shape. I then painted this gold and then applied the two olive-green edges to it.
In the photo below, the keel can also be clearly seen. The original keel is almost impossible to maintain while sanding the first and second planking. I chose to sand away the existing keel completely, and apply a (fake) keel later when the boat is in the right shape. What remains in the picture is the rudder. That is still to come.
View attachment 527471
As usual, the last thing everything gets another coat of matt clear varnish, which, among other things, removes all the shiny stains from the superglue.
View attachment 527472
And finally, all ingredients are brought on board and secured with varnish.
View attachment 527473
De sloep is inmiddels ook helemaal af en ingericht. Om een idee te krijgen, heb ik alvast een plek boven de kuil uitgemeten, samen met de bak.
View attachment 527475
View attachment 527476
View attachment 527477
The second planking of the pinnacle has also been applied, but it still has to be finished. I have just started on the cutter. The 1st planking is on. The roster is in front of the cutter.
View attachment 527498
View attachment 527478
View attachment 527479
View attachment 527480
- Joined
- Jul 17, 2024
- Messages
- 75
- Points
- 113

Hello Allan,Very neat work. Is the below photo that you posted the pinnace? Thanks
Allan
This is indeed the pinas.
I see that you’ve been active on this forum for about a year now. Are you by any chance also working on the Victory? What’s the reason for this question?
- Joined
- Jul 17, 2024
- Messages
- 75
- Points
- 113

28 The Gunport Hatches
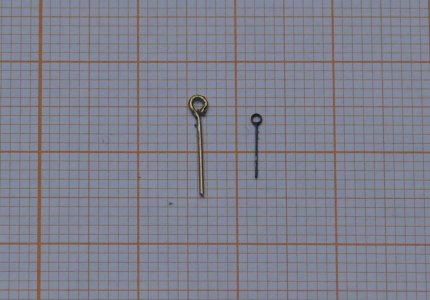
The hatches: The kit contains very tiny eye bolts that are extremely delicate and flimsy. I tried using them on the guns, but it was not a success. Has anyone had experience with these eye bolts?
For the guns and the rest of the work inside the hull, I used 11 mm eye bolts from Billing. These are actually too large for the guns, but they seem fine as anchor points for rigging coming from the masts. For the gunport hatches, they’re certainly too big, I think.
Earlier on, when the hull could still be tilted, I sized all the hatches accordingly. On some hatches, the wales are interrupted. I continued this profile on the corresponding hatches. Everything was numbered and neatly stored in separate containers for port and starboard for later use.
And now, later has arrived. A project I’ve been dreading for a long time. A lot of repetitive work and very fragile. But the installation of the railings around the ship reassured me. These offer sufficient protection for later on. So in fact, the hull can now be fully completed before I start on the masts and rigging.
To begin, I took a long strip of leftover plywood and marked the numbering of the hatches on it. After each step, the lid can go back in its slot.
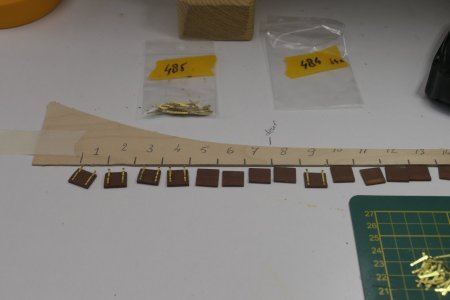
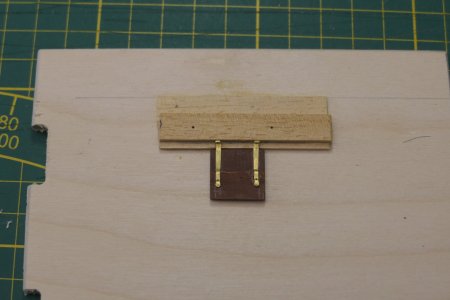
I made a small template for installing the hinges, so that all hinges stick out the same amount on each lid.
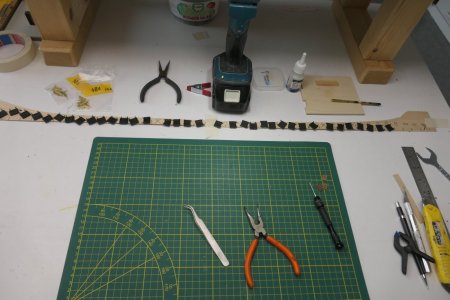
At this point, the hatches on the starboard side have been painted black once on the outside, and they still need a second coat. The inside and the surrounding edges will be painted reddish brown.
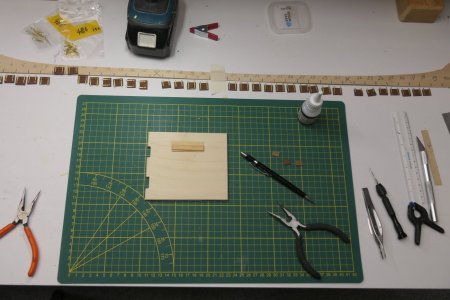
In the above photo it’s hard to see, but the holes for the eye bolts with the ropes are already there. There are only 78 hatches, since not all gunports will have hatches.
All the hatches are now finished and ready to be mounted. The dummy cannons on the lower and middle gun decks are installed. However, I’ve postponed attaching the hatches. I still find it too fragile, and I can always do it later.
In other words, the hull is now completely finished. I’ve checked everything again and as far as I can tell, nothing has been overlooked.
The hatches: The kit contains very tiny eye bolts that are extremely delicate and flimsy. I tried using them on the guns, but it was not a success. Has anyone had experience with these eye bolts?
For the guns and the rest of the work inside the hull, I used 11 mm eye bolts from Billing. These are actually too large for the guns, but they seem fine as anchor points for rigging coming from the masts. For the gunport hatches, they’re certainly too big, I think.

Earlier on, when the hull could still be tilted, I sized all the hatches accordingly. On some hatches, the wales are interrupted. I continued this profile on the corresponding hatches. Everything was numbered and neatly stored in separate containers for port and starboard for later use.
And now, later has arrived. A project I’ve been dreading for a long time. A lot of repetitive work and very fragile. But the installation of the railings around the ship reassured me. These offer sufficient protection for later on. So in fact, the hull can now be fully completed before I start on the masts and rigging.
To begin, I took a long strip of leftover plywood and marked the numbering of the hatches on it. After each step, the lid can go back in its slot.

I made a small template for installing the hinges, so that all hinges stick out the same amount on each lid.

At this point, the hatches on the starboard side have been painted black once on the outside, and they still need a second coat. The inside and the surrounding edges will be painted reddish brown.

In the above photo it’s hard to see, but the holes for the eye bolts with the ropes are already there. There are only 78 hatches, since not all gunports will have hatches.
All the hatches are now finished and ready to be mounted. The dummy cannons on the lower and middle gun decks are installed. However, I’ve postponed attaching the hatches. I still find it too fragile, and I can always do it later.
In other words, the hull is now completely finished. I’ve checked everything again and as far as I can tell, nothing has been overlooked.

Last edited:
Indeed very tedious work28 The Gunport Hatches
The hatches: The kit contains very tiny eye bolts that are extremely delicate and flimsy. I tried using them on the guns, but it was not a success. Has anyone had experience with these eye bolts?
For the guns and the rest of the work inside the hull, I used 11 mm eye bolts from Billing. These are actually too large for the guns, but they seem fine as anchor points for rigging coming from the masts. For the gunport hatches, they’re certainly too big, I think.
View attachment 529001
Earlier on, when the hull could still be tilted, I sized all the hatches accordingly. On some hatches, the wales are interrupted. I continued this profile on the corresponding hatches. Everything was numbered and neatly stored in separate containers for port and starboard for later use.
And now, later has arrived. A project I’ve been dreading for a long time. A lot of repetitive work and very fragile. But the installation of the railings around the ship reassured me. These offer sufficient protection for later on. So in fact, the hull can now be fully completed before I start on the masts and rigging.
To begin, I took a long strip of leftover plywood and marked the numbering of the hatches on it. After each step, the lid can go back in its slot.
View attachment 529005
I made a small template for installing the hinges, so that all hinges stick out the same amount on each lid.
View attachment 529003
At this point, the hatches on the starboard side have been painted black once on the outside, and they still need a second coat. The inside and the surrounding edges will be painted reddish brown.
View attachment 529004
In the above photo it’s hard to see, but the holes for the eye bolts with the ropes are already there. There are only 78 hatches, since not all gunports will have hatches.
All the hatches are now finished and ready to be mounted. The dummy cannons on the lower and middle gun decks are installed. However, I’ve postponed attaching the hatches. I still find it too fragile, and I can always do it later.
In other words, the hull is now completely finished. I’ve checked everything again and as far as I can tell, nothing has been overlooked.
View attachment 529002
Looking good
HiI see that you’ve been active on this forum for about a year now. Are you by any chance also working on the Victory? What’s the reason for this question?
I built Victory from scratch twice, between 1978 and 1980, but that was a long time ago. I doubt I would ever build another 1st rate.
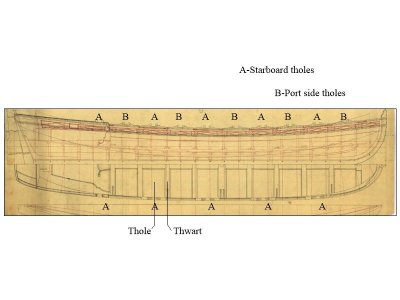
I realize this may be a kit error, but the reason I asked is the boat in the photo is double banked and pinnaces were single banked. Also, the tholes are even with the thwarts so the rowers could not row the boat. Example of a contemporary drawing of a pinnace and the location of the thwarts is below.
Attachments
- Joined
- Jul 17, 2024
- Messages
- 75
- Points
- 113

Helo Allan,
That's very attentive of you.
A point of attention by my next project,
That's very attentive of you.
A point of attention by my next project,
From the hundreds of build logs we see, it is usually a good idea to check contemporary information such as drawings IF that kind of thing is interesting to you. Do what YOU enjoy doing. Research is something some people enjoy, others do not, and after all, building a model is a hobby for most folks, not a science project or history course. 
Allan
Allan
- Joined
- Jul 17, 2024
- Messages
- 75
- Points
- 113

Hello Allan,
The drawings that come with the Caldercraft kit also indicate what you mentioned above. I’ve just checked my model to see how I did it with the other boats. These three boats are correctly done, the thole pins are positioned between the benches. With the pinnace, however, I did indeed make a mistake, here the thole pin is above the benches. But the pinnace is already fully fitted out and fixed on the deck, so I’m not going to change that anymore. I think this choice is reasonably acceptable.
Thank you for your attention
- Joined
- Jul 17, 2024
- Messages
- 75
- Points
- 113

29 Making your own rope
Meanwhile, I have also decided to start making my own rope. For this, I will apprentice myself to a couple of master rope makers, in particular Stephan Kertez (Steef66). The idea is that I will build the rope walk (machine) myself and then practice a lot to master the whole process. The yarn and parts of the rope walk have already been ordered. I am very much looking forward to this.
In Amsterdam, I got my hands on my construction kit for my rope walk and during the demo at the Maritime Museum, I made my first rope walk.
At home, I start working on the stuff and then it turns out that things had to be slightly different from what I had in mind. So I take it apart again and start all over again. It's just like modelling.
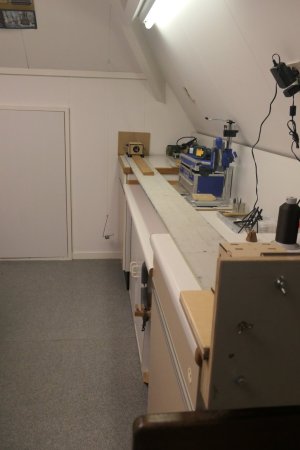
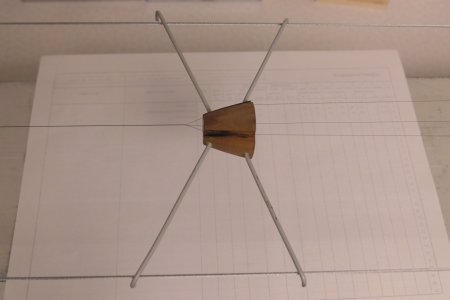
In the end, I made a rope walk, on which I can, for the time being, make rope of about 2 metres in length, a nice size for practice because you walk up and down a bit, I have noticed. I can later expand the rope walk by about 2.5 metres, but first I need to master the technique of rope-walking, and that's not easy yet.
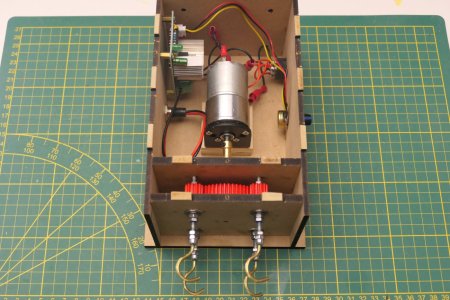
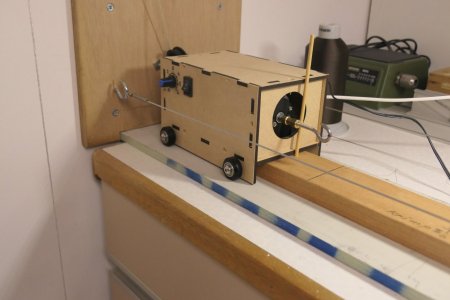
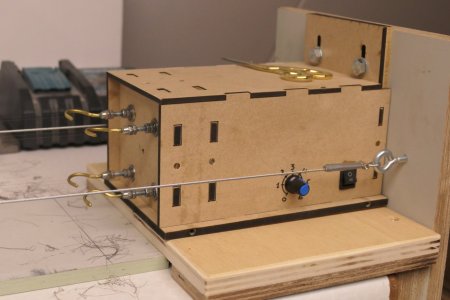
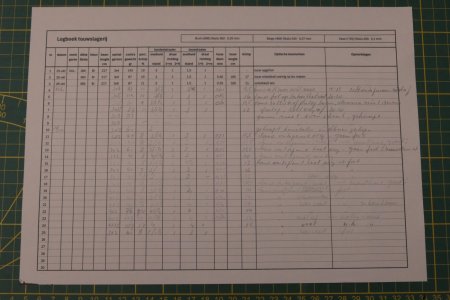
The pictures below give a small impression of this structure with a logbook of all the findings at the end.
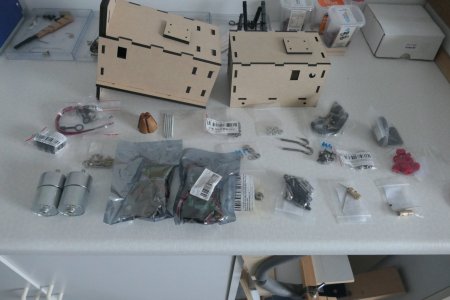
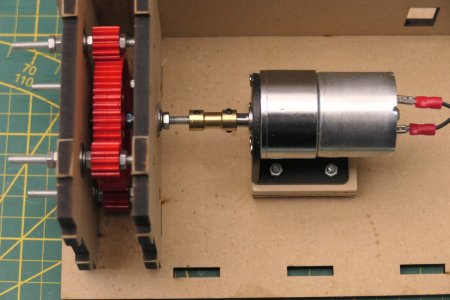
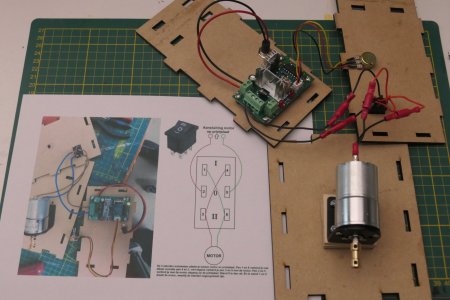
In those days I read through Serikoff's building report on SOS. My first impression is that Sergey (Ukrainian) does a lot of study into all kinds of aspects of building a Victory and is also a true perfectionist. The results, he shows, are at times astonishing. But enough about the man.
In his build report, Sergey makes a whole argument about colouring the ropes. He starts from white rope and coloured to taste. In doing so, he points out that black rope is also just a bit black and in fact unrealistic.
In fairness, I must say that Sergey has a point with this, I think, but I would like to hear your opinion on this.
Now, I myself have now taken up rope walking, so I have complete freedom to choose what will later be hung in the masts. Not that I am going to colour rope myself, but at the moment I have three colours at my disposal, namely:
Scala 360 colour 696 (brown)
Scala 240 colour 464 (beige)
Scala 200 colour 702 (black)
So my question to you guys is: do I choose brown or black. What do you guys think about this?
Put another way, "Is the colour of the shrouds (after tying, griefing & cladding" in reality more black than brown, or more brown than black?
Usually the conclusion then is that it is a matter of personal taste, and often it is, of course. The best example, of course, is the yellow colour or pink, as some also find.
After all, the difference between new and weathered is very subjective.
I'm just going to do some trials with the colours I have.
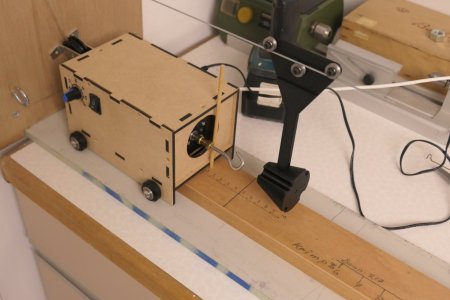
The photos of my rope walk show that the taper runs over two steel cables.
However, I am not enthusiastic about this construction. The cables make accessibility of the hooks on the trolley turner difficult and the cone moves erratically, which in my opinion is not conducive to the process.
Therefore, I am going to modify this construction by suspending a new cone on one higher cable and adding ball bearings to the running gear.
To be continued
Update rope walk.
Meanwhile, my rope bearing has been fitted with a taper, running over a steel cable suspended above. Thanks to wonderful 3D printing work by Stephan (Steef66). Initially, the trolley did not run smoothly, but further inspection revealed that one of the v-bearings was not rotating smoothly. The cause of this was the small washers between the screw and the bearing. Due to the stamping, these were not flat but slightly convex, so that not the inner ring, but also the rotating intermediate ring was clamped. Turning these washers around solved the problem. Runs nicely light now.
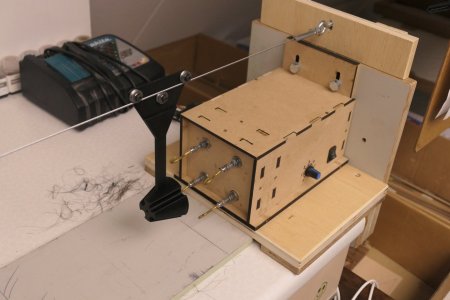
By now I am about 75 ropes further along in my experimentation phase and I am starting to get a bit of a view of the process, but I am still far from there. The ropes made are not yet of good quality. There are many knobs that can be turned in this process. But at the moment, the rope walk is running smoothly, which is the most important thing at the moment.
PS
To build my ropewalk, I was trained by Stephan Kertez. I have greatly benefited from Stephan’s knowledge, which he had already shared on this forum before. For those who are interested, his build log “Make your rope on a rope walk” is highly recommended: https://shipsofscale.com/sosforums/threads/make-your-rope-on-a-rope-walk.9094/
Building your own ropewalk is also highly recommended.
Therefore, I owe special thanks to Stephan for his practical advice.
Meanwhile, I have also decided to start making my own rope. For this, I will apprentice myself to a couple of master rope makers, in particular Stephan Kertez (Steef66). The idea is that I will build the rope walk (machine) myself and then practice a lot to master the whole process. The yarn and parts of the rope walk have already been ordered. I am very much looking forward to this.
In Amsterdam, I got my hands on my construction kit for my rope walk and during the demo at the Maritime Museum, I made my first rope walk.
At home, I start working on the stuff and then it turns out that things had to be slightly different from what I had in mind. So I take it apart again and start all over again. It's just like modelling.
In the end, I made a rope walk, on which I can, for the time being, make rope of about 2 metres in length, a nice size for practice because you walk up and down a bit, I have noticed. I can later expand the rope walk by about 2.5 metres, but first I need to master the technique of rope-walking, and that's not easy yet.
The pictures below give a small impression of this structure with a logbook of all the findings at the end.


In those days I read through Serikoff's building report on SOS. My first impression is that Sergey (Ukrainian) does a lot of study into all kinds of aspects of building a Victory and is also a true perfectionist. The results, he shows, are at times astonishing. But enough about the man.
In his build report, Sergey makes a whole argument about colouring the ropes. He starts from white rope and coloured to taste. In doing so, he points out that black rope is also just a bit black and in fact unrealistic.
In fairness, I must say that Sergey has a point with this, I think, but I would like to hear your opinion on this.
Now, I myself have now taken up rope walking, so I have complete freedom to choose what will later be hung in the masts. Not that I am going to colour rope myself, but at the moment I have three colours at my disposal, namely:
Scala 360 colour 696 (brown)
Scala 240 colour 464 (beige)
Scala 200 colour 702 (black)
So my question to you guys is: do I choose brown or black. What do you guys think about this?
Put another way, "Is the colour of the shrouds (after tying, griefing & cladding" in reality more black than brown, or more brown than black?
Usually the conclusion then is that it is a matter of personal taste, and often it is, of course. The best example, of course, is the yellow colour or pink, as some also find.
After all, the difference between new and weathered is very subjective.
I'm just going to do some trials with the colours I have.
The photos of my rope walk show that the taper runs over two steel cables.
However, I am not enthusiastic about this construction. The cables make accessibility of the hooks on the trolley turner difficult and the cone moves erratically, which in my opinion is not conducive to the process.
Therefore, I am going to modify this construction by suspending a new cone on one higher cable and adding ball bearings to the running gear.
To be continued
Update rope walk.
Meanwhile, my rope bearing has been fitted with a taper, running over a steel cable suspended above. Thanks to wonderful 3D printing work by Stephan (Steef66). Initially, the trolley did not run smoothly, but further inspection revealed that one of the v-bearings was not rotating smoothly. The cause of this was the small washers between the screw and the bearing. Due to the stamping, these were not flat but slightly convex, so that not the inner ring, but also the rotating intermediate ring was clamped. Turning these washers around solved the problem. Runs nicely light now.


By now I am about 75 ropes further along in my experimentation phase and I am starting to get a bit of a view of the process, but I am still far from there. The ropes made are not yet of good quality. There are many knobs that can be turned in this process. But at the moment, the rope walk is running smoothly, which is the most important thing at the moment.
PS
To build my ropewalk, I was trained by Stephan Kertez. I have greatly benefited from Stephan’s knowledge, which he had already shared on this forum before. For those who are interested, his build log “Make your rope on a rope walk” is highly recommended: https://shipsofscale.com/sosforums/threads/make-your-rope-on-a-rope-walk.9094/
Building your own ropewalk is also highly recommended.
Therefore, I owe special thanks to Stephan for his practical advice.
Last edited:


![IMG_20250618_113812[1].jpg IMG_20250618_113812[1].jpg](https://shipsofscale.com/sosforums/data/attachments/510/510160-771ef2b476a68957d3d76031644d8dc6.jpg?hash=oYRnMvmhCC)


