-

Win a Free Custom Engraved Brass Coin!!!
As a way to introduce our brass coins to the community, we will raffle off a free coin during the month of August. Follow link ABOVE for instructions for entering.
-

PRE-ORDER SHIPS IN SCALE TODAY!
The beloved Ships in Scale Magazine is back and charting a new course for 2026!
Discover new skills, new techniques, and new inspirations in every issue.
NOTE THAT OUR FIRST ISSUE WILL BE JAN/FEB 2026
You are using an out of date browser. It may not display this or other websites correctly.
You should upgrade or use an alternative browser.
You should upgrade or use an alternative browser.
Le Saint Philippe 1693 after Jean-Claude Lemineur (Ancre) in scale 1:48
- Thread starter dockattner
- Start date
- Watchers 80
-
- Tags
- 1:48 ancre saint philippe
- Joined
- Sep 10, 2024
- Messages
- 1,022
- Points
- 393

Is finishing really necessary? Your wood surfaces look so well finished au naturel that they could be allowed to patinize naturally over time with exceedingly satisfying results. No need to gild the lily. Your joinery and wood surfaces speak for themselves.
Paul, I have to agree with Peter here. With the care that you have taken in preparing the surfaces of your parts, any finish you put on her (or no finish at all) will look fantastic. I know that you're after "that perfect finish" and I fully understand what you're going through. I often spend more time trying to work out what I'm going to do so that it is perfect, rather than actually doing something.
 Don't stress about it, no matter what you do, you still rank in the top tier of craftsman on this forum!
Paul your model sure brings the structural elements into focus. I might have a hard time covering any of that beautiful pear with anything other than a clear mat poly and let the pear darken naturally.Hello Friends,
As I continue to explore wood finishing options (translation: throwing good money after bad) work continues on the Saint Philippe stern section model.
I have now emotionally committed to working on the exterior hull planking as my next major effort (translation: kicking the can down the road on the wood finishing decision). But I had already begun work on the rider frames and flat crotches so I thought it would be best to wrap those up before starting something new (translation: if I don't finish these now, I'll forget how to do what I am doing).
Here is where I am at the conclusion of the weekend:
View attachment 551451
View attachment 551452
I'm sure you noticed the gap between the rider frames and hull framing. This is intentional. The rider frames actually sit on the ceiling strakes - but I'm not installing ceiling strakes - thus the gap.
I had hoped to show you one more rider frame (actually, two half rider frames) that sit on the upper flat crotch. Unfortunately, while working on these half frames, I cut the fairing bevel in the wrong direction. Double unfortunately, I have now used up the pearwood panels needed for the frames (6.2 mm thick) so I am back to being a woodworker instead of a modeler. Not a major set-back, but still frustrating.
Thanks for stopping by!
Thanks for this nice post, Jim! Indeed, there was some colorful muttering when I tried to fit the new parts to the ship...Ha! I can completely relate to your “translation mode,” Paul — I think we’ve all been there. It sounds like you’re handling the Saint Philippe project with both patience and humor, which is half the battle with these complex POF builds.
As for the fairing bevel mishap, that’s the kind of “character-building exercise” every woodworker knows too well (translation: muttering under your breath while pretending it’s part of the plan). The rider frames and crotches are looking great, though — even with the missing ceiling strakes, your approach makes perfect sense.
Looking forward to seeing how the exterior planking unfolds once you’ve recovered from your woodworking detour!
Is finishing really necessary? Your wood surfaces look so well finished au naturel that they could be allowed to patinize naturally over time with exceedingly satisfying results. No need to gild the lily. Your joinery and wood surfaces speak for themselves.
 Didn't you make or refinish furniture in an earlier life? Your suggestion is well-reasoned but unexpected given the source.
Don't obsess? Is that an option?Yup Paul - continue building and dont obsess on the finish - its looking really nice regardless of your choice
You too, Daniel!?! Don't worry, I won't paint it!Paul your model sure brings the structural elements into focus. I might have a hard time covering any of that beautiful pear with anything other than a clear mat poly and let the pear darken naturally.
Thanks, Russ. I have a box of goodies arriving tomorrow. I frankly hate doing trials but in this case it seems warranted. Less is more will certainly prevail.Paul, I have to agree with Peter here. With the care that you have taken in preparing the surfaces of your parts, any finish you put on her (or no finish at all) will look fantastic. I know that you're after "that perfect finish" and I fully understand what you're going through. I often spend more time trying to work out what I'm going to do so that it is perfect, rather than actually doing something.Don't stress about it, no matter what you do, you still rank in the top tier of craftsman on this forum!
- Joined
- Sep 3, 2021
- Messages
- 5,191
- Points
- 738

Guess your wife has very high standards.My wife assures me I am mediocre. I use that for calibration.
Or offers grace beyond measure.Guess your wife has very high standards.
- Joined
- Jun 17, 2021
- Messages
- 3,200
- Points
- 588

Most of the antiques I restored, 18th-19thc., had shellac finishes, which I restored. Lots of tedious sanding with fine sandpaper. (Any scratches you put in you have to take out.) So many hours of tedious rubbing with slightly worn fine sandpaper required. Then amalgamating and polishing with either blond and/or amber shellac, or a mix. I used Zinsser off the shelf. Always bought small quantities. it has a limited shelf life. Mixing my own was a waste of time and effort, better spent on the considerable amount of time required in the physical labor of getting a job done and out the door.
Caveat: The amber color builds up and intensifies faster than you'd think.
Caveat: The amber color builds up and intensifies faster than you'd think.
Thanks for the tip, Peter.Most of the antiques I restored, 18th-19thc., had shellac finishes, which I restored. Lots of tedious sanding with fine sandpaper. (Any scratches you put in you have to take out.) So many hours of tedious rubbing with slightly worn fine sandpaper required. Then amalgamating and polishing with either blond and/or amber shellac, or a mix. I used Zinsser off the shelf. Always bought small quantities. it has a limited shelf life. Mixing my own was a waste of time and effort, better spent on the considerable amount of time required in the physical labor of getting a job done and out the door.
Caveat: The amber color builds up and intensifies faster than you'd think.
Thanks, Gunther. The learning curve is pretty steep for me - but I'm making progress.Hey Paul,
that's what I call modelling. Beautifully realised!!! But I'm just as excited as you are about your finish! I'm impressed!
I had the day off today, so there was bonus time in the shipyard.
This now brings the previously aborted fabrication of rider frames and flat crotches to a satisfying conclusion (notwithstanding the part where I sanded off a little bit of my finger ).
).


Everything is just sitting there loose and will now be removed to a safe place pending final installation.
Next up: back to the monograph to research stern planking along with the wales and hull planking.
Thanks for stopping by!
This now brings the previously aborted fabrication of rider frames and flat crotches to a satisfying conclusion (notwithstanding the part where I sanded off a little bit of my finger


Everything is just sitting there loose and will now be removed to a safe place pending final installation.
Next up: back to the monograph to research stern planking along with the wales and hull planking.
Thanks for stopping by!
- Joined
- Sep 10, 2024
- Messages
- 1,022
- Points
- 393

No pain, no gain, right?(notwithstanding the part where I sanded off a little bit of my finger)
I know you've heard it a thousand times, but here's 1001 - beautiful - simply beautiful!
Just curious, how fine do you go with the sandpaper?
Thanks, Russ. Nothing past 220 at this point.No pain, no gain, right?
I know you've heard it a thousand times, but here's 1001 - beautiful - simply beautiful!
Just curious, how fine do you go with the sandpaper?
- Joined
- Jun 17, 2021
- Messages
- 3,200
- Points
- 588

Beautiful! And such nice crisp joinery. It holds itself together like Chinese joinery. No glue!
Good morning Paul. I've followed your builds for a few years now and have come to expect nothing short of brilliance. When I ride MTB downhill with my son and his friends I always get that "no way- how do they ride like that" feeling. I have that same feeling watching this build. Cheers GrantI had the day off today, so there was bonus time in the shipyard.
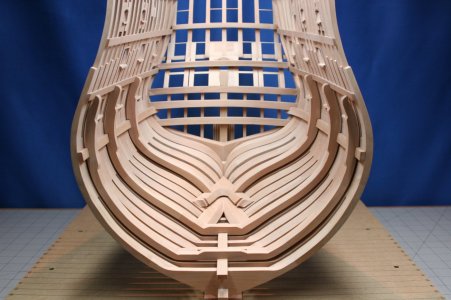
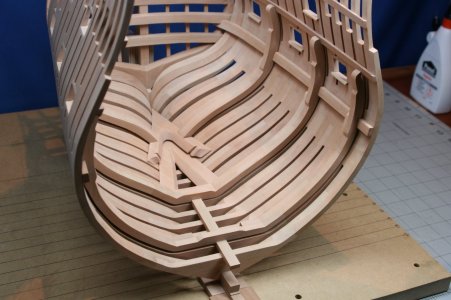
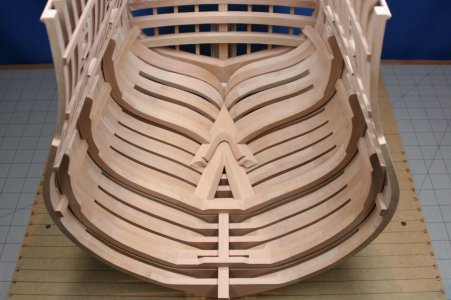
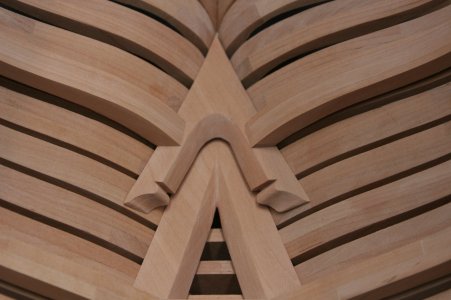
This now brings the previously aborted fabrication of rider frames and flat crotches to a satisfying conclusion (notwithstanding the part where I sanded off a little bit of my finger).
View attachment 552061
View attachment 552064
View attachment 552062
View attachment 552063
Everything is just sitting there loose and will now be removed to a safe place pending final installation.
Next up: back to the monograph to research stern planking along with the wales and hull planking.
Thanks for stopping by!
Just a house of cards. Ten seconds after the photo half the ship was on the floorBeautiful! And such nice crisp joinery. It holds itself together like Chinese joinery. No glue!
 .
.Thanks for this very nice post, Grant. I have the 'no way' feeling every time I look at the drawingsGood morning Paul. I've followed your builds for a few years now and have come to expect nothing short of brilliance. When I ride MTB downhill with my son and his friends I always get that "no way- how do they ride like that" feeling. I have that same feeling watching this build. Cheers Grant
To quote a Russian proverb: the eyes are afraid, but the hands are doing.


