1/200 Titanic hull painted

Have finished painting the hull apart from small details i.e the yellow line between the hull and superstructure of my 1/200 Titanic.
Now working on painting all of the superstructure.
Played around with lighting the inside of the hull to see the effect.
Next big job is to pre cut acrylic rods and insert into the portholes and transparent sheet to fit into all the superstructure windows.
Should be a challenge.View attachment 159068View attachment 159069View attachment 159070View attachment 159071View attachment 159072
Today I managed to spray the funnels on my 1/200 Trumperter Titanic.

I think I got the Buff colour as close as I am going to get it.

The pictures don’t show the colour as it is in day light, but give a pretty good idea.

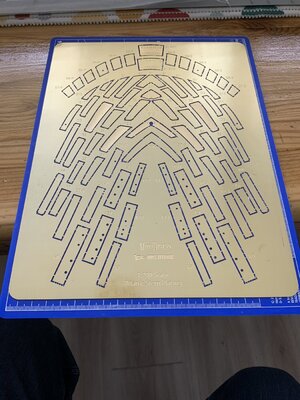
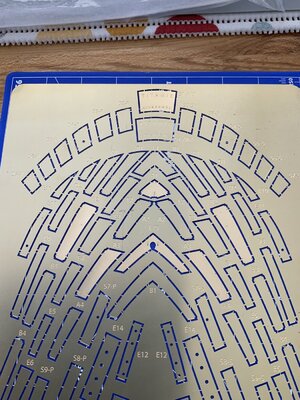
Received the Pontos detail set from China, which is incredibly well boxed, and contains a lot of nicely made parts.

One thing I would say is that I think the propellers are too small.

On opening the box I noticed that one piece of the photo etched had been cut out of one of the frets.
which I can’t understand why.

I have also ordered the KA models detail set with all the resin fittings so I am going to wait until I get that before I make a decision as to what I am going to use.

Hope you all have a pleasant weekend./QUOTE]

Ouch, that cost a bit, both the Pontos and KA.
 
Hi Richard,
For the hull I used Tamiya TS 63 Nato Black
Tamiya white primer for the all the superstructure
A metal primer for the red anit fouling colour on the bottom
The White Star buff on the funnels is really a matter of "trial and error".
I used Italeri acrylic paint.
Is it 100% correct, NO, but it's as close as I am going to get it.

I hope this is helpful.

Beau.
 
Last edited:
Hi Guys,

I have just received the KA Models / MK1 design detail set for the 1/200 Trumpeter Titanic.
The detail on the resin parts is outstanding, the photo etched parts are superbly made and the wooden decks look really good.
The only thing I have found that I don’t think is correct is the rudder.
I think the rudder is too thin and quite flimsy, apart from that everything Looks really well designed and will enhance the model to a whole new level.
Well worth waiting for, so now there are no more excuses. I guess I will have to get stuck in and make it happen.
Beau.

99121E73-4E99-46FE-ACB2-F9E8EB98E588.jpeg
 
Last edited by a moderator:
Have finished painting the hull apart from small details i.e the yellow line between the hull and superstructure of my 1/200 Titanic.
Now working on painting all of the superstructure.
Played around with lighting the inside of the hull to see the effect.
Next big job is to pre cut acrylic rods and insert into the portholes and transparent sheet to fit into all the superstructure windows.
Should be a challenge.View attachment 159068View attachment 159069View attachment 159070View attachment 159071View attachment 159072
Nice!
But cutting clear rods to make windows?
Why not use liquid glass?
I've used this to fill almost all portholes in boats.
Must take a look get the right name of this product.
Best Theo
 
Hi Guys,

An observation I have made.
If you are using the wooden decks from the KA models detail set for the 1/200 Titanic,
make sure the fore deck and aft deck are completely smooth as the positions for the deck bollards don’t line up on the plastic deck.
I Have removed the wood in the areas where the deck bollards go and the same goes for fairleads and deck capstans, there will be plenty of adjustments to make.

You will need to drill two wholes for the anchor chains so when they are put around the anchor winches. ”see picture’ the ends can go down through the deck.
I hope this helps some of you.

Have a great weekend.

Beau.6E5AA3D5-4028-4BAC-86B6-167B9DE6FA6D.jpeg
 
Last edited:
Hi Guys,

I have just received the KA Models / MK1 design detail set for the 1/200 Trumpeter Titanic.
The detail on the resin parts is outstanding, the photo etched parts are superbly made and the wooden decks look really good.
The only thing I have found that I don’t think is correct is the rudder.
I think the rudder is too thin and quite flimsy, apart from that everything Looks really well designed and will enhance the model to a whole new level.
Well worth waiting for, so now there are no more excuses. I guess I will have to get stuck in and make it happen.
Beau.


I've seen a vid of a wooden deck glued onto the kit styrene and it began to unstick. I think, the deck would first need to be sanded with course sandpaper for the glue to stick. I'm afraid it would peel over time. White glue is typically made for paper/wood, not wood/styrene. The only advantage IMHO of white glue is you have time to move the deck around and place it but the proper prep work required to have better adherence that it may not be the best glue for the job.
 
Hi Guys,

An observation I have made.
If you are using the wooden decks from the KA models detail set for the 1/200 Titanic,
make sure the fore deck and aft deck are completely smooth as the positions for the deck bollards don’t line up on the plastic deck.
I Have removed the wood in the areas where the deck bollards go and the same goes for fairleads and deck capstans, there will be plenty of adjustments to make.

You will need to drill two wholes for the anchor chains so when they are put around the anchor winches. ”see picture’ the ends can go down through the deck.
I hope this helps some of you.

Have a great weekend.

Beau.View attachment 184789
I believe, Kit and KA decks have a self adhesive??? but, are you using them as is or using gorilla/white glue and what prep work did you do on the deck other than removing the recommended parts? Did you sand/remove the raised representation of the styrene deck planks??
 
Great paint Job. Also a great job on drilling the port holes, which I know is very difficult. Better than mine. Although I glued acrylic clear rod into each of mine. Not for the faint hearted I must say.

Regarding the lights, The lights that came with the kit are a joke as we all know. IMG_1216.jpgIMG_1670.jpgIMG_1668.jpgIMG_1666.jpgI have used micro LEDs. These are the 3v type that you often see as Christmas decoration in glass jars etc. they also come in long lengths. You can chop them all up and rewire them the way you want. The biggest advantage is that are Dimmable! NO additional restores needed! I have managed to get them into single cabins on the upper deck. I put them on clear acrylic sheets for the hull, with frosted acrylic over the top to diffuse. You can also use a Dremel to remove the acrylic blister and get them small enough for the bulkhead lights, if you don't mind a slight mismatch in scale. Once all installed, you can have the hull, cabin, navigation and exterior lights on different dimmer switches to get a nice overall brightness balance. I also downloaded images of same period rooms and printed them in miniature to decorate walls, floors and gangways etc. which worked fairly well. A few photos attached. I hope this helps those that want to go in this direction.
 
Have finished painting the hull apart from small details i.e the yellow line between the hull and superstructure of my 1/200 Titanic.
Now working on painting all of the superstructure.
Played around with lighting the inside of the hull to see the effect.
Next big job is to pre cut acrylic rods and insert into the portholes and transparent sheet to fit into all the superstructure windows.
Should be a challenge.
Hallo @Beau
we wish you the BEST and a HAPPY BIRTHDAY
Birthday-Cake
 
A tip with regards to the wooden decks is to use thinned gorilla wood glue to glue the deck down EVEN with the self adhesive decks. This will prevent the deck from lifting.

I believe you have to remove all the deck fittings anyway, to prep the deck for the KA fittings, I have just done that as well.
 
Yesterday I received the photo etched stern plating from Mini Brass and also ordered the funnels and the fore deck hatch from Model Monkey.
I am only going to use the plates that go around the top of the stern to correct the angle.
 

Attachments

  • 412F374A-363E-41A4-8F22-D9EEADE2275B.jpeg
    412F374A-363E-41A4-8F22-D9EEADE2275B.jpeg
    277.8 KB · Views: 21
  • 2BFBA062-28A3-49DF-8C38-E7E8C63AF7BB.jpeg
    2BFBA062-28A3-49DF-8C38-E7E8C63AF7BB.jpeg
    317.3 KB · Views: 21
Back
Top