Avro Anson Mk.1 - Plastic by Airfix in 1/48 Scale - Build by Smithy

to see what it would look like.

It’s a useful drawing Dean. Thanks for that. Skinny little thing ain’t it?

You could send me the file and I could get one printed by my son and make the control column look quite realistic. However, I know that I simply wouldn't enjoy doing it that way.

I asked myself why not? It's actually a far from simple question and unpicking the threads of my emotional/philosophical/technical/social/historical response to your offer will occupy my mind for quite a while. Stand by for an essay on the subject sometime soon. ;)
 
it has to be modeled

This is how I'm trying to model it right now.

P4150004.JPG

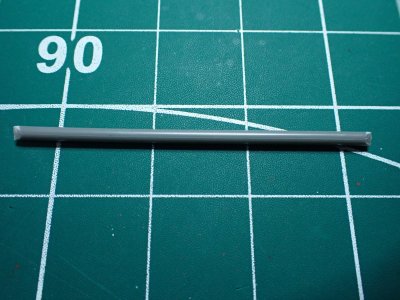
Take a piece of plastic sprue. (Strictly speaking that's a runner, not a sprue but we'll go with that general misunderstanding.)

P4150005.JPG

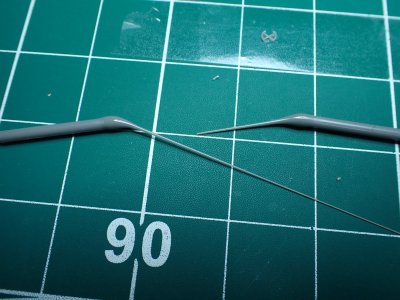
Heat it in the middle with a candle or cigarette lighter until it's softened exactly enough for the required final diameter. (Softer = thinner)

Cut to size (by eye) for the spokes.

Cut a thin slice from the thicker portion for the centre boss.

P4140002.JPG

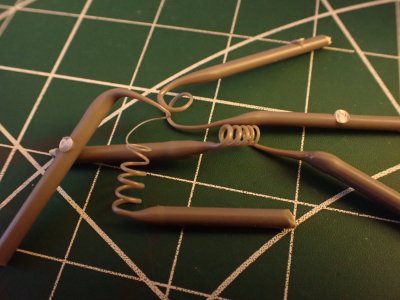
Repeat the process, winding the soft plastic around some round objects to form the curve of the hand grips.

Cut to size.

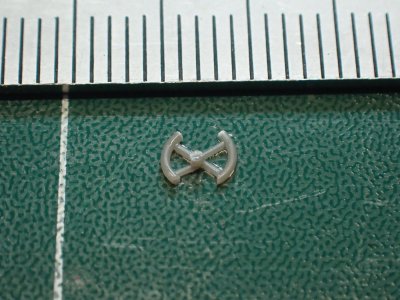
P4150003.JPG

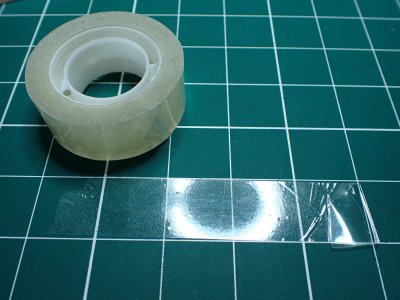
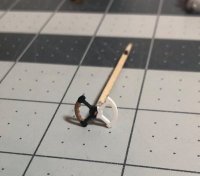
Make glue-proof working area with Sellotape.

P4150006.JPG

Assemble and glue with Tamiya Extra Thin cement.

Back slowly away from the bench while it dries out and hardens completely.

Offer up a prayer to the Modelling Gods that it won't stick to the tape.

To be continued...
 
Hi Smithy.

I noticed your earlier comment about how well maintained UK Ansons were. My late and much older brother was an airframe engineering apprentice (cadet) at RAF Halton (UK) in the late 1940's. Her told me that Halton was the 'go-to place' for Anson repairs and servicing, most of the work being used to train apprentices, consequently bent and poorly ones were flown of tracked in from all over the UK. They were always given the full treatment- re-paints, re-upholstery, engine rebuilds and a dish of complimentary peppermints. As 'transitional' aircraft in design they had many of the features of more modern aircraft but had the advantages of relative simplicity and also more room to work on things. He told me that as a youth he found that he could actually climb inside a partially dismantled engine nacelle and have a little sleep or smoke a Woodbine out of sight of the cadet sergeants who he described as 'evil monsters'.
 
an airframe engineering apprentice (cadet) at RAF Halton (UK) in the late 1940's.

I was almost that man.

I was an electrical and instrument fitter at RAF Halton (UK) in the early 1970's. Thirty years after your brother's time, the aircraft were more complex and the standards of hand skills had declined a little - no leather work, no welding, no fabric etc. However, some of the test pieces made by the wartime apprentices were displayed to inspire/demoralise us. They made their own micrometers back then while I struggled to hand file a simple brass rectangle to a tolerance of diddley squat. ROTF
 
P4150008[1].JPG

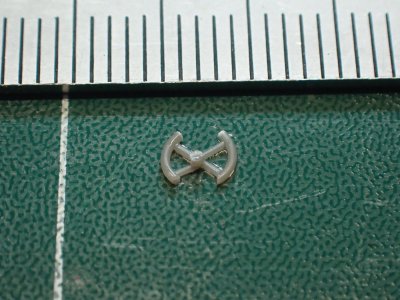
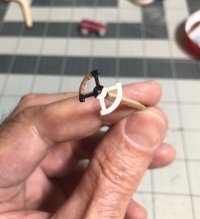
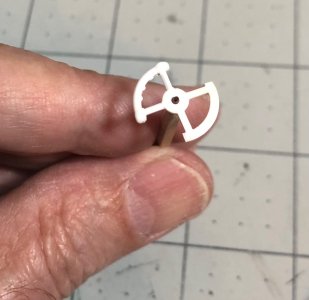
It's a little small, side to side, but well within my current tolerances.

I'm rather proud of myself for making that, despite the shakes, the poor vision, the false starts etc. It may not be accurate but it has 'Smithy Fecit Me' written on its soul.

Now I have to paint it!
 
View attachment 513906

It's a little small, side to side, but well within my current tolerances.

I'm rather proud of myself for making that, despite the shakes, the poor vision, the false starts etc. It may not be accurate but it has 'Smithy Fecit Me' written on its soul.

Now I have to paint it!
That’s a nice representation at scale. I would have used some PVA glue to make bumps on the grips. Dip toothpick in glue and dap on handle and viola…raised bumps for grip! ;)
 
PVA glue to make bumps on the grips

The bumps fit between the fingers of the pilot. Let’s say an inch or 24mm apart. You can place five dots of PVA glue, 0.5mm apart, maybe 0.1mm in diameter, with a toothpick, on the inside of the curve. I’m impressed.

With hand skills like that why do you bother with 3D printing?
 
Hello Smithy, I just globed on to your Avro Anson, and I must say you have a very fine-looking build. Your ability with plastic certainly surpasses mine, am looking forward to seeing the completed version. Since I will be building more plastic in the future, I am going to have to make a Tamyia liquid glue holder similar to the one your son made for you, it really impressed me.
 
The bumps fit between the fingers of the pilot. Let’s say an inch or 24mm apart. You can place five dots of PVA glue, 0.5mm apart, maybe 0.1mm in diameter, with a toothpick, on the inside of the curve. I’m impressed.

With hand skills like that why do you bother with 3D printing?
Well, I add small bolt heads with glue all the time, one of the techniques I use. If I want them real small, I use a needle. And of course I wear magnifying glasses. ;) It can be done sir, and even if a little out of scale, it adds to realism. Not being critical of your work, just sharing a technique. ;)
 
Well, I add small bolt heads with glue all the time, one of the techniques I use. If I want them real small, I use a needle. And of course I wear magnifying glasses. ;) It can be done sir, and even if a little out of scale, it adds to realism. Not being critical of your work, just sharing a technique. ;)

Cheeze Whiz! I really thought you were joking. That would be far beyond the horizons of my technical capability, horizons which close in tighter every day. :oops:
 
Last edited:
I will be building more plastic in the future

Yes, me too. Having had a few years off while I mastered misunderstood modelling in wood and string, I'm enjoying building in plastic too. I find that the two genres, two materials aren't mutually exclusive at all, and it suits me to flit like a deranged butterfly from one to t'other. :)
 
Cheeze Whiz! I really thought you were joking, sorry. That's far beyond the horizons of my technical capability, horizons which close in tighter every day. :oops:
Just to demonstrate, I took a plastic wheel and modified…

IMG_7802.jpegIMG_7800.jpeg
Note the right side, it is still square edged. On the left I used an xacto knife to scrape the edges to be round. It is better than using a file because you can get in tight areas. Then added glue bumps with a toothpick. Yes I added less and made them larger for effect, disregarding scale so it can actually be seen. Then I added some more material around the tips of the handle with a toothpick and PVA glue. Just roll it around the surface to build up.
Then she was painted and a light dry brush on the handle…
IMG_7810.jpeg
IMG_7809.jpeg

And that was what I was suggesting. I would never suggest someone do something I could not do myself. ;)
 
Just to demonstrate, I took ...

...an enormous...

... plastic wheel

P4150006.JPG

That rule at the top is graduated in millimeters, not inches. Your dots need to go into a 1.7mm space between the spokes.

usa guy.jpegP4150015[1].JPG

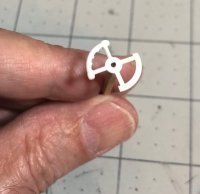
And compare the sizes of our index fingers and our wheels - "disregarding scale" indeed.

Now do one my size (and as fragile).

I knew you were shooting a line. ROTF
 
Last edited:
Yup, you did. I somehow missed that. Sucks to get old.

Actually, most of us here are accustomed to hulking great ships with eight foot diameter double steering wheels so a titchy little aeroplane semi-wheel is bound to be a bit confusticating. ;)
 
Back
Top