What I respect most about you, Peter, is your ingenuity. Where I am more like a musician trying to read and play music created by someone else - you are a composer who is creating de novo. Marvelous stuff...
-

Win a Free Custom Engraved Brass Coin!!!
As a way to introduce our brass coins to the community, we will raffle off a free coin during the month of August. Follow link ABOVE for instructions for entering.
-

PRE-ORDER SHIPS IN SCALE TODAY!
The beloved Ships in Scale Magazine is back and charting a new course for 2026!
Discover new skills, new techniques, and new inspirations in every issue.
NOTE THAT OUR FIRST ISSUE WILL BE JAN/FEB 2026
You are using an out of date browser. It may not display this or other websites correctly.
You should upgrade or use an alternative browser.
You should upgrade or use an alternative browser.
BALDER, Vlaardingen Herring Lugger from 1912, scratch build scale 1:50 Plate-On-Frame
- Thread starter Peter Voogt
- Start date
- Watchers 65
As an amateur musician I appreciate this wonderful compliment. Thanks, Paul.What I respect most about you, Peter, is your ingenuity. Where I am more like a musician trying to read and play music created by someone else - you are a composer who is creating de novo. Marvelous stuff...
Regards, Peter
After some minor adjustments, I placed the stringer from the bow/keel frame, over frames 53 and 51 and let the stringer rest on frame 39:
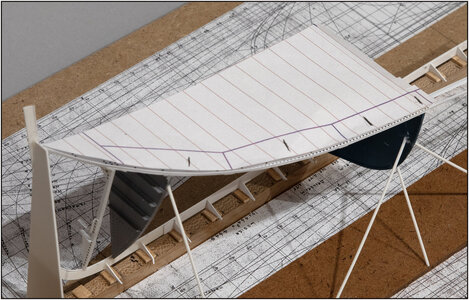
Here is the template with the position of the frames.
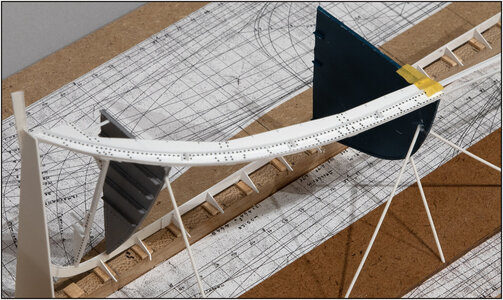
With the stringer in place. The stringer plate still needs to be riveted to the deck beam of frame 53 …….
The sheer is already quite evident:
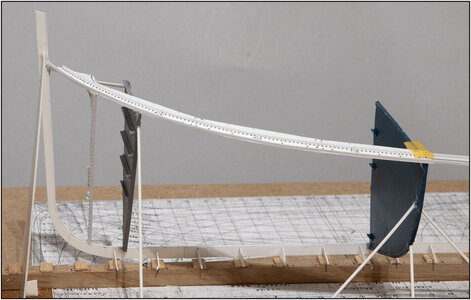
It immediately gives the whole structure solidity.
Now I could also check the alignment over the 2 frames towards the bow:
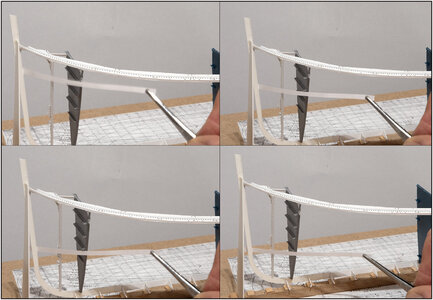
In 4 positions with a strip of paper. This connected neatly to the sides of the frames. Particularly in frame 53, I bent the rear-facing side slightly outwards with a gradient from top (more) to bottom (less).
Gr. Peter

Here is the template with the position of the frames.

With the stringer in place. The stringer plate still needs to be riveted to the deck beam of frame 53 …….
The sheer is already quite evident:

It immediately gives the whole structure solidity.
Now I could also check the alignment over the 2 frames towards the bow:

In 4 positions with a strip of paper. This connected neatly to the sides of the frames. Particularly in frame 53, I bent the rear-facing side slightly outwards with a gradient from top (more) to bottom (less).
Gr. Peter
Last edited:
Magnificent work Peter.After some minor adjustments, I placed the stringer from the bow/keel frame, over frames 53 and 51 and let the stringer rest on frame 39:
View attachment 406558
Here is the template with the position of the frames.
View attachment 406559
With the stringer in place. The stringer plate still needs to be riveted to the deck beam of frame 53 …….
The sheer is already quite evident:
View attachment 406560
It immediately gives the whole structure solidity.
Now I could also check the alignment over the 2 frames towards the bow:
View attachment 406561
In 4 positions with a strip of paper. This connected neatly to the sides of the frames. Particularly in frame 53, I bent the rear-facing side slightly outwards with a gradient from top (more) to bottom (less).
Gr. Peter

Cheers,
Stephen.
Thanks for this compliment, Stephen. The tests continue to go well so far.Magnificent work Peter.
Cheers,
Stephen.
Regard, Peter
Good morning Peter. Whew. That looks very delicate. Is there a reason why you did not (besides giving the structure some strength)After some minor adjustments, I placed the stringer from the bow/keel frame, over frames 53 and 51 and let the stringer rest on frame 39:
View attachment 406558
Here is the template with the position of the frames.
View attachment 406559
With the stringer in place. The stringer plate still needs to be riveted to the deck beam of frame 53 …….
The sheer is already quite evident:
View attachment 406560
It immediately gives the whole structure solidity.
Now I could also check the alignment over the 2 frames towards the bow:
View attachment 406561
In 4 positions with a strip of paper. This connected neatly to the sides of the frames. Particularly in frame 53, I bent the rear-facing side slightly outwards with a gradient from top (more) to bottom (less).
Gr. Peter
"lay" the frames 50 to 40 prior to the stringer? Cheers Grant
Good morning, Grant. My intention is to build the compartments from watertight bulkhead to watertight bulkhead. I first compleet the frames between the bow and 51. Also as a test if I can align them all in a correct way. Then the frames between 51 and 39, 39 till 14 and 14 to stern.Good morning Peter. Whew. That looks very delicate. Is there a reason why you did not (besides giving the structure some strength)
"lay" the frames 50 to 40 prior to the stringer? Cheers Grant
The stringer is one of my guild lines and I will increase every compartment and extend it to the next to prevent sagging.
Besides the keel is the double L-profile midship the 3th guide. But there are a few hatches and structures that disrupt that.
Yes, I have not build them ………Is there a reason why you did not "lay" the frames 50 to 40 prior to the stringer?
Regards, Peter
Thanks, Johan.This looks probably more fragile than it actually is, but one thing's certain: you're one brave modeller.
I've already had some sweat on my forehead.you're one brave modeller.
When I see this picture of the restoration, the fragility is approximately 1 to 1 the same as that of the original Balder:
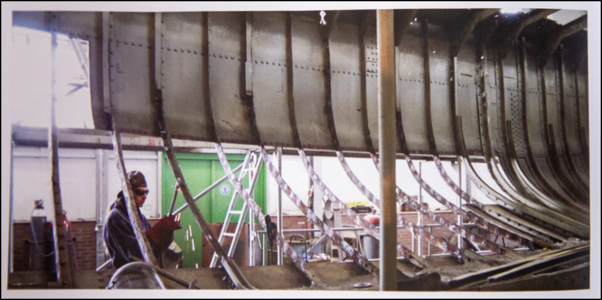
(Source: restoration book pag. 30 of the SZB)
The frames also look fragile. I think you can (als bend them with some force if there are no hull plates on it yet.
My build is also nice in comparison in that area ..........
The entire construction will provide stiffness.
Regards, Peter
- Joined
- Sep 3, 2021
- Messages
- 5,197
- Points
- 738

Yeah, I went through the pictures and drawings you posted earlier, looking for some rigidity, before it all comes together. Surprise: there isn't much, other than the keel, the deck beam and the bulkheads. I was looking for alternative ways of assembling the hull; there are options, but those require more jigs to form and control the skins and frames. In short, it most definitely would not simplify your build.Thanks, Johan.
I've already had some sweat on my forehead.
When I see this picture of the restoration, the fragility is approximately 1 to 1 the same as that of the original Balder:
View attachment 406732
The frames also look fragile. I think you can (als bend them with some force if there are no hull plates on it yet.
My build is also nice in comparison in that area ..........
The entire construction will provide stiffness.
Regards, Peter
The 4 front frames in place:
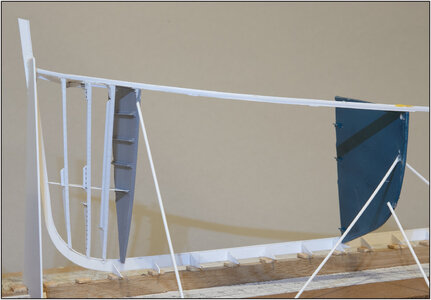
The floor of the forepeak was also custom made. Only the rivets were applied to the other side. Because they are in plain sight.
The alignment seems pretty good:
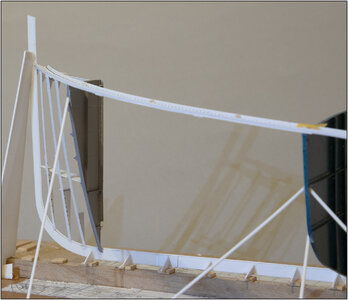
Now come up with something for the cement with which the lower part is filled.
I'll visit the florist for 'oasis'. Is easy to cut and who knows, with a 'concrete colour'.
Regards, Peter

The floor of the forepeak was also custom made. Only the rivets were applied to the other side. Because they are in plain sight.
The alignment seems pretty good:

Now come up with something for the cement with which the lower part is filled.
I'll visit the florist for 'oasis'. Is easy to cut and who knows, with a 'concrete colour'.
Regards, Peter
COOL!
THANKS!COOL!
Regards, Peter
Got a tip on the Dutch forum: gray floral foam. Found it at a big ‘chain-store: 23x11x7,5 cm for: €0,55. Big investment, but I give it a try.I'll visit the florist for 'oasis'. Is easy to cut and who knows, with a 'concrete colour'.
Regards, Peter
Love your workThe 4 front frames in place:
View attachment 407000
The floor of the forepeak was also custom made. Only the rivets were applied to the other side. Because they are in plain sight.
The alignment seems pretty good:
View attachment 407001
Now come up with something for the cement with which the lower part is filled.
I'll visit the florist for 'oasis'. Is easy to cut and who knows, with a 'concrete colour'.
Regards, Peter
Thanks, Johan.Too soon to draw conclusions, but this certainly looks promising (asides from rather impressive...)
Still in the testing phase. First the starboard side for getting a symmetry and painting through the frames.
Then a final go or no-go.
Regards, Peter
Last edited:
Thanks, Shota. It was a lot of learning in Fushion, but now the first results are there.Dear Peter.
you have done wonderful work with Fusion and the beginning looks promising
Regards, Peter
Thanks, Grant. I also felt a smile come on after placing the 4th frame and the little floor.Love your work
Regards, Peter
Last edited:

