Good morning Peter. It is beyond me how you got those curved inner planks so good within such a confined space......skills my friend. Cheers GrantThe ship carpenter enjoys and makes progress:
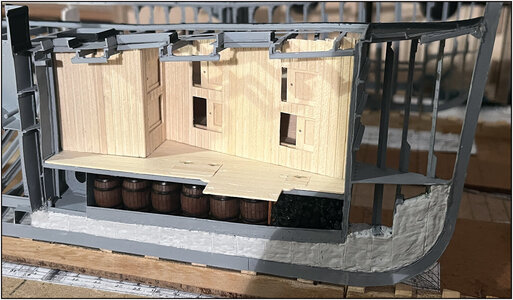
The wall between the dry hold and the 2 transverse bunks:
View attachment 455738
At the front there are 2 cleats on which the floors of the 2 bunks will rest. The dry hold is intended for the storage of provisions for the crew.
Made a first draft for the vertical ladder in the hold:
View attachment 455739
A bit inspired by the climbing holes in the planks in the aft hold. It must be a bit of a fool's test for those fishermen with their wooden shoes. Need to finish it some more.
The dry hold only has access via a hatch on the deck:
View attachment 455740
The dry hold also has a shelf. The ladder helps support that shelf.
Soon only visible through the hatch opening because there will be another wall at the head of the hold and transverse bunks.
Everything is still dry-fit for the time being because I still have to figure out in which order I am going to build everything up. Perhaps the longitudinal bunks with their sloping wall first?
Regards, Peter
-

Win a Free Custom Engraved Brass Coin!!!
As a way to introduce our brass coins to the community, we will raffle off a free coin during the month of August. Follow link ABOVE for instructions for entering.
-

PRE-ORDER SHIPS IN SCALE TODAY!
The beloved Ships in Scale Magazine is back and charting a new course for 2026!
Discover new skills, new techniques, and new inspirations in every issue.
NOTE THAT OUR FIRST ISSUE WILL BE JAN/FEB 2026
You are using an out of date browser. It may not display this or other websites correctly.
You should upgrade or use an alternative browser.
You should upgrade or use an alternative browser.
BALDER, Vlaardingen Herring Lugger from 1912, scratch build scale 1:50 Plate-On-Frame
- Thread starter Peter Voogt
- Start date
- Watchers 65
Thanks, Grant. First I thought you meant the curves on the side of the wall. But I suppose you mean the lengthwise outside wall planks.Good morning Peter. It is beyond me how you got those curved inner planks so good within such a confined space......skills my friend. Cheers Grant
Just plank by plank with a lot of fitting and sanding and one by one gluing.
For the wall it self:
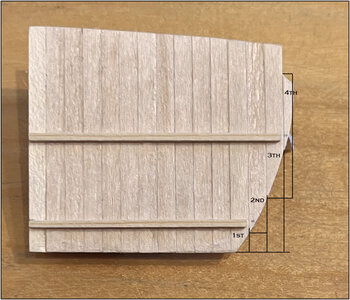
Also plank bij plank, starting with the 1st in the lower corner. When the curve is correct than the 2nd, 3th and 4th.
Regards, Peter
Last edited:
- Joined
- Sep 3, 2021
- Messages
- 5,190
- Points
- 738

This looks exactly what we’ve come to expect; marvelous.The ship carpenter enjoys and makes progress:
The wall between the dry hold and the 2 transverse bunks:
View attachment 455738
At the front there are 2 cleats on which the floors of the 2 bunks will rest. The dry hold is intended for the storage of provisions for the crew.
Made a first draft for the vertical ladder in the hold:
View attachment 455739
A bit inspired by the climbing holes in the planks in the aft hold. It must be a bit of a fool's test for those fishermen with their wooden shoes. Need to finish it some more.
The dry hold only has access via a hatch on the deck:
View attachment 455740
The dry hold also has a shelf. The ladder helps support that shelf.
Soon only visible through the hatch opening because there will be another wall at the head of the hold and transverse bunks.
Everything is still dry-fit for the time being because I still have to figure out in which order I am going to build everything up. Perhaps the longitudinal bunks with their sloping wall first?
Regards, Peter
True storyThis looks exactly what we’ve come to expect; marvelous.
This looks exactly what we’ve come to expect; marvelous.
Thanks, Johan and Grant. Expectations (and habit) are a bit of a pitfall.True story
One 'module' further: the 2 transverse bunks:
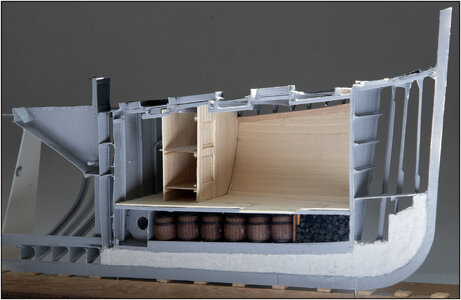
Everything dry-fit, so not yet completely tight. Some small brackets on the wall and floor to help with alignment.
On the inside slats are the two floors of these cages.
With the closing wall on the end side:
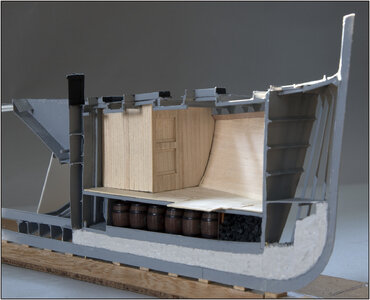
An little angled seam at the bottom. That goes away when I press on the wall and remove the slight bulge in the watertight bulkhead.
At the front the 2 'opgeklampte' sliding doors.
Of course they can be opened:
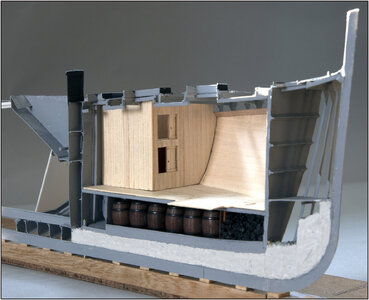
No protruding parts. So no buttons but finger holes.
Seen diagonally from above:
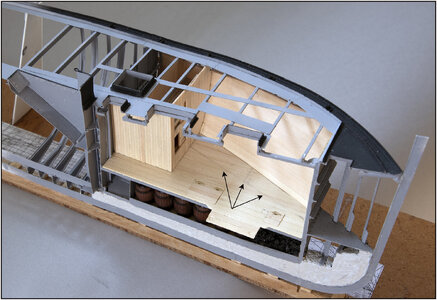
With the height of the walls, always kept an eye on the sheer of the deck. That the walls do not push them up.
The 3 arrows point to the sloping wall for the other 4 bunks with their dividing wall.
Regards, Peter

Everything dry-fit, so not yet completely tight. Some small brackets on the wall and floor to help with alignment.
On the inside slats are the two floors of these cages.
With the closing wall on the end side:

An little angled seam at the bottom. That goes away when I press on the wall and remove the slight bulge in the watertight bulkhead.
At the front the 2 'opgeklampte' sliding doors.
Of course they can be opened:

No protruding parts. So no buttons but finger holes.
Seen diagonally from above:

With the height of the walls, always kept an eye on the sheer of the deck. That the walls do not push them up.
The 3 arrows point to the sloping wall for the other 4 bunks with their dividing wall.
Regards, Peter
- Joined
- Aug 8, 2019
- Messages
- 5,568
- Points
- 738

Of course, he said. Pretty big thing in this scale.Of course they can be opened:

So delicate! Amazing modeling Peter!
Haha, living up to expectations...Of course, he said. Pretty big thing in this scale.
Thanks, Paul. The plan worked out again.So delicate! Amazing modeling Peter!
Regards, Peter
Obviously, mon ami you have no limits in your modeling! The systematic approach pays dividends! Aploud-Loud!
Thanks for your friendly words and compliments, Ami Jim.Obviously, mon ami you have no limits in your modeling! The systematic approach pays dividends! Aploud-Loud!
Regards, Peter
Thanks for your very kind words and comments, Johan. Flexibility for sure, by the materials and plans.A very convincing representation of how the Balder’s interior may have looked. Taking into account the properties of the materials you’re using, very flexible, this is quite an achievement.
Regards, Peter
- Joined
- Apr 20, 2020
- Messages
- 6,241
- Points
- 738

'מודול' אחד נוסף: 2 הדרגשים הרוחביים:
View attachment 456361
הכל בהתאמה יבשה, אז עדיין לא הדוק לחלוטין. כמה סוגרים קטנים על הקיר והרצפה כדי לעזור ביישור.
על הדקים הפנימיים נמצאות שתי הקומות של הכלובים הללו.
עם הקיר הסוגר בצד הקצה:
View attachment 456362
תפר זוויתי קטן בתחתית. זה נעלם כשאני לוחץ על הקיר ומסיר את הבליטה הקלה במחיצה האטומה למים.
בחזית 2 דלתות הזזה 'opgeklampte'.
כמובן שניתן לפתוח אותם:
View attachment 456363
אין חלקים בולטים. אז בלי כפתורים אלא חורים באצבעות.
נראה באלכסון מלמעלה:
View attachment 456364
עם גובה הקירות, תמיד פקח עין על הדק של הסיפון. שהקירות לא דוחפים אותם למעלה.
3 החצים מצביעים על הקיר המשופע עבור שאר 4 הדרגשים עם הקיר המפריד שלהם.
בברכה, פיטר

I have run out of words of praise and admiration
Thanks for that BIG ONE, Shota. Appreciated!View attachment 456406
I have run out of words of praise and admiration
Regards, Peter
Making the 4 bunks placed diagonally forward was quite a challenge. I will take you through some steps in the production process.
The bottom of the lower 2 bunks on a frame:
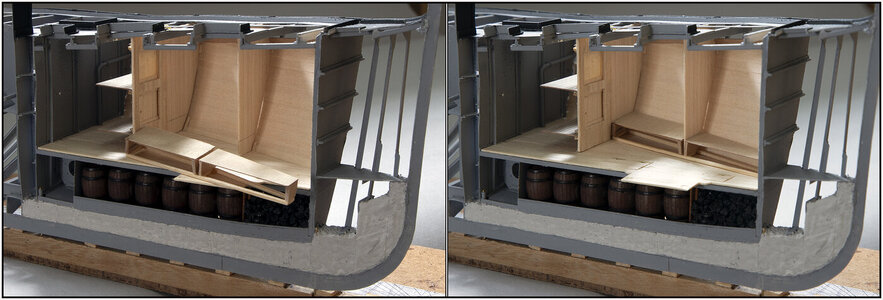
Made in such a way that it can slide around the partition wall that has also been made.
On top of that the supports for the floor of the top 2 bunks:
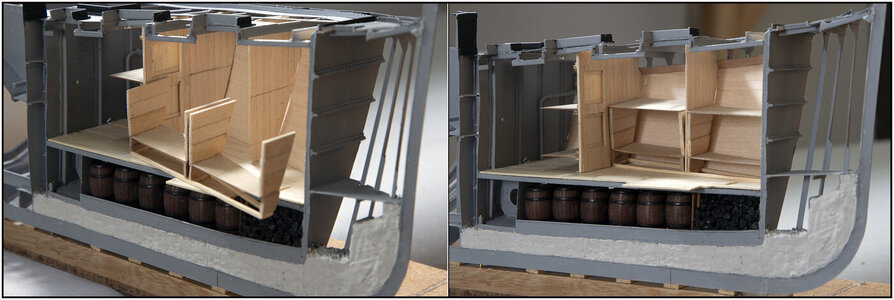
Also with the floors and it can be slid between the walls again. I need the floors to slide up the shutters.
The wall had to be treated with the necessary care:
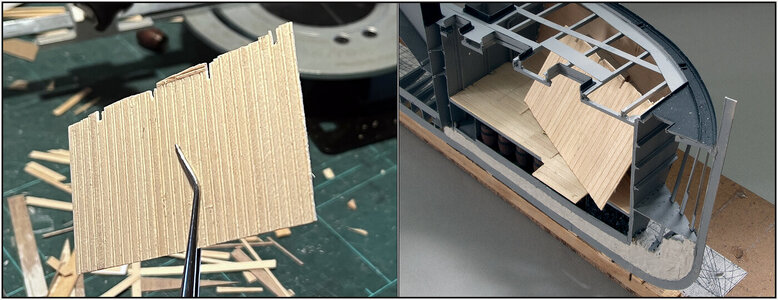
It consists of 26 slats of 3.0 x 0.7 mm. With 4 recesses for the profiles of the deck beams. Once the wall has been finally installed, it will be neatly finished at the top. Together with covering the metal deck profiles with wood.
Placing the wall also receives the necessary attention. It must be inserted at an angle and then tilted with the 4 recesses along the 4 deck profiles.
That's why I'll have to install everything in reverse order later. Because if the 2 transverse cages are already there, I will never be able to tilt this wall in.
With a lot of trial and error, this worked:

Then drew the 4 recesses at the back for the openings for the 4 shutters.
After making the shutters, place the necessary slats at the back so that the shutters can slide:

I can get that back in place too.
With the dry-fit test installation of all parts:
Yes: once again theory and practice come together. It is standing!
Now take everything apart again, clean it thoroughly, put it partly in linseed oil and then finally glue it into place.
Regards, Peter
The bottom of the lower 2 bunks on a frame:

Made in such a way that it can slide around the partition wall that has also been made.
On top of that the supports for the floor of the top 2 bunks:

Also with the floors and it can be slid between the walls again. I need the floors to slide up the shutters.
The wall had to be treated with the necessary care:

It consists of 26 slats of 3.0 x 0.7 mm. With 4 recesses for the profiles of the deck beams. Once the wall has been finally installed, it will be neatly finished at the top. Together with covering the metal deck profiles with wood.
Placing the wall also receives the necessary attention. It must be inserted at an angle and then tilted with the 4 recesses along the 4 deck profiles.
That's why I'll have to install everything in reverse order later. Because if the 2 transverse cages are already there, I will never be able to tilt this wall in.
With a lot of trial and error, this worked:

Then drew the 4 recesses at the back for the openings for the 4 shutters.
After making the shutters, place the necessary slats at the back so that the shutters can slide:

I can get that back in place too.
With the dry-fit test installation of all parts:

Yes: once again theory and practice come together. It is standing!
Now take everything apart again, clean it thoroughly, put it partly in linseed oil and then finally glue it into place.
Regards, Peter
I've always wondered what it would be like to sleep in a chicken coop...
Then you have to look to the forecastle of the Bluenose ………I've always wondered what it would be like to sleep in a chicken coop...
Last edited:
- Joined
- Jun 17, 2021
- Messages
- 3,200
- Points
- 588

My next jar of pickled herring will hold special meaning!Making the 4 bunks placed diagonally forward was quite a challenge. I will take you through some steps in the production process.
The bottom of the lower 2 bunks on a frame:
View attachment 457154
Made in such a way that it can slide around the partition wall that has also been made.
On top of that the supports for the floor of the top 2 bunks:
View attachment 457155
Also with the floors and it can be slid between the walls again. I need the floors to slide up the shutters.
The wall had to be treated with the necessary care:
View attachment 457156
It consists of 26 slats of 3.0 x 0.7 mm. With 4 recesses for the profiles of the deck beams. Once the wall has been finally installed, it will be neatly finished at the top. Together with covering the metal deck profiles with wood.
Placing the wall also receives the necessary attention. It must be inserted at an angle and then tilted with the 4 recesses along the 4 deck profiles.
That's why I'll have to install everything in reverse order later. Because if the 2 transverse cages are already there, I will never be able to tilt this wall in.
With a lot of trial and error, this worked:
View attachment 457157
Then drew the 4 recesses at the back for the openings for the 4 shutters.
After making the shutters, place the necessary slats at the back so that the shutters can slide:
View attachment 457158
I can get that back in place too.
With the dry-fit test installation of all parts:
View attachment 457159
Yes: once again theory and practice come together. It is standing!
Now take everything apart again, clean it thoroughly, put it partly in linseed oil and then finally glue it into place.
Regards, Peter
