BALDER, Vlaardingen Herring Lugger from 1912, scratch build scale 1:50 Plate-On-Frame

That's because you live in the north of Holland, I live in the south …
Sorry Stephan, but Woudrichem is below all the great rivers. So it’s in the south of the Nederlands, although it is located in Noord-Brabant. Not everything ‘above Limburg’ is ‘the north of Holland’.;) Al most on compass heading. :)
Regards, Peter
 
Sorry Stephan, but Woudrichem is below all the great rivers. So it’s in the south of the Nederlands, although it is located in Noord-Brabant. Not everything ‘above Limburg’ is ‘the north of Holland’.;) Al most on compass heading. :)
Regards, Peter
And than to think the Netherlands are the size of a small stamp and we’re still arguing…
 
I had to think a little longer before making and installing the stairs.
View attachment 459537
On the left a photo from the restoration book of the Scheepvaartmuseum. On the right I took it myself in the Balder. It is a robust staircase that crew members can safely use with their clogs.
To the right of the stairs is the narrow passage to the galley. Behind the stairs is a piece of partition wall.
At the bottom right of the photo is an insert of the top stair tread. This is located on the same level of the deck. It also protrudes slightly in front of both stair stringers and the outer corners are bevelled.

First measured the angle of the stairs.
View attachment 459538
At the background a stringer in the model. Measured from the waterline it's 10 degrees.

Made a 2x10 degree mold and stuck it to the cross table with double-sided tape:
View attachment 459539
Glued both stair stringers also on the tape. The recesses for the 7 treads were then milled horizontally.
The treads will then also be horizontal to the waterline relative to the ship. So not in the corner of the keel or floor of the forecastle. Why? Have you ever walked on a staircase where the treads are tilted? That throws you off balance.

7 treads of 11 mm cut with the Ultimation:
View attachment 459540
Bottom left: gluing the treads using the small square with a 0.6 mm spacer behind the tread. So that the treads protrude slightly at the front. With the slanted corners.

Given a color so that it looks like a hardwood staircase:
View attachment 459541
In the middle photo the piece of floor, back wall and skirting board that will slide over the current floor.
Partly applied in the right photo. A piece of thin foil under the floor slides between the floor and the beams to give the bonding some strength.

The test fit:
View attachment 459542
Left photo:
Arrows A: the piece of floor must slide over the floor profiles in the starboard half. Just like the piece of floor in front of the stove.
Arrow B: The wall must slide behind the profile of the deck beam.
Right photo: The two parts against each other.
In the starboard part you can see some uprights. I also removed the interrupted parts of the deck center beam in that part. As I wrote about the design of the port side, I didn't like it.

Glued in the piece of wall/floor and placed the stairs:
View attachment 459543
With a photo from the front to check alignment:
View attachment 459544
Unfortunately, I can't get a nice photo from the inside with the iPhone, so I have a comparison photo like the double photo at the beginning of the post.

The two parts combined:
View attachment 459545
Both floors slide neatly over the beams of the starboard part.
View attachment 459546
I don't know yet what I will do with the uprights in the starboard part. Maybe I'll leave them white to indicate that parts are not part of the gray construction.
So far, so good.
Regards, Peter
These details show that your scale selection (1:50) is spot on; especially the ladder is very convincing, much more so than in your Bluenose build. (By no means meant to be derogatory.)
 
These details show that your scale selection (1:50) is spot on; especially the ladder is very convincing, much more so than in your Bluenose build. (By no means meant to be derogatory.)
Thanks, Johan. I am happy that I could build it in scale, conform the old specifications where it’s also named as a stair (trap).
Regards, Peter
 
Last edited:
Hello Peter, I had to catch up on 14 pages of your absolutely amazing build. It's fantastic, the attention to detail, simply magnificent.
Thanks for your renewed visit, compliments and all the likes, Tobias. :)
I suppose there are now 2 options: I post less pages or you come by sooner ……. ;)
Regards, Peter
 
Thanks for your renewed visit, compliments and all the likes, Tobias. :)
I suppose there are now 2 options: I post less pages or you come by sooner ……. ;)
Regards, Peter

I'm spending more time on the forum again. It's been a difficult few weeks and I haven't had much time.
 
Thanks for the compliment, Jack. For me it are lesson’s in finding solutions.
Regards, Peter
Finding solutions is always a challenging task, but I am confident in your skills to find not just the one, but the correct one! No wonder the model you building is unique!
 
Started with the planking of the deck.
The old specifications state: 'of Swedish greens 6" - 3", fastened with deck screws. To be caulked with two wires.'
A second specification states 'pitch pine' as the type of wood.

During the first restoration in Amsterdam, Oregon pine was chosen. The deck parts were attached with 3/8" carriage bolts, with the nuts on the bottom against the beam flanges. At the top, the holes were capped with 2 cm thick caps so that the deck could be planed later without any problems.
I could not find anything about the seams.

During the second restoration in Vlaardingen, Iroko was chosen. The deck parts were pressed into a Sikaflex adhesive layer on the steel deck and attached with approx. 2000 stainless steel threaded pins welded to the deck with ceramic rings and stainless steel musts. Covered with glued-in wooden plugs. The seams were sealed with Sikaflex and then sanded.

I still had a few beech planks lying around that Hans (Kolderstok) had sawn for me for the Bluenose. But I didn't use them in the end.
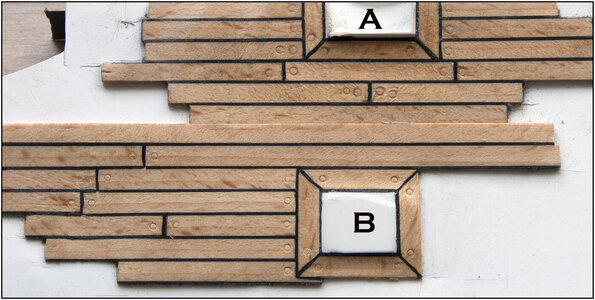
I sawed 3 mm slats from the wide strips. I laid a test piece with 0.33 mm black paper as seams. I found the seams a bit too thick in relation to the planks.
A second test in which I first glued the paper seams onto the slats under pressure. Then they become approximately 0.26 mm thick.
0338 Dek.jpg
A = with 0.33 mm seams and imitation plugs of 1 mm;
B = with 0.26 mm seams and imitation plugs of 0.6 mm.
Both with a layer of linseed oil.

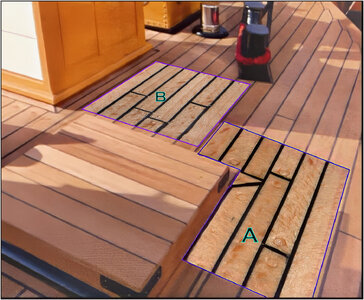
Via Photoshop I 'pasted' some parts of these test pieces onto a photo with the deck during the 2nd restoration:
0339 Dek.jpg
See the A and B in the blue frames. Then the seams are still too thick in proportion. The planks themselves could also be a bit narrower.

Found another black paper of 0.20 mm. Made a test piece with the 3 mm slats. The 3 mm are still in my point of view a bit too thick, new slats of 2.8 mm and a new test piece made:
0340 3-0 en 2-8.jpg
Here also both with a layer of linseed oil.
It doesn't make much difference .......... but it looks a bit better to me.
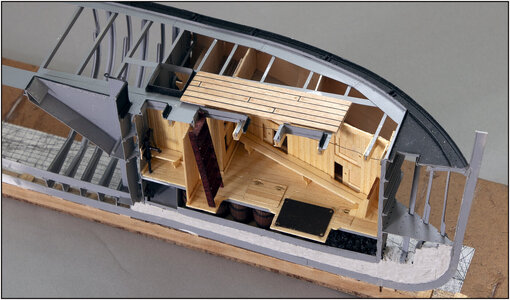
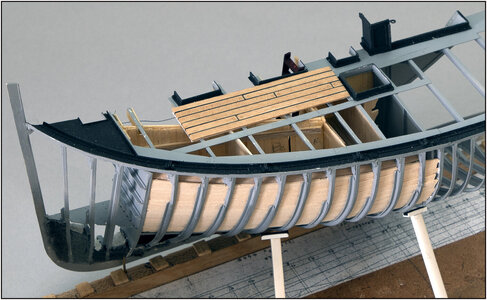
This is how it should look on the deck:
0341 Dek.jpg
0342 Dek.jpg
It is best to plank the deck in one go to maintain the continuous lines. Maybe I will already do a piece in the head and around the hatches.
Regards, Peter
 
Looks like you found the right combination for the decking with your last iteration of 0.20 and 2.8mm. The cut away showcasing the crews' quarters of wood juxtaposed with the iron is just awesome to look at. The decking on top will be like icing on a cake WOW!
 
Started with the planking of the deck.
The old specifications state: 'of Swedish greens 6" - 3", fastened with deck screws. To be caulked with two wires.'
A second specification states 'pitch pine' as the type of wood.

During the first restoration in Amsterdam, Oregon pine was chosen. The deck parts were attached with 3/8" carriage bolts, with the nuts on the bottom against the beam flanges. At the top, the holes were capped with 2 cm thick caps so that the deck could be planed later without any problems.
I could not find anything about the seams.

During the second restoration in Vlaardingen, Iroko was chosen. The deck parts were pressed into a Sikaflex adhesive layer on the steel deck and attached with approx. 2000 stainless steel threaded pins welded to the deck with ceramic rings and stainless steel musts. Covered with glued-in wooden plugs. The seams were sealed with Sikaflex and then sanded.

I still had a few beech planks lying around that Hans (Kolderstok) had sawn for me for the Bluenose. But I didn't use them in the end.
I sawed 3 mm slats from the wide strips. I laid a test piece with 0.33 mm black paper as seams. I found the seams a bit too thick in relation to the planks.
A second test in which I first glued the paper seams onto the slats under pressure. Then they become approximately 0.26 mm thick.
View attachment 461306
A = with 0.33 mm seams and imitation plugs of 1 mm;
B = with 0.26 mm seams and imitation plugs of 0.6 mm.
Both with a layer of linseed oil.

Via Photoshop I 'pasted' some parts of these test pieces onto a photo with the deck during the 2nd restoration:
View attachment 461307
See the A and B in the blue frames. Then the seams are still too thick in proportion. The planks themselves could also be a bit narrower.

Found another black paper of 0.20 mm. Made a test piece with the 3 mm slats. The 3 mm are still in my point of view a bit too thick, new slats of 2.8 mm and a new test piece made:
View attachment 461308
Here also both with a layer of linseed oil.
It doesn't make much difference .......... but it looks a bit better to me.
This is how it should look on the deck:
View attachment 461309
View attachment 461310
It is best to plank the deck in one go to maintain the continuous lines. Maybe I will already do a piece in the head and around the hatches.
Regards, Peter
Good afternoon Peter. Yep at this scale the narrower planks, thinner caulking and smaller nail plugs the better. Lovely work. Cheers Grant
 
I like the appearance under Linseed oil, mon ami. I also like smaller planks (2,8), I know 0.2mm doesn't sound a lot, but it will make a big difference in the bigger picture. The caulking, at least in my eyes, is still a bit oversized, maybe use the pencil marks instead? I love the treenail heads!
 
Back
Top