BALDER, Vlaardingen Herring Lugger from 1912, scratch build scale 1:50 Plate-On-Frame

Looks like you found the right combination for the decking with your last iteration of 0.20 and 2.8mm. The cut away showcasing the crews' quarters of wood juxtaposed with the iron is just awesome to look at. The decking on top will be like icing on a cake WOW!
Thanks, Daniel. The deck with all the attributes will have a lot of nice details. A lot of challenges.
Regards, Peter
 
I like the appearance under Linseed oil, mon ami. I also like smaller planks (2,8), I know 0.2mm doesn't sound a lot, but it will make a big difference in the bigger picture. The caulking, at least in my eyes, is still a bit oversized, maybe use the pencil marks instead? I love the treenail heads!
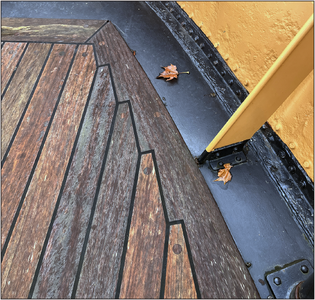
Thanks, Jim. As show in the picture in post #837 of the Balder, the deck planking has some 'convincing' caulking. Perhaps better to see this picture of the deck:
1722087202229.png
It's the same deck as on that earlier picture, but more weathered after all those years.
The connections in the waterways will be a challenge, but I have the experience now with the Bluenose deck.
Regards, Peter
 
You should try out steamed pear. When I look to the original deck it has the same colour as the pear I have in stock. Just an idea.
Thanks for the offer, Stephan. But I am happy with the beech. And about the color of the wood on that first picture: it's a picture of the picture in the book. Don't know what color-profile is used. Looking to the picture in my reaction on Jim's post, I can choose more types of wood. ;)
Regards, Peter
 
Started with the planking of the deck.
The old specifications state: 'of Swedish greens 6" - 3", fastened with deck screws. To be caulked with two wires.'
A second specification states 'pitch pine' as the type of wood.

During the first restoration in Amsterdam, Oregon pine was chosen. The deck parts were attached with 3/8" carriage bolts, with the nuts on the bottom against the beam flanges. At the top, the holes were capped with 2 cm thick caps so that the deck could be planed later without any problems.
I could not find anything about the seams.

During the second restoration in Vlaardingen, Iroko was chosen. The deck parts were pressed into a Sikaflex adhesive layer on the steel deck and attached with approx. 2000 stainless steel threaded pins welded to the deck with ceramic rings and stainless steel musts. Covered with glued-in wooden plugs. The seams were sealed with Sikaflex and then sanded.

I still had a few beech planks lying around that Hans (Kolderstok) had sawn for me for the Bluenose. But I didn't use them in the end.
I sawed 3 mm slats from the wide strips. I laid a test piece with 0.33 mm black paper as seams. I found the seams a bit too thick in relation to the planks.
A second test in which I first glued the paper seams onto the slats under pressure. Then they become approximately 0.26 mm thick.
View attachment 461306
A = with 0.33 mm seams and imitation plugs of 1 mm;
B = with 0.26 mm seams and imitation plugs of 0.6 mm.
Both with a layer of linseed oil.

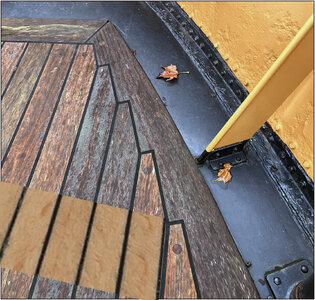
Via Photoshop I 'pasted' some parts of these test pieces onto a photo with the deck during the 2nd restoration:
View attachment 461307
See the A and B in the blue frames. Then the seams are still too thick in proportion. The planks themselves could also be a bit narrower.

Found another black paper of 0.20 mm. Made a test piece with the 3 mm slats. The 3 mm are still in my point of view a bit too thick, new slats of 2.8 mm and a new test piece made:
View attachment 461308
Here also both with a layer of linseed oil.
It doesn't make much difference .......... but it looks a bit better to me.
This is how it should look on the deck:
View attachment 461309
View attachment 461310
It is best to plank the deck in one go to maintain the continuous lines. Maybe I will already do a piece in the head and around the hatches.
Regards, Peter
I agree with the thickness of the chaulking, it appears a tad too thick, but also using black paper may lead to a “harsh” appearance. Maybe anthracite or even a very dark grey could soften the appearance.
When looking at your “copy and paste” work it looks as if the width of the planks is spot on and that the “deviation” from her life-size namesake is caused by the thickness of the chaulking.
Thanks for this post, Johan.
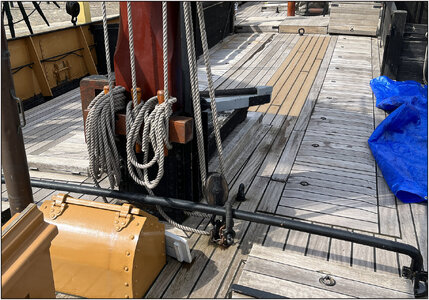
I have projected my 2,8 / 0,2 test-deck in the last picture of the deck:
0344 Dek.jpg
Not bad of 1:50 into 1:1.
Perhaps a little test with some colored linseed oil on it.
Regards, Peter
 
Last edited:
Thanks for this post, Johan.
I have projected my 2,8 / 0,2 test-deck in the last picture of the deck:
View attachment 461358
Not bad of 1:50 into 1:1.
Perhaps a little test with some colored linseed oil on it.
Regards, Peter
Maybe these macro pics are killing it…
What if you take a pic of a slightly larger area and compare that to the original? Stepping away from it a little bit further may give a better perspective.
 
Maybe these macro pics are killing it…
What if you take a pic of a slightly larger area and compare that to the original? Stepping away from it a little bit further may give a better perspective.
Digital is a bit different then real life. The outcome in terms of proportions will be the same. But I will make one for you.
Regards, Peter
 
Last edited:
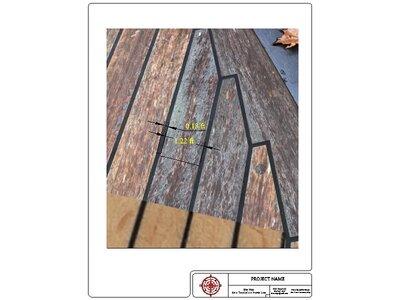
Food for thought Peter. Per this photo below, at any scale the deck caulking fits into the plank width 9.38 times.
That is 1.22/.13=9.38. So if your plank is 2.8mm wide then 2.8/9.38=0.298 or 0.30 as the scaled width for your caulk where as now you are using 0.2 which may be a little too thin?

Deck Ratio.JPG
 
Food for thought Peter. Per this photo below, at any scale the deck caulking fits into the plank width 9.38 times.
That is 1.22/.13=9.38. So if your plank is 2.8mm wide then 2.8/9.38=0.298 or 0.30 as the scaled width for your caulk where as now you are using 0.2 which may be a little too thin?

View attachment 461456
A interesting approach and outcome. Zeker als 'het oog' bij de geprojecteerde foto zegt dat ze nog iets te dik zijn.
In my opinion the caulking is in both cases much to dominant. You can try 0.1mm I have a picture of the keel assemble of my Alert but sorry no pictures of a deckView attachment 461539
Thanks for the input, Christian. But for a deck on a fishing vessel with men walking on wooden clogs ....

Time for some new input.
For the eye:
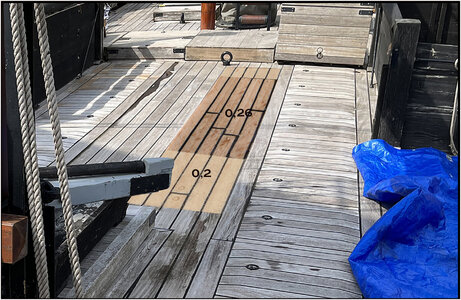
Here I projected the test piece with 0,26 mm caulking in the part with the 0,2 mm:
0346 Dek.jpg
The eye says: too wide!

With a digital input:
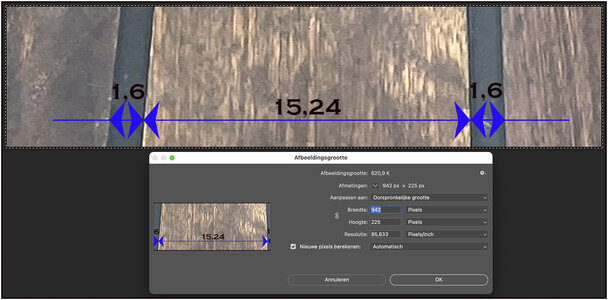
I took a picture of mine of the deck of the Balder where a planks is a almost 90 dgr on my camera lens.
Assuming the plank is 6" wide. I use 'Dutch thumbs' for that. And for convenience inches. 6 x 2,54 = 15,24 cm:
0347 Dek.jpg
Cut out a part and made the resolution on such a scale that when a draw a line over the width of the plank, the line outcome is 15,24 cm. On that same resolution I draw 2 lines over both caulkings aside the plank. Both were 1,6 cm.
That would be in 0,32 mm in scale 1:50. Almost the outcome of Daniel .....:)

Have in mind that 15,24 cm is 3,05 mm in scale. I used planks 2,8. Because of ‘the eye’.
And now comes 'the eye' back on deck: the eye says: a bit to dominant caulking on you last test piece!
2 possible option: 1: using gray paper; 2: visit the Balder and take my measuring tape with me.
I give that grey paper a try. And for sure: I will visit the Balder many times in the next months.

PS: For posting the last picture, I up-scaled the amount of pixels ..... ;)
Regards, Peter
 
Last edited:
2: visit the Balder and take my measuring tape with me.
That method is surefire. The only thing that would change the ratios of caulk width to plank width would be if they used the same caulk width on different plank widths. Well, that could get too complex, anyway I am a big fan of ratios wherever they lend themselves for practical use.
 
In my opinion the caulking is in both cases much to dominant. You can try 0.1mm I have a picture of the keel assemble of my Alert but sorry no pictures of a deckView attachment 461539
Hi Christian,

I am not sure about the caulking (the way the shipwrights did on the hulls and desks) they did between the various timber components and their joints and scarfs.
For example, traditional caulking on wooden ships\boats uses fibers like oakum and cotton, which are driven into the seams with a caulking iron and mallet. The caulking is then covered with putty or melted pine pitch. This process was never defined on timber joints and scarfs, specifically on stern\stem posts, where in some cases only pine pitch was used to protect the joined timber,
For the most part, IMHO, it is our own (scale modeler's) interpretation to emphasize the timber joints.
 
Back
Top