True storyModeling extravaganza, that's what this is...
-

Win a Free Custom Engraved Brass Coin!!!
As a way to introduce our brass coins to the community, we will raffle off a free coin during the month of August. Follow link ABOVE for instructions for entering.
-

PRE-ORDER SHIPS IN SCALE TODAY!
The beloved Ships in Scale Magazine is back and charting a new course for 2026!
Discover new skills, new techniques, and new inspirations in every issue.
NOTE THAT OUR FIRST ISSUE WILL BE JAN/FEB 2026
You are using an out of date browser. It may not display this or other websites correctly.
You should upgrade or use an alternative browser.
You should upgrade or use an alternative browser.
BALDER, Vlaardingen Herring Lugger from 1912, scratch build scale 1:50 Plate-On-Frame
- Thread starter Peter Voogt
- Start date
- Watchers 65
Good afternoon Peter. Wonderful pump although “he” looks pretty lost, alone and forlorn at the momentIn my enthusiasm I had let the mooring planks continue to the watertight bulkhead. In the middle, however, there is one of the two bilge pumps with panelling.
Started working on the pump.
The Amsterdam Scheepvaartmuseum had just digitalized a number of old drawings. I was given access to them to use. Also of the pumps nicely detailed with measurements accurate to the mm.
This is how they are on the Balder:
View attachment 493947
And on the model by Sybe de Jong that he made before the first restoration could start:
View attachment 493948
With this as a result:
View attachment 493949
A slightly distorted image because the bulwark still has to be added.
I made the pump house from 5 mm beech round timber. At the top it is 4.6 mm and tapers towards the bottom to 3.6 mm. I made the pump rod and suction rod from 2 mm beech round timber. The brackets from strips of brass plate.
Striking to me in this photo: I already mentioned that the planks of the cladding on the inside of the hull have a strange course when viewed from different angles. At the bottom they connect to the straight floorboards, but towards the top they 'shift' parallel to the bilge gauge.
The shadows of the deck profiles and stringer plates running lengthwise run parallel to the planks in this image.
Not strange in itself because that was also visible in one of the photos of the curved bilge gauge, but seen diagonally from above it is still parallel between stringer plates for the deck hatches. A fascinating play of lines.
Back to the pump:
View attachment 493950
This is attached to the bulkhead with 2 brackets. And yes, the pump rod and suction rod are functional.
From another angle:
View attachment 493951
And the unforgivable macro:
View attachment 493952
The pins are temporary. They will be replaced by brass ones. I want to be able to remove the fragile parts when I start working around it.
The next step is the cladding of the bilge pump.
Regards, Peter
Thanks, Grant. Have a moment and it will have some privacy ..........Good afternoon Peter. Wonderful pump although “he” looks pretty lost, alone and forlorn at the moment. Cheers Grant
Regards, Peter
The panelling around the bilge pump has also been placed:
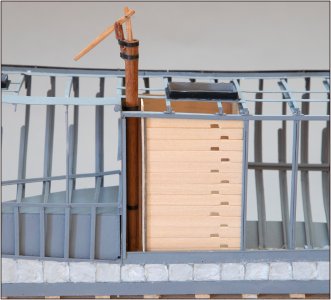
It actually closes off both pumps. But now with the intended result by the half construction method: we keep an eye on the inner parts.
Also the 12 weighing planks at the new length.
On the wall the U-profile where the weighing planks fall into:
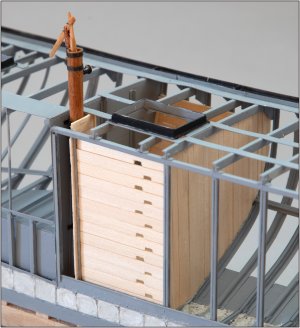
Everything still needs to be provided with 2 layers of linseed oil.
The inside:
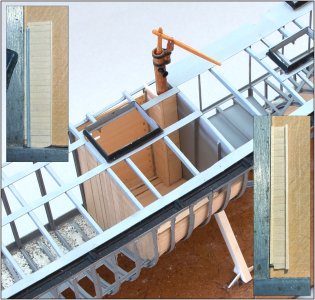
Both walls are constructed with horizontal planks. That is how it is on the old drawing and therefore also built that way. Use a small square to glue everything straight.
The insert at the top left: the half transverse part with the U-profile on one side and a protection moulding on the other side. That prevents the fishing nets on the corner from rubbing against the end sides of the planks. With the risk of damage.
The insert bottom right: View of the inside of the long part with both corner mouldings and at the bottom the recess for the skirting board.
I will now try to make a somewhat similar fishing net that can be stored in the hold.
Regards, Peter

It actually closes off both pumps. But now with the intended result by the half construction method: we keep an eye on the inner parts.
Also the 12 weighing planks at the new length.
On the wall the U-profile where the weighing planks fall into:

Everything still needs to be provided with 2 layers of linseed oil.
The inside:

Both walls are constructed with horizontal planks. That is how it is on the old drawing and therefore also built that way. Use a small square to glue everything straight.
The insert at the top left: the half transverse part with the U-profile on one side and a protection moulding on the other side. That prevents the fishing nets on the corner from rubbing against the end sides of the planks. With the risk of damage.
The insert bottom right: View of the inside of the long part with both corner mouldings and at the bottom the recess for the skirting board.
I will now try to make a somewhat similar fishing net that can be stored in the hold.
Regards, Peter
Good morning. And in a moment it certainly has it privacy and then some. I love the effect of the weighing planks have. No doubt - the look through to the whole length of the pump is so very effective. Cheers GrantThanks, Grant. Have a moment and it will have some privacy ..........
Regards, Peter
You are right, Grant. And the old drawing gave me the information and inspiration. Here the comparison:Good morning. And in a moment it certainly has it privacy and then some. I love the effect of the weighing planks have. No doubt - the look through to the whole length of the pump is so very effective. Cheers Grant
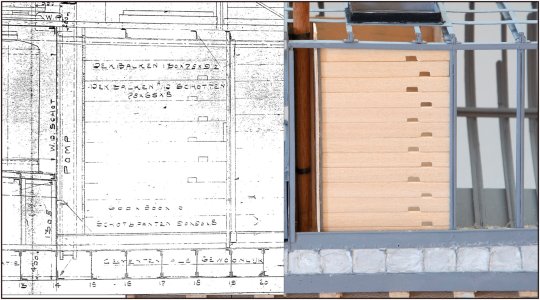
And the drawing is more of less also the cross section of the ship.
Regards, Peter.
Hello Peter, I am always amazed at how fast time flies. Just been catching up on your build, somehow over a month has gone by since I last visited. I see you have maintained your excellent high standard of work and by the way a fantastic recovery on the misstep at the stern. On some of the close in shots the paint and rivets look like real ones, just amazing. Happy New Year my friend!
Thanks for your renewed visit and HNY-wishes, Daniel. For you and your beloved all the best and a good health!Hello Peter, I am always amazed at how fast time flies. Just been catching up on your build, somehow over a month has gone by since I last visited. I see you have maintained your excellent high standard of work and by the way a fantastic recovery on the misstep at the stern. On some of the close in shots the paint and rivets look like real ones, just amazing. Happy New Year my friend!
I am also very happy with the result of the rivets. In addition to the money, it also costs a lot of time to apply and 'preserv', but the layer of paint works wonders.
Regards, Peter
I had some ideas in mind for making some fishing nets.
In post #3 I had already shown a picture of the type of net that was used: the 'vleet':

Up to 70 standing nets of 30 meters long and 15 meters high/deep each.
I'm not going to make them all. That's also not possible in scale, given the thin yarn the nets were made of. Or I'll have to knit nets myself with Serafil .......
Woudrichem where I live is also a 'old' fishing town and there are some fishing man who still pass on the old skills such as knitting nets and making splices.
In the net room of the model you only had a view of what is on top. I'm going to make a copy of 1 net that will be on top with the necessary padding underneath.
Then I won't place all the weighing boards, but put a few next to them.
I also found a piece of mosquito netting:

With this piece of length I think I can make something representative. And of which I don't know yet whether that will actually work. But it's fun to do because I now get a view of all the details of such a net.
First I attached the pieces of lead at the bottom of the net. These are number 8 in the drawing.
Now I am busy tying the 'speerreep' to the net. These are number 7. The pieces of cork will also be attached there as floats.
I may still attach the 'seizings', number 6, but I have to check whether anything is still visible.
The mesh is now grey in colour. The whole thing will be brown to make it look tanned. Also old fashion which is still demonstrated during the yearly Fishing Days here in town. Boiling in big kettles with tannin that was extracted from the bark of the birch or oak.
Regards, Peter
In post #3 I had already shown a picture of the type of net that was used: the 'vleet':

Up to 70 standing nets of 30 meters long and 15 meters high/deep each.
I'm not going to make them all. That's also not possible in scale, given the thin yarn the nets were made of. Or I'll have to knit nets myself with Serafil .......
Woudrichem where I live is also a 'old' fishing town and there are some fishing man who still pass on the old skills such as knitting nets and making splices.
In the net room of the model you only had a view of what is on top. I'm going to make a copy of 1 net that will be on top with the necessary padding underneath.
Then I won't place all the weighing boards, but put a few next to them.
I also found a piece of mosquito netting:

With this piece of length I think I can make something representative. And of which I don't know yet whether that will actually work. But it's fun to do because I now get a view of all the details of such a net.
First I attached the pieces of lead at the bottom of the net. These are number 8 in the drawing.
Now I am busy tying the 'speerreep' to the net. These are number 7. The pieces of cork will also be attached there as floats.
I may still attach the 'seizings', number 6, but I have to check whether anything is still visible.
The mesh is now grey in colour. The whole thing will be brown to make it look tanned. Also old fashion which is still demonstrated during the yearly Fishing Days here in town. Boiling in big kettles with tannin that was extracted from the bark of the birch or oak.
Regards, Peter
- Joined
- Oct 23, 2018
- Messages
- 886
- Points
- 403

Shouldn't the honeycombs of the net be arranged diagonally?
It depends on what kind of knitting they are using, Christian. The old-fashioned were often horizontal [ ] squared. Later on the <> shape was more common.Shouldn't the honeycombs of the net be arranged diagonally?
A professional net-knitter can make both. Modern ones are even hexagonal.
Regards, Peter
Last edited:
And then macro photography becomes fun again:
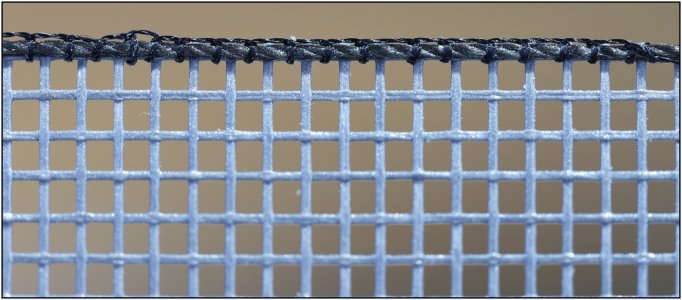
To see if the knots with the Serafil 4000 (0.12 mm <120/2>) are neatly placed. The mesh width is 1.5 mm.
For those interested: With a 100mm macro lens and 25mm Extension Tube. The image magnification factor of this lens is increased by 0.25 by this tube. Instead of 24 meshes I now get 18 meshes in the image.
Regards, Peter

To see if the knots with the Serafil 4000 (0.12 mm <120/2>) are neatly placed.
For those interested: With a 100mm macro lens and 25mm Extension Tube. The image magnification factor of this lens is increased by 0.25 by this tube. Instead of 24 meshes I now get 18 meshes in the image.
Regards, Peter
Thanks, Mirek. Much appreciated.Hello
Fabulous work, Piotr, sewing sails would be a piece of cake for you. Best regards, Mirek
About the sail, how did you know that?
Made this sail almost 40 years ago. Not bij hand but on the machine of my Admiral:
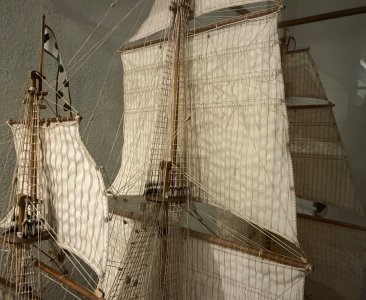
Still hanging proud on my ‘Le Mirage’.
Regards, Peter
Hi Peter,
Guess with these nets you don't go fishing for herring but mosquito's instead. Please let us know when you have your first catch of salted mosquito.
Guess with these nets you don't go fishing for herring but mosquito's instead. Please let us know when you have your first catch of salted mosquito.
Then I invite you for a sandwich with salted mosquito thighs … with of without onions ….Hi Peter,
Guess with these nets you don't go fishing for herring but mosquito's instead. Please let us know when you have your first catch of salted mosquito.

With onions and no sandwich but directly at the tailThen I invite you for a sandwich with salted mosquito thighs … with of without onions ….

Sometimes you have to let an idea sink in. The mosquito netting is quite stiff and coarse in scale. And to make a nice bunch of stored nets from that?I had some ideas in mind for making some fishing nets.
In post #3 I had already shown a picture of the type of net that was used: the 'vleet':
View attachment 494354
Up to 70 standing nets of 30 meters long and 15 meters high/deep each.
I'm not going to make them all. That's also not possible in scale, given the thin yarn the nets were made of. Or I'll have to knit nets myself with Serafil .......
Woudrichem where I live is also a 'old' fishing town and there are some fishing man who still pass on the old skills such as knitting nets and making splices.
In the net room of the model you only had a view of what is on top. I'm going to make a copy of 1 net that will be on top with the necessary padding underneath.
Then I won't place all the weighing boards, but put a few next to them.
I also found a piece of mosquito netting:
View attachment 494355
With this piece of length I think I can make something representative. And of which I don't know yet whether that will actually work. But it's fun to do because I now get a view of all the details of such a net.
First I attached the pieces of lead at the bottom of the net. These are number 8 in the drawing.
Now I am busy tying the 'speerreep' to the net. These are number 7. The pieces of cork will also be attached there as floats.
I may still attach the 'seizings', number 6, but I have to check whether anything is still visible.
The mesh is now grey in colour. The whole thing will be brown to make it look tanned. Also old fashion which is still demonstrated during the yearly Fishing Days here in town. Boiling in big kettles with tannin that was extracted from the bark of the birch or oak.
Regards, Peter
Then I remembered that I still had a Midget netting from a trip to Scotland. That is much thinner and finer in structure.
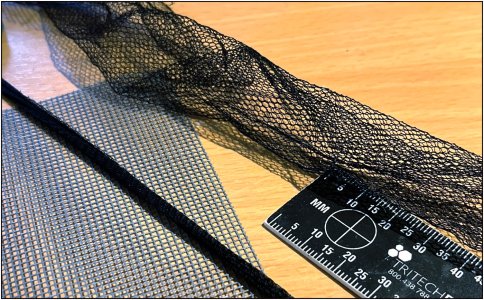
A test strip cut. Above a somewhat loosely draped piece and pulled together crosswise below it to what looks like a net that has been brought in and can be stored. Then you can't see much of what kind of meshes have been used.
Now make a test with some accentuating cork-like blocks. And whether the string 'fritted' with some diluted wood glue stays in place.
Regards, Peter
After quite a few hours of cutting, sewing and fitting:
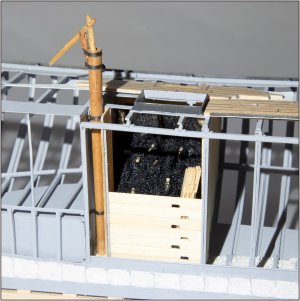
The wood has been treated with linseed oil. The cork blocks have been sewn to the upper edge of the nets and draped in such a way that they are visible on top. This all would not have been possible with the mosquito netting from the first attempt.
With the deck planked, there is only a view from the side. (Now some test planks have been placed on the deck to block out some light.) That is why the upper 6 weighing planks were not stacked but placed behind the others.
To get good lighting with the dark net, the necessary adjustments were needed. The light planks then overexpose.
Still an acceptable picture.
Regards, Peter
Success! Always an innovator, Peter.


