This view is beautiful, fascinating and instructive all at the same time. I almost expect to see a carpenter walking down the decking carrying another plank to put in place.There are only 2 planks per hold but it immediately gives a completely different impression:
View attachment 495580
After an hour of work I have to give my eyes a rest. You work with the tweezers between the frames with the model on the side where your eyes have to focus all the time. With each newly made plank as a template for the next one that also goes in and out at least 2x for the right fit. Only then can you glue it in place.
Regards, Peter
-

Win a Free Custom Engraved Brass Coin!!!
As a way to introduce our brass coins to the community, we will raffle off a free coin during the month of August. Follow link ABOVE for instructions for entering.
-

PRE-ORDER SHIPS IN SCALE TODAY!
The beloved Ships in Scale Magazine is back and charting a new course for 2026!
Discover new skills, new techniques, and new inspirations in every issue.
NOTE THAT OUR FIRST ISSUE WILL BE JAN/FEB 2026
You are using an out of date browser. It may not display this or other websites correctly.
You should upgrade or use an alternative browser.
You should upgrade or use an alternative browser.
BALDER, Vlaardingen Herring Lugger from 1912, scratch build scale 1:50 Plate-On-Frame
- Thread starter Peter Voogt
- Start date
- Watchers 65
I'm with Herman on this. The addition of the wood planking brings this model to life visually.
I rarely comment on some of the builds here. Why? I left no words from the English dictionary describing such amazing work. Yours, Peter, is on those builds. Being a scale modeler, I know what it takes to fabricate parts. But you bring a scratch building to a different level!
Thanks, Daniel. You are lucky, I found an old picture .......This view is beautiful, fascinating and instructive all at the same time. I almost expect to see a carpenter walking down the decking carrying another plank to put in place.
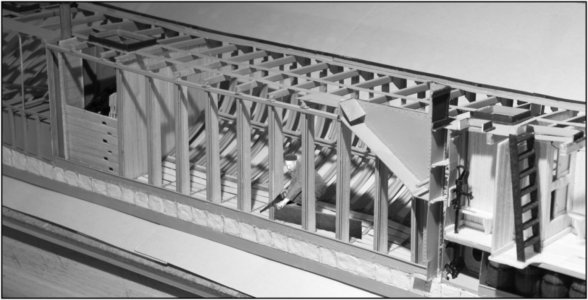
PS: No AI, just some Photoshop skills ...........
Regards, Peter
Last edited:
I fully agree, Paul. After the grey 'iron' the wood bring her alive.I'm with Herman on this. The addition of the wood planking brings this model to life visually.
Regards, Peter
You also thanks for this compliments and nice words, Jim. When I started this build I could not imagine that that this would be the result.I rarely comment on some of the builds here. Why? I left no words from the English dictionary describing such amazing work. Yours, Peter, is on those builds. Being a scale modeler, I know what it takes to fabricate parts. But you bring a scratch building to a different level!
Regards, Peter
That carpenter is working hard. Another 18 custom planks to slide in:Thanks, Daniel. You are lucky, I found an old picture .......
View attachment 495610
PS: No AI, just some Photoshop skills ...........
Regards, Peter
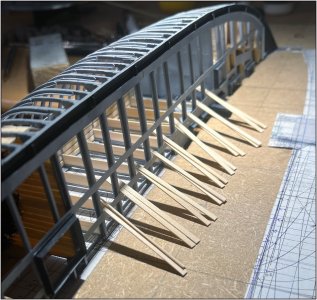
The port side part on its side. So I know for sure that everything stays straight and flat. The planks are inserted from above. I first insert the foot into the U-profile in the bottom, then I tilt the head into the U-profile under the deck beam.
Regards, Peter
- Joined
- Oct 23, 2018
- Messages
- 886
- Points
- 403

Who knows, after your current project ...
My Fly is only the first part of my long term project as you in my signature can see. I have also found some other really nice sloops and greater ships. So the time is definitely to go back to styrene .
- Joined
- Oct 28, 2018
- Messages
- 760
- Points
- 403

Hi Peter,
Beautiful pumps and nets, these small details are a feast for the eyes to see.
Regards
Henk
Beautiful pumps and nets, these small details are a feast for the eyes to see.
Regards
Henk
Thanks, Henk. Call you later this week.Hi Peter,
Beautiful pumps and nets, these small details are a feast for the eyes to see.
Regards
Henk
Regards, Peter
A small update on my intended method for placing the walls. To give you an idea of how my planning changes a little bit every time.
My plan was to place the floor planks after placing a wall. To keep space to work between the frames. I adjusted it a little bit ......
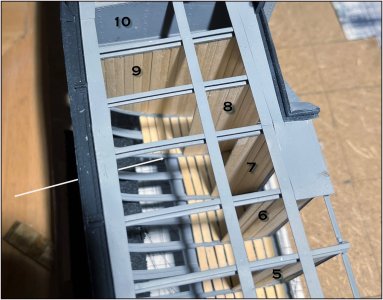
As an example, the current situation in this photo.
After wall 9, empty hold 10 was next for the floor planks. Phew ........ that was almost impossible from above. Fortunately, that space will hardly be visible anymore.
After wall 9, I now place the floor planks between 8 and 9. That does not cause any problems with placing wall 8. Because I work to the right of the frames where wall 8 will be placed. The white arrow indicates that.
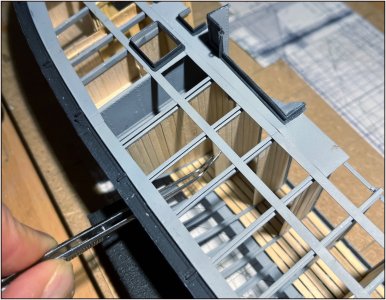
That works with the tweezers because the frames after the wall have a revers frame up to the bilge. That gives just a little extra space.
I'll continue with the 20 shelves per wall....
Regards, Peter
My plan was to place the floor planks after placing a wall. To keep space to work between the frames. I adjusted it a little bit ......

As an example, the current situation in this photo.
After wall 9, empty hold 10 was next for the floor planks. Phew ........ that was almost impossible from above. Fortunately, that space will hardly be visible anymore.
After wall 9, I now place the floor planks between 8 and 9. That does not cause any problems with placing wall 8. Because I work to the right of the frames where wall 8 will be placed. The white arrow indicates that.

That works with the tweezers because the frames after the wall have a revers frame up to the bilge. That gives just a little extra space.
I'll continue with the 20 shelves per wall....
Regards, Peter
Ditto and True storyThe volunteers are obviously a discerning group! They appreciate the skill and accuracy with which you are creating this incredible model of the ship they give their time and hearts to!
The editors of "De Spil" also make great editorial choices, since they selected your unique model to feature in their magazine!! Congratulations!
Love following your log and watching this beautiful build progress. Your pictures are superb...thanks for sharing.
Thanks, Grant. Also for going through the recent posts.Ditto and True story
Regards, Peter
The work was nicely described on the Dutch forum: 'mini carpenter'.
With the planks I also have to work around the bilge stringers.

Make a point on the 2.8 x 0.8 mm plank to fill the space.
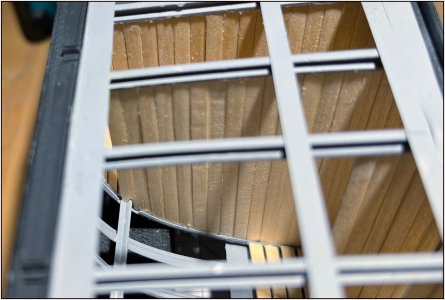
I accept the small corner under the stringer .....
Taking photos of the walls is only possible with light from above and from the side. Then you can clearly see that the planks are a bit rough. But it is not a luxury yacht. There is a lot of work going on on the ship:

Source: Restoration book ScheepvaartMuseum Amsterdam, page 25.
Before the barrels are loaded into the holds, hooks are placed around the edges. The barrels will then certainly bump against the walls and leave their marks. Smoothly finished planks will not have a long neat life.
Caption to the photo: "The photo was probably posed for, because in reality a barrel went into the hold along the length of the ship." And if I see it correctly, they also use the net hold with the double overlay hatch.
And when the holds are filled with barrels, you won't see much of the walls anymore:
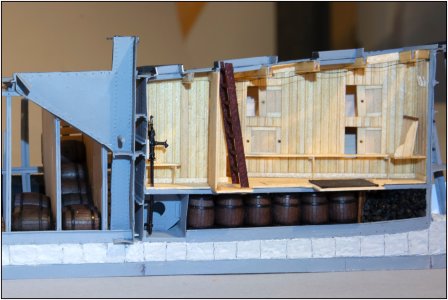
The layers of linseed oil will make it a bit tighter.
But you and I know ........
Regards, Peter
With the planks I also have to work around the bilge stringers.

Make a point on the 2.8 x 0.8 mm plank to fill the space.

I accept the small corner under the stringer .....
Taking photos of the walls is only possible with light from above and from the side. Then you can clearly see that the planks are a bit rough. But it is not a luxury yacht. There is a lot of work going on on the ship:

Source: Restoration book ScheepvaartMuseum Amsterdam, page 25.
Before the barrels are loaded into the holds, hooks are placed around the edges. The barrels will then certainly bump against the walls and leave their marks. Smoothly finished planks will not have a long neat life.
Caption to the photo: "The photo was probably posed for, because in reality a barrel went into the hold along the length of the ship." And if I see it correctly, they also use the net hold with the double overlay hatch.
And when the holds are filled with barrels, you won't see much of the walls anymore:

The layers of linseed oil will make it a bit tighter.
But you and I know ........
Regards, Peter
Last edited:
In light of how you have to install the boards the fact that they are there at all outdistances any concerns for how perfectly aligned they are...
- Joined
- Sep 3, 2021
- Messages
- 5,197
- Points
- 738

To me it looks as if Peter is filling a lot chip bags from the tip. (It's a phrase used by a colleague of mine when we had to relocate a cargo hatch to the narrowing part of the fuselage of the Fokker 70.)In light of how you have to install the boards the fact that they are there at all outdistances any concerns for how perfectly aligned they are...
A little supervision of the carpenter never hurts .…….In light of how you have to install the boards the fact that they are there at all outdistances any concerns for how perfectly aligned they are...
It's always nice when a post brings back old memories.To me it looks as if Peter is filling a lot chip bags from the tip. (It's a phrase used by a colleague of mine when we had to relocate a cargo hatch to the narrowing part of the fuselage of the Fokker 70.)
- Joined
- Sep 3, 2021
- Messages
- 5,197
- Points
- 738

Your picture triggered my curiosity with regards to the crew on these loggers. Wikipedia has a nice page in Dutch, giving a more detailed description of the crew, composition, food and pay:Taking photos of the walls is only possible with light from above and from the side. Then you can clearly see that the planks are a bit rough. But it is not a luxury yacht. There is a lot of work going on on the ship:
View attachment 496729
Source: Restoration book ScheepvaartMuseum Amsterdam, page 25.
Before the barrels are loaded into the holds, hooks are placed around the edges. The barrels will then certainly bump against the walls and leave their marks. Smoothly finished planks will not have a long neat life.
Caption to the photo: "The photo was probably posed for, because in reality a barrel went into the hold along the length of the ship." And if I see it correctly, they also use the net hold with the double overlay hatch.
"Crew
The lower crew's underdeck accomodation - also called the focsle - was suited for about 12 men. In the focsle they slept, ate and cooked. There was a slight difference in the number of crew members between the different fishing villages. At Vlaardingen, there was one man more among the crew than at Scheveningen and Katwijk. The skipper and the helmsman had their accommodation in the aft cabin. When the logger fleet became motorized during the 1920s, the mechanic also stayed in the aft cabin with the skipper and the helmsman.
The skipper and the helmsman were often seen working on deck with the rest of the crew. The sailors were full-fledged herring fishermen; the cook was one of theirs. The ranks were as follows:
Boatman
Helmsman
Mechanic
Sailor (5)
Sailor cook
Young or light sailor, referred to as 7/8th
Oldest (1 of 2)
Youngest
Bar shooter
Holder
Food
For the new - especially post-war - loggers which were equipped with a real galley - the designated cook could receive instruction from a teacher as a pseudo-cook in a practice room of a housekeeping school. Ship's cooks learned how to prepare healthier food and more varied meals on board, on the basis of new insights. They also learned to bake bread and make fresh soup.
In the focsle of the older loggers meals were prepared under less than favorable conditions. Especially among these pre-war loggers, cooking food was not particularly high on the list of priorities. One of the older sailors was appointed cook in addition to being a fisherman. His possibilities were primitive and very limited. Vegetables like brown beans, gray peas and green peas or a soup brewed from them, together with rice or barley, formed the main components of the daily diet.
Meat was not offered because of the limited shelf life. Instead bacon was on the menu. Furthermore, bread, which also had a very limited shelf life, very soon gave way to the so-called ship's biscuit. There was no fishing on Sundays: according to biblical views, this was a day of rest. That rest period was already ushered in on Saturday evening by baking and eating pancakes. This baking was one of the tasks of an elder.
Pay
Among the crew, about 25% of the stock was distributed; said percentage is an assumption because it changed quite a bit over time from lower to higher. The amount in question was converted into so-called eighths via a certain calculation system. A skipper got 16/8th-, the helmsman 12/8th-, the motor driver 10/8th-, a sailor 8/8th-, a youngest sailor 7/8th-, the oldest 6/8th-, the youngest 5/8th-, the bar shooter 4/8th-, the holder 3/8th part."
Having read this article and the various posts of your build log, my appreciation of the perseverance of these men only rose to new levels and I consider myself lucky not having had to endure their hardships.
That's fully correct, Johan. Life was hard on board of those luggers. In the restoration book of Amsterdam there is also a chapter of how life was on board during the fishing days. I will make a translation of that chapter soon. It's almost unbelievable how that went.Your picture triggered my curiosity with regards to the crew on these loggers. Wikipedia has a nice page in Dutch, giving a more detailed description of the crew, composition, food and pay:
"Crew
The lower crew's underdeck accomodation - also called the focsle - was suited for about 12 men. In the focsle they slept, ate and cooked. There was a slight difference in the number of crew members between the different fishing villages. At Vlaardingen, there was one man more among the crew than at Scheveningen and Katwijk. The skipper and the helmsman had their accommodation in the aft cabin. When the logger fleet became motorized during the 1920s, the mechanic also stayed in the aft cabin with the skipper and the helmsman.
The skipper and the helmsman were often seen working on deck with the rest of the crew. The sailors were full-fledged herring fishermen; the cook was one of theirs. The ranks were as follows:
Boatman
Helmsman
Mechanic
Sailor (5)
Sailor cook
Young or light sailor, referred to as 7/8th
Oldest (1 of 2)
Youngest
Bar shooter
Holder
Food
For the new - especially post-war - loggers which were equipped with a real galley - the designated cook could receive instruction from a teacher as a pseudo-cook in a practice room of a housekeeping school. Ship's cooks learned how to prepare healthier food and more varied meals on board, on the basis of new insights. They also learned to bake bread and make fresh soup.
In the focsle of the older loggers meals were prepared under less than favorable conditions. Especially among these pre-war loggers, cooking food was not particularly high on the list of priorities. One of the older sailors was appointed cook in addition to being a fisherman. His possibilities were primitive and very limited. Vegetables like brown beans, gray peas and green peas or a soup brewed from them, together with rice or barley, formed the main components of the daily diet.
Meat was not offered because of the limited shelf life. Instead bacon was on the menu. Furthermore, bread, which also had a very limited shelf life, very soon gave way to the so-called ship's biscuit. There was no fishing on Sundays: according to biblical views, this was a day of rest. That rest period was already ushered in on Saturday evening by baking and eating pancakes. This baking was one of the tasks of an elder.
Pay
Among the crew, about 25% of the stock was distributed; said percentage is an assumption because it changed quite a bit over time from lower to higher. The amount in question was converted into so-called eighths via a certain calculation system. A skipper got 16/8th-, the helmsman 12/8th-, the motor driver 10/8th-, a sailor 8/8th-, a youngest sailor 7/8th-, the oldest 6/8th-, the youngest 5/8th-, the bar shooter 4/8th-, the holder 3/8th part."
Having read this article and the various posts of your build log, my appreciation of the perseverance of these men only rose to new levels and I consider myself lucky not having had to endure their hardships.
Regards, Peter

