Every (half) hold has a hatch: 2 rows of 9 hatches. Also for the net holds: 2 hatches.Hi Peter,
Is every barrel hold getting it own hatch? Or is there a passage between the holes below deck?
-

Win a Free Custom Engraved Brass Coin!!!
As a way to introduce our brass coins to the community, we will raffle off a free coin during the month of August. Follow link ABOVE for instructions for entering.
-

PRE-ORDER SHIPS IN SCALE TODAY!
The beloved Ships in Scale Magazine is back and charting a new course for 2026!
Discover new skills, new techniques, and new inspirations in every issue.
NOTE THAT OUR FIRST ISSUE WILL BE JAN/FEB 2026
You are using an out of date browser. It may not display this or other websites correctly.
You should upgrade or use an alternative browser.
You should upgrade or use an alternative browser.
BALDER, Vlaardingen Herring Lugger from 1912, scratch build scale 1:50 Plate-On-Frame
- Thread starter Peter Voogt
- Start date
- Watchers 65
I can now do a bit of 'production' painting the barrels:
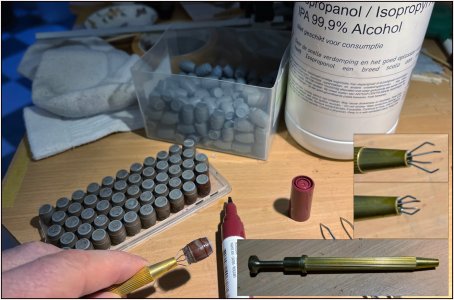
First cleaned them all. Luckily I found my 4-finger gripper in time. It's much easier to paint. After the painting (3 layers) with the brush pen I just have to clamp them in the lathe for the hoops.
By pressing the top with its inner spring the 4 fingers come out. By releasing the inner spring grabs them.
Regards, Peter
Or you can use a tapered dowel that you wedge inside.I can now do a bit of 'production' painting the barrels:
View attachment 498034
First cleaned them all. Luckily I found my 4-finger gripper in time. It's much easier to paint. After the painting (3 layers) with the brush pen I just have to clamp them in the lathe for the hoops.
By pressing the top with its inner spring the 4 fingers come out. By releasing the inner spring grabs them.
Regards, Peter
O yes, but I have to buy or make that …….Or you can use a tapered dowel that you wedge inside.
This was laying in a drawer waiting for years and shouting: please use me!
Last edited:
Because I wanted to have all the steps of the construction in view, I decided to first place all the walls of the barrel holds:
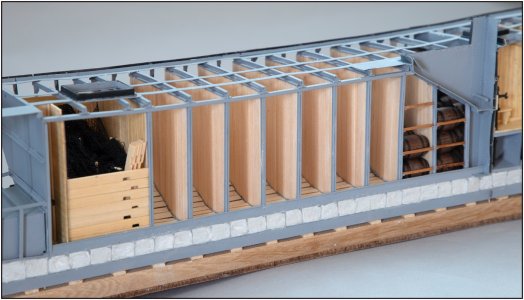
So that I could take a picture of the 7 remaining empty holds.
As mentioned before: 9x20 planks for the walls and 9x16 planks for the intermediate floors.
With an overview:
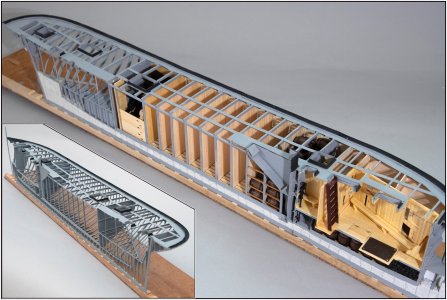
It is already becoming quite a compleet interior. It is now also becoming a very stiff construction, certainly if you compare it to the open construction part. Only the back is still somewhat flexible. Now to store and the small beams, then the rear accommodation is next.
Regards, Peter

So that I could take a picture of the 7 remaining empty holds.
As mentioned before: 9x20 planks for the walls and 9x16 planks for the intermediate floors.
With an overview:

It is already becoming quite a compleet interior. It is now also becoming a very stiff construction, certainly if you compare it to the open construction part. Only the back is still somewhat flexible. Now to store and the small beams, then the rear accommodation is next.
Regards, Peter
Last edited:
- Joined
- Aug 8, 2019
- Messages
- 5,575
- Points
- 738

Back in 2023
you made a good decision splitting the ship in half. I can look for hours to the details you make on the inside.
BALDER, Vlaardingen Herring Lugger from 1912, scratch build scale 1:50 Plate-On-Frame
He got a green mat, for sure. See post #3 WYSIWYG
shipsofscale.com
Wow! I finally understand what is happening  ! Thanks for the overview image with the walls in place. Just wonderful modeling!
 ! Thanks for the overview image with the walls in place. Just wonderful modeling!
Thanks, Stephan. Made the decision to split the hull in a split second. Luckily not a split personality. Just a bit pleasantly disturbed …..Back in 2023
you made a good decision splitting the ship in half. I can look for hours to the details you make on the inside.BALDER, Vlaardingen Herring Lugger from 1912, scratch build scale 1:50 Plate-On-Frame
He got a green mat, for sure. See post #3 WYSIWYGshipsofscale.com
Regards, Peter
Thanks, Paul. Glad a made this decision…… particularly for you ….Wow! I finally understand what is happening! Thanks for the overview image with the walls in place. Just wonderful modeling!
Regards, Peter
Peter,
She looks beautiful, and as people have mentioned, it’s great to see all the details of the interior. You have definitely created a model that is worthy of display and admiration. I look forward to seeing the eventual completion. For now, I enjoy watching it go together.
She looks beautiful, and as people have mentioned, it’s great to see all the details of the interior. You have definitely created a model that is worthy of display and admiration. I look forward to seeing the eventual completion. For now, I enjoy watching it go together.
Thanks for your compliments, Dean. In my head I am many steps ahead and already building up the deck with the planking with hatches and the masts with the partly split rigging. But building the inside is also great fun. After placing all the barrels I can satisfy the captain and helmsman with their accommodation. Then building 3 stoves, a Donkey steam kettle etc etc.Peter,
She looks beautiful, and as people have mentioned, it’s great to see all the details of the interior. You have definitely created a model that is worthy of display and admiration. I look forward to seeing the eventual completion. For now, I enjoy watching it go together.
Regards, Peter
Started with the rest of the beams:
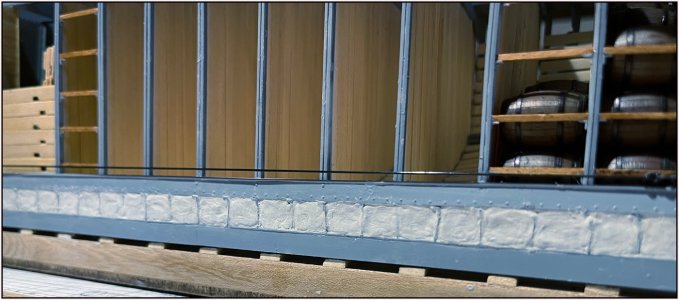
First I made the 5 beams in the left hold (9), fitted them with the knees and placed them at the height of the 5 barrels. Dry-fit and layer by layer I will further align and secure them.
Now I will apply the beams layer by layer and align them between holds 2 and 9. For this I have stretched a thin elastic line on the underside of the beams.
The remaining 6 beams were made to size and first placed dry-fit between the U-profiles:
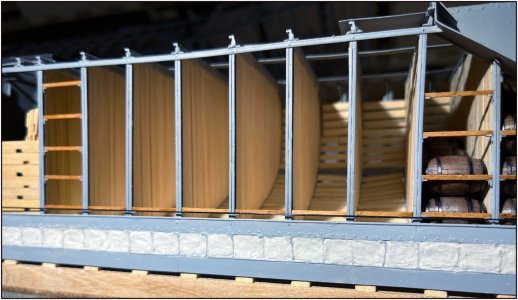
Then I placed small dots of glue under the knees in the U-profiles and then slide the beams into position.
Regards, Peter

First I made the 5 beams in the left hold (9), fitted them with the knees and placed them at the height of the 5 barrels. Dry-fit and layer by layer I will further align and secure them.
Now I will apply the beams layer by layer and align them between holds 2 and 9. For this I have stretched a thin elastic line on the underside of the beams.
The remaining 6 beams were made to size and first placed dry-fit between the U-profiles:

Then I placed small dots of glue under the knees in the U-profiles and then slide the beams into position.
Regards, Peter
Last edited:
- Joined
- Apr 20, 2020
- Messages
- 6,242
- Points
- 738

Dear PeterStarted with the rest of the beams:
View attachment 498943
First I made the 5 beams in the left hold (9), fitted them with the knees and placed them at the height of the 5 barrels. Dry-fit and layer by layer I will further align and secure them.
Now I will apply the beams layer by layer and align them between holds 2 and 9. For this I have stretched a thin elastic line on the underside of the beams.
The remaining 6 beams were made to size and first placed dry-fit between the U-profiles:
View attachment 498944
Then I placed small dots of glue under the knees in the U-profiles and then slide the beams into position.
Regards, Peter
you are doing incredible things on this wonderful ship model
Thanks, Shota. It’s sometimes exploring new boundaries.Dear Peter
you are doing incredible things on this wonderful ship model
Gr. Peter
Good morning Peter. Wow. Keep all those details coming….she just gets better and better. What an inspiration this model is. Cheers GrantStarted with the rest of the beams:
View attachment 498943
First I made the 5 beams in the left hold (9), fitted them with the knees and placed them at the height of the 5 barrels. Dry-fit and layer by layer I will further align and secure them.
Now I will apply the beams layer by layer and align them between holds 2 and 9. For this I have stretched a thin elastic line on the underside of the beams.
The remaining 6 beams were made to size and first placed dry-fit between the U-profiles:
View attachment 498944
Then I placed small dots of glue under the knees in the U-profiles and then slide the beams into position.
Regards, Peter
Thanks, Grant. And the constant research is paying off ......... see below ......Good morning Peter. Wow. Keep all those details coming….she just gets better and better. What an inspiration this model is. Cheers Grant
Regards, Peter
Just in time I was able to find the explanation for an ambiguity on the old drawings from 1912 and from the Amsterdam archives about the restoration:

In the cross-section drawings from 1912 (left) and from the Amsterdam archives (right), a few battens and a floor have been drawn in the 8th hold, on the walls that are placed in frames 21 and 23. I have outlined this on both drawings.
The side of wall '23' is also drawn on the Amsterdam drawing. See right. There are also 3 walls drawn.
Up until last week, this only raised questions for me. Until I was reading the Amsterdam restoration book again and came across this text:
"A removable plank floor was made in the rear tier holds on the starboard and port sides. In the event of an abundant catch, herring could also be temporarily stored here if the space in the crabs was not large enough."
That explains the floor and the walls. Only not in the rear 9th hold but in the 8th hold.
Started working in that 8th hold:
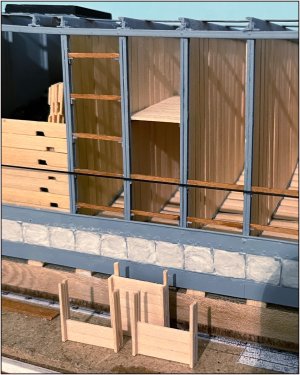
I have placed the 'loose' floorboards on 2 battens.
Made the 3 walls. To prevent the fiddling in the hold, I have pre-fixed the battens to the planks between which the planks can be slid. Now 2 compartments can be made for the temporary storage of the herring.
Placed the 3 walls:
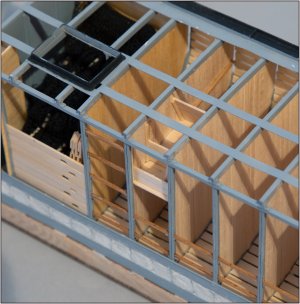
To keep an eye on this flexible layout later, not all planks have been placed:
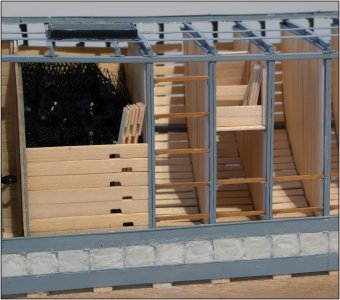
Just like in the net hold, the unused planks have been placed against the side.
Now I can continue with the beams.
Regards, Peter

In the cross-section drawings from 1912 (left) and from the Amsterdam archives (right), a few battens and a floor have been drawn in the 8th hold, on the walls that are placed in frames 21 and 23. I have outlined this on both drawings.
The side of wall '23' is also drawn on the Amsterdam drawing. See right. There are also 3 walls drawn.
Up until last week, this only raised questions for me. Until I was reading the Amsterdam restoration book again and came across this text:
"A removable plank floor was made in the rear tier holds on the starboard and port sides. In the event of an abundant catch, herring could also be temporarily stored here if the space in the crabs was not large enough."
That explains the floor and the walls. Only not in the rear 9th hold but in the 8th hold.
Started working in that 8th hold:

I have placed the 'loose' floorboards on 2 battens.
Made the 3 walls. To prevent the fiddling in the hold, I have pre-fixed the battens to the planks between which the planks can be slid. Now 2 compartments can be made for the temporary storage of the herring.
Placed the 3 walls:

To keep an eye on this flexible layout later, not all planks have been placed:

Just like in the net hold, the unused planks have been placed against the side.
Now I can continue with the beams.
Regards, Peter
I really like the vertically stacked boards idea, Peter. I noticed it earlier and I believe it supports a: this is a working boat ethos perfectly.
A thin skeleton is becoming a strong and rigid fishing boat, ready for the "abundant catch" to which you refer!
Your diligent research paid off! Those fishermen sure went the extra mile to make every inch capable of holding the money-making herring.
I can't imagine how crowded it would be with all those barrels...and the smell, once the catch was in. Good thing the nose becomes accustomed to odors after being exposed to them for prolonged periods!!! When I came back from submarine trips, my wife made me undress and put my clothes in a plastic bag on the back porch, then straight to the shower. I'm sure the fisher-wives did the same.
The nets look great too!

