-

Win a Free Custom Engraved Brass Coin!!!
As a way to introduce our brass coins to the community, we will raffle off a free coin during the month of August. Follow link ABOVE for instructions for entering.
-

PRE-ORDER SHIPS IN SCALE TODAY!
The beloved Ships in Scale Magazine is back and charting a new course for 2026!
Discover new skills, new techniques, and new inspirations in every issue.
NOTE THAT OUR FIRST ISSUE WILL BE JAN/FEB 2026
You are using an out of date browser. It may not display this or other websites correctly.
You should upgrade or use an alternative browser.
You should upgrade or use an alternative browser.
Bluenose 1:64 by Model Shipways - Build log
- Thread starter HughLo
- Start date
- Watchers 25
-
- Tags
- bluenose model shipways
HughLo, The comment I want to make is - Your symmetry of your stanchions looks great in the overhead photos, along with the nibbing is visually striking. Great work!
BTW - I'm going to try to make a couple of the club meetings up in Denver here soon.
BTW - I'm going to try to make a couple of the club meetings up in Denver here soon.
Thanks for the kind words. Hope to see you at either the workshop meeting or the club meeting. The workshop is tomorrow morning but I’m heading out and won’t be there. I do expect to be at the club meeting on 8/19.HughLo, The comment I want to make is - Your symmetry of your stanchions looks great in the overhead photos, along with the nibbing is visually striking. Great work!
BTW - I'm going to try to make a couple of the club meetings up in Denver here soon.
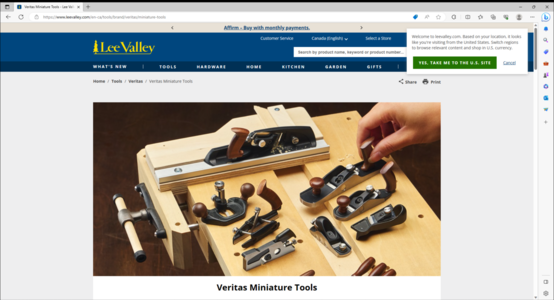
Thanks for the recommendation. Got a week away from the BN which gives me some time to decide and order.Lee Valley.View attachment 388045
Do you know if there is a block planer that can also cut as a chamfering tool?
- Joined
- Jun 17, 2021
- Messages
- 3,200
- Points
- 588

I think Garret Wade has a choice of good quality block planes in different sizes. Also, the one that feels the best in your, hand is an important consideration.
You might look at the Stewart MacDonald Luthier's catalog as well . stewmac.com Sharpness of the blade is key.
I love my 40+ year old Stanley. My favorite all around plane. Not as fancy as the other brands, but just as good, if they still make it and haven't "improved " it or cut costs or quality in its' manufacture.
Pete
You might look at the Stewart MacDonald Luthier's catalog as well . stewmac.com Sharpness of the blade is key.
I love my 40+ year old Stanley. My favorite all around plane. Not as fancy as the other brands, but just as good, if they still make it and haven't "improved " it or cut costs or quality in its' manufacture.

Pete
Last edited:
- Joined
- Jun 17, 2021
- Messages
- 3,200
- Points
- 588

I like the look of the Lee Valley block plane that will fit in the palm of one hand. Make sure it has an adjustment for the throat of the blade , I don't see it on the little Lee Vally one
Last edited:
- Joined
- Jun 17, 2021
- Messages
- 3,200
- Points
- 588

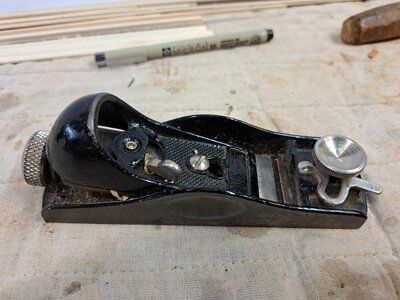
This is a Stanley 6 1/2" long overall (6" shoe) block plane about 40+ years old. It is a multipurpose plane, just the right size and weight to use with one or two hands and easy to control. It has all the features a block plane MUST have: depth of cut control and fine adjustment for the throat in the toe. It comes apart and reassembles easily and has a nice, hardened carbon steel blade that sharpens easily and holds an edge. I don't know what it costs anymore or even if Stanley still makes exactly the same plane. But it has all the features and utility you want in a block plane and will last forever. I've even dropped it on my concrete basement floor a couple of times with no apparent ill effect, although I wouldn't recommend it.
Pete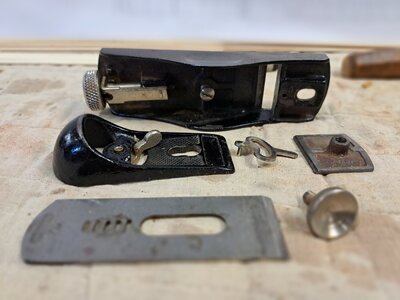
Pete


Last edited:
Beautiful time-tested tool! And enough weight to let the plane do the work - best part, Stanley planes are easy to find on Ebay - except a #1This is a Stanley 6 1/2" long overall (6" shoe) block plane about 40+ years old. It is a multipurpose plane, just the right size and weight to use with one or two hands and easy to control. It has all the features a block plane MUST have: depth of cut control and fine adjustment for the throat in the toe. It comes apart and reassembles easily and has a nice, hardened carbon steel blade, that sharpens easily and holds an edge. I don't know what it costs anymore or even if Stanley still makes exactly the same plane. But it has all the features and utility you want in a block plane and will last forever. I've even dropped it on my concrete basement floor a couple of times with no apparent ill effect, although I wouldn't recommend it.
PeteView attachment 388184View attachment 388185

- Joined
- Jun 17, 2021
- Messages
- 3,200
- Points
- 588

Good point about the weight (and of course a sharp edge!) to let the tool do the cutting. 
 Nothing more dangerous than a dull edge with a lot of force behind it!

 Nothing more dangerous than a dull edge with a lot of force behind it!

I used a plane on my Bluenose. I use a small Stanley that is about 3x1 inch at the base.Thanks for the tip. Is there a good one or ones you (or anyone out there) recommend?
Is it easy to use a full-sized plane on a 3/32” plank board? I’ve never used a plane. Would you recommend a beginner use a “full-sized” one (like your Stanley) or go with a small/miniature one?This is a Stanley 6 1/2" long overall (6" shoe) block plane about 40+ years old. It is a multipurpose plane, just the right size and weight to use with one or two hands and easy to control. It has all the features a block plane MUST have: depth of cut control and fine adjustment for the throat in the toe. It comes apart and reassembles easily and has a nice, hardened carbon steel blade that sharpens easily and holds an edge. I don't know what it costs anymore or even if Stanley still makes exactly the same plane. But it has all the features and utility you want in a block plane and will last forever. I've even dropped it on my concrete basement floor a couple of times with no apparent ill effect, although I wouldn't recommend it.
PeteView attachment 388184View attachment 388185
- Joined
- Jun 17, 2021
- Messages
- 3,200
- Points
- 588

My 6" Stanley feels right to me . Use what feels best to you. Mine feels easy to control even with a small plank in one hand, or a vise, and the plane in the other.
Tools are instruments. It takes a little practice, but after a while you can make beautiful music.
Tools are instruments. It takes a little practice, but after a while you can make beautiful music.
8/14 to 8/24
While I was in Vallarta I decided that instead of using a plane for tapering the planks on the quarterdeck, I would use a nice 4” drill press clamp and an exacto knife. My reasoning was that in order to use the plane, I’d need to first clamp the plank in something. So at this point, why buy two things when I can get a good clamp and use my existing blades. The clamp was at home when I returned.
The clamp was bigger and heavier than I had expected but I believe those are good qualities in what I need. The weight will help to keep the clamp in place while the size allows more of the plank to be held in the jaws of the clamp. Since the taper is supposed to be 6” but the clamp face is only 4”, my plan was to use some scrap 1/2” aluminum strips I had to “increase” the clamp face to around 7”.
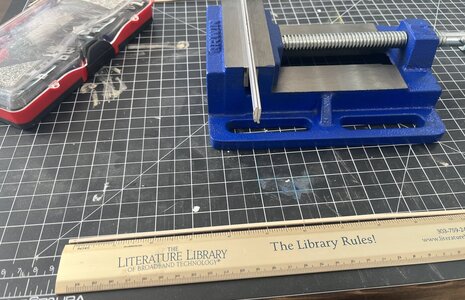
This idea didn’t work as well as I had hoped for because in order to work, I have to hold both aluminum strips plus my plank (which needs to be at a very slight angle to create the taper) - while tightening the clamp. Just too much.

Then I tried to make a wooded jig that would fit inside the clamp and let the plank sit on top of the jig at the correct angle. This too didn’t work either as it had too much flexibility - after all, I’m only cutting a 3/32” taper. Any flexibility is bad.
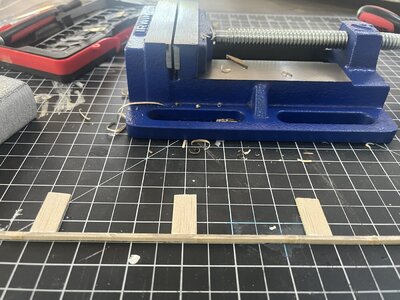
What I landed on was to clamp the plank in the jaws at about the correct angle with one end of the plank aligning with the end of the clamp face. I’d then cut away about 3” of the taper and then loosen the clamp and slide the plank so I could taper the other end. Then a little sanding. Not ideal, but it worked and was repeatable.
Long term I may get a set of magnetized 6” clamp jaws to attach to my clamp, but for now I’ll use it as described above and then see how often I need 6” or longer tapers and the 6” clamp jaws.
Installed 8 planks (4 on each side). I believe I’ll need between 8 and 10 more on each side to reach the side of the transom and the nibbing plank. At this point most or all of them will need to be tapered.
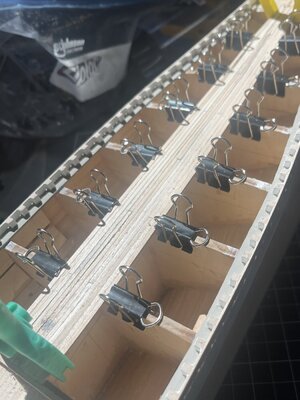
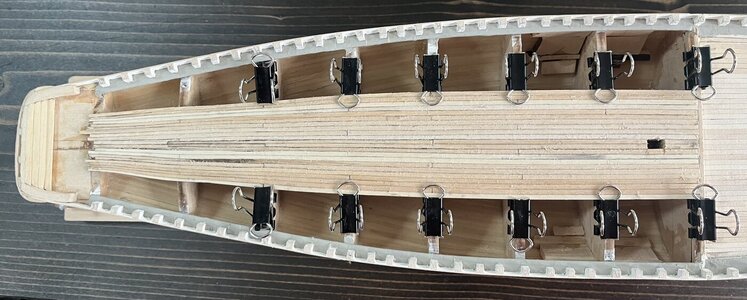
Installed 10 more planks, 5 on each side and cut out the hole for the main mast. Unfortunately when I went to drill the beginning of the hole, the drill went into the plank on the starboard side. Argh! I cut a small section out of the damaged plank and glued in a replacement piece. I believe this will be covered by the mast ring and the fife rail, so hopefully it won’t be noticeable.
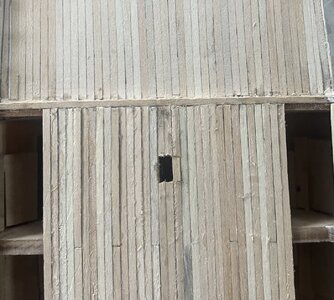
Installed 4 more tapered planks, 2 on each side. In order to even up the number of planks on each side, I needed to modify the tapers on the starboard planks. For the next 2 planks, only on the starboard side, I made the taper less than the others.
I then glued the nibbing strake on both sides, and wrapped up the day’s work by installing the final tapered plank on each side.

Once the deck is complete, I plan on drawing a line across the ends of the planks on the transom and then cutting off the snagletooth appearance.
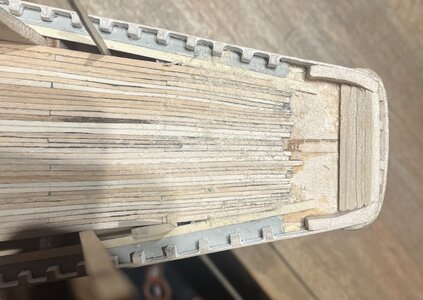
Started with the planks that get nibbed. It’s been over a month since I nibbed the foredeck and was hoping to finish the last 1/2 dozen or so planks and close off the quarterdeck but given reality, I was only able to nib one plank on each side before having to tap out as we’re on the road again. This time we’re heading California to visit our daughter who is a (can I say a bad-ass) wildland firefighter who’s working the Smith River Complex fire right at the CA/OR border.
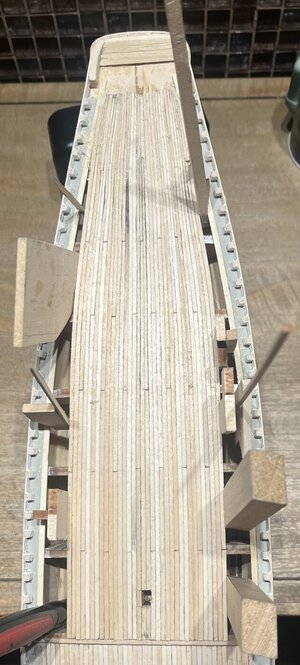
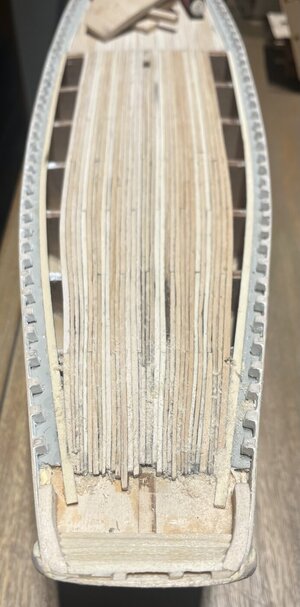
I feel it looks rough but think (okay HOPE) it will look good once I sand it.
Sorry to put the Bluenose back in dry dock, but happy to (okay hopefully) see our daughter (if she can get some R&R). See ya all in about 2 weeks.

Work time: 12 hours
Total work time: 139.5 hours

While I was in Vallarta I decided that instead of using a plane for tapering the planks on the quarterdeck, I would use a nice 4” drill press clamp and an exacto knife. My reasoning was that in order to use the plane, I’d need to first clamp the plank in something. So at this point, why buy two things when I can get a good clamp and use my existing blades. The clamp was at home when I returned.
The clamp was bigger and heavier than I had expected but I believe those are good qualities in what I need. The weight will help to keep the clamp in place while the size allows more of the plank to be held in the jaws of the clamp. Since the taper is supposed to be 6” but the clamp face is only 4”, my plan was to use some scrap 1/2” aluminum strips I had to “increase” the clamp face to around 7”.

This idea didn’t work as well as I had hoped for because in order to work, I have to hold both aluminum strips plus my plank (which needs to be at a very slight angle to create the taper) - while tightening the clamp. Just too much.

Then I tried to make a wooded jig that would fit inside the clamp and let the plank sit on top of the jig at the correct angle. This too didn’t work either as it had too much flexibility - after all, I’m only cutting a 3/32” taper. Any flexibility is bad.

What I landed on was to clamp the plank in the jaws at about the correct angle with one end of the plank aligning with the end of the clamp face. I’d then cut away about 3” of the taper and then loosen the clamp and slide the plank so I could taper the other end. Then a little sanding. Not ideal, but it worked and was repeatable.
Long term I may get a set of magnetized 6” clamp jaws to attach to my clamp, but for now I’ll use it as described above and then see how often I need 6” or longer tapers and the 6” clamp jaws.
Installed 8 planks (4 on each side). I believe I’ll need between 8 and 10 more on each side to reach the side of the transom and the nibbing plank. At this point most or all of them will need to be tapered.


Installed 10 more planks, 5 on each side and cut out the hole for the main mast. Unfortunately when I went to drill the beginning of the hole, the drill went into the plank on the starboard side. Argh! I cut a small section out of the damaged plank and glued in a replacement piece. I believe this will be covered by the mast ring and the fife rail, so hopefully it won’t be noticeable.

Installed 4 more tapered planks, 2 on each side. In order to even up the number of planks on each side, I needed to modify the tapers on the starboard planks. For the next 2 planks, only on the starboard side, I made the taper less than the others.
I then glued the nibbing strake on both sides, and wrapped up the day’s work by installing the final tapered plank on each side.

Once the deck is complete, I plan on drawing a line across the ends of the planks on the transom and then cutting off the snagletooth appearance.

Started with the planks that get nibbed. It’s been over a month since I nibbed the foredeck and was hoping to finish the last 1/2 dozen or so planks and close off the quarterdeck but given reality, I was only able to nib one plank on each side before having to tap out as we’re on the road again. This time we’re heading California to visit our daughter who is a (can I say a bad-ass) wildland firefighter who’s working the Smith River Complex fire right at the CA/OR border.


I feel it looks rough but think (okay HOPE) it will look good once I sand it.
Sorry to put the Bluenose back in dry dock, but happy to (okay hopefully) see our daughter (if she can get some R&R). See ya all in about 2 weeks.

Work time: 12 hours
Total work time: 139.5 hours

- Joined
- Jun 17, 2021
- Messages
- 3,200
- Points
- 588

I like your enginuity! You could actually (theoretically) put a strip of double sticky tape on one of the aluminum jaw extensions, fix your plank strip to that at just the right angle, then do that with the other side. Then clamp the whole assembly into that admittedly wonderful vise. As I said, still theoretical. Probably a fussy pain in the ass in practice.  As for releasing the tape you can do that with a little lacquer thinner on a brush without warping or damaging the plank. The thinner shouldn't (in theory) raise the wood grain. But that's all neither here nor there since you've got it done. Looks pretty cool!
As for you daughter being a Badass! NO $**+! Confronted with THAT I would soil my pants and run like hell the other way!
I hope you and she at least have time for a .
. 
All the best, Pete
 As for releasing the tape you can do that with a little lacquer thinner on a brush without warping or damaging the plank. The thinner shouldn't (in theory) raise the wood grain. But that's all neither here nor there since you've got it done. Looks pretty cool!
As for you daughter being a Badass! NO $**+! Confronted with THAT I would soil my pants and run like hell the other way!
I hope you and she at least have time for a
 .
. All the best, Pete
I had success planing 2 strips at a time while held in a clamp-on vise. I think the small Stanley plane I used likely had more control of the cutting depth than using a chisel-type blade would of had. The 2 strips helped support each other and add a bit more rigidity while planing. It also had the benefit of keeping the taper fairly even on port and starboard sides of the deck as I used one strip on each side.8/14 to 8/24
While I was in Vallarta I decided that instead of using a plane for tapering the planks on the quarterdeck, I would use a nice 4” drill press clamp and an exacto knife. My reasoning was that in order to use the plane, I’d need to first clamp the plank in something. So at this point, why buy two things when I can get a good clamp and use my existing blades. The clamp was at home when I returned.
The clamp was bigger and heavier than I had expected but I believe those are good qualities in what I need. The weight will help to keep the clamp in place while the size allows more of the plank to be held in the jaws of the clamp. Since the taper is supposed to be 6” but the clamp face is only 4”, my plan was to use some scrap 1/2” aluminum strips I had to “increase” the clamp face to around 7”.
View attachment 391402
This idea didn’t work as well as I had hoped for because in order to work, I have to hold both aluminum strips plus my plank (which needs to be at a very slight angle to create the taper) - while tightening the clamp. Just too much.
View attachment 391403
Then I tried to make a wooded jig that would fit inside the clamp and let the plank sit on top of the jig at the correct angle. This too didn’t work either as it had too much flexibility - after all, I’m only cutting a 3/32” taper. Any flexibility is bad.
View attachment 391404
What I landed on was to clamp the plank in the jaws at about the correct angle with one end of the plank aligning with the end of the clamp face. I’d then cut away about 3” of the taper and then loosen the clamp and slide the plank so I could taper the other end. Then a little sanding. Not ideal, but it worked and was repeatable.
Long term I may get a set of magnetized 6” clamp jaws to attach to my clamp, but for now I’ll use it as described above and then see how often I need 6” or longer tapers and the 6” clamp jaws.
Installed 8 planks (4 on each side). I believe I’ll need between 8 and 10 more on each side to reach the side of the transom and the nibbing plank. At this point most or all of them will need to be tapered.
View attachment 391405
View attachment 391407
Installed 10 more planks, 5 on each side and cut out the hole for the main mast. Unfortunately when I went to drill the beginning of the hole, the drill went into the plank on the starboard side. Argh! I cut a small section out of the damaged plank and glued in a replacement piece. I believe this will be covered by the mast ring and the fife rail, so hopefully it won’t be noticeable.
View attachment 391406
Installed 4 more tapered planks, 2 on each side. In order to even up the number of planks on each side, I needed to modify the tapers on the starboard planks. For the next 2 planks, only on the starboard side, I made the taper less than the others.
I then glued the nibbing strake on both sides, and wrapped up the day’s work by installing the final tapered plank on each side.
View attachment 391410
Once the deck is complete, I plan on drawing a line across the ends of the planks on the transom and then cutting off the snagletooth appearance.
View attachment 391409
Started with the planks that get nibbed. It’s been over a month since I nibbed the foredeck and was hoping to finish the last 1/2 dozen or so planks and close off the quarterdeck but given reality, I was only able to nib one plank on each side before having to tap out as we’re on the road again. This time we’re heading California to visit our daughter who is a (can I say a bad-ass) wildland firefighter who’s working the Smith River Complex fire right at the CA/OR border.
View attachment 391411
View attachment 391412
I feel it looks rough but think (okay HOPE) it will look good once I sand it.
Sorry to put the Bluenose back in dry dock, but happy to (okay hopefully) see our daughter (if she can get some R&R). See ya all in about 2 weeks.
View attachment 391413
Work time: 12 hours
Total work time: 139.5 hours
View attachment 391408
I admire your commitment to the tappered planks. A deja-vu for me. It is difficult to apply them smoothly as a complete package. You are doing a nice job.8/14 to 8/24
While I was in Vallarta I decided that instead of using a plane for tapering the planks on the quarterdeck, I would use a nice 4” drill press clamp and an exacto knife. My reasoning was that in order to use the plane, I’d need to first clamp the plank in something. So at this point, why buy two things when I can get a good clamp and use my existing blades. The clamp was at home when I returned.
The clamp was bigger and heavier than I had expected but I believe those are good qualities in what I need. The weight will help to keep the clamp in place while the size allows more of the plank to be held in the jaws of the clamp. Since the taper is supposed to be 6” but the clamp face is only 4”, my plan was to use some scrap 1/2” aluminum strips I had to “increase” the clamp face to around 7”.
View attachment 391402
This idea didn’t work as well as I had hoped for because in order to work, I have to hold both aluminum strips plus my plank (which needs to be at a very slight angle to create the taper) - while tightening the clamp. Just too much.
View attachment 391403
Then I tried to make a wooded jig that would fit inside the clamp and let the plank sit on top of the jig at the correct angle. This too didn’t work either as it had too much flexibility - after all, I’m only cutting a 3/32” taper. Any flexibility is bad.
View attachment 391404
What I landed on was to clamp the plank in the jaws at about the correct angle with one end of the plank aligning with the end of the clamp face. I’d then cut away about 3” of the taper and then loosen the clamp and slide the plank so I could taper the other end. Then a little sanding. Not ideal, but it worked and was repeatable.
Long term I may get a set of magnetized 6” clamp jaws to attach to my clamp, but for now I’ll use it as described above and then see how often I need 6” or longer tapers and the 6” clamp jaws.
Installed 8 planks (4 on each side). I believe I’ll need between 8 and 10 more on each side to reach the side of the transom and the nibbing plank. At this point most or all of them will need to be tapered.
View attachment 391405
View attachment 391407
Installed 10 more planks, 5 on each side and cut out the hole for the main mast. Unfortunately when I went to drill the beginning of the hole, the drill went into the plank on the starboard side. Argh! I cut a small section out of the damaged plank and glued in a replacement piece. I believe this will be covered by the mast ring and the fife rail, so hopefully it won’t be noticeable.
View attachment 391406
Installed 4 more tapered planks, 2 on each side. In order to even up the number of planks on each side, I needed to modify the tapers on the starboard planks. For the next 2 planks, only on the starboard side, I made the taper less than the others.
I then glued the nibbing strake on both sides, and wrapped up the day’s work by installing the final tapered plank on each side.
View attachment 391410
Once the deck is complete, I plan on drawing a line across the ends of the planks on the transom and then cutting off the snagletooth appearance.
View attachment 391409
Started with the planks that get nibbed. It’s been over a month since I nibbed the foredeck and was hoping to finish the last 1/2 dozen or so planks and close off the quarterdeck but given reality, I was only able to nib one plank on each side before having to tap out as we’re on the road again. This time we’re heading California to visit our daughter who is a (can I say a bad-ass) wildland firefighter who’s working the Smith River Complex fire right at the CA/OR border.
View attachment 391411
View attachment 391412
I feel it looks rough but think (okay HOPE) it will look good once I sand it.
Sorry to put the Bluenose back in dry dock, but happy to (okay hopefully) see our daughter (if she can get some R&R). See ya all in about 2 weeks.
View attachment 391413
Work time: 12 hours
Total work time: 139.5 hours
View attachment 391408
I used a descending aluminum strip to cut them. It is important to keep a close eye on the direction of the wood grain.
Looking forward to your nibbled side planks.
Regards, Peter
- Joined
- Jun 17, 2021
- Messages
- 3,200
- Points
- 588

Lots of creative ideas from people confronted with the same problem to solve. I like it! 

9/12 to 9/18
After spending some time in Cali with my daughter while she was getting some well deserved R&R after working on the Smith River Complex fire at the CA/OR border I came home to an appointment with my orthopedic surgeon to clean up some meniscus tears and arthritis artifacts in my knee (kicking a knee replacement down the road), I’m finally feeling like working on my Bluenose.
I only have a few more planks on the quarterdeck to nib and install so hopefully I’ll be able to knock them out within a couple of days.
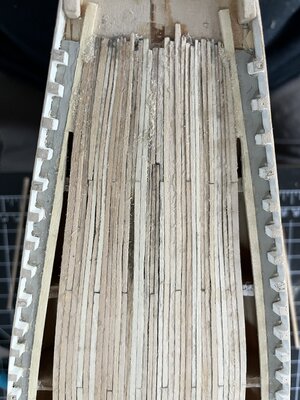
The couple of days turned out to be a couple of hours as I’ve finished closing the hull. I did notice on the next to last plank that I had forgotten to pencil the sides of 3 planks on each side. I’m assuming I’ll be able to notice once the deck is sanded, but I decided NOT to pull them up and re-do them.
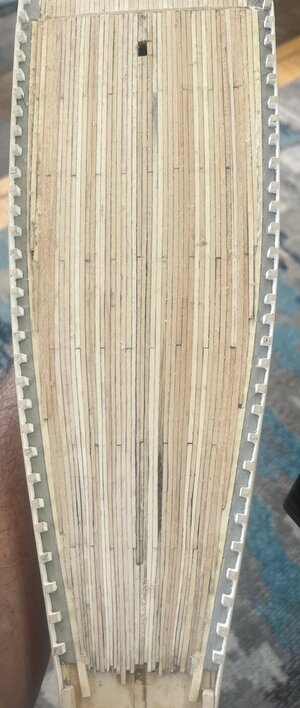
Now I’ll focus on sanding, and obviously more sanding. Yes, I can tell where I didn’t pencil the planks, but when I pointed it out to my wife, she couldn’t see what I was talking about. While sanding I knocked off 2 of the fake stanchions, worrisome yes, but not a big deal as I can glue them back on. I also noticed that I still need to clean up the planking on the transom as I had not even tried to have the ends of the planking align with each other.
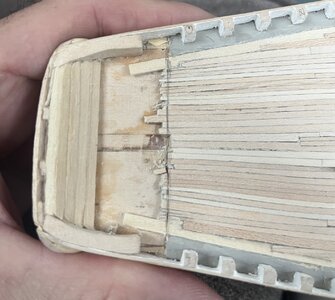
Transom is cleaned up and planked - now back to sanding.
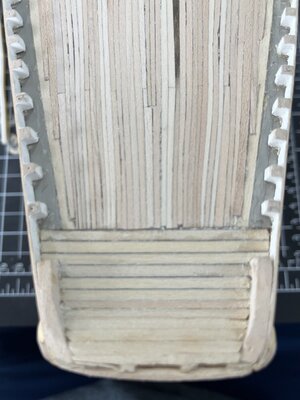
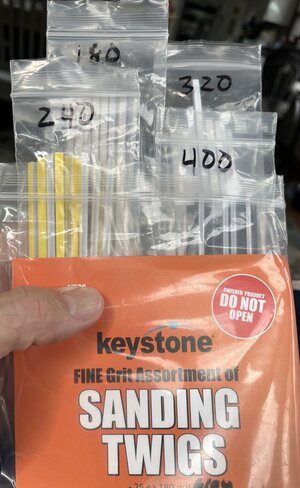
After I had used a variety of sandpaper grits in my sanding block, I began using some “sanding twigs” I bought a while ago. I’m sure they are not new to many of the people on here, but they were new to me. I started with 180 grit twigs, then went to 240, then 320, and wrapped my sanding up with a 400 grit. These twigs are nice as they allow me to sand in a fairly small space as they are only about 1/8” wide, are flexible, and only cost about $13 for 100 of them.
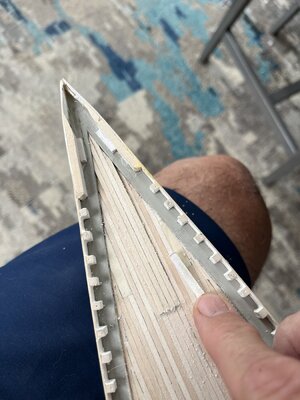
Based on how everything looks, I am not going to add the extra board at the great beam (to hide the snaggle-toothiness of the foredeck.
I still need to do two things to wrap up this portion of my build: 1) Decide what color/shade of stain to use on the deck and 2) Touch up the white and grey paint of the rail and waterways.
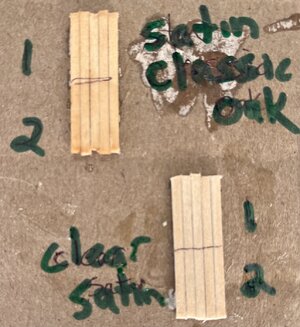
I’ve cut the deck choices down to 2; a clear satin varnish and a satin classic oak (Minwax polyshade). I glued a few planks together and then put both a single coat and a second coat on them. I decided to go with two coats of the classic oak (with a light sanding with 320 grit between coats).
Although I really like the overall color of the deck, it’s a bit too shiny for me. To knock it down, I did another light sanding.
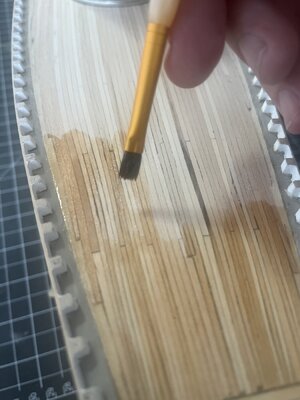
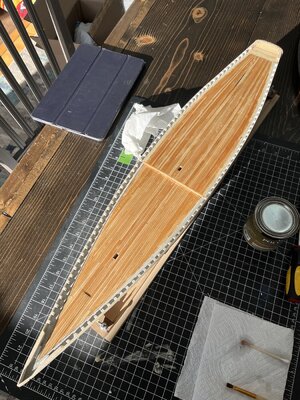
Then a touch up of the white and grey paint of the rail and waterways.

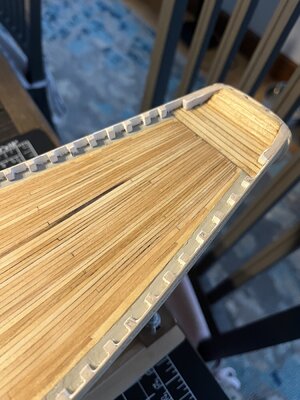
Looking for a recommendation…
Do I paint the hull or do I install the rails?
Getting ready for another short trip to Mexico that’s chocked full of work. Nice part is I’ll be in Vallarta, bad part is I may not have time to work on my Molino while I’m there.
Work time: 9 hours
Total work time: 148.5 hours
After spending some time in Cali with my daughter while she was getting some well deserved R&R after working on the Smith River Complex fire at the CA/OR border I came home to an appointment with my orthopedic surgeon to clean up some meniscus tears and arthritis artifacts in my knee (kicking a knee replacement down the road), I’m finally feeling like working on my Bluenose.
I only have a few more planks on the quarterdeck to nib and install so hopefully I’ll be able to knock them out within a couple of days.

The couple of days turned out to be a couple of hours as I’ve finished closing the hull. I did notice on the next to last plank that I had forgotten to pencil the sides of 3 planks on each side. I’m assuming I’ll be able to notice once the deck is sanded, but I decided NOT to pull them up and re-do them.

Now I’ll focus on sanding, and obviously more sanding. Yes, I can tell where I didn’t pencil the planks, but when I pointed it out to my wife, she couldn’t see what I was talking about. While sanding I knocked off 2 of the fake stanchions, worrisome yes, but not a big deal as I can glue them back on. I also noticed that I still need to clean up the planking on the transom as I had not even tried to have the ends of the planking align with each other.

Transom is cleaned up and planked - now back to sanding.

After I had used a variety of sandpaper grits in my sanding block, I began using some “sanding twigs” I bought a while ago. I’m sure they are not new to many of the people on here, but they were new to me. I started with 180 grit twigs, then went to 240, then 320, and wrapped my sanding up with a 400 grit. These twigs are nice as they allow me to sand in a fairly small space as they are only about 1/8” wide, are flexible, and only cost about $13 for 100 of them.


Based on how everything looks, I am not going to add the extra board at the great beam (to hide the snaggle-toothiness of the foredeck.
I still need to do two things to wrap up this portion of my build: 1) Decide what color/shade of stain to use on the deck and 2) Touch up the white and grey paint of the rail and waterways.
I’ve cut the deck choices down to 2; a clear satin varnish and a satin classic oak (Minwax polyshade). I glued a few planks together and then put both a single coat and a second coat on them. I decided to go with two coats of the classic oak (with a light sanding with 320 grit between coats).

Although I really like the overall color of the deck, it’s a bit too shiny for me. To knock it down, I did another light sanding.


Then a touch up of the white and grey paint of the rail and waterways.


Looking for a recommendation…
Do I paint the hull or do I install the rails?
Getting ready for another short trip to Mexico that’s chocked full of work. Nice part is I’ll be in Vallarta, bad part is I may not have time to work on my Molino while I’m there.
Work time: 9 hours
Total work time: 148.5 hours
The final result of the deck is looking very good 


