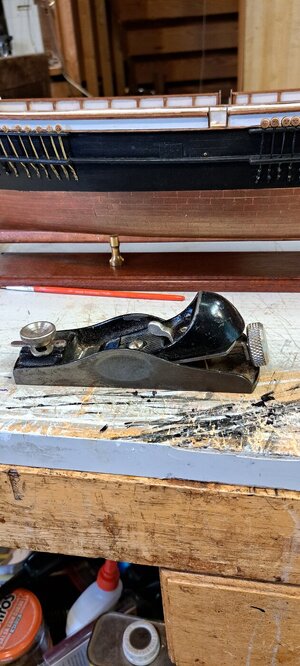
Nice job on the monkey rail. I remember fretting about that for a long time.
-

Win a Free Custom Engraved Brass Coin!!!
As a way to introduce our brass coins to the community, we will raffle off a free coin during the month of August. Follow link ABOVE for instructions for entering.
-

PRE-ORDER SHIPS IN SCALE TODAY!
The beloved Ships in Scale Magazine is back and charting a new course for 2026!
Discover new skills, new techniques, and new inspirations in every issue.
NOTE THAT OUR FIRST ISSUE WILL BE JAN/FEB 2026
You are using an out of date browser. It may not display this or other websites correctly.
You should upgrade or use an alternative browser.
You should upgrade or use an alternative browser.
Bluenose 1:64 by Model Shipways - Build log
- Thread starter HughLo
- Start date
- Watchers 25
-
- Tags
- bluenose model shipways
- Joined
- Jun 17, 2021
- Messages
- 3,200
- Points
- 588

Nice to see you back. I hope you wife is well.
Very nice work! I'll be referring back to your build log when I get around to an old Scientific Models small scale kit of Bluenose I got recently on ebay.
This last post is especially elucidating.
Pete
Very nice work! I'll be referring back to your build log when I get around to an old Scientific Models small scale kit of Bluenose I got recently on ebay.
This last post is especially elucidating.
Pete
2/12 to 2/22
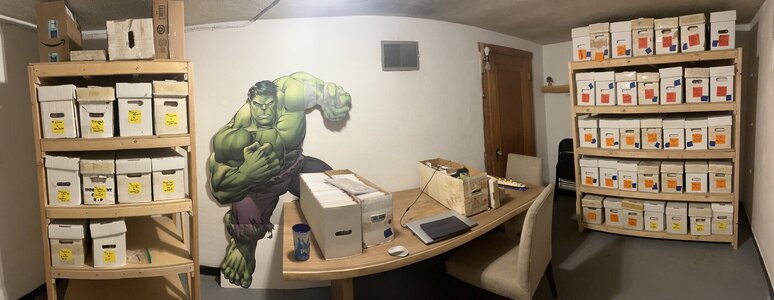
Time to paint the hull. It’s hard to believe that around 6 months ago I posted that I thought I was really close to painting the hull - how time flies. I will admit I’m working slower than I’d like too but in addition to splitting time between here and Mexico (and working on my pirate ship the Molino), I’m trying to inventory my comics (~13k) in hopes of selling them and creating a workshop. But it is finally time to paint.
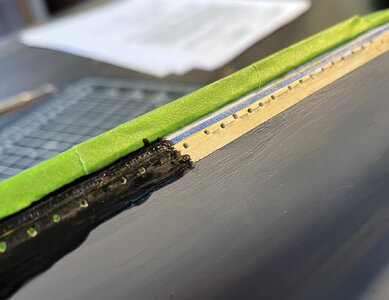
It may come back to bite me but in looking at the 4 different colors that will be used on the hull, I decided to paint the yellow line just under the main rail first. To paint the line, I taped it off and then painted it yellow. The tape below the line will also cover up all the scupper holes (which will be needed to be taped when I paint the majority of the hull with gray primer).
3 coats and the yellow line looks good. So good that I forgot to take a picture…
Next up is taping up the rails and deck and then using the gray primer. The temperature has been edging up into the low 50s after a snowstorm dropped about 9” of snow at the house. Most of the snow has melted, but today’s 52 degrees will have to suffice as another storm is expected to move in tonight. If I don’t paint today, I may have to wait a week.

The gray looks nice, but it also highlighted a few places where I’ll need to sand, use filler, sand again, and repaint with primer.

The filler I use is made by Elmer’s and is water-based. One of the things I really like about it is that after I apply the filler I can smooth it out even more by using a finger that has been dipped in water. Let’s me put on a very light/thin coat.

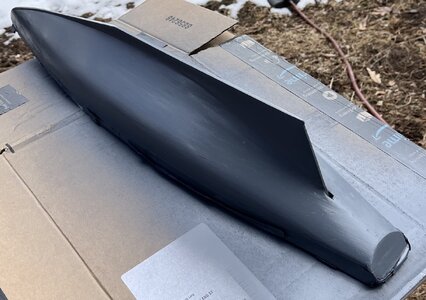
So after the thin filler coat dried, I sanded it, and then wrapped up with another coat of the primer. The primer is gray even though it looks black in the picture below. I pulled the tape off and while it wasn’t perfect, I’m happy with the outcome.
Time to tape off the main rail and the yellow line as the area between these needs to be painted black. I’ll also paint the hull at and around the scuppers. This area had previously been covered by the tape when I painted the yellow line.

After 2 coats of the black, it looks pretty good.
Next up, even though there’s plenty more of the hull to paint, I’m taking a bit of a turn… building the display stand.
Work time: 7 hours
Total work time: 211.5 hours
Time to paint the hull. It’s hard to believe that around 6 months ago I posted that I thought I was really close to painting the hull - how time flies. I will admit I’m working slower than I’d like too but in addition to splitting time between here and Mexico (and working on my pirate ship the Molino), I’m trying to inventory my comics (~13k) in hopes of selling them and creating a workshop. But it is finally time to paint.

It may come back to bite me but in looking at the 4 different colors that will be used on the hull, I decided to paint the yellow line just under the main rail first. To paint the line, I taped it off and then painted it yellow. The tape below the line will also cover up all the scupper holes (which will be needed to be taped when I paint the majority of the hull with gray primer).
3 coats and the yellow line looks good. So good that I forgot to take a picture…
Next up is taping up the rails and deck and then using the gray primer. The temperature has been edging up into the low 50s after a snowstorm dropped about 9” of snow at the house. Most of the snow has melted, but today’s 52 degrees will have to suffice as another storm is expected to move in tonight. If I don’t paint today, I may have to wait a week.

The gray looks nice, but it also highlighted a few places where I’ll need to sand, use filler, sand again, and repaint with primer.

The filler I use is made by Elmer’s and is water-based. One of the things I really like about it is that after I apply the filler I can smooth it out even more by using a finger that has been dipped in water. Let’s me put on a very light/thin coat.

So after the thin filler coat dried, I sanded it, and then wrapped up with another coat of the primer. The primer is gray even though it looks black in the picture below. I pulled the tape off and while it wasn’t perfect, I’m happy with the outcome.

Time to tape off the main rail and the yellow line as the area between these needs to be painted black. I’ll also paint the hull at and around the scuppers. This area had previously been covered by the tape when I painted the yellow line.

After 2 coats of the black, it looks pretty good.

Next up, even though there’s plenty more of the hull to paint, I’m taking a bit of a turn… building the display stand.
Work time: 7 hours
Total work time: 211.5 hours
2/25 to 2/28
The hull painting has gone fairly smoothly to this point but I’m switching gears to build the stand. I know it’s not really needed yet but the Rocky Mountain Shipwrights are going to have another show in April and I’m planning on displaying my Bluenose again. And given I’m heading to Vallarta in less than a month, I need to be at a good spot to not just display it, but also to hand it off to a friend who can display her and take care of her while I’m gone. Additionally I’m planning to show it during our club’s monthly meeting’s “show and tell” and then give it to Ralph afterwards. That means I have about 3 weeks to build the stand and finish painting the hull.
Like most things in this stage of my modeling, I haven’t scratch-built a stand.
I started by picking up a 3/16” x 4” board, a 14”x 6” “plaque” board, and some black felt at a local hobby store.
Using a profile gauge, I drew out where the 2 boards will go on the hull. I cut these drawings out and test fit them on the hull.
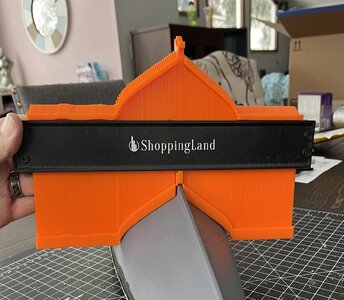
A few modifications including making them look more than just “square” boards and I transferred the patterns over to the 3/16” x 4” board and roughly cut them out.
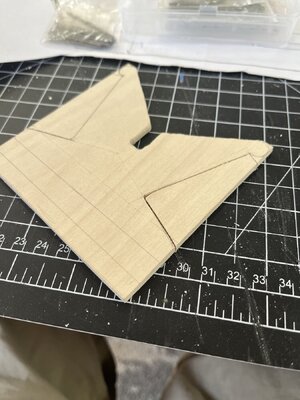
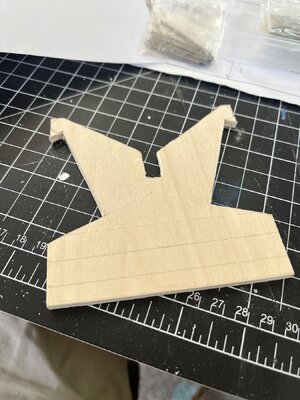
Using my Goxawee (a Dremel-like device), I cleaned up the boards and test fit them against the hull. Once I was comfortable with their fit (plus a little wiggle room for the felt), I did a bit more cleanup work making them match each other as much as possible.
I squared them up and glued on 2 cross members.
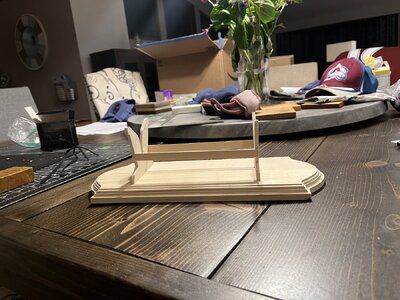
Once dried, I measured and marked on the plaque board where it should be attached.
I drilled three small holes around 1/2” deep on each support and glued a small nail in each hole, leaving about 1/2” sticking out.
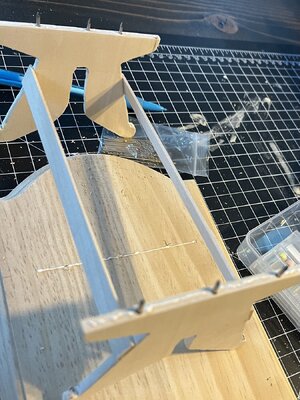
I line it up on the plaque board and marked where each nail was and drilled corresponding holes.
A little glue to the holes as well as the line where the support will go and on the support itself.
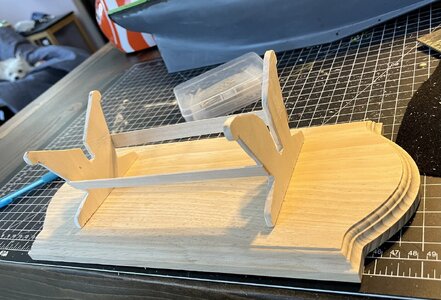
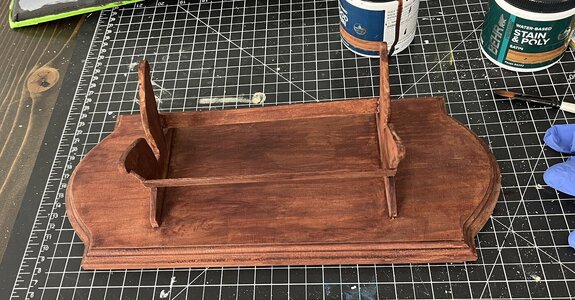
A little clean up and two coats of English Chestnut water-based stain.
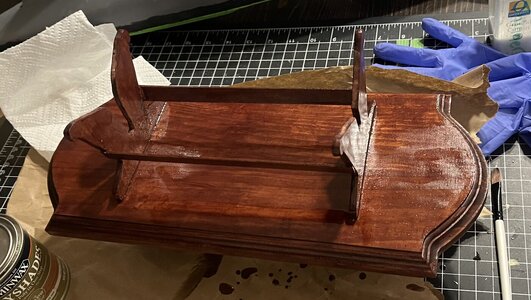
Two coats of Pecan oil-based stain & poly with a light sanding in between coats.
Glue thin strips of black felt to the edges that the ship will rest on.
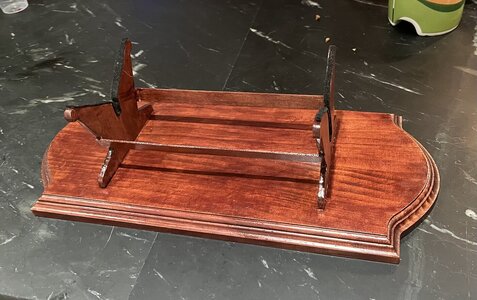
It’s my 1st scratch-built stand (okay, really anything) and I’m happy with the results. Now back to painting the hull.
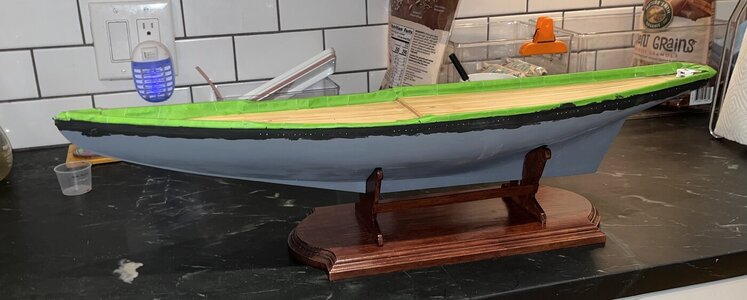
Work time: 6.5 hours
Total work time: 218 hours
The hull painting has gone fairly smoothly to this point but I’m switching gears to build the stand. I know it’s not really needed yet but the Rocky Mountain Shipwrights are going to have another show in April and I’m planning on displaying my Bluenose again. And given I’m heading to Vallarta in less than a month, I need to be at a good spot to not just display it, but also to hand it off to a friend who can display her and take care of her while I’m gone. Additionally I’m planning to show it during our club’s monthly meeting’s “show and tell” and then give it to Ralph afterwards. That means I have about 3 weeks to build the stand and finish painting the hull.
Like most things in this stage of my modeling, I haven’t scratch-built a stand.
I started by picking up a 3/16” x 4” board, a 14”x 6” “plaque” board, and some black felt at a local hobby store.
Using a profile gauge, I drew out where the 2 boards will go on the hull. I cut these drawings out and test fit them on the hull.

A few modifications including making them look more than just “square” boards and I transferred the patterns over to the 3/16” x 4” board and roughly cut them out.


Using my Goxawee (a Dremel-like device), I cleaned up the boards and test fit them against the hull. Once I was comfortable with their fit (plus a little wiggle room for the felt), I did a bit more cleanup work making them match each other as much as possible.
I squared them up and glued on 2 cross members.

Once dried, I measured and marked on the plaque board where it should be attached.
I drilled three small holes around 1/2” deep on each support and glued a small nail in each hole, leaving about 1/2” sticking out.

I line it up on the plaque board and marked where each nail was and drilled corresponding holes.
A little glue to the holes as well as the line where the support will go and on the support itself.

A little clean up and two coats of English Chestnut water-based stain.

Two coats of Pecan oil-based stain & poly with a light sanding in between coats.

Glue thin strips of black felt to the edges that the ship will rest on.

It’s my 1st scratch-built stand (okay, really anything) and I’m happy with the results. Now back to painting the hull.

Work time: 6.5 hours
Total work time: 218 hours
May I ask you where did you get the base?
Michael’s… $8.
Good morning Hug. Cool base for the stand. Cheers Grant2/25 to 2/28
The hull painting has gone fairly smoothly to this point but I’m switching gears to build the stand. I know it’s not really needed yet but the Rocky Mountain Shipwrights are going to have another show in April and I’m planning on displaying my Bluenose again. And given I’m heading to Vallarta in less than a month, I need to be at a good spot to not just display it, but also to hand it off to a friend who can display her and take care of her while I’m gone. Additionally I’m planning to show it during our club’s monthly meeting’s “show and tell” and then give it to Ralph afterwards. That means I have about 3 weeks to build the stand and finish painting the hull.
Like most things in this stage of my modeling, I haven’t scratch-built a stand.
I started by picking up a 3/16” x 4” board, a 14”x 6” “plaque” board, and some black felt at a local hobby store.
Using a profile gauge, I drew out where the 2 boards will go on the hull. I cut these drawings out and test fit them on the hull.
View attachment 431418
A few modifications including making them look more than just “square” boards and I transferred the patterns over to the 3/16” x 4” board and roughly cut them out.
View attachment 431419
View attachment 431420
Using my Goxawee (a Dremel-like device), I cleaned up the boards and test fit them against the hull. Once I was comfortable with their fit (plus a little wiggle room for the felt), I did a bit more cleanup work making them match each other as much as possible.
I squared them up and glued on 2 cross members.
View attachment 431421
Once dried, I measured and marked on the plaque board where it should be attached.
I drilled three small holes around 1/2” deep on each support and glued a small nail in each hole, leaving about 1/2” sticking out.
View attachment 431422
I line it up on the plaque board and marked where each nail was and drilled corresponding holes.
A little glue to the holes as well as the line where the support will go and on the support itself.
View attachment 431423
A little clean up and two coats of English Chestnut water-based stain.
View attachment 431424
Two coats of Pecan oil-based stain & poly with a light sanding in between coats.
View attachment 431425
Glue thin strips of black felt to the edges that the ship will rest on.
View attachment 431426
It’s my 1st scratch-built stand (okay, really anything) and I’m happy with the results. Now back to painting the hull.
View attachment 431427
Work time: 6.5 hours
Total work time: 218 hours
3/2 to 3/14
Today is the Rocky Mountain Shipwright’s workshop. I have two things I hope to do. The first is to organize my new “toolbox” and then mark the waterline.
Given I don’t set up a workshop at home and instead have made the decision to take stuff out whenever I want to work and then put everything away when I’m done for the day, having a nice toolbox has been on my mind for a while. I enjoy working in the main part of the house so I’m “around” my wife instead of going off by myself to work in the basement or back part of the house.
My new toolbox (which will mostly be duplicated in Mexico) are inexpensive plastic interlocking boxes. They come in a set of two boxes but I’ve added a third one in order to easily hold just about everything (except my painting supplies). Sure I got a joke or two about being able to store not just all my tools but my shoes too, but I think they’ll suit my needs.
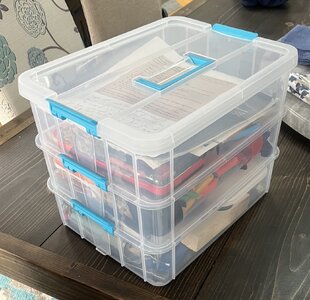
I’ve separated my tools into 3 groups. Group 1 is stuff I use all the time, such as glue, caliper, pencils and xxx. Group 2 is basically everything to do with sanding and filling. And group 3 is stuff I don’t need too often but stuff I consider important. Right now this box has my waterline marker, my chamfer, and my plank bending tools.
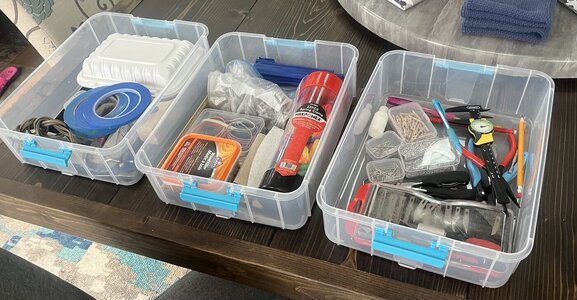
I’ve debated if I should make this 3rd box for tools I don’t plan on duplicating in both Mexico and Colorado since I don’t use them enough to purchase two sets. This 3rd box could be transported fairly easily but if I go this route, I’ll need to make sure it’s stuff that can get through TSA at the airport as the goal is to not have to check luggage.
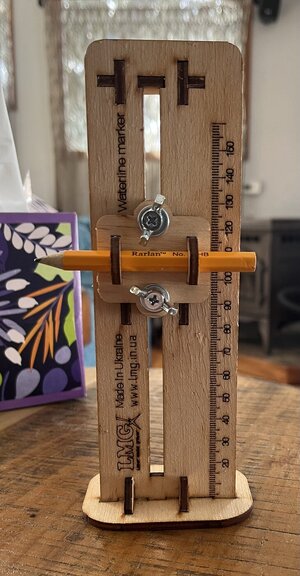
With the toolbox completed, I began to draw the waterline. I recently purchased a kit (came all the way from the Ukraine) and even though this was my 1st waterline, it went fairly smoothly with the only issue being that I needed to use a longer pencil than the golf pencil that was supplied with the kit.
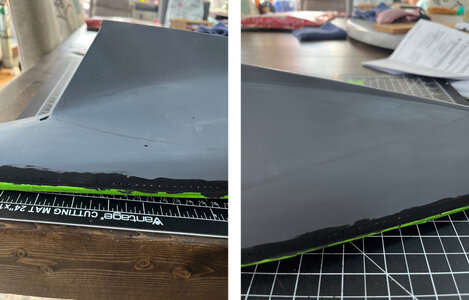
The remaining time at the workshop I mapped out how I would paint the hull.
Tape off slightly above the waterline with 1/8” tape
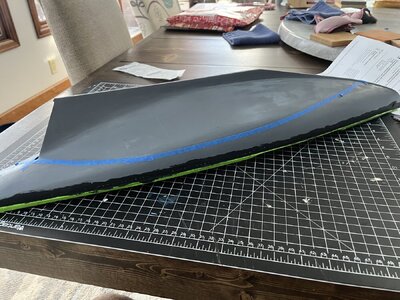
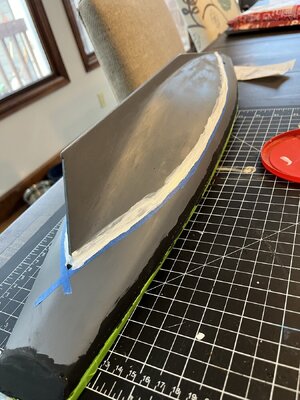
Once dried, I put 1/16” tape directly next to the 1/8” tape covering up what will become the waterline.
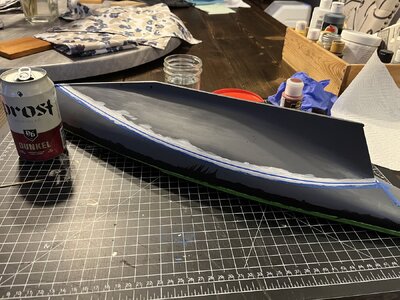
For the lower half of the hull, I’m using a thinned down (with water) 50/50 mix of hull copper red (from Model Expo) and red clay acrylic from Michael’s. I had purchased the hull copper red a while back but wasn’t sure I’d have enough so on a whim I looked at the paint selection at Michael’s and found the red clay which was a very close match.
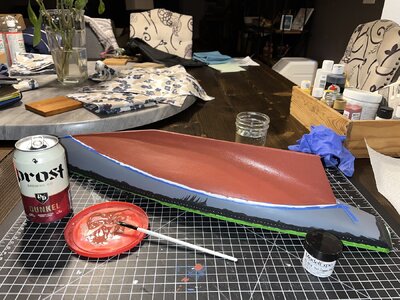
I did as couple of thin coats and am very pleased with the results other than two “spots” that showed up.
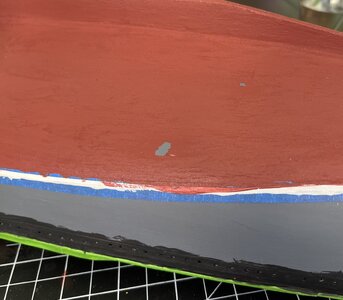
I cleaned up the bad spot, gave the hull a light sanding, and added another coat of red paint. Once dried, I removed the 1/8” tape above the waterline, leaving the 1/16” tape that covers the waterline in place.
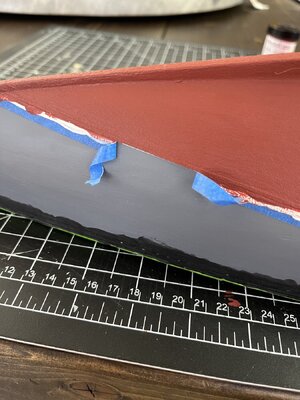
The black only needed 2 coats, after which I removed the 1/16” tape at waterline). Very little paint bleeding.
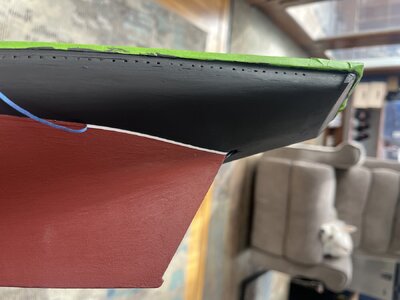
Removed all remaining tape and while there is some bleeding, overall it looks good. I had been worried about the yellow and white lines because they were 1/16”, but even they had only minimal bleeding.
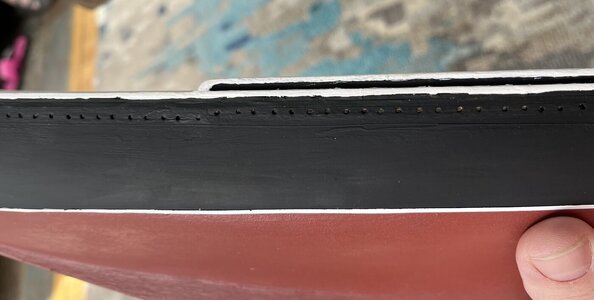
Each of the four colors needed multiple coats of touch up, mostly due the shakiness of my hands, however minor. It’s hard to touch up a 1/16” line with even just a little bit of shakiness.

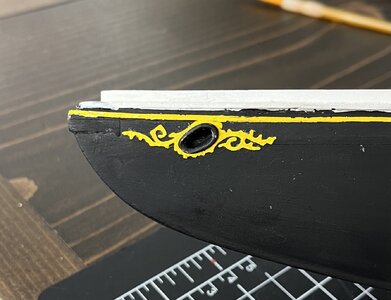
Next up is the scroll work at the bow around the hawse holes as well as the attaching the hawse hole lips. The scroll work is painted yellow while the lips are painted black. A big shoutout to @Jeff T for sending me his leftover 3D printed scroll work. Hard to believe I’ve had them sitting in my box waiting for a little over 9 months.
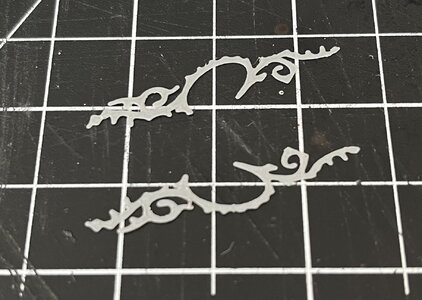
After gluing the scroll work around the holes, I added a little yellow paint to “attach” the scrolls to the yellow line and then glued the hawse hole lips.
I’m going to wait until my return from Mexico (in June) to paint everything with the clear satin as I read that it’s best to wait for acrylic paint to fully cure before using varnish, and that could take up to 2 weeks. Being how dry it is here in Denver, I’m sure it would be cured in a lot less time, but with the RMSW’s meeting (and my show and tell of my Bluenose) on Saturday, I’m not going to push it just to say I’ve done it.
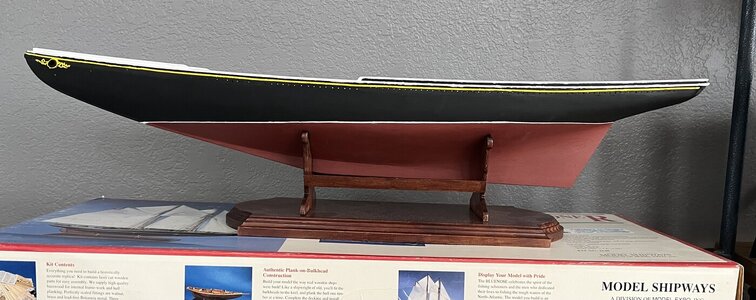
Now it’s off to Vallarta for a couple of months. See ya all on my Buccaneer/Molino build log.
Work time: 9.5 hours
Total work time: 227.5 hours
Today is the Rocky Mountain Shipwright’s workshop. I have two things I hope to do. The first is to organize my new “toolbox” and then mark the waterline.
Given I don’t set up a workshop at home and instead have made the decision to take stuff out whenever I want to work and then put everything away when I’m done for the day, having a nice toolbox has been on my mind for a while. I enjoy working in the main part of the house so I’m “around” my wife instead of going off by myself to work in the basement or back part of the house.
My new toolbox (which will mostly be duplicated in Mexico) are inexpensive plastic interlocking boxes. They come in a set of two boxes but I’ve added a third one in order to easily hold just about everything (except my painting supplies). Sure I got a joke or two about being able to store not just all my tools but my shoes too, but I think they’ll suit my needs.

I’ve separated my tools into 3 groups. Group 1 is stuff I use all the time, such as glue, caliper, pencils and xxx. Group 2 is basically everything to do with sanding and filling. And group 3 is stuff I don’t need too often but stuff I consider important. Right now this box has my waterline marker, my chamfer, and my plank bending tools.

I’ve debated if I should make this 3rd box for tools I don’t plan on duplicating in both Mexico and Colorado since I don’t use them enough to purchase two sets. This 3rd box could be transported fairly easily but if I go this route, I’ll need to make sure it’s stuff that can get through TSA at the airport as the goal is to not have to check luggage.
With the toolbox completed, I began to draw the waterline. I recently purchased a kit (came all the way from the Ukraine) and even though this was my 1st waterline, it went fairly smoothly with the only issue being that I needed to use a longer pencil than the golf pencil that was supplied with the kit.


The remaining time at the workshop I mapped out how I would paint the hull.
Tape off slightly above the waterline with 1/8” tape
- Paint the waterline white (multiple coats)
- Use 1/16” thin tape to cover white paint at the waterline (leave existing tape in place)
- Paint bottom half of hull “Hull Copper Red” (multiple coats)
- Remove 1/8” tape above waterline, leaving the thin tape in place
- Paint top half of hull black (multiple coats)
- Remove all remaining tape
- Paint entire hull clear satin (multiple coats)


Once dried, I put 1/16” tape directly next to the 1/8” tape covering up what will become the waterline.

For the lower half of the hull, I’m using a thinned down (with water) 50/50 mix of hull copper red (from Model Expo) and red clay acrylic from Michael’s. I had purchased the hull copper red a while back but wasn’t sure I’d have enough so on a whim I looked at the paint selection at Michael’s and found the red clay which was a very close match.

I did as couple of thin coats and am very pleased with the results other than two “spots” that showed up.

I cleaned up the bad spot, gave the hull a light sanding, and added another coat of red paint. Once dried, I removed the 1/8” tape above the waterline, leaving the 1/16” tape that covers the waterline in place.

The black only needed 2 coats, after which I removed the 1/16” tape at waterline). Very little paint bleeding.

Removed all remaining tape and while there is some bleeding, overall it looks good. I had been worried about the yellow and white lines because they were 1/16”, but even they had only minimal bleeding.

Each of the four colors needed multiple coats of touch up, mostly due the shakiness of my hands, however minor. It’s hard to touch up a 1/16” line with even just a little bit of shakiness.

Next up is the scroll work at the bow around the hawse holes as well as the attaching the hawse hole lips. The scroll work is painted yellow while the lips are painted black. A big shoutout to @Jeff T for sending me his leftover 3D printed scroll work. Hard to believe I’ve had them sitting in my box waiting for a little over 9 months.

After gluing the scroll work around the holes, I added a little yellow paint to “attach” the scrolls to the yellow line and then glued the hawse hole lips.

I’m going to wait until my return from Mexico (in June) to paint everything with the clear satin as I read that it’s best to wait for acrylic paint to fully cure before using varnish, and that could take up to 2 weeks. Being how dry it is here in Denver, I’m sure it would be cured in a lot less time, but with the RMSW’s meeting (and my show and tell of my Bluenose) on Saturday, I’m not going to push it just to say I’ve done it.

Now it’s off to Vallarta for a couple of months. See ya all on my Buccaneer/Molino build log.
Work time: 9.5 hours
Total work time: 227.5 hours
Always good to have a plan for setting the waterline on the hull, Hugh. Starting with the Rarlan pencil give a nice start.3/2 to 3/14
Today is the Rocky Mountain Shipwright’s workshop. I have two things I hope to do. The first is to organize my new “toolbox” and then mark the waterline.
Given I don’t set up a workshop at home and instead have made the decision to take stuff out whenever I want to work and then put everything away when I’m done for the day, having a nice toolbox has been on my mind for a while. I enjoy working in the main part of the house so I’m “around” my wife instead of going off by myself to work in the basement or back part of the house.
My new toolbox (which will mostly be duplicated in Mexico) are inexpensive plastic interlocking boxes. They come in a set of two boxes but I’ve added a third one in order to easily hold just about everything (except my painting supplies). Sure I got a joke or two about being able to store not just all my tools but my shoes too, but I think they’ll suit my needs.
View attachment 435146
I’ve separated my tools into 3 groups. Group 1 is stuff I use all the time, such as glue, caliper, pencils and xxx. Group 2 is basically everything to do with sanding and filling. And group 3 is stuff I don’t need too often but stuff I consider important. Right now this box has my waterline marker, my chamfer, and my plank bending tools.
View attachment 435148
I’ve debated if I should make this 3rd box for tools I don’t plan on duplicating in both Mexico and Colorado since I don’t use them enough to purchase two sets. This 3rd box could be transported fairly easily but if I go this route, I’ll need to make sure it’s stuff that can get through TSA at the airport as the goal is to not have to check luggage.
With the toolbox completed, I began to draw the waterline. I recently purchased a kit (came all the way from the Ukraine) and even though this was my 1st waterline, it went fairly smoothly with the only issue being that I needed to use a longer pencil than the golf pencil that was supplied with the kit.
View attachment 435149
View attachment 435151
The remaining time at the workshop I mapped out how I would paint the hull.
Tape off slightly above the waterline with 1/8” tape
I used some 1/8” tape just above the waterline and then painted the area right below the tape white.
- Paint the waterline white (multiple coats)
- Use 1/16” thin tape to cover white paint at the waterline (leave existing tape in place)
- Paint bottom half of hull “Hull Copper Red” (multiple coats)
- Remove 1/8” tape above waterline, leaving the thin tape in place
- Paint top half of hull black (multiple coats)
- Remove all remaining tape
- Paint entire hull clear satin (multiple coats)
View attachment 435152
View attachment 435153
Once dried, I put 1/16” tape directly next to the 1/8” tape covering up what will become the waterline.
View attachment 435154
For the lower half of the hull, I’m using a thinned down (with water) 50/50 mix of hull copper red (from Model Expo) and red clay acrylic from Michael’s. I had purchased the hull copper red a while back but wasn’t sure I’d have enough so on a whim I looked at the paint selection at Michael’s and found the red clay which was a very close match.
View attachment 435155
I did as couple of thin coats and am very pleased with the results other than two “spots” that showed up.
View attachment 435156
I cleaned up the bad spot, gave the hull a light sanding, and added another coat of red paint. Once dried, I removed the 1/8” tape above the waterline, leaving the 1/16” tape that covers the waterline in place.
View attachment 435161
The black only needed 2 coats, after which I removed the 1/16” tape at waterline). Very little paint bleeding.
View attachment 435162
Removed all remaining tape and while there is some bleeding, overall it looks good. I had been worried about the yellow and white lines because they were 1/16”, but even they had only minimal bleeding.
View attachment 435163
Each of the four colors needed multiple coats of touch up, mostly due the shakiness of my hands, however minor. It’s hard to touch up a 1/16” line with even just a little bit of shakiness.
View attachment 435164
Next up is the scroll work at the bow around the hawse holes as well as the attaching the hawse hole lips. The scroll work is painted yellow while the lips are painted black. A big shoutout to @Jeff T for sending me his leftover 3D printed scroll work. Hard to believe I’ve had them sitting in my box waiting for a little over 9 months.
View attachment 435165
After gluing the scroll work around the holes, I added a little yellow paint to “attach” the scrolls to the yellow line and then glued the hawse hole lips.
View attachment 435166
I’m going to wait until my return from Mexico (in June) to paint everything with the clear satin as I read that it’s best to wait for acrylic paint to fully cure before using varnish, and that could take up to 2 weeks. Being how dry it is here in Denver, I’m sure it would be cured in a lot less time, but with the RMSW’s meeting (and my show and tell of my Bluenose) on Saturday, I’m not going to push it just to say I’ve done it.
View attachment 435168
Now it’s off to Vallarta for a couple of months. See ya all on my Buccaneer/Molino build log.
Work time: 9.5 hours
Total work time: 227.5 hours
The outcome with the color combination give a very nice result and accentuate her beautiful lines more and more.
Regards, Peter
Nice job with the painting. It turned out great!
I always get excited about putting her (or the Molino) away when I’m switching locations, but then reality sinks in as I know I’m not going to work on her for quite a while.
- Joined
- Jun 17, 2021
- Messages
- 3,200
- Points
- 588

Wow! Thanks for the tutorial in putting together a well-organized portable workshop that can be made to work in just about any situation.
I'm in a state of denial about soon being confronted with some draconian downsizing. This gives me hope and a plan.
Congratulations as well on your Bluenose. She's looking gorgeous. Something to be very proud of, with a very finished appearance even at this incomplete stage.
I'm in a state of denial about soon being confronted with some draconian downsizing. This gives me hope and a plan.
Congratulations as well on your Bluenose. She's looking gorgeous. Something to be very proud of, with a very finished appearance even at this incomplete stage.

Especially with your 3D scroll workNice job with the painting. It turned out great!
5/6
Got the Bluenose back after my club’s (Rocky Mountain Shipwrights) exhibit while I was in Mexico working on my Molino at our club workshop. I wasn’t expecting to work at the workshop given I just got back into town the night before, but it was great catching up with the other members in attendance.
Since I’m only back for a week and we already have a bunch scheduled, I only expect to varnish the hull with a satin varnish. Two coats and I’m done.
Darkened it up a bit, gave it a little shine, and some added protection - all of which I’m okay with.


Now back to the Molino and Mexico.
Work time: 1.5 hours
Total work time: 229 hours
Got the Bluenose back after my club’s (Rocky Mountain Shipwrights) exhibit while I was in Mexico working on my Molino at our club workshop. I wasn’t expecting to work at the workshop given I just got back into town the night before, but it was great catching up with the other members in attendance.
Since I’m only back for a week and we already have a bunch scheduled, I only expect to varnish the hull with a satin varnish. Two coats and I’m done.
Darkened it up a bit, gave it a little shine, and some added protection - all of which I’m okay with.


Now back to the Molino and Mexico.
Work time: 1.5 hours
Total work time: 229 hours
6/21
Life continues to get in the way of building and part of that delay included me finally taking the plunge and creating a workshop in one of our spare rooms. I’ve held off on this as I prefer being “near” my wife and family (if they are around). Our house is a beautiful open concept, so to date I’ve been working on our dining room table which has me right there with everyone and we can talk as I work. I then clean it up and put everything away each night.
But this week my wife asked about moving a credenza that would hold then all my stuff but since it has doors, it would be out of sight when it’s put away. Instead of moving the credenza, we talked about me setting up a workshop in the basement, in the office in the garage, or in the spare bedroom. For a variety of reasons we decided on the spare bedroom.
The lighting isn’t the greatest but I can add a desk light plus there is both a window right by the desk as well as a set of French doors. There is a decent sized desk plus a bunch of shelves. The workshop will be a work in progress for a while, but it’s set up enough for me to start working again.
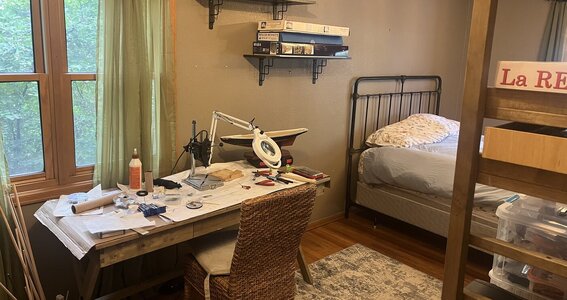
I’ll still need to keep things organized as my daughter uses this room when she comes over with the grandkids, but that’s only a couple times a month so I can leave everything out otherwise.
Life continues to get in the way of building and part of that delay included me finally taking the plunge and creating a workshop in one of our spare rooms. I’ve held off on this as I prefer being “near” my wife and family (if they are around). Our house is a beautiful open concept, so to date I’ve been working on our dining room table which has me right there with everyone and we can talk as I work. I then clean it up and put everything away each night.
But this week my wife asked about moving a credenza that would hold then all my stuff but since it has doors, it would be out of sight when it’s put away. Instead of moving the credenza, we talked about me setting up a workshop in the basement, in the office in the garage, or in the spare bedroom. For a variety of reasons we decided on the spare bedroom.
The lighting isn’t the greatest but I can add a desk light plus there is both a window right by the desk as well as a set of French doors. There is a decent sized desk plus a bunch of shelves. The workshop will be a work in progress for a while, but it’s set up enough for me to start working again.

I’ll still need to keep things organized as my daughter uses this room when she comes over with the grandkids, but that’s only a couple times a month so I can leave everything out otherwise.
It's great to have a "room" to work in and be able to leave things out. My little boat shop is in a room that we consider our office. The admiral has half the space and my workshop is the other half.
Enjoy your new space.
Jan
Enjoy your new space.
Jan
6/11 to 7/2
I’m back from Vallarta but it took almost a week for me to get my hands on my Bluenose… just too much stuff that needs my attention after being gone for over two months. I’m glad in many ways of being home, but I’ll be glad when it feels like home again.
First up is “what” exactly should I work on first? I decided to work on the chainplates followed by the eyelets.
Lots of written text (even for me) for what ended up a fairly small amount of work.
I liked the way Gary Brinker did them on his YouTube channel (BLUENOSE PART 19… Deadeyes & Chainplates) which is similar to what is shown in the instructions. Looks nice and the deadeyes are functional. The first one took about an hour (minus the three holes) and while I know I’d improve on the time and appearance, I wasn’t super impressed by my work. I also knew duplicating them (there are a total of 20) would be difficult and time consuming.
Then I built one like many builders do including the Suburban Ship Modeler. The first one took about 20 minutes (minus the three holes), and just like the other method I knew I’d improve upon the time and look, but I also felt in addition to looking better, they would be easier to duplicate.
The test came when I put both of these on the ship side by side. Bottom line the second method looked better. Plus I felt it would be easier to duplicate.
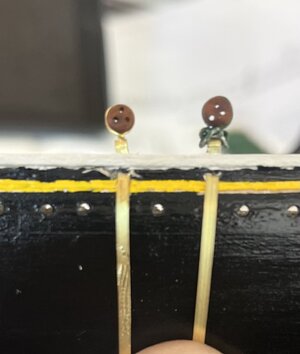
Building them is involved but fairly straightforward except for the drilling of the holes. More on that later.
The second part is drilling the holes for mounting them to the hull - each needs either 2 or 3 holes. Drilling the holes was the most difficult part of the overall process not just because drilling with a pin vice was proving to be difficult, but more importantly, if the hole wasn’t right in the middle of the strip, the brass strip would break when I folded it over. I used a push pin as a center punch, but the drilling was still daunting. I even tried using my GOXAWEE Rotary Tool (a Dremel-like tool) but it was still difficult.
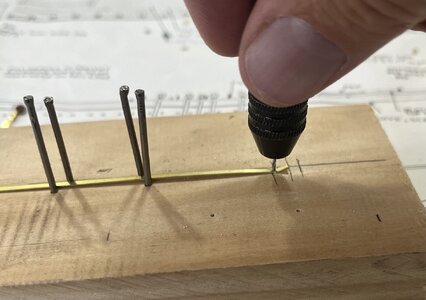
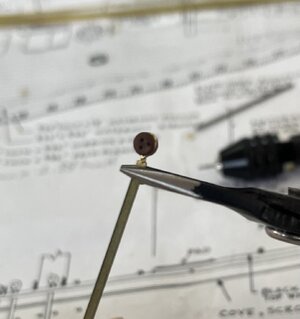
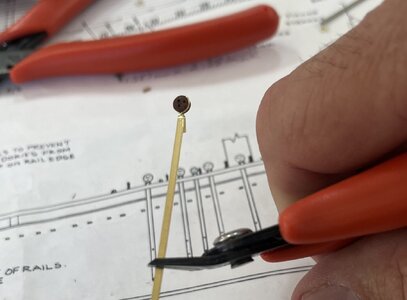
I’m sure it would have been easier if I had a pair of magnifying glasses and a drill press - neither of which I currently have. I believe my local club (Rocky Mountain Shipwrights) has a drill press that I can borrow so I will wait on drilling the attachment holes.
Saturday June 15th was the club meeting where I picked up the drill press. Hopefully it will make things easier.
There was a learning curve on using the drill press (after all, I’m still drilling into a 1/16” strip), but I was able to finish the 2nd half of the chainplates (other than the 3 holes) in about an hour.
I build a small jig to help with the 3 holes… and yes it’s just stiff cardboard taped to a board but it does the trick.
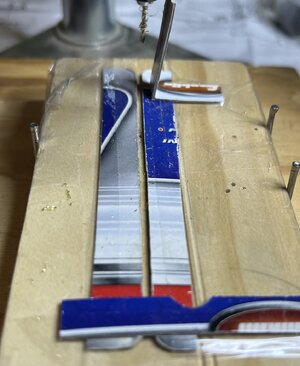
As long as I take it slowly, I am able to drill the holes in one chainplate. I really need to focus on taking my time. One poorly drilled hole and I have to completely rebuild the chainplate. Of the 20, I end up needing to rebuild 5. The biggest take away is that with such a small drill bit, it tends to be flexible. When it touches the brass strip, it can very easily bend slightly and move off center. To resolve this, I have to tightly hold the strip against the table which is a bit difficult as the strip gets hot plus I have to hold it very close to the desired location of the hole… right next to the drill’s chuck. I end us using some old tweezers that have a bent tip.
After all 20 are drilled, I add a drop of super glue to where the twisted wire of the deadeye is located in folded strip. This goes fairly smoothly although the glue fills a few of the holes in the deadeyes. I’m able to drill these out on all of them except for one which I have to rebuild.

I then paint the brass black.
EDIT: After drilling the holes on the pintles and gudgeons (covered in next post), I wish I would have done something similar with the chainplates and glued the brass strips to a board. That process went a “hole” lot easier (intentional misspelling ). I’m really surprised that no one recommended that before, or at least the build logs I follow.
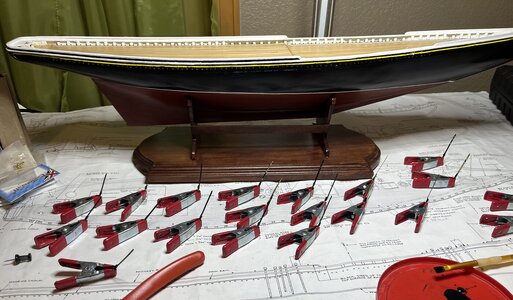
Looking at the rails that they will go through before being attached to the hull, I notice that while I made the slits for the chainplates for the foremast, I did not do it for the mainmast. And these slits actually need to go through two rails. Ugh. Since it’s been a few months since cut the slits, I looked back at my log to see if I could remember doing (and not doing) them, but somehow I didn’t write anything about them. I’m assuming I did them after painting the hull but before varnishing it.
Putting the slits in isn’t too difficult using a very narrow knife blade, but because of the way I made the chainplates (folding the strip over the twisted wire), the slits need to be more than slits; they need to be wide enough to let the folded section slide into the rail, at least partially. I use a variety of tools to make these holes in the rails; a small drill bit in a pin vice, two different files, one circular and the other flat, and the very narrow knife.
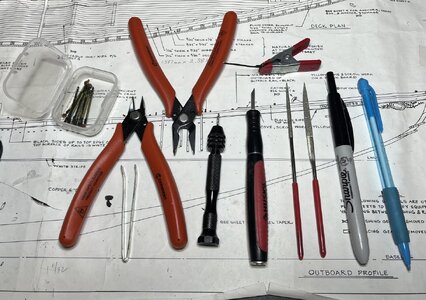
And even though I force myself to make these holes slowly, I still break through the side of the rail in a few places. These I close up with glue and a clamp.
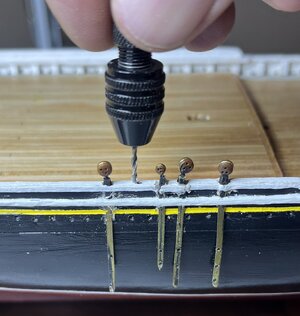
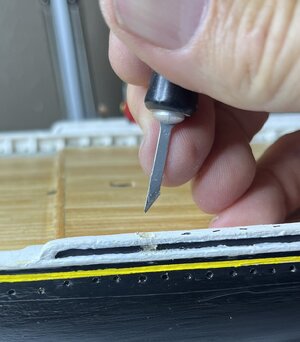
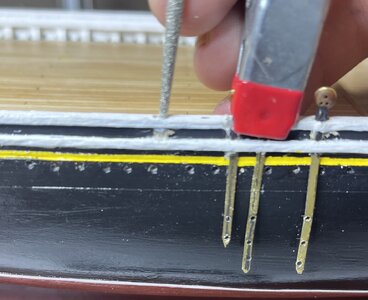
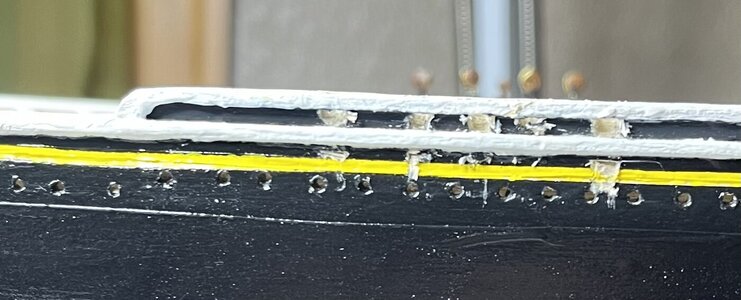
While test fitting the chainplates in place, I break one off them causing me to have to rebuild it.
Attaching the chainplates is fairly straightforward as they are glued and nailed to the hull. For the nailing, I get to use a pair of pin insertion pliers that I bought a while back from Micro-Mark. I only had about 60 pins to insert, but these pliers were great. I whole-heartily endorse them.
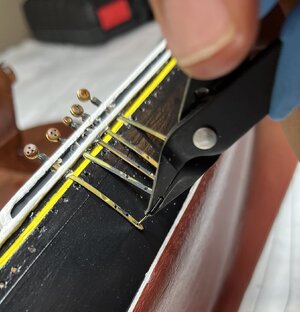
As for the super glue, I haven’t use it very much, so it is still a learning experience. One thing I learned from last time was to invest in some long skinny tips for the glue. This seems to have helped a lot.
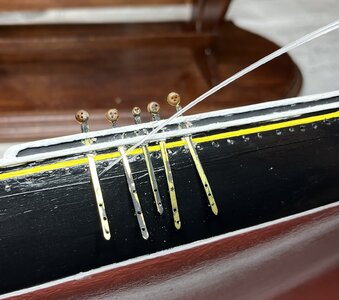
After all of the chainplates are attached, I touch up the paint (black, white, and yellow) followed by a touch up of the satin varnish.
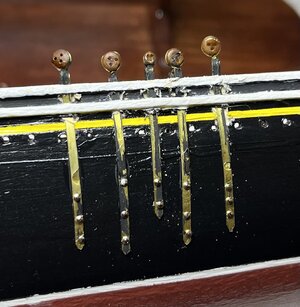
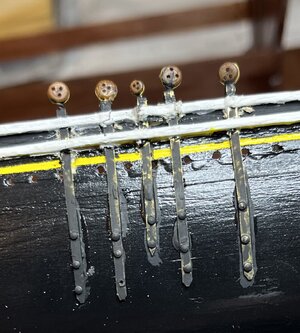
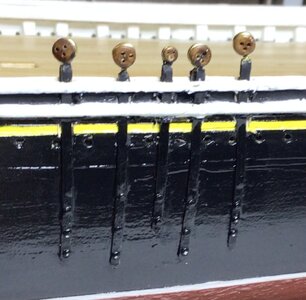

The nail heads need a little touch up, but overall I’m pleased with them.
If I had a mulligan, I would have slid a card behind the chainplates before I attached them and touched up the black paint at that point. Live and learn.
Work time: 15 hours
Total work time: 244 hours
I’m back from Vallarta but it took almost a week for me to get my hands on my Bluenose… just too much stuff that needs my attention after being gone for over two months. I’m glad in many ways of being home, but I’ll be glad when it feels like home again.
First up is “what” exactly should I work on first? I decided to work on the chainplates followed by the eyelets.
Lots of written text (even for me) for what ended up a fairly small amount of work.
I liked the way Gary Brinker did them on his YouTube channel (BLUENOSE PART 19… Deadeyes & Chainplates) which is similar to what is shown in the instructions. Looks nice and the deadeyes are functional. The first one took about an hour (minus the three holes) and while I know I’d improve on the time and appearance, I wasn’t super impressed by my work. I also knew duplicating them (there are a total of 20) would be difficult and time consuming.
Then I built one like many builders do including the Suburban Ship Modeler. The first one took about 20 minutes (minus the three holes), and just like the other method I knew I’d improve upon the time and look, but I also felt in addition to looking better, they would be easier to duplicate.
The test came when I put both of these on the ship side by side. Bottom line the second method looked better. Plus I felt it would be easier to duplicate.

Building them is involved but fairly straightforward except for the drilling of the holes. More on that later.
- Wrap wire around the deadeye
- Twist the ends of the wire tightly together
- Drill a hole about 1/4” from the end in the brass strip
- Feed the twisted ends through the hole in the brass strip
- Fold the end of the brass strip over upon itself trapping the twisted wire
- Measure and cut the chainplate to the proper length
- Cut the tip into a point
- Drill three (or two for the smaller ones) holes in the strip on the opposite end as the deadeye
- Secure the deadeye to the brass strip with a drop of superglue holding the twisted wire between the folds of the strip
The second part is drilling the holes for mounting them to the hull - each needs either 2 or 3 holes. Drilling the holes was the most difficult part of the overall process not just because drilling with a pin vice was proving to be difficult, but more importantly, if the hole wasn’t right in the middle of the strip, the brass strip would break when I folded it over. I used a push pin as a center punch, but the drilling was still daunting. I even tried using my GOXAWEE Rotary Tool (a Dremel-like tool) but it was still difficult.


I’m sure it would have been easier if I had a pair of magnifying glasses and a drill press - neither of which I currently have. I believe my local club (Rocky Mountain Shipwrights) has a drill press that I can borrow so I will wait on drilling the attachment holes.
Saturday June 15th was the club meeting where I picked up the drill press. Hopefully it will make things easier.
There was a learning curve on using the drill press (after all, I’m still drilling into a 1/16” strip), but I was able to finish the 2nd half of the chainplates (other than the 3 holes) in about an hour.
I build a small jig to help with the 3 holes… and yes it’s just stiff cardboard taped to a board but it does the trick.

As long as I take it slowly, I am able to drill the holes in one chainplate. I really need to focus on taking my time. One poorly drilled hole and I have to completely rebuild the chainplate. Of the 20, I end up needing to rebuild 5. The biggest take away is that with such a small drill bit, it tends to be flexible. When it touches the brass strip, it can very easily bend slightly and move off center. To resolve this, I have to tightly hold the strip against the table which is a bit difficult as the strip gets hot plus I have to hold it very close to the desired location of the hole… right next to the drill’s chuck. I end us using some old tweezers that have a bent tip.
After all 20 are drilled, I add a drop of super glue to where the twisted wire of the deadeye is located in folded strip. This goes fairly smoothly although the glue fills a few of the holes in the deadeyes. I’m able to drill these out on all of them except for one which I have to rebuild.

I then paint the brass black.
EDIT: After drilling the holes on the pintles and gudgeons (covered in next post), I wish I would have done something similar with the chainplates and glued the brass strips to a board. That process went a “hole” lot easier (intentional misspelling ). I’m really surprised that no one recommended that before, or at least the build logs I follow.

Looking at the rails that they will go through before being attached to the hull, I notice that while I made the slits for the chainplates for the foremast, I did not do it for the mainmast. And these slits actually need to go through two rails. Ugh. Since it’s been a few months since cut the slits, I looked back at my log to see if I could remember doing (and not doing) them, but somehow I didn’t write anything about them. I’m assuming I did them after painting the hull but before varnishing it.
Putting the slits in isn’t too difficult using a very narrow knife blade, but because of the way I made the chainplates (folding the strip over the twisted wire), the slits need to be more than slits; they need to be wide enough to let the folded section slide into the rail, at least partially. I use a variety of tools to make these holes in the rails; a small drill bit in a pin vice, two different files, one circular and the other flat, and the very narrow knife.

And even though I force myself to make these holes slowly, I still break through the side of the rail in a few places. These I close up with glue and a clamp.


While test fitting the chainplates in place, I break one off them causing me to have to rebuild it.
Attaching the chainplates is fairly straightforward as they are glued and nailed to the hull. For the nailing, I get to use a pair of pin insertion pliers that I bought a while back from Micro-Mark. I only had about 60 pins to insert, but these pliers were great. I whole-heartily endorse them.

As for the super glue, I haven’t use it very much, so it is still a learning experience. One thing I learned from last time was to invest in some long skinny tips for the glue. This seems to have helped a lot.

After all of the chainplates are attached, I touch up the paint (black, white, and yellow) followed by a touch up of the satin varnish.


The nail heads need a little touch up, but overall I’m pleased with them.
If I had a mulligan, I would have slid a card behind the chainplates before I attached them and touched up the black paint at that point. Live and learn.
Work time: 15 hours
Total work time: 244 hours
Last edited:
An hour-long job that required your attention, Hugh. Because it is all in sight and attracts attention. So far so good!6/11 to 7/2
I’m back from Vallarta but it took almost a week for me to get my hands on my Bluenose… just too much stuff that needs my attention after being gone for over two months. I’m glad in many ways of being home, but I’ll be glad when it feels like home again.
First up is “what” exactly should I work on first? I decided to work on the chainplates followed by the eyelets.
Lots of written text (even for me) for what ended up a fairly small amount of work.
I liked the way Gary Brinker did them on his YouTube channel (BLUENOSE PART 19… Deadeyes & Chainplates) which is similar to what is shown in the instructions. Looks nice and the deadeyes are functional. The first one took about an hour (minus the three holes) and while I know I’d improve on the time and appearance, I wasn’t super impressed by my work. I also knew duplicating them (there are a total of 20) would be difficult and time consuming.
Then I built one like many builders do including the Suburban Ship Modeler. The first one took about 20 minutes (minus the three holes), and just like the other method I knew I’d improve upon the time and look, but I also felt in addition to looking better, they would be easier to duplicate.
The test came when I put both of these on the ship side by side. Bottom line the second method looked better. Plus I felt it would be easier to duplicate.
View attachment 457009
Building them is involved but fairly straightforward except for the drilling of the holes. More on that later.
I started building them out and I’m halfway done (8 large and 2 small) with the first part of the chainplates.
- Wrap wire around the deadeye
- Twist the ends of the wire tightly together
- Drill a hole about 1/4” from the end in the brass strip
- Feed the twisted ends through the hole in the brass strip
- Fold the end of the brass strip over upon itself trapping the twisted wire
- Measure and cut the chainplate to the proper length
- Cut the tip into a point
- Drill three (or two for the smaller ones) holes in the strip on the opposite end as the deadeye
- Secure the deadeye to the brass strip with a drop of superglue holding the twisted wire between the folds of the strip
The second part is drilling the holes for mounting them to the hull - each needs either 2 or 3 holes. Drilling the holes was the most difficult part of the overall process not just because drilling with a pin vice was proving to be difficult, but more importantly, if the hole wasn’t right in the middle of the strip, the brass strip would break when I folded it over. I used a push pin as a center punch, but the drilling was still daunting. I even tried using my GOXAWEE Rotary Tool (a Dremel-like tool) but it was still difficult.
View attachment 457010 View attachment 457011 View attachment 457012
I’m sure it would have been easier if I had a pair of magnifying glasses and a drill press - neither of which I currently have. I believe my local club (Rocky Mountain Shipwrights) has a drill press that I can borrow so I will wait on drilling the attachment holes.
Saturday June 15th was the club meeting where I picked up the drill press. Hopefully it will make things easier.
There was a learning curve on using the drill press (after all, I’m still drilling into a 1/16” strip), but I was able to finish the 2nd half of the chainplates (other than the 3 holes) in about an hour.
I build a small jig to help with the 3 holes… and yes it’s just stiff cardboard taped to a board but it does the trick.
View attachment 457014
As long as I take it slowly, I am able to drill the holes in one chainplate. I really need to focus on taking my time. One poorly drilled hole and I have to completely rebuild the chainplate. Of the 20, I end up needing to rebuild 5. The biggest take away is that with such a small drill bit, it tends to be flexible. When it touches the brass strip, it can very easily bend slightly and move off center. To resolve this, I have to tightly hold the strip against the table which is a bit difficult as the strip gets hot plus I have to hold it very close to the desired location of the hole… right next to the drill’s chuck. I end us using some old tweezers that have a bent tip.
After all 20 are drilled, I add a drop of super glue to where the twisted wire of the deadeye is located in folded strip. This goes fairly smoothly although the glue fills a few of the holes in the deadeyes. I’m able to drill these out on all of them except for one which I have to rebuild.
View attachment 457013
I then paint the brass black.
View attachment 457015
Looking at the rails that they will go through before being attached to the hull, I notice that while I made the slits for the chainplates for the foremast, I did not do it for the mainmast. And these slits actually need to go through two rails. Ugh. Since it’s been a few months since cut the slits, I looked back at my log to see if I could remember doing (and not doing) them, but somehow I didn’t write anything about them. I’m assuming I did them after painting the hull but before varnishing it.
Putting the slits in isn’t too difficult using a very narrow knife blade, but because of the way I made the chainplates (folding the strip over the twisted wire), the slits need to be more than slits; they need to be wide enough to let the folded section slide into the rail, at least partially. I use a variety of tools to make these holes in the rails; a small drill bit in a pin vice, two different files, one circular and the other flat, and the very narrow knife.
View attachment 457020
And even though I force myself to make these holes slowly, I still break through the side of the rail in a few places. These I close up with glue and a clamp.
View attachment 457016 View attachment 457017 View attachment 457019View attachment 457018
While test fitting the chainplates in place, I break one off them causing me to have to rebuild it.
Attaching the chainplates is fairly straightforward as they are glued and nailed to the hull. For the nailing, I get to use a pair of pin insertion pliers that I bought a while back from Micro-Mark. I only had about 60 pins to insert, but these pliers were great. I whole-heartily endorse them.
View attachment 457021
As for the super glue, I haven’t use it very much, so it is still a learning experience. One thing I learned from last time was to invest in some long skinny tips for the glue. This seems to have helped a lot.
View attachment 457022
After all of the chainplates are attached, I touch up the paint (black, white, and yellow) followed by a touch up of the satin varnish.
View attachment 457023 View attachment 457024View attachment 457026
View attachment 457027
The nail heads need a little touch up, but overall I’m pleased with them.
If I had a mulligan, I would have slid a card behind the chainplates before I attached them and touched up the black paint at that point. Live and learn.
Work time: 15 hours
Total work time: 244 hours
Regards, Peter
- Joined
- Sep 3, 2021
- Messages
- 5,190
- Points
- 738

This is the exact reason I don’t keep track of hours…Work time: 15 hours
Total work time: 244 hours


